i’m not a fan of snow. ok, i’ve gone and said it out loud…actually, i really do not like snowy weather at all. and for me, driving in it is not an option that i look forward to either. give me any kind of weather besides cold/snow and i’m happy. by now, you should realize that it is snowing in nashville, has been doing so all day. needless to say, i haven’t left the house and have no plans to do so.
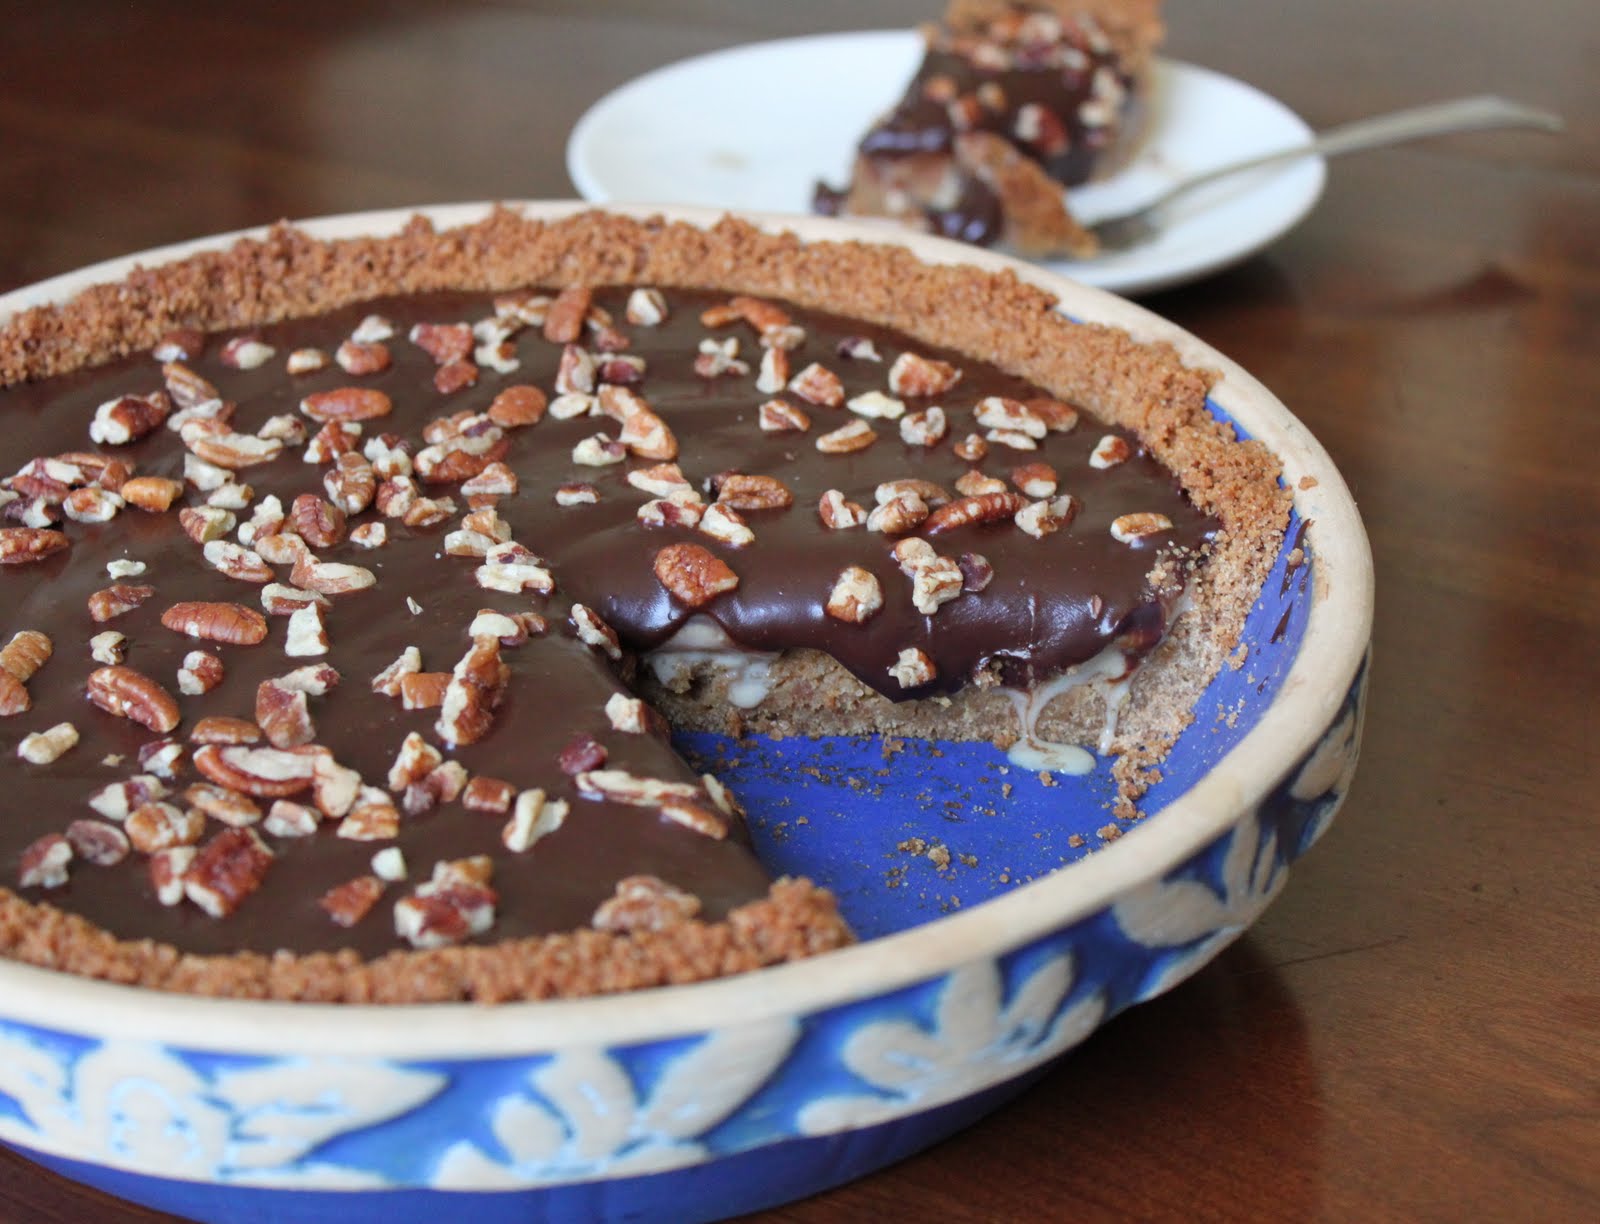
so now that we know i am housebound (because that single inch of snow out there is holding me back) just how did i entertain myself? with a bad holiday movie, it’s even worse sequel and with pie #2. and any of you adventurous sorts out there that want to try this at home, please do and then send me a picture(bakinbabe116@aol.com) and i will post it here, a round up if you will for anyone who dares…
when i was working on my recipes for the book that i just finished, i tried to include one of my favorite shortcuts/hints but i was forced to leave it out. apparently, it is viewed as not user friendly and too difficult for the average home baker-it would require a purchase deemed unrealistic for many folks. moving right along, i have chosen to use it here.
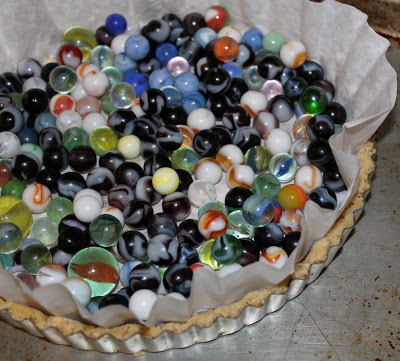
whenever i make pies or tarts that require a prebaked or completely baked crust, i always line the empty crust with a restaurant sized coffee filter and fill it full of dried beans or as pictured above, marbles. in the cafe, it is always dried beans, pintos to be exact but here at home, i just fill it full of marbles. the great thing about those paper filters is that they are designed to hold weight-especially when wet. it is entirely possible to lift out a filter full of beans by gathering the paper edges-the filter is strong enough to hold the beans without tearing. marbles on the other hand are heavy and i generally spoon them out. inevitably, one or two hit the floor and alas, i am always losing my marbles…and the reason this hint was not acceptable, it would require people to buy huge packages of filters at the restaurant supply or membership store and that was what didn’t fly; we can’t ask the readers/users to buy 250 of them. so i suggest that you find a friend in a restaurant or coffee house and convince them to sell you a few. my reason is simple; its easy to work with. foil makes creases in your crust and can cause breakage when you remove it. parchment paper becomes brittle and you cannot lift it after baking it. lastly, wax paper is waxed and who wants to add wax to a pie?
getting off the soapbox and back onto the pie now. in the winter, citrus fruits come into season and they are one of the few bright spots in the world of flavors when the weather is dismal. i found myself with a bunch of lemons that needed to be juiced, i had zested them previously, and i let that be my inspiration.
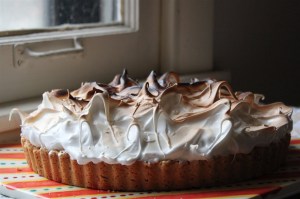
not just lemon meringue pie, but a lemon cream in an almond crust with a bit of rose hip jam.
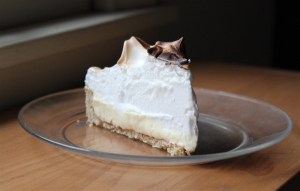
i cooked a fresh lemon curd and folded in some whipped cream. the toasted almond tart shell was completely baked and a thin layer of rose hip jam was spread over the bottom. the lemon cream was poured into the shell and topped with a big dome of meringue. since i am not one of those pastry chefs who has to have a torch in her kitchen (don’t need any help setting the kitchen on fire, refer to this
previous post) i put it under the broiler and let it get a little too toasty-but i like my marshmallows a little dark and crunchy, thank you very much…
meringue topped lemon cream tart with and almond crust-serves 8
almond crust-makes 1 standard 9″ tart shell (use a pan with a removable bottom)
1/2 cup sliced, natural almonds
1 cup all purpose flour
6 tablespoons powdered sugar
6 tablespoons unsalted butter, cut into small cubes
1 egg yolk mixed with 2 teaspoons water
preheat the oven to 350. toast the almonds until golden, about 7 minutes and let them cool completely. place the almonds, flour and sugar in the bowl of a food processor. pulse them to combine them. add the butter and pulse the mixture until the butter is no longer in lumps and it resembles coarse meal or looks sandy. add the egg mixture and combine completely to form soft dough that holds together when squeezed. the dough can be worked with immediately; it does not need to rest like pie dough before rolling and can be pressed into the tart pan with your fingers. place the tart shell on a baking pan, line it with the coffee filter and weights. bake it completely since it will not be returned to the oven to bake again-about 25-30 minutes. carefully remove the filter and weights and allow the crust to cool completely before removing it from the pan.
lemon cream filling
3 tablespoons cornstarch
1/4 cup water
4 egg yolks
3/4 cup sugar
1/2 cup fresh squeezed lemon juice
zest of one lemon
1/2 cup heavy cream, whipped stiff
place the cornstarch in a heat proof bowl and whisk in the water to make a lump free mixture. whisk in the egg yolks and set aside. in a small, heavy bottomed pot, combine the sugar and lemon juice and over medium heat, bring the mixture to a boil. slowly whisk the hot syrup into the egg yolk mixture and then pour this mixture into the pot and return it to the stove over low-medium heat. whisk the mixture as it returns to a boil, allow it to boil for a minute and then pour it through a mesh strainer into a clean, nonmetal bowl. stir in the lemon zest, press plastic wrap to the surface and chill completely. when cold, fold in the whipped cream
meringue topping
3/4 cup egg whites, about 6 large whites
1/4 teaspoon cream of tartar
3/4 cup sugar
in a large bowl, combine the egg whites and cream of tartar. with a mixer on high speed, whip the mixture until foamy. slowly add the sugar and continue to whip it until stiff peaks form.
to assemble the tart, carefully remove the crust from the tart pan and place it on a heat proof plate that is flat. spread 3-4 tablespoons of a darkly colored jam (such as raspberry, blackberry or other seedless flavor) over the bottom of the tart shell. top it with the cream filling and distribute it evenly in the shell. dollop the meringue over the cream filling and if spikes are desired, quickly tap a spoon to the meringue and pull it away to form the spikes. the meringue can also be piped on to the filling. place it under the broiler to color it-watch it carefully or you may burn it!
 not just lemon meringue pie, but a lemon cream in an almond crust with a bit of rose hip jam.
 i cooked a fresh lemon curd and folded in some whipped cream. the toasted almond tart shell was completely baked and a thin layer of rose hip jam was spread over the bottom. the lemon cream was poured into the shell and topped with a big dome of meringue. since i am not one of those pastry chefs who has to have a torch in her kitchen (don’t need any help setting the kitchen on fire, refer to this previous post) i put it under the broiler and let it get a little too toasty-but i like my marshmallows a little dark and crunchy, thank you very much…