black bottoms; a family obsession

IMG_7691
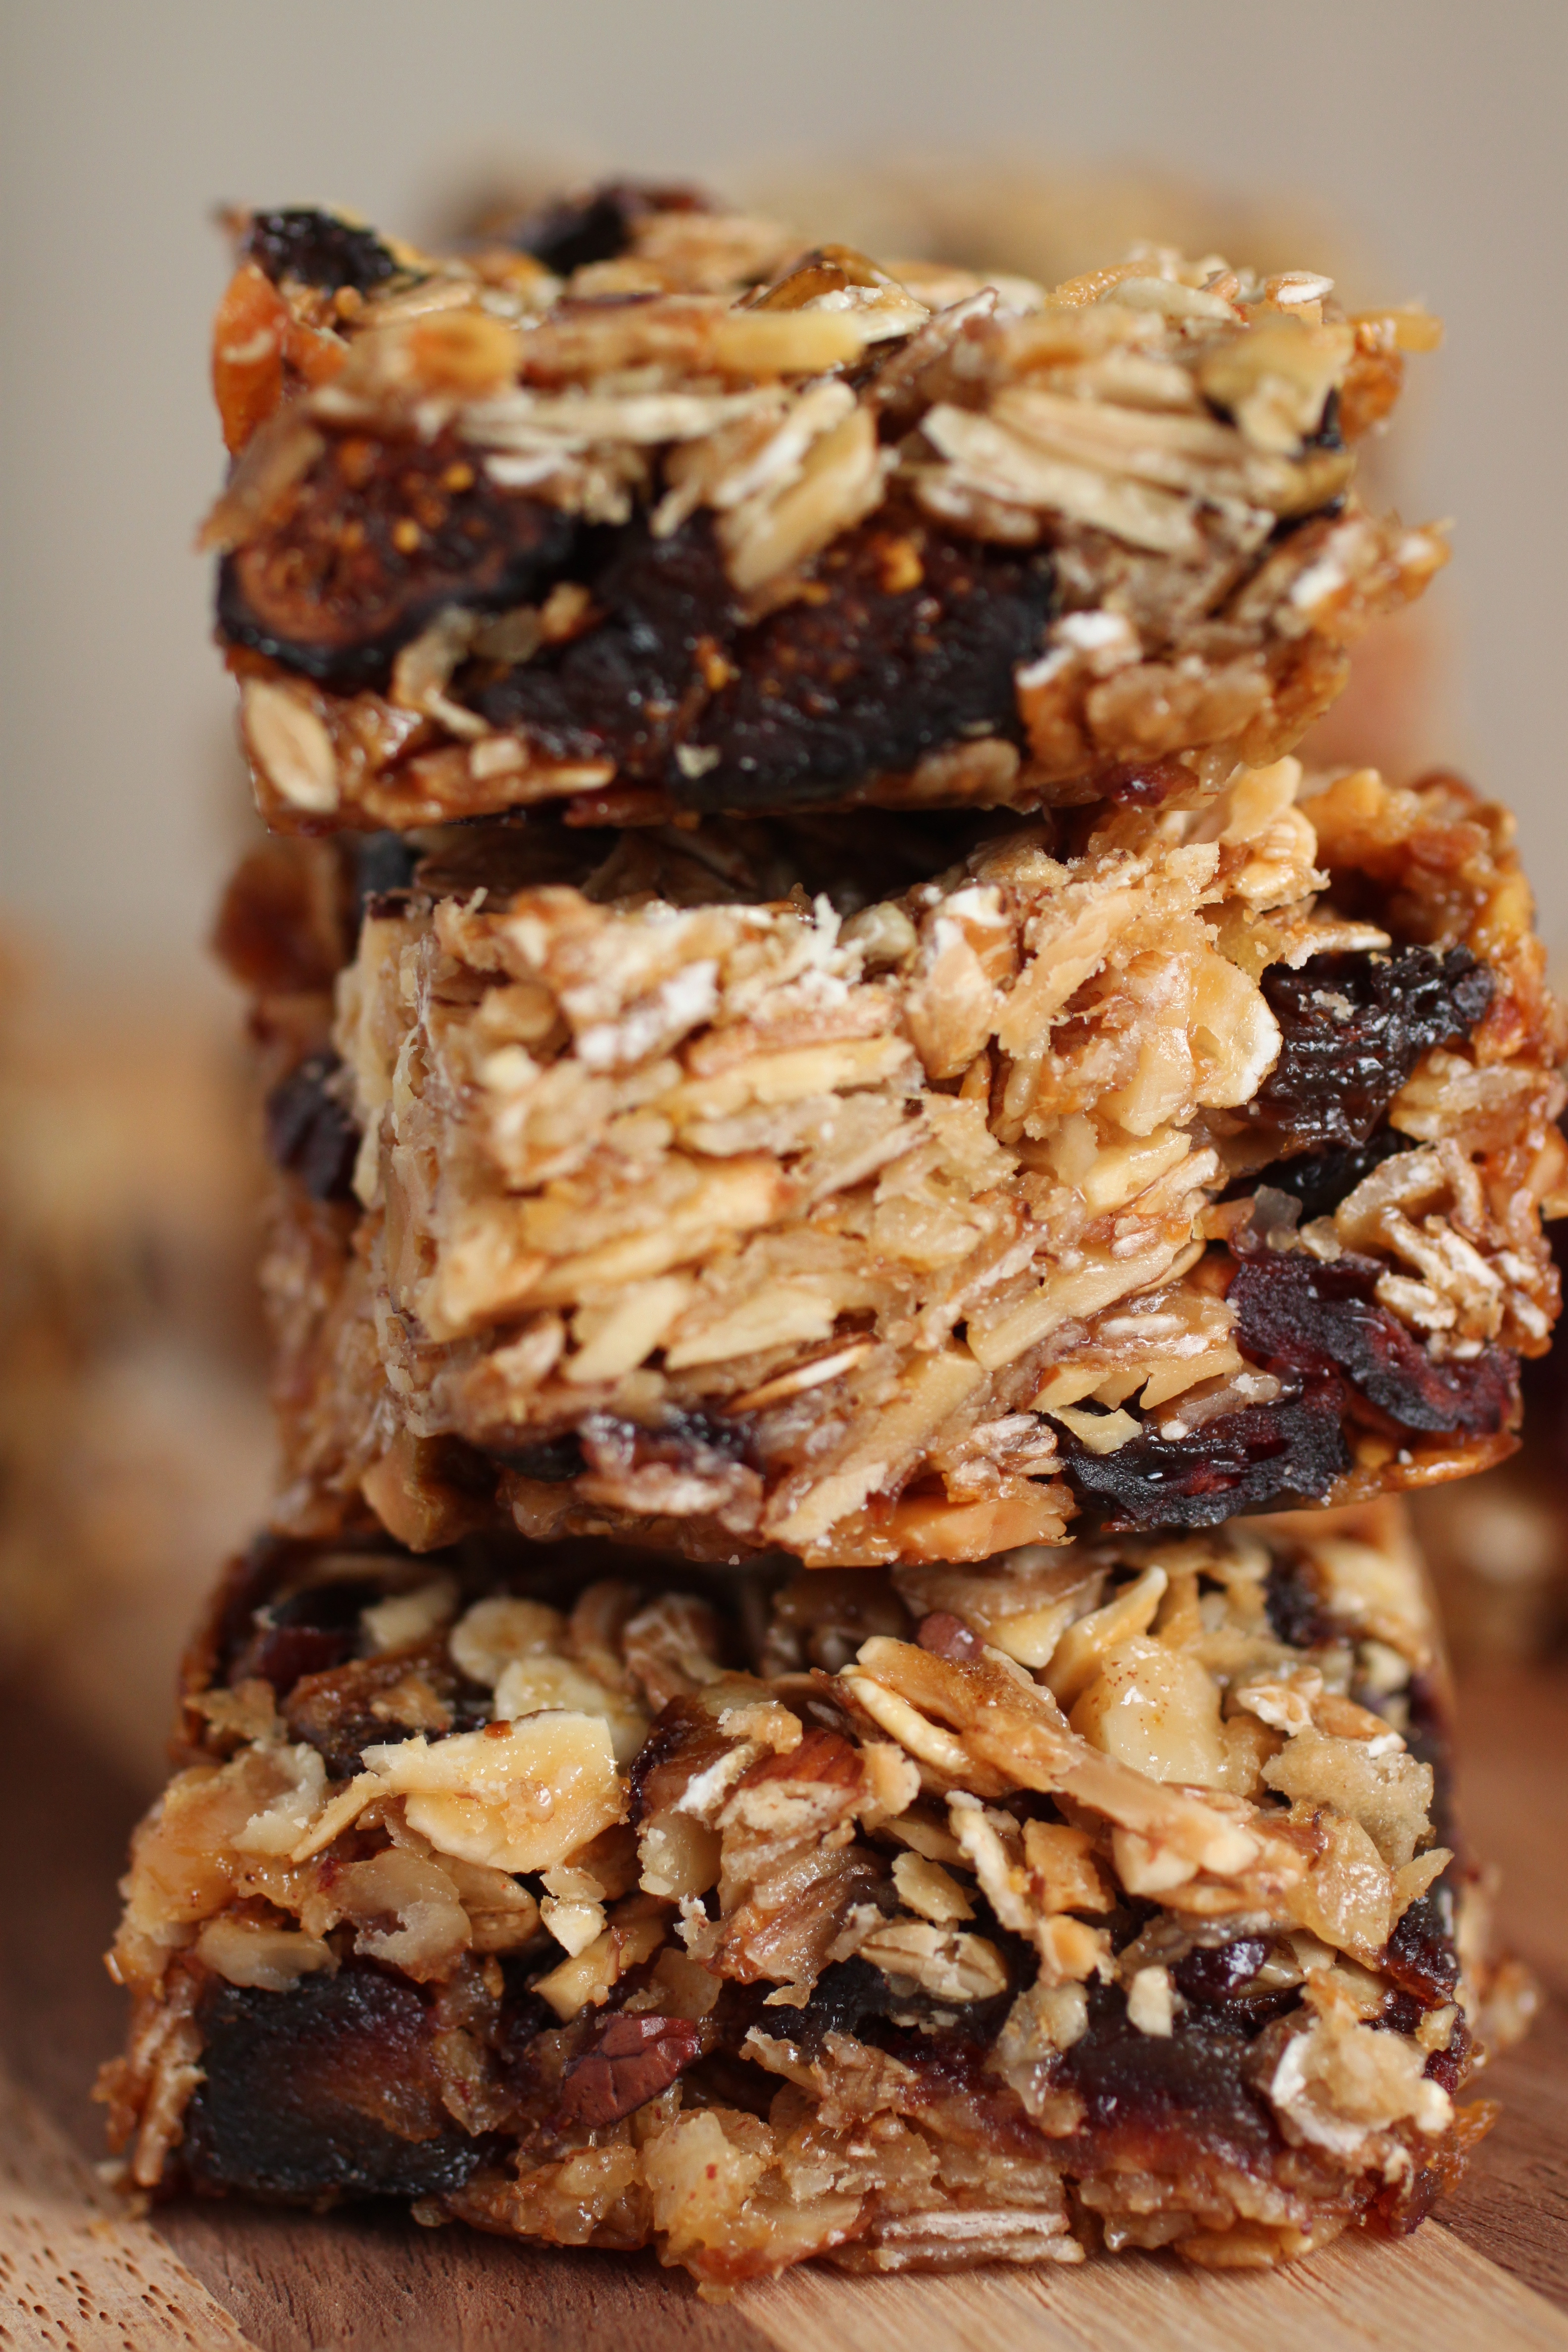
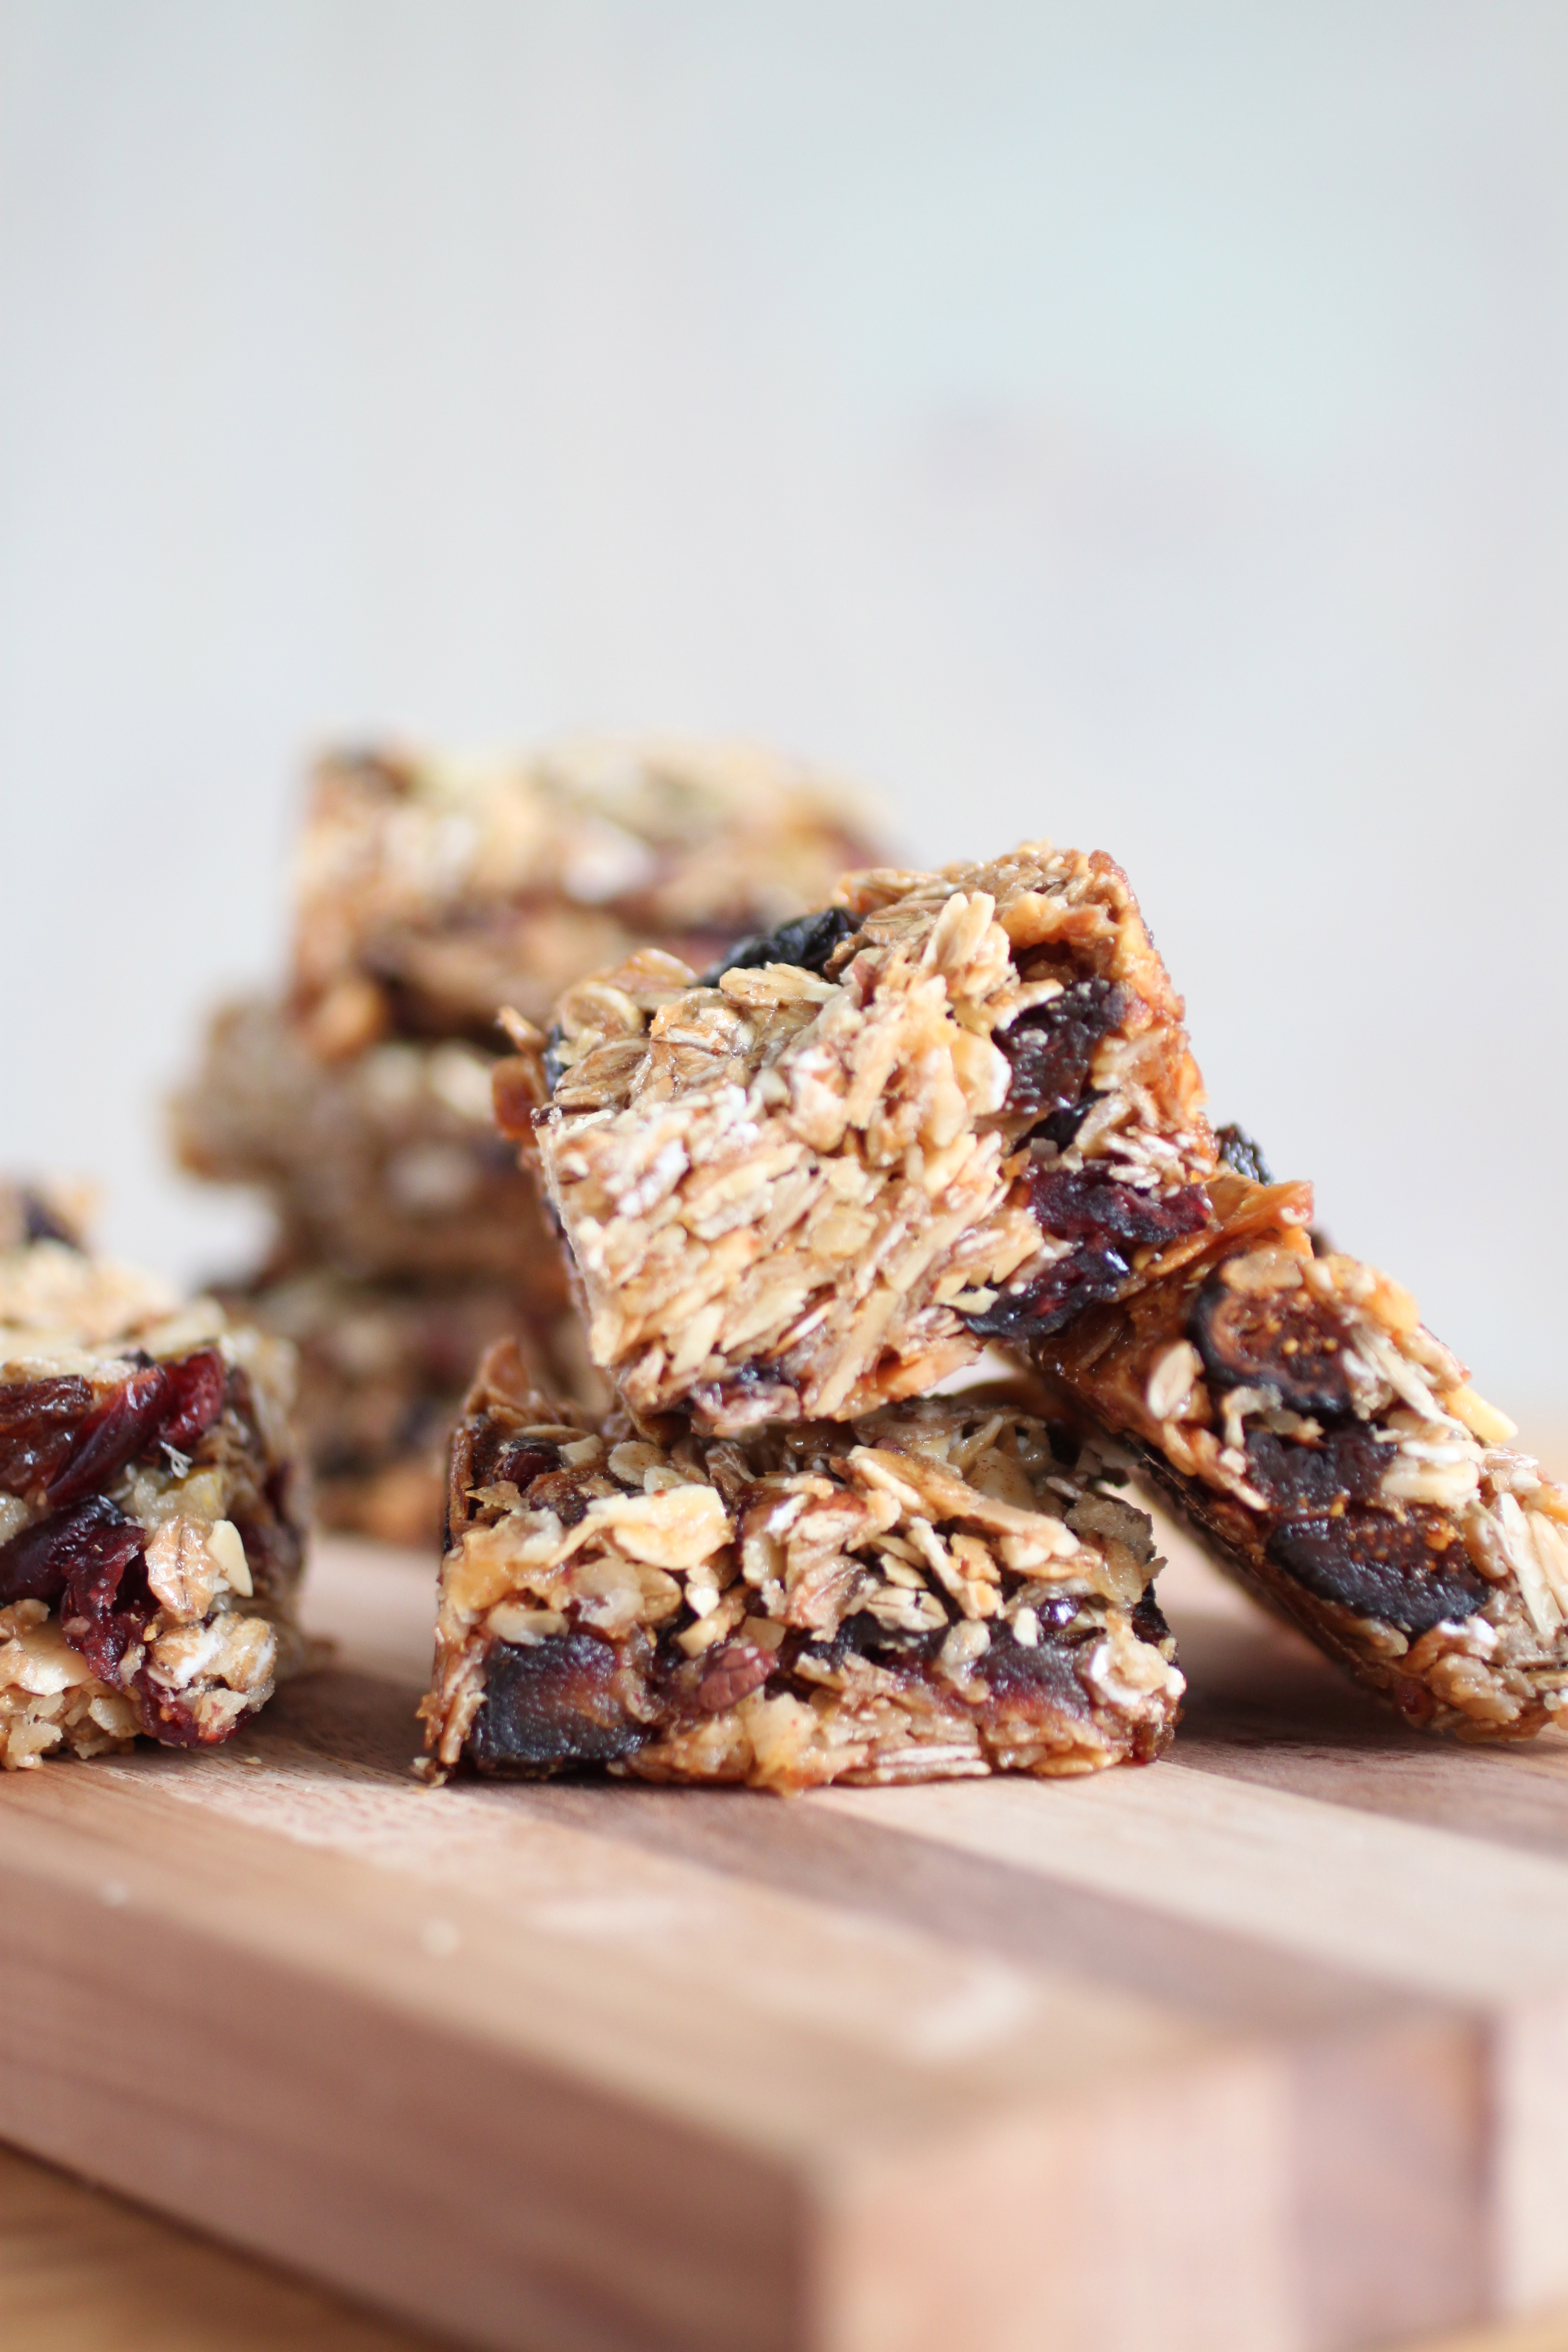
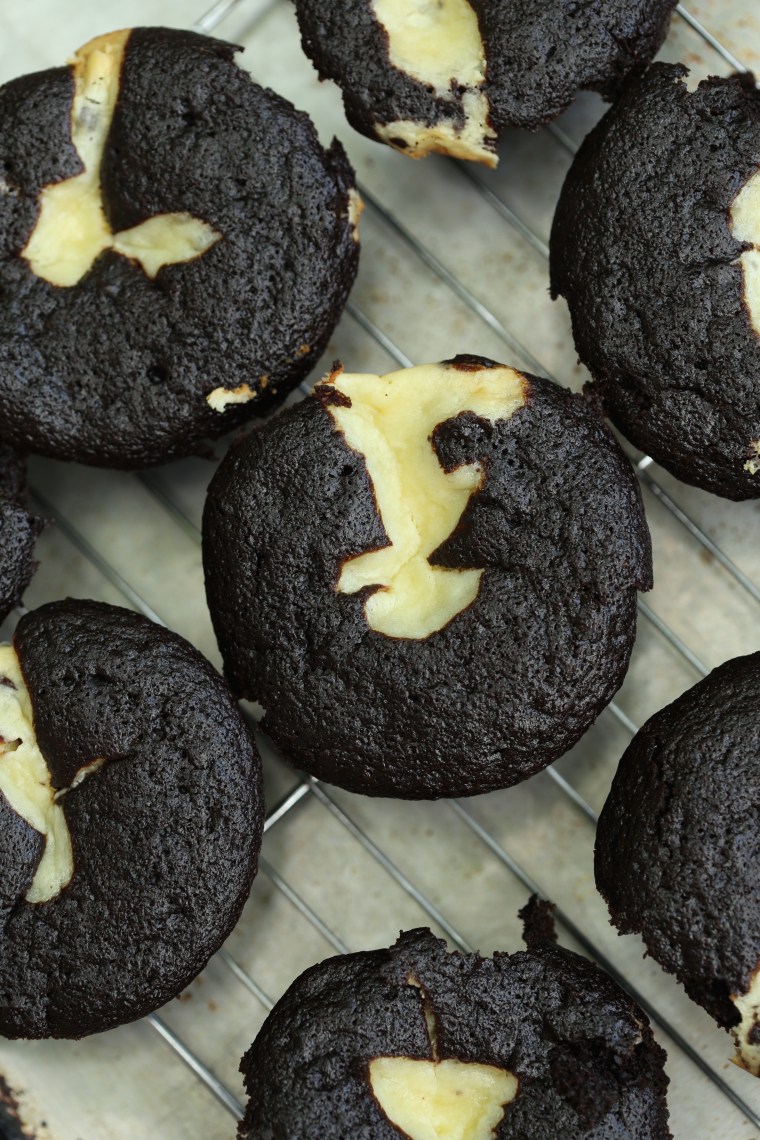
Obsession is a strong word, but in this case, an accurate one.  When I began making these for our bakery (twenty years ago), everyone in my family got hooked on them.  Moist chocolate cake and a rich chocolate chip cheesecake are baked together in muffin cups and the result is a decadent, obsession worthy treat.

My preference is to bake these in giant muffin pans with a cup volume of about 7 oz or 200ml, the ones that are sometimes referred to as Texas size.  Just try not to eat the whole thing by yourself!  This time, I made them in standard sized muffin cups which have a volume of 3.5 oz or 100ml,  but they can be made in any size pan as long as you use cupcake liners.  Otherwise, it is a lot of work to pry them out of the pans.

There are a few tips I like to share in hopes of guaranteeing success for anyone that makes these.  First of all, use a cream cheese that is dense rather than fat free, whipped or extra creamy.  While that famous brand (named after a Pennsylvania city) is great for spreading on a bagel, it really doesn’t provide the best results for this recipe.  Whatever they do to make the cheese creamy yields a filling that is thin and runny.  During baking,  the chips can sink to the bottom of the cupcake while the cheese floats to the top.  If the filling doesn’t sink in the middle a bit, they just don’t look like they should but more importantly, the two batters bake layered.   The best ones have a cheesecake center with cake on the sides and bottom and just a little of the cheese filling peeking out on top.  Save your pennies and buy the store brand, it will work perfectly!  You can make the filling ahead of time and keep it in the fridge; cold filling is more likely to sink in than room temp filling.

When I make these, I generally use whatever chocolate chips I have handy.  However, if you use mini chips, they will be less likely sink to the bottom like the large ones will.  Keep in mind that either way, the results will be delicious.  Just save the freshly chopped chocolate for a different recipe since the tiny shards will color the filling and make it look more like a chocolate filling.

Want to make these quickly?  Want all of them to be the same size?  Use portion scoops!  Seriously, purchase professional style portion scoops, also called dishers, in a range of sizes and you will not have to worry about the size or whether they will bake evenly.  Depending on what size pan you use, you will need a range of scoops.  For jumbo pans, #12 and #16 will work for the cake and cheesecake, respectively while #16 and #40 will be needed for a standard sized pan.  Purchasing scoops is an investment but if you are regular baker, you will find yourself using these scoops for all sorts of things such as muffins, drop biscuits, cookies and more.  For the best prices and range of sizes, look in a restaurant supply shop or website.

If you do not intend to use the scoops, you will need a 1/3 cup and 1/4 cup measure for the jumbo cupcakes (chocolate cake and cheesecake filling respectively) or 1/4 cup and 1/8 cup measure for the standard sized cupcakes.

IMG_7696

Black Bottom Cupcakes

makes 12 jumbo or 24 standard sized cupcakes

12 ounces cream cheese (see notes above)

1-1/2 cups plus 2/3 cup granulated sugar

2 large eggs

1 cup mini semi-sweet chocolate chips (see notes above)

2 cups unbleached all-purpose flour

2/3 cup unsweetened, natural cocoa powder

1-3/4 teaspoons baking soda

3/4 teaspoons salt

4 teaspoons vinegar-distilled white or cider

1 teaspoon vanilla extract

1/2 cup vegetable oil such as canola or soybean

Preheat the oven to 350F.  Line the muffin tins with paper cups and set aside.  In a mixing bowl, cream the cheese with the 2/3 cup sugar to combine, do not whip it because it will warm up (see notes above).  Add the eggs, one at a time, then mix only enough to combine.  Stir the chocolate chips into the filling by hand and set it in the fridge until needed.

Place a large mesh strainer or sifter into a large mixing bowl.  Add the flour, remaining 1-1/2 cups sugar, cocoa, baking soda and salt to the strainer and sift the dry ingredients into the bowl. Using a whisk, combine them completely.  In a large liquid measuring cup, pour 1-1/2 cups water, the vinegar and the vanilla and set aside.  Dump the oil into the dry ingredients and add about half of the water.  Using the whisk, mix it well to create a smooth paste.  Scrape the bowl and whisk in the remaining water mixture.  Whisk it well and using the larger portion scoop or measuring cup (see notes above), divide the batter between the cups.  Top each cupcake with a dollop of the cheesecake using the scoop or measuring cup called for in the notes above.

Bake the cupcakes until they have a little golden-brown color around the edges of the cheesecake and they feel firm around the edges of the cake, about 40-45 minutes for the jumbo size, 30-35 minutes for the standard size. To bake them evenly, be sure to turn them halfway through baking.  Once baked, let them cool in the pan for 10-15 minutes then carefully turn them out and place them on a rack to cool completely.  To store these, keep them in the fridge, but let them sit out a bit to warm up to room temp for serving.  Freezing works well for longer storage; wrap them individually and place them in a closed container in the freezer.  Allow them to thaw in the fridge, still wrapped and then serve them at room temp.  They will last in the freezer for a month, maybe two but I doubt they will ever make it there…

This recipe can also be found in my book, Desserts from the Famous Loveless Cafe.  


finding inspiration at the grocery store; $10 tomato sauce

$10 tomato sauce

Maintaining a blog page that centers around food means I spend time looking for recipe ideas.  Using someone else’s recipe (with proper credits of course) is always a possibility but it does not say much for my own abilities in the kitchen.  Having a constant stream of original recipe ideas is challenging and I never know where inspiration may strike.  As some of you already know, I am a member of the Tuesdays with Dorie baking group and once a week, we post a recipe from either Baking with Julia or Baking Chez Moi.  But that is only one day out of seven and what will I do for the other six days?

On a recent trip to the grocery store, I found my inspiration in the pasta and tomato sauce aisle.  Actually, to be more accurate, I found myself stunned that anyone would pay nearly $10 for a jar of tomato sauce.  When I was growing up, the only tomato sauce we ate was my mothers homemade cooked they way my great-grandmother taught her to make sauce.  It has always been the standard by which I judge tomato sauce.  As my children were growing up, I found myself struggling to keep up and generally relied on a jar of sauce from the store.  When money was short, and it frequently was, a jar of sauce and a pound of pasta could feed us affordably and there would be leftovers.  Needless to say, $10 for a jar of sauce nearly knocked me down; I am in the wrong line of work it seems!

It wasn’t hard to figure out what I would be making, photographing and posting on the blog after that.  With so many interesting flavors to choose from, I decided I would make up a batch of sauce and leave the high dollar jars at the store.  Knowing I had some butternut squash to work with, I decided on a batch of butternut tomato sauce.  The two flavors compliment each other well.  The squash which adds a nice velvety texture to the sauce also has enough natural sweetness to balance the acidity of the tomatoes without the addition of sugar.

.
IMG_2615

Because I like a tomato sauce with more than tomatoes in it, I also chopped up some carrots, celery, mushrooms and onions too and tossed them with the butternut squash and a little olive oil.  
IMG_2617

Roasting vegetables gives color as well as flavor and after about 45 minutes at 425 degrees, the vegetables were soft enough.  First, they went into the pot with all of the other ingredients and I let it simmer a bit then I pureed the mixture.  If you use a regular blender for the job, be sure to do it in small batches, cover it but leave a small gap for steam to escape and drape a towel over the top of the blender.  Hold the top in place and blend on low-speed.  Do not do this unless you are holding the top down or the lid could pop off and send hot sauce flying all over!

IMG_2626Perciatelli is a hollow spaghetti tube and it was the perfect choice for such a creamy sauce.  Some folks will tell you that you should never toss cook pasta with oil to keep it from clumping.  The oil will make the pasta slippery and keep the sauce from sticking to it.  Maybe so but I generally add the oil anyway, but I do make an effort to add only the smallest amount possible.

IMG_2639

Roasted Butternut Tomato Sauce

makes about 3 pints

1 1/2 pounds of butternut squash

2 medium carrots

1-2 stalks celery

3-4 cloves garlic

1 medium onion

1 cup button mushrooms, about 8-10

3 tablespoons olive oil

1 (28 oz) can plum tomatoes

3-4 sprigs fresh basil

1 tablespoon fresh thyme leaves

1-2 bay leaves (one if fresh are used)

3/4 teaspoon turmeric

3/4 teaspoon smoked paprika

1 1/2 cups vegetable broth, divided

2 tablespoons balsamic vinegar

1 teaspoon salt

1/2 teaspoon black pepper

Preheat the oven to 425.  Peel the squash and cut into large cubes.  Peel the carrots and cut them along with the celery into 1″ slices.  Roughly chop the onions.  Halve the garlic cloves and the mushrooms and combine all of the vegetables in a bowl with the olive oil.  Toss to coat and dump them onto a baking sheet that is lined with parchment paper or foil.  Roast the vegetables until the carrot and squash are fork tender, about 45 minutes.  Dump the roasted vegetables into a heavy bottomed stock pot with at least a 3 quart capacity.

Add the tomatoes to the pot and using your hands, crush the tomatoes a bit to break them up.  Add the basil, thyme, bay leaf, turmeric and smoked paprika.  Add 1 cup of the broth and bring the mixture to a gentle simmer.  Allow the sauce to simmer for about 30 to 45 minutes.  Using an immersion blender (if you have one) or a regular blender, puree the sauce; be sure to take precautions with a regular blender-read the warning above!  Return the sauce to the pot and using the additional 1/2 cup of broth, adjust the consistency of the sauce to your preference.  Season with the salt and pepper and serve with your favorite pasta.  Garnish with additional fresh parsley sprigs and grated Romano cheese if you like.  The sauce can be canned using the same method for tomato sauce or it can be frozen in containers.

IMG_2633Personally, I am planning to grow butternut squash and plum tomatoes in the garden just so I can make more sauce this summer!

granola energy bars; a tuesdays with dorie post

IMG_2867

For what seems like forever, I have wanted to make my own granola bars.  When I had to pack lunches for the girls, I would buy them and occasionally, eat some myself, but a single glance at the ingredient list alway left me cringing.  Over the years, I have experimented with granola bars but most of the results just did not give me the chewy but soft texture I was hoping for.  My collection of recipes to try has grown quite a bit and when the Tuesdays with Dorie bakers chose to make the recipe for Granola Energy Bars in Baking Chez Moi, I happily baked along.

The recipe is fairly simple and does not have any tricky steps.  Toast, boil, mix and bake.  Simple ingredients, easy process, what more could a baker want?  The added perk, flexibility as far as what you put in the bars.  The only must, rice syrup something that most supermarkets with a natural food section carry these days.  My thought was to try different combinations of fruits and nuts to make a variety of bars to snack on.  The only thing I did not do was use rolled oats.  Trader Joe’s sells a whole grain hot cereal blend that is made of rolled oats, wheat, barley and rye. There is almost always a carton on the shelf in my pantry and I decided to use the blend rather than just oats.  Working with half the recipe amounts for each batch, I made one batch with dates, cocoa nibs, and walnuts, one batch with Trader Joes Berry Blend (dried cranberries, cherries, golden raisins and blueberries) with almonds and a third batch with mission figs and almonds.  For all of them, I included sweetened coconut and pumpkin seeds, substituted coconut oil for the butter and eliminated the sunflower seeds and the vanilla extract.  
IMG_2872

The mixture was easy to prepare and the three pans came together quickly.  My only wish, that somewhere in the directions it stated how thick they should be in the pan.  The dimensions of the pan is slightly uncommon and with my half batches, I was winging it and hoping that my 6″x 6″ were a good choice.  Since I have had such a problem with the oven temperatures in other recipes, I set the oven to 300F and it took a long time for them to bake, nearly double the time to get them a nice toasty color on top.  This may also have to do with the fact that I did not pretoast my rolled grains; I was hoping to keep them softer.

So what were my results?  Really chewy and almost hard bars that despite the different combinations of fruit, all tasted the same.  Because I did not want them to taste like vanilla, I left out the extract but now I wonder about whether I should have added something like cinnamon because they had an oily taste that must have come from greasing the pans.  In the end, I was a little disappointed with my results but will probably try them again with a full batch of the recipe and a little cinnamon or maybe some pumpkin seed oil and possibly a tiny bit of extract.  As for my husband, he couldn’t eat them fast enough and in a couple of days, had devoured at least half of the bars!

To see what the rest of the bakers came up with, visit the Tuesdays with Dorie website and look for the “leave your links” post.
IMG_2859