 Every month, our Master Gardener group has a potluck dinner that precedes our meeting. Each member brings a dish to feed about 8-10 people and I always bring cake. My original plan was to make an apple cake to use a few leftover apples, but when I went to the grocery store, pineapples were on sale. My plans quickly changed.
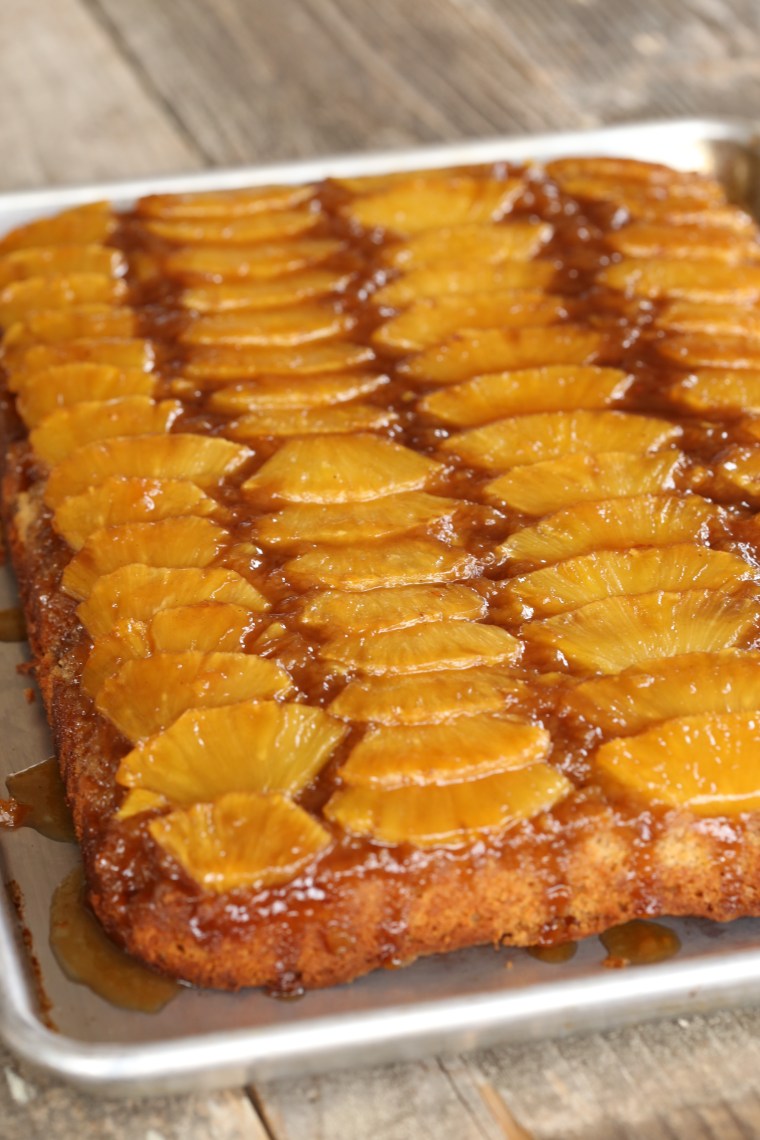
If you have spent any time on the internet looking at dessert recipes, you have seen recipe after recipe for slab pies. Honestly, I have seen too many. Yes, they are a little easier than a typical pie but I felt it was time for a change. As I planned my dessert for the dinner, I decided to double it and bake it in a roasting pan; an upside-down sheet cake. The result, a big slab of cake to feed a crowd.
One very important note to all of you bakers, this recipe is formulated by weights! Cups are great but can vary from set to set as well as from baker to baker since everybody has their own way of filling them. By using weights, you get exactly what you need! Purchasing a scale is easy, they can be found in most stores that sell baking equipment and are relatively cheap, mine cost me $15 and I use it a lot!
 To make a really good pineapple upside-down cake, you must use a fresh pineapple. While canned fruit will work in a pinch, it just does not have the flavor of a fresh pineapple. If you do not want to mess with cleaning a fresh one, look in the refrigerated section of the produce department in the grocery store. Most stores will stock fresh pineapple that has been peeled and cored, keep in mind that it will also cost at least double the price.
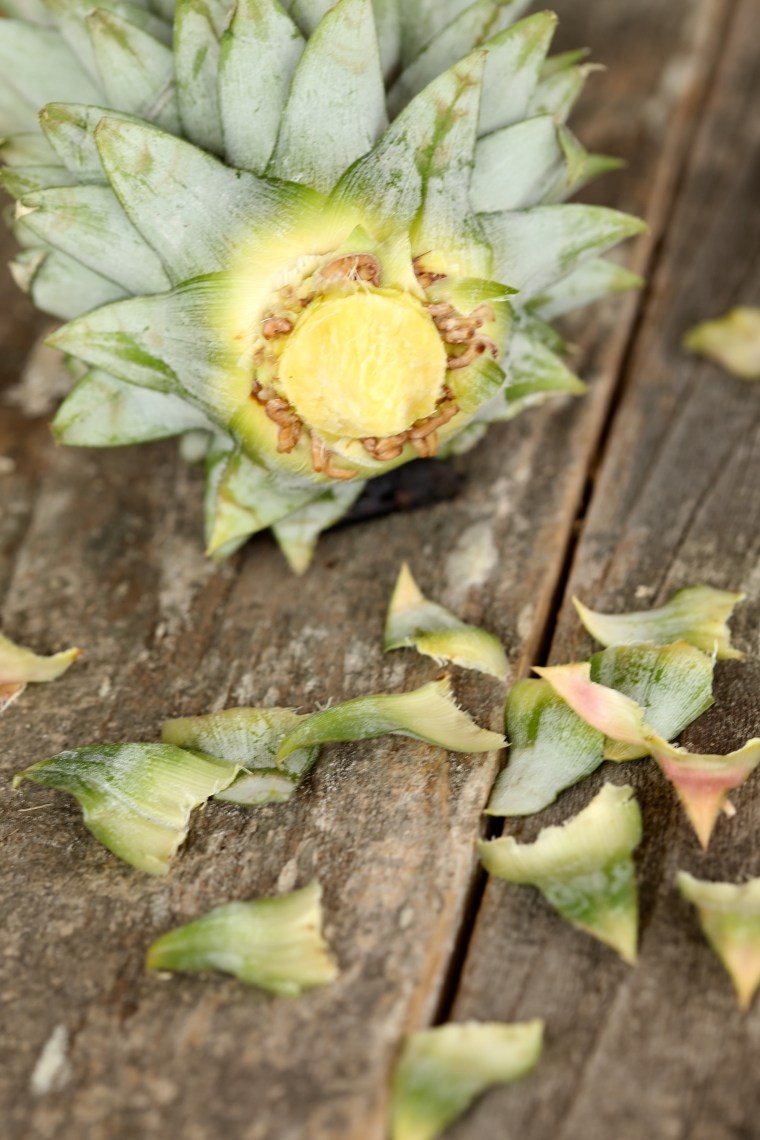
Another reason to buy a whole fruit, the crown. Pineapple tops, if removed correctly, can be rooted and grown and in about 2 years, you will actually get a fruit. Before you cut the fruit, grab the top and twist until it releases and breaks free. You will get a little pointed knob on the bottom. Set it aside for now and carefully trim away all of the skin and eyes using a serrated knife. Cut the fruit in half, from top to bottom, and then cut each piece in half. You will have a somewhat triangular piece of fruit and the core will be at the pointed end. Using your knife, cut the core away in one long strip. Lay the piece down and slice the fruit into 3/8 of an inch thick. Take all of the little scraps and small pieces and chop them up, you will need 5 ounces, about 2/3 cup, for the cake recipe. Be sure to use the ugly pieces for this!
 Use a roasting pan that is 10 inches by 13 inches or use a rectangular cake pan of a similar size as long as the sides are close to two inches high. Grease the pan well and pour in the caramel. Tilt the pan to spread it evenly across the bottom and then layer in the slices in any pattern that suits you. For my cake, I chose rows simply because they would act as a cutting guide for the person who would be slicing the cake and it worked out beautifully.
 When the cake comes out of the oven, it is important that you let it sit for 10 minutes before unmolding it or the fruit will stick to the pan. The caramel is boiling at that point and it needs to cool a bit to form a bond with the fruit and the cake. If you wait too long, you will need to return it to the oven to heat it up again, so this step is not one that you want to lose track of. Set your timer for 10 minutes when you take it from the oven and wait for it! Place a sheet tray or serving platter over the cake and invert it. The cake should release immediately and fall right out onto the platter. Allow it to completely cool off before slicing or the cake will crumble.
 The perfect blend of spice cake and caramelized fruit!
 While your cake cools, let’s get that crown taken care of! Gently pull off the leaves of the crown until you reveal what looks like roots. Believe it or not, they are roots! When you have a nice layer of them that goes all the way around the pointed end, place it in a glass of water.
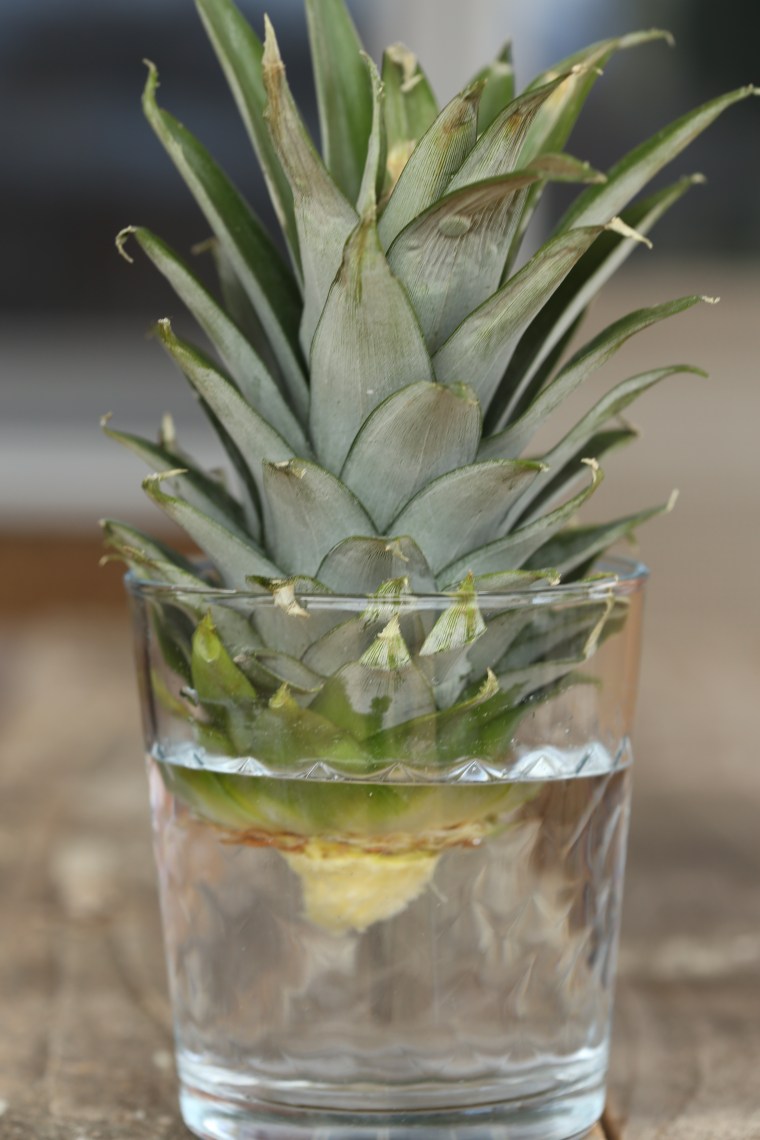 Keep it near a bright window and be sure to change the water frequently so that it does not get moldy or fermented. If all goes well, you will have roots that stretch down into the water and you can plant it in a pot. Use a light soil, one that will not hold water and make sure it is in a warm, sunny spot. It will take a long time to grow a fruit, be patient! For more information, here is a good link on growing pineapples.
This method has worked for me in the past, and it has also failed. The good news is that pineapples are affordable and you can experiment with allowing it to dry out and plant it directly into soil as well as rooting in water! Look for the grocery store to have a sale, this one was $1.89, the peeled/cored ones were $5.99!
Pineapple Upside-Down Slab Cake
serves about 36
Please note, this cake can be baked in one roasting pan, 10″ x 13″ or in two 10″ cake pans or cast iron skillets. The recipe is also easily divided in half since the ingredients are measured by weight! Cup measurements are included but are approximate amounts and may yield slightly different results.
topping
1 ripe pineapple, peeled and sliced as described above
4 ounces unsalted butter
4 ounces dark brown sugar (1/2 cup)
5-1/2 ounces light honey (1/2 cup)
cake
8 ounces unsalted butter, softened to room temperature
11-1/2 ounces granulated sugar (1-2/3 cup)
8 ounces dark brown sugar (1 cup)
1 tablespoon freshly grated ginger
2 teaspoons vanilla extract
1/2 teaspoon salt
4 large eggs
1 pound and 6 ounces all purpose flour (4-1/2 cups)
4 teaspoons baking powder
2 teaspoons ground cinnamon
3/4 teaspoon ground allspice
1/4 teaspoon ground mace
1 cup buttermilk
5 ounces of chopped pineapple (2/3 cup)
Preheat the oven to 325F. To make the topping, prepare the pineapple as directed and set it aside. In a skillet or saute pan, melt the butter over medium-low heat. Add the brown sugar and honey and stir to dissolve it. Bring the mixture to a slow boil and allow it to cook until it thickens a bit, 2-3 minutes. Pour the syrup into the greased pan and tilt it to spread it evenly. Carefully arrange the pineapple slices and set this aside while you prepare the cake.
To prepare the cake, place the butter, the sugars, ginger, vanilla and salt into a mixing bowl. With the mixer on low, combine the ingredients, scrape the bowl well and then allow it to cream until fluffy. Add the eggs, one at a time, and mix well. Be sure to scrape the bowl well to combine it evenly. Place the flour, baking powder and spices into a mesh strainer or sifter and sift it over the bowl, all at once. Fold it by hand a few times, dump the buttermilk in, all at once and fold it completely. Finally, add the reserved pineapple bits and the juice that has accumulated in the cup and finish folding it until no streaks of flour or juice remain. Carefully drop dollops of the batter over the pineapple in the pan and gently spread it out evenly over the surface. Use an offset palette knife along with a gentle hand for the best results, you do not want to disturb the pattern of the fruit!
Bake the cake until a pick inserted in the center comes out clean, about 1 hour. Remove from the oven, allow it to sit for 10 minutes (use a timer for this!) and then invert it onto a serving platter or tray. It is best to wait until it is completely cooled to cut it, you may have to restrain yourself!
 Rhubarb is not easy to grow in the south. The high heat and humidity make it challenging for this Siberian transplant. Some of the varieties can survive in our area, Nashville zone 7a, such as Victoria, Canada Red, Cherry Red or Valentine, but afternoon shade is the key. Plant the crowns on a Northern slope or in an area that gets shade in the afternoon so that the soil temperatures stay cooler, be sure it gets plenty of water too. In my garden, I have four Victoria crowns growing, the most commonly found variety here in Nashville, and I use large, plastic bread racks to provide shade for the plants during the hottest periods of summer.
 This year, I was surprised at how quickly all of the crowns grew and I was able to harvest some stalks to both make this cake and to freeze for later. One of my favorite cakes to bake is an upside-down cake. Being able to turn a fully decorated cake out of a pan is so much better than having to frost and decorate layers. As beautiful as it is, the stalks made me think of celery-luckily, it didn’t taste like celery!
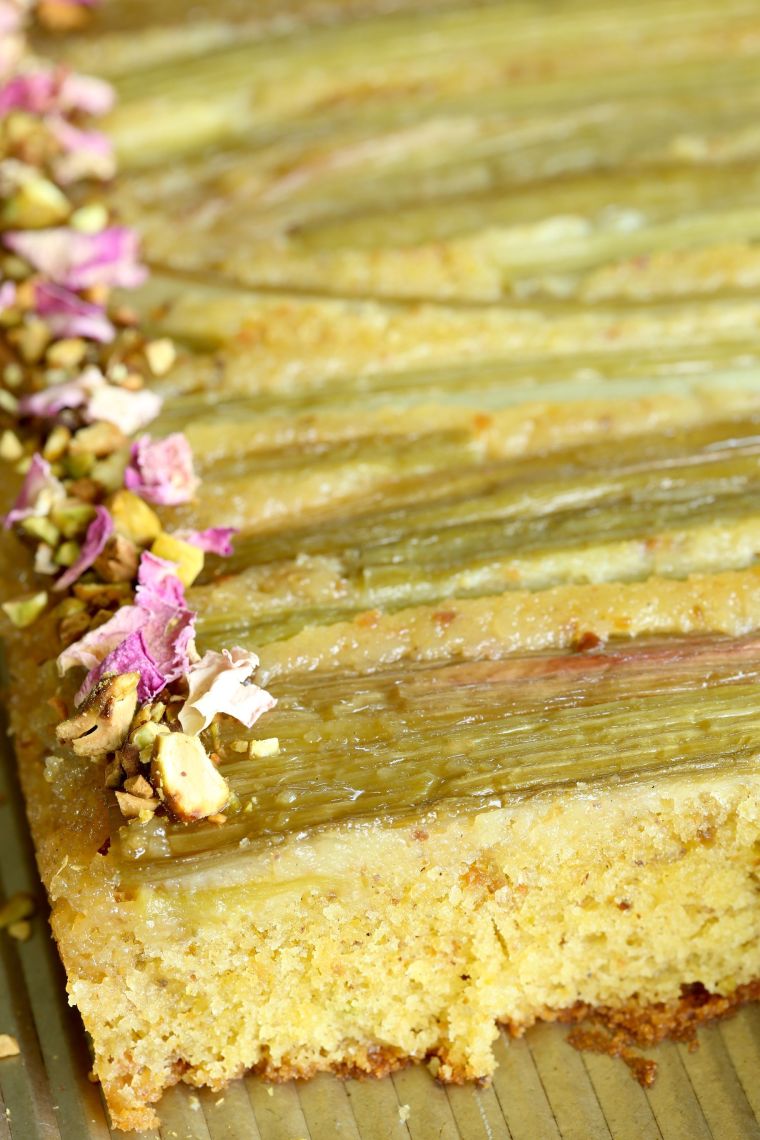 This recipe is a work in progress and I am not posting it here but it is based on a Persian Love cake made with pistachios, lemon zest, cardamom and rosewater. To decorate it a little after turning it out of the pan, I sprinkled chopped pistachios and rose petals around the edges. Because this was a large cake, 9″x13″, I took it to a Master Gardener meeting and potluck dinner, I came home with a very small piece; I ate it for breakfast the next day.
 Well, it goes without saying, I have neglected this blog lately. As spring approached, things in the garden at home and in the Demonstration Garden got busy, very busy. As we have worked to prepare the Demonstration Garden, a small team of volunteers worked on getting the word out. The result, a chance to tape two segments for a local TV show,

 When I signed up to attend the hypertufa workshop, read about that
  Late summer is tomato season and if you find yourself with a few too many, consider making a cake with them. Actually, this recipe is versatile enough that you can make it with canned tomatoes, either crushed or puree, or even with tomato juice which means you can have it anytime. If you use a purchased puree or juice, check the ingredient list to make sure that ingredients such as onions or garlic are not included.
 A few things to consider here. Raisins are one of those ingredients that you either love or hate. Personally, I am not a big fan but in this recipe, the golden raisins really work. Just be sure not to skip the step to plump them or they will actually draw moisture from the cake and can make it seem dry. If you use fresh tomatoes, blanch them to remove the skin and then cut each one in half and squeeze out as many of the seeds as you can before pureeing them. The nice thing about using fresh tomatoes, you can mix it up by changing the variety of tomato. Of course, you can just use a can of puree and make it anytime you want a fresh baked spice cake.
 As the summer fades, spice cakes shift to center stage. Slightly denser, jammed full of warm spices, and in this case, loaded with dried fruit and nuts, spice cakes are the perfect pick-me-up as the temperatures finally start to cool off. For this cake, I combined cinnamon, allspice, cloves and freshly grated nutmeg which give the cake a warm, spicy flavor.
 Guess Again Tomato Cake
 Rhubarb is not commonly found in southern gardens. The intense heat and humidity just do not suit the plant well. In the demonstration garden, we have learned that the best way to grow it is to plant it in an area that does not see the intense light and heat of afternoon sun. In the back of our vegetable garden, we have a shady area and in it are two rhubarb plants that are a green variety which seem to be better suited to our growing conditions.
 Color is not generally an indication of sweetness in rhubarb but the manner in which it was grown can be. Hot house rhubarbs that have been forced are generally sweeter than those grown outdoors naturally. This crop was pretty tart and I decided to let it macerate in sugar before adding it to the cake.
 Having chickens in our own garden has been a wonderful experience. When we moved into the new house, we added a few more and the littles have begun laying! We have one Americauna hen who has been laying tiny green eggs. We haven’t had the heart to crack them yet, but at the rate we are going, we will have to or run the risk of being buried in a pile of eggs.
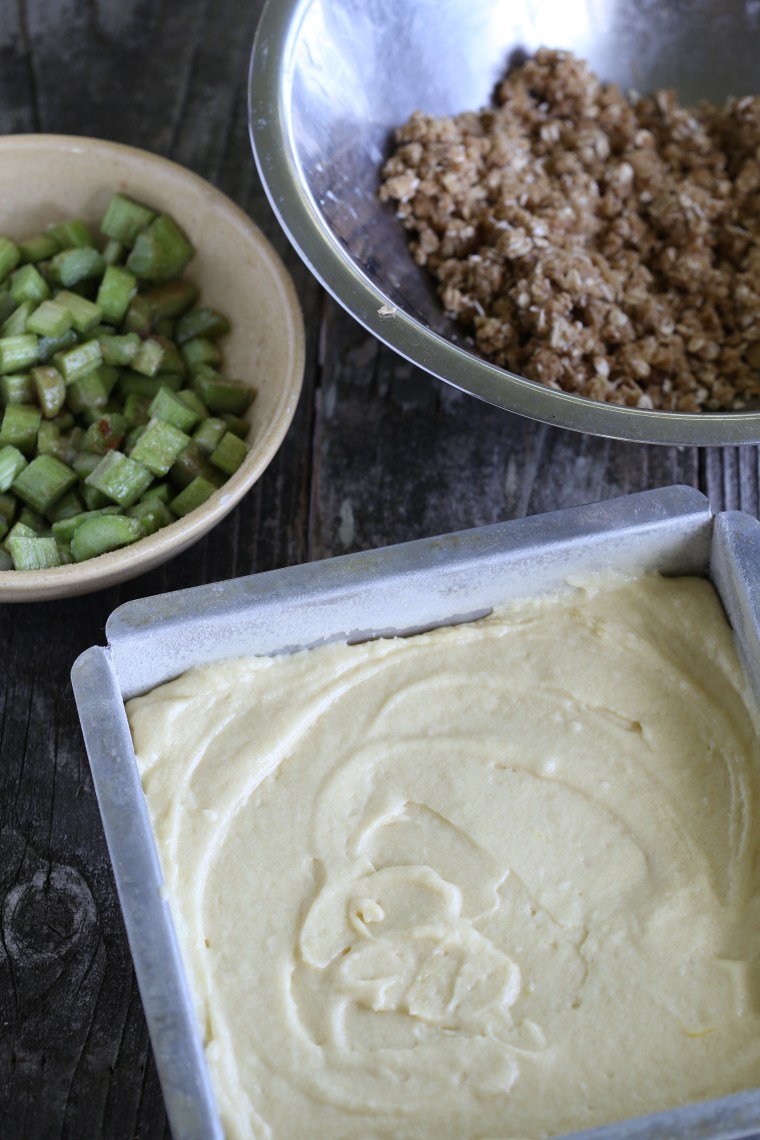 Buckles are one of my favorite summer fruit cakes. This particular recipe is so versatile that by making simple substitutions, you can have a completely different cake each time! This time though, I kept it pretty simple and just substituted rhubarb for the usual sour red cherries.
 The name “buckle” comes from the manner in which some of the fruit sinking while some of the batter rises up during the baking and this can give the cake a “buckled” appearance.
 With the final addition of a walnut crumb topping, the cake was ready to go into the oven.
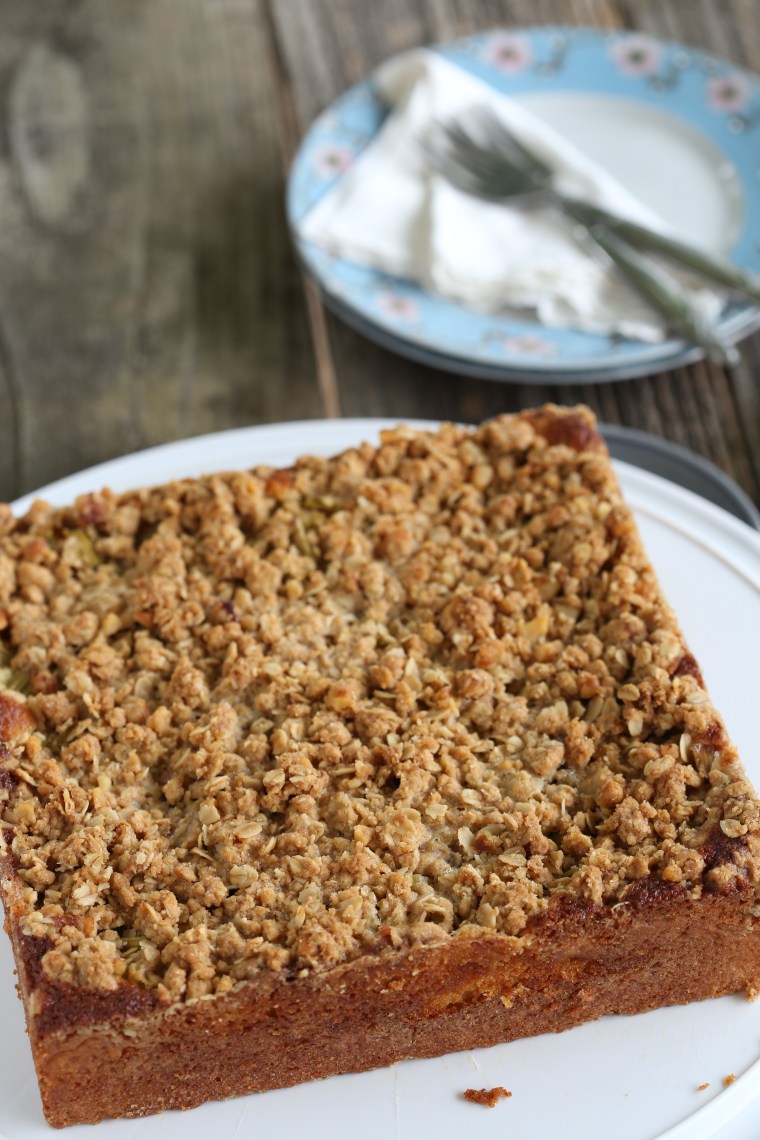 The buckling I was hoping for was not as pronounced and I suspect that it may have needed to macerate longer or I may need to increase the amount of rhubarb in the recipe. Looks like I will have to make another soon to test the theory! Despite that, it did make a nice sweet-tart layer of filling between the cake and the crumbs, the perfect treat after spending several hours digging and pulling weeds.
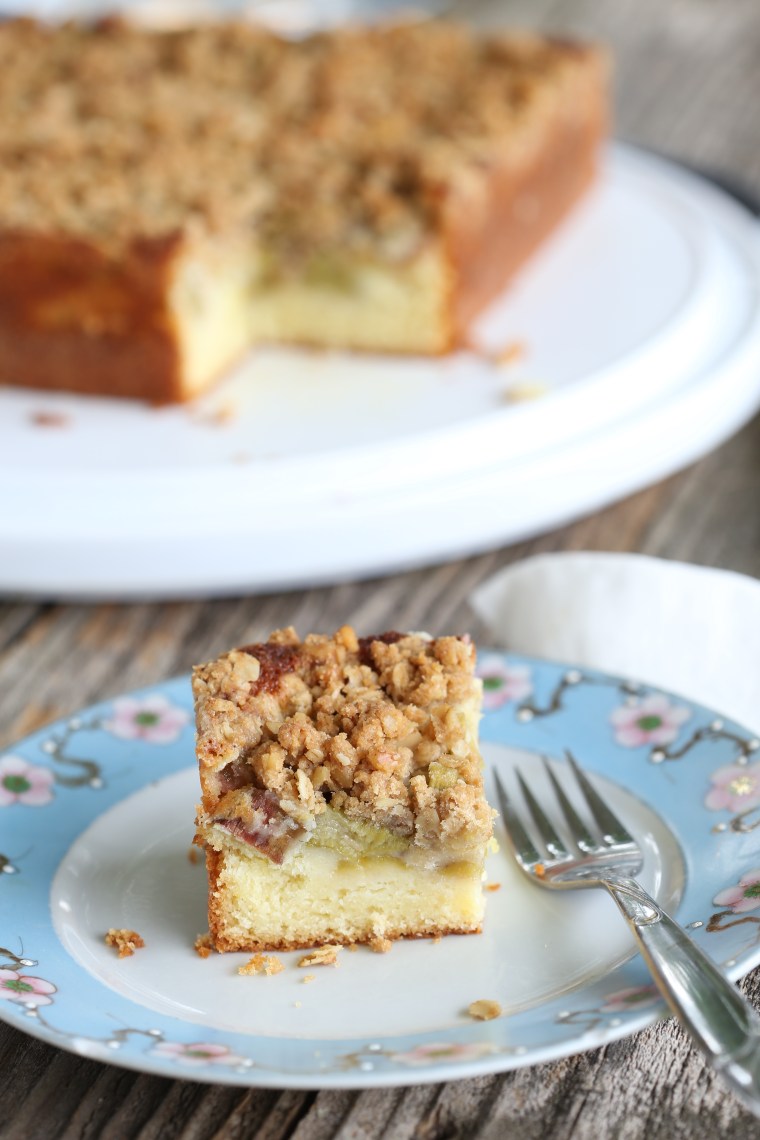 Fresh Rhubarb Buckle
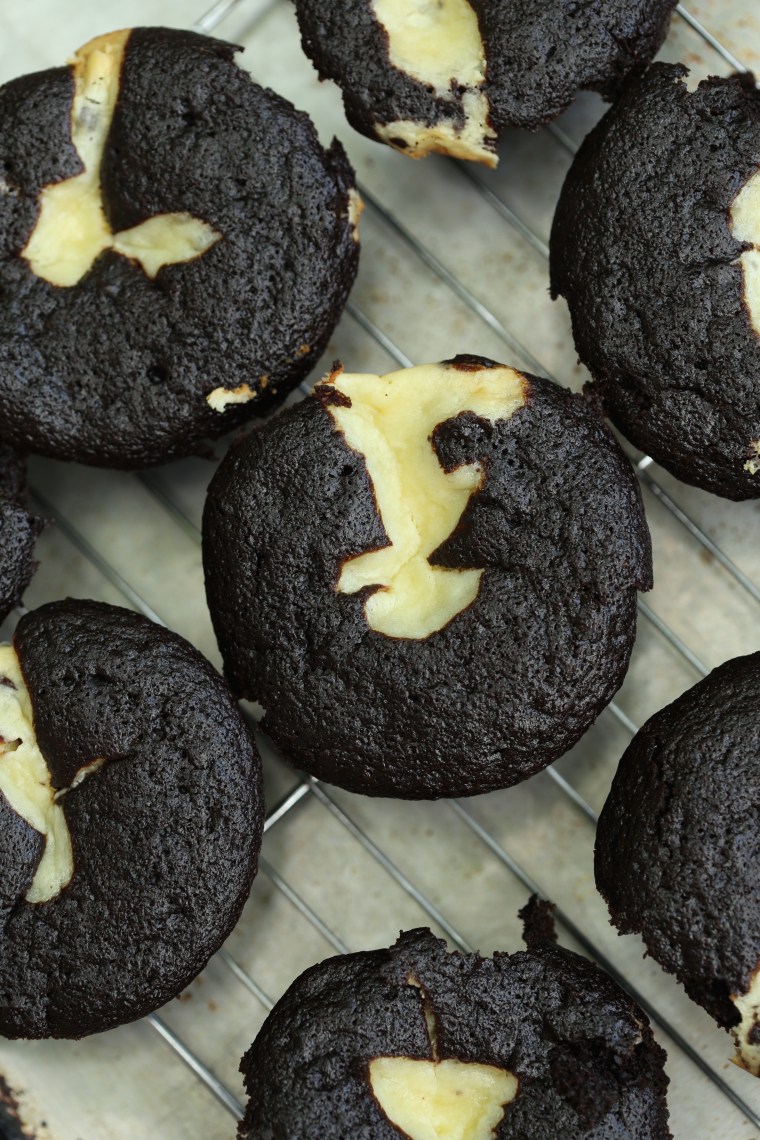 Obsession is a strong word, but in this case, an accurate one. When I began making these for our bakery (twenty years ago), everyone in my family got hooked on them. Moist chocolate cake and a rich chocolate chip cheesecake are baked together in muffin cups and the result is a decadent, obsession worthy treat.
 Long story short, I am staying with mom while she recovers from a fall. While out in the yard, she fell, broke her leg and had to have a rod inserted to support the bone. Thankfully, she is well on her way to returning to normal but it will take some time and for the next few weeks, I will be here doing all of the things she cannot do and some of the things she does not care to do, like baking cookies.
 Leaving my garden for a month was rough. We had really just begun to get the summer crops in and there is still much to do to eradicate the bermuda grass. Here in PA, spring is still in the air and the trees have only recently leafed out. In case you haven’t visited this blog before, I have posted photos of
 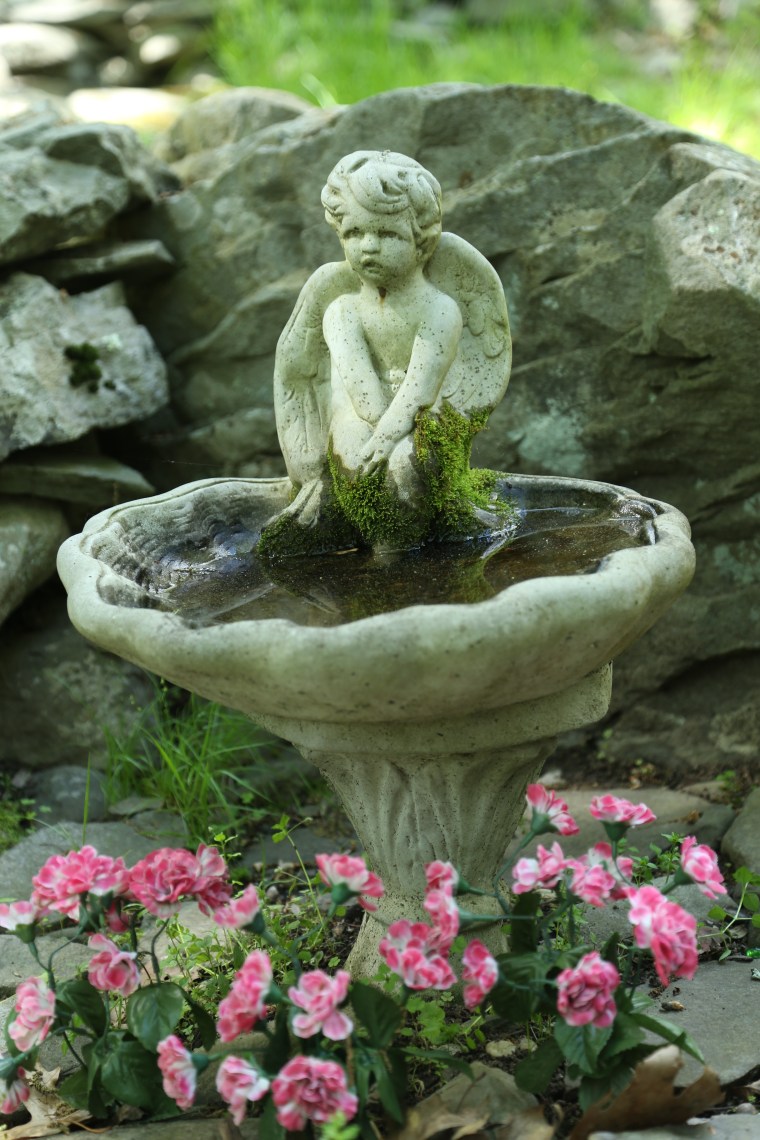 Moss grows all over the yard because it is shady and moist. This little cherub spends his time watching the yard but if he knows what the gnomes are up to, he isn’t telling anyone. He sits and stares in disbelief as raccoons and squirrels come to the basin to drink water.
 This little guy seems to be guarding the front door. We throw peanuts to him from the deck but he usually lets the squirrels eat them.
 The yard is so lush and green right now that the only color that pops out is red.
 All over the yard are these tiny blue blossoms, wish I had my wildflower book with me!
 When you walk the yard, you really need to watch where you are going, it is easy to step on the residents. This moon face greets all that visit the pond.
 It must be nice to have the time to lounge in the woods all day.
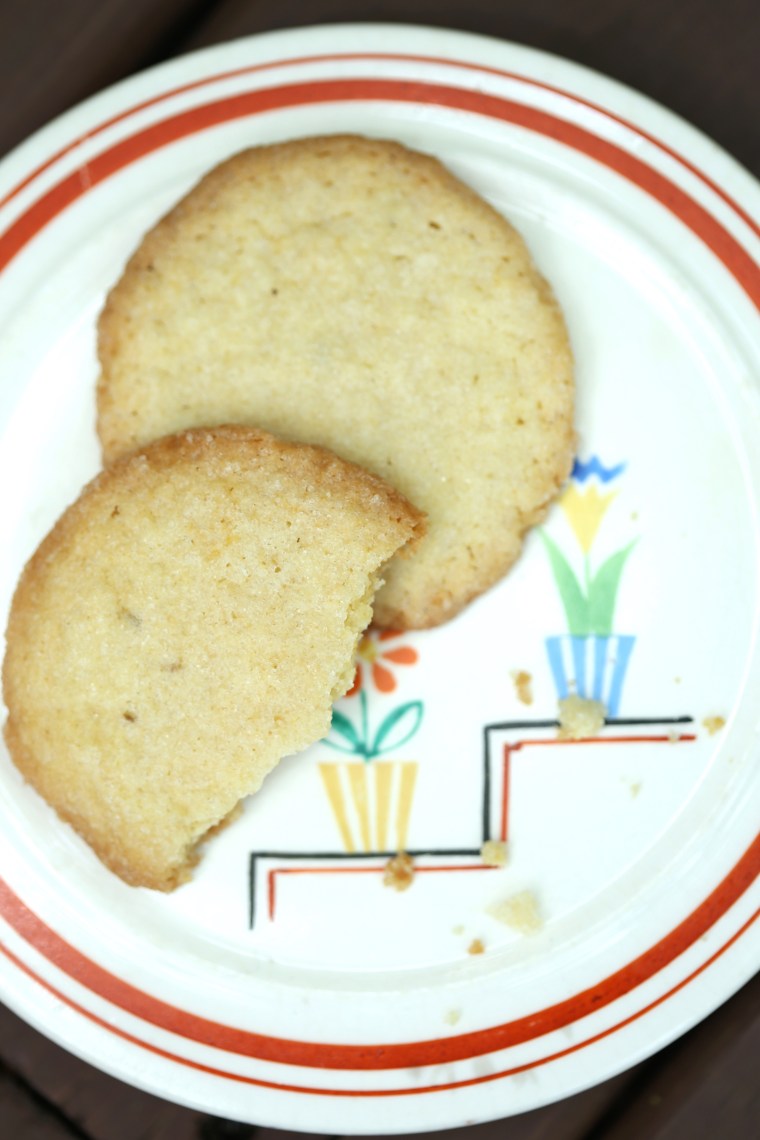
 Mom is not a big fan of chocolate so I made a batch of crispy lemon cookies with a small amount of anise seeds thrown in for fun. Since I do not have my cookbooks here to flip through, I used
 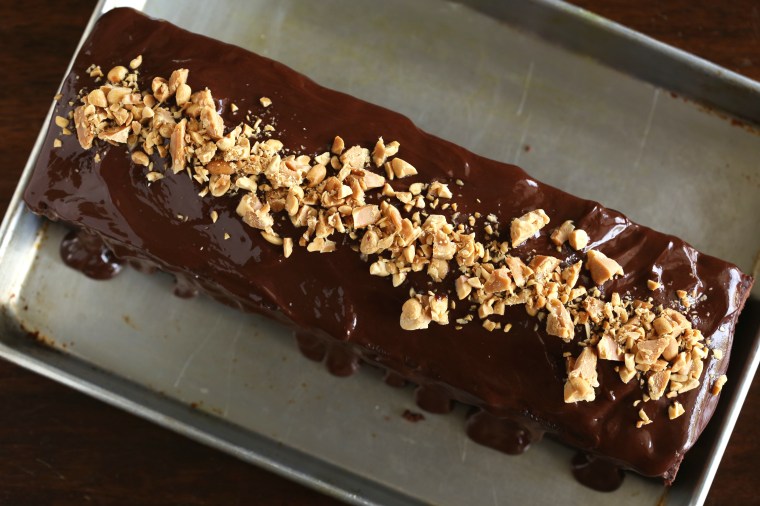 If only I knew what a Sunday in Paris was like; someday… Actually, in this case, it is a reference to a pastry shop in Paris and that is the name of it; Sunday in Paris. This cake is a specialty of theirs and a favorite of Dorie Greenspan’s which is why she developed the recipe for her book, Baking Chez Moi. The Tuesdays with Dorie bakers chose this cake for February and it was a great cake for Valentine’s day, or any day that chocolate and peanut butter are appropriate-otherwise known as everyday in my book!
 Peanut butter is not that popular in Paris where Nutella apparently reigns but here in Tennessee, it flies and fast. We took this cake to a potluck dinner and I came home with crumbs on a dirty tray. The dark, rich cake reminded me of
  This is a recipe I would make again and if you have the book, do not hesitate to try it! To see what the other bakers came up with this week, visit
 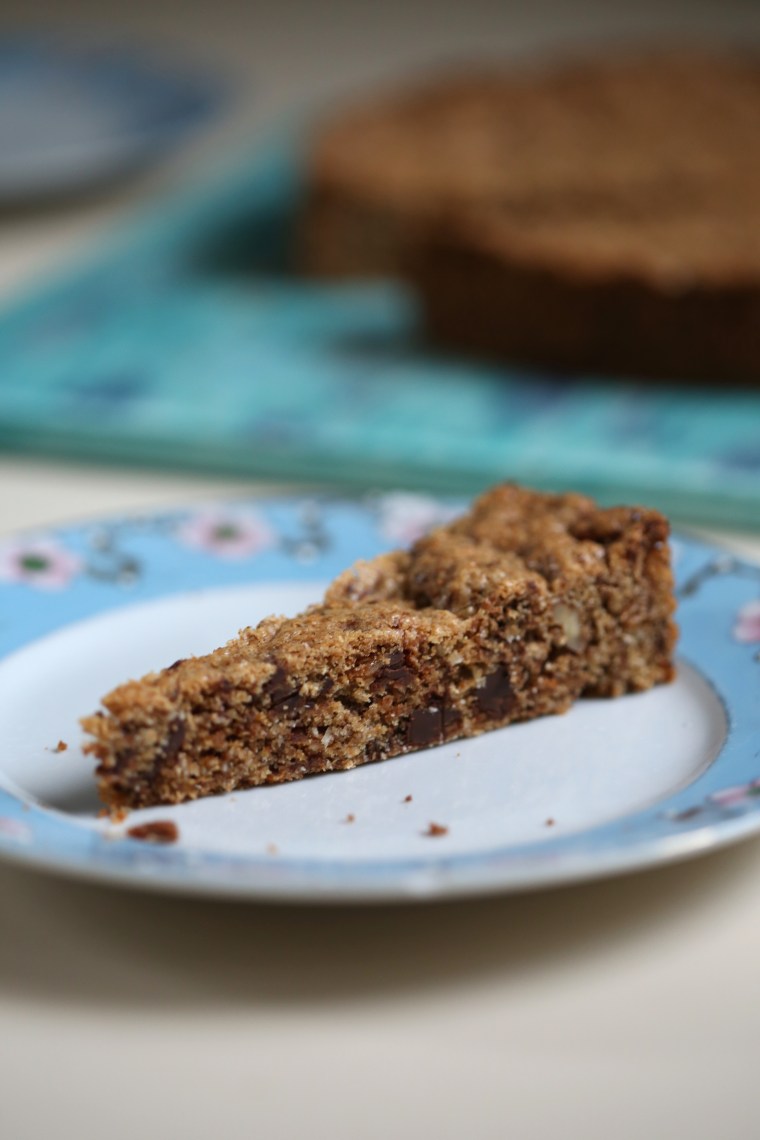 Back in September, I learned we were relocating again. After a few bumps in the road, we have landed back in Nashville and are settling into our new home. During the move, one of the things I missed the most was being able to bake in my own kitchen and now that I have a kitchen again, I am also baking again!
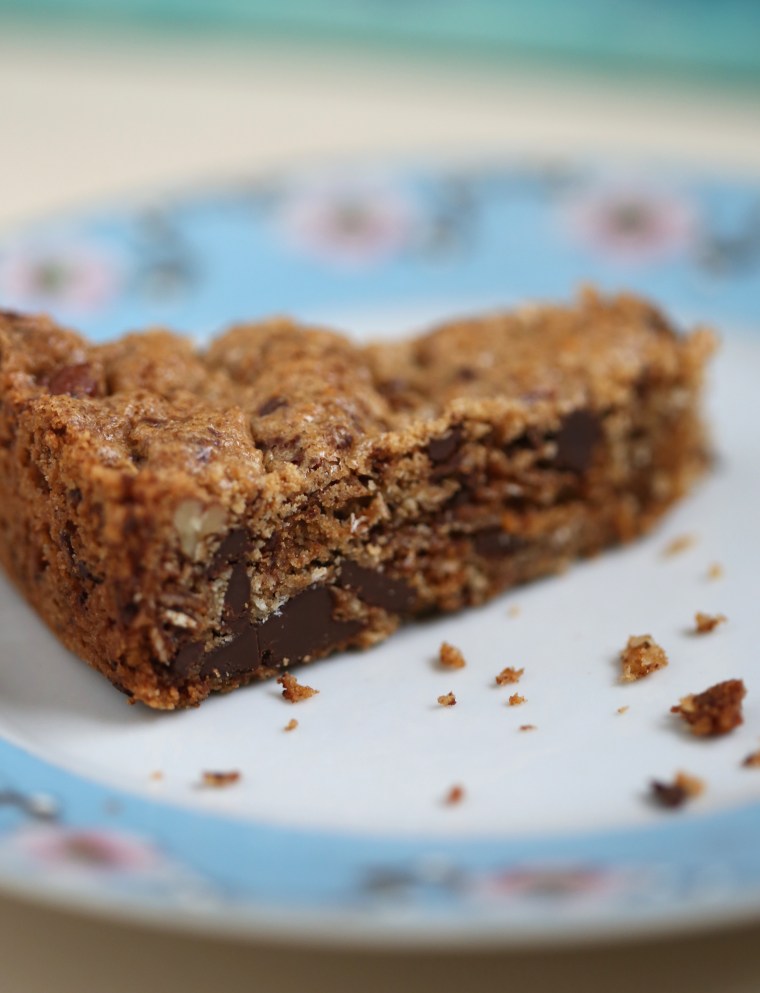 The recipe calls for bittersweet chocolate, shredded coconut and granola which all combine to make the flavor similar to an oatmeal cookie with coconut and chocolate chips. The only thing you need to know, use a good quality granola because it is a large part of the flavor and texture of the cake. With this in mind, I made a small batch of my own granola rather than buy it.
 Granola
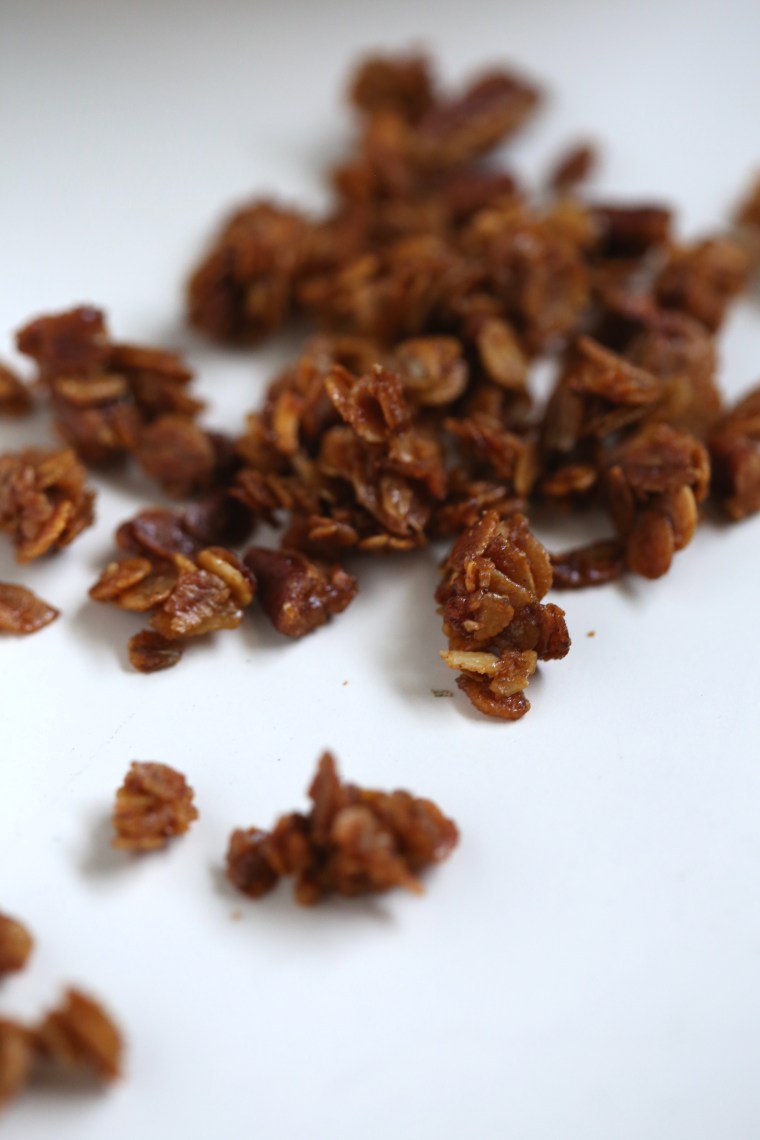 Want to bake along with us? Pick up a copy of the
  If you are like 99% of the people I know, you are in a hurry and trying to get everything done; baking, cooking, cleaning, shopping, wrapping and more. Even though I am still trying to get my house unpacked from the move, I am also trying to do some holiday baking because it just isn’t Christmas without a small truckload of cookies in the house! The good news is, that I have found one of the quickest and easiest recipes to prepare.
 Coconut Spritz Cookies
