Embossing cookie dough

Recently, I was offered the chance to try out an embossed rolling pin from embossedco.com.  Jessica, one of the founders of Embossed Company offered to send me one in exchange for blogging about it-something I generally do not do.  However, I have been looking at them on the internet for so long and have always hesitated ordering one because they were shipping from Eastern Europe and I just couldn’t do it.  Luckily for me, Embossed Company makes their pins here in the US and they ship from the west coast.

IMG_8841
Directions for using and caring for the pin are on the website under the FAQ page.  However, I decided to include my step by step experience.  When I roll out dough, I like to position it between wooden dowels to achieve an even thickness.  You can find dowels in any store that sells lumber and they come in all different sizes.  The first set I used are 1/4 inch dowels and on a floured surface, I rolled out my dough with a smooth pin.

IMG_8843

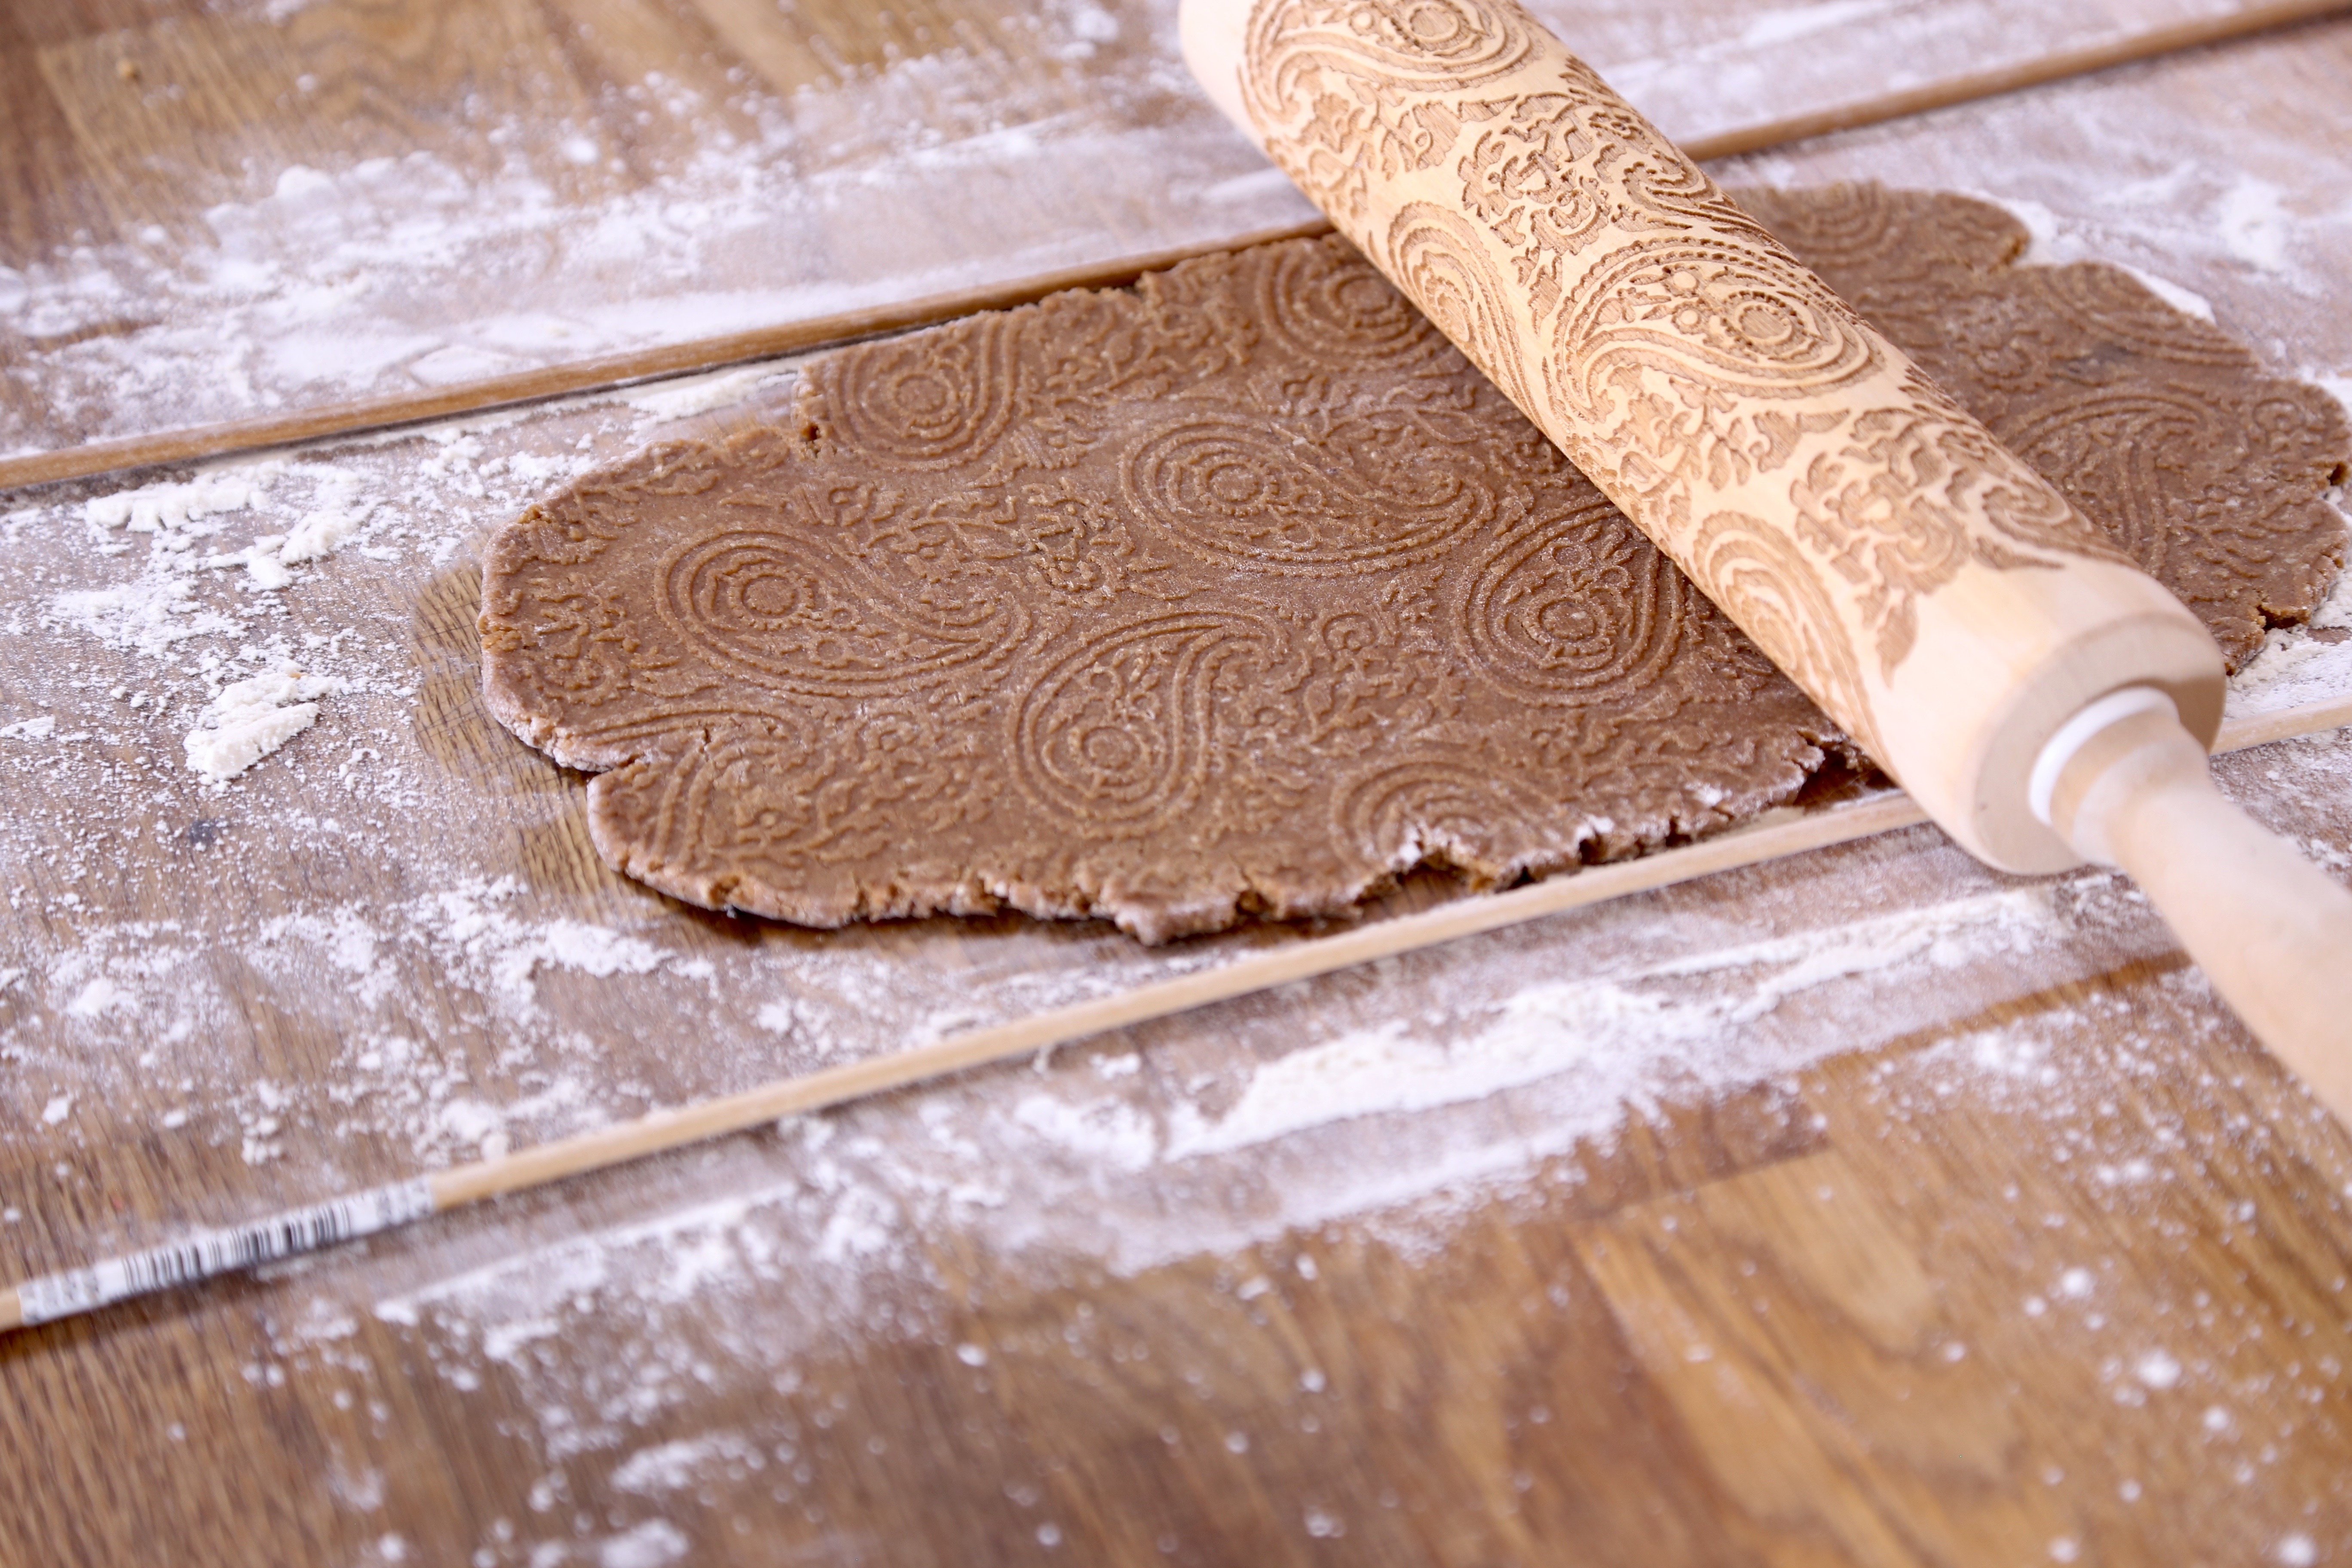
A quick switch to 3/16 inch dowels and to the embossing pin, I started at the surface closest to me and pressed down while rolling away from me.

IMG_8844


The pin leaves a nice impression of the design, this one is called Paisley.
IMG_8845
Your choice of dough really matters here.  If you are familiar with springerle or speculaa cookies, you might already have a favorite dough to work with.  For those of you new to this concept, stick with a cookie dough that doesn’t have a leavener such as a classic rolled sugar cookie.  This is my adaptation of a Spekulatius cookie, a traditional German version of gingerbread.  
IMG_8847
The design is abstract but organized in a manner that you can easily position cutters over sections of the dough to get a specific part of the design or just wing it and see what happens!
IMG_8848
Rather than fuss over positioning the cutter, I just worked at placing them in an efficient pattern to eliminate wasted space.  Square cutters are perfect for this.
IMG_8852
Round cutters are not, they generate lots of scraps that I saved for the next time I need a few freshly baked cookies.
IMG_8854
The dowels may seem unnecessary but they really aren’t.  If you have ever rolled out cookies and had some on the tray burn before others were baked, it is because the thickness of the dough wasn’t consistent.  This is where the dowels come in; they stop you from rolling the dough out thinner than you intended to.
IMG_8858
Once baked, the design is a bit softer but still pretty obvious.  If you have ever baked springerle, you are familiar with the concept of letting the cookies sit and dry before baking-something I might try.  A lower baking temperature might also aid in retaining the design. 
IMG_8860
Regardless, the cookies look great, the pin was easy to use and I am thrilled that I agreed to take Jessica up on her offer!  Embossed Company is a new business but they are off to a great start and they even pledge to donate 15% of their profits to non profits that are working towards providing meals to impoverished communities around the world.
IMG_8861

Almond Spekulatius Cookies

MAKES 4-6 DOZEN COOKIES DEPENDING ON THE SIZE OF YOUR CUTTERS

7 ounces unsalted butter, softened (14 tablespoons, 199g)

1 cup dark brown sugar, packed in the cup (210 g)

1 teaspoon vanilla extract

1/4 teaspoon salt

1 whole egg, large size

2 tablespoons spekulatius spice blend, homemade or purchased*

1/2 cup almond flour (60g)*

1 cup white whole wheat flour (154g)*

1 cup unbleached all purpose flour (140g)

In a mixing bowl, cream the butter with the brown sugar, vanilla and salt until fluffy.  Scrape the bowl as you go to insure it is completely mixed.  Add the egg, mix it in completely.  By hand, fold in the remaining ingredients and form a thick disk with the dough.  Wrap the dough in plastic and refrigerate for several hours and up to several days, you can also freeze it for a month.

When ready to make the cookies, allow the dough to come to room temperature, it should be pliable but not sticky.  Preheat the oven to 350.  Using the method described in the photos above, roll and cut out the cookies.  Place them on sheet pans lined with parchment or silpats and bake until golden around the edges, about 12-14 minutes.  Allow them to cool on the tray for a few minutes and then move them to a cooling rack to finish cooling.  Store them in an air tight container.

Some notes on the ingredients:

Spekulatius spice is fairly common in Germany, we have friends there that sent us some over the holidays but you can easily make it or purchase some.

Almond flour gives a nice crunch to the dough, you can substitute with any finely ground nut that you prefer.  For those with nut allergies, substitute an additional 1/2 cup of all purpose flour.

White whole wheat flour is just another way of adding texture to the dough along with a little extra flour.  Feel free to experiment with other whole grain flours but start by measuring out a cup, they all have different weights!

last minute cookies; coconut spritz

img_0426If you are like 99% of the people I know, you are in a hurry and trying to get everything done; baking, cooking, cleaning, shopping, wrapping and more.  Even though I am still trying to get my house unpacked from the move, I am also trying to do some holiday baking because it just isn’t Christmas without a small truckload of cookies in the house!  The good news is, that I have found one of the quickest and easiest recipes to prepare.

Coconut Spritz cookies are easy to mix and just as easy to shape.  While the dough can be shaped with a cookie press, it can also be scooped out and pressed with a cookie stamp, a flat bottomed glass or even the palm of your hand.  However, if you have a cookie press, use it, it will save you some time and produce cookies that are consistent in size.  One note, this dough is a bit high in fat and on the soft side.  Like most Spritz recipes, you should press the dough directly onto a sheet pan that is not non-stick or lined with any kind of paper.  While this may go against all you know about cookie baking, if you try to use paper or a treated pan, the dough cannot stick as you press it out and you will spend your time fighting with the press.  Do not worry, after baking, you will be able to get them off the pans by simply letting them set for a minute and then lifting them with a thin spatula.

The coconut flavor mainly comes from the oil so be sure to use a virgin oil that has not been refined and stripped of the flavor.  This recipe also calls for finely shredded coconut and if you plan to use the press, it must be extremely fine.  Whether it is sweetened or not is hardly important but in this case, size absolutely matters! If you cannot find it at the grocery store, try a Latino market, that is where I found mine.

img_7278Coconut Spritz Cookies

makes about 72 pressed cookies

1 cup coconut oil, at room temperature-not melted

5.4 oz sugar (153 g, 3/4 cup)

1 1/2 teaspoons vanilla extract

1/4 teaspoon salt

2 large egg yolks

10.75 oz unbleached all purpose flour (305 g, 2 1/4 cups)

1/8 teaspoon baking powder

1/2 oz extra fine shredded coconut (14 g, 1/4 cup)

3-4 tablespoons heavy cream

Coarse sugar for sprinkling

Preheat the oven to 350.  In a mixing bowl, cream the coconut oil with the sugar, vanilla and salt until well blended but do not mix it too long-the oil may begin to melt.  Add the egg yolks and mix to combine, scrape the bowl well.  Stir in the flour and baking powder and then the coconut.  Mix until it comes together.  Add the heavy cream, 1 tablespoon at a time until you have a dough that is soft and easy to shape.  You may not need all of it, and the more you add, the more the cookies spread in the oven.

Using the press, deposit the cookies onto the baking pans, leaving at least 1 inch between them.  Sprinkle the top of each cookie with a little coarse sugar.  Bake until golden around the edges, about 12 minutes.  Rotate the pans halfway through baking.  Let the hot cookies set for a minute then remove them from the pan with a thin, metal spatula and cool completely on a rack.  Store in an airtight container for about a week-if they last that long…

If not using a press, use a small portion scoop such as a #50 scoop.  Dip the top of each ball of dough into the coarse sugar and place onto a pan.  Flatten them slightly with a cookie stamp, the flat bottom of a glass or your hand.  Baking times will depend on the size of the scoop used, watch them closely and adjust the time as needed.

img_7287

the stockings were hung by the chimney with care: a hand-knit family tradition

IMG_2073
My stocking for baby Matthew on the left, the stocking Joan made for me when I was born is second from the left and the others she made for my husband and daughters.

Every year as we decorate the house for Christmas, our stockings become a focal point.  While I am sure that we are not the only family that decorates with Christmas stockings, ours are truly special and they are part of a family tradition that dates back more than 50 years.  Each member of the family, mine and all of my cousins and their families, has a hand knit stocking with their name on it.  My mother’s sister, my Aunt Joan, knit one for each of us as we were born and then as each of us married, our spouses were also given stockings.  It became a right of passage in a way, if you were gifted a hand-knit stocking from Joan, it was a big welcome to the family!

The tradition continued on and as the grandchildren came, so did the stockings.  When my aunt passed away, we all wondered who would continue the tradition of hand-knitting the stockings!  My mother, who is a knitter herself, was not up to the task; she simply did not think she could make one due to the color changes.  Knitting with multiple bobbins of 6-8 colors per row can be tricky and if you have color blindness, it can be nearly impossible.  What am I talking about?  My mother actually has color blindness which is something that men are more commonly affected by.  Needless to say, the tradition of a hand knit personalized stocking for each new family member was in question and it was quite possible that it was finished.

However, as my mother will tell you, I am not one to shy away from a challenge and I quickly offered to make one when one of Joan’s sons, my cousin Tim and his wife Laura, welcomed Sara into their family.  Can I just say that I had no idea what I was getting myself into?  Knitting with bobbins and lots of color changes…Had I lost my mind?  This was so beyond my knitting skill!  Somehow, I managed to complete that stocking for Sara.  Then came one for Ed, the new husband of my cousin Mary, Joan’s only daughter.  To get some practice, I decided to knit a set for my closest friend, her husband and their son.  With each one, my skills improved and the process became easier.  Then, nothing.  No additions to the family until late this summer.

In September, another of Joan’s sons, Chris and his wife Rosemary, welcomed little Matthew into the family.  Suddenly, I had a stocking to make!  Quickly, I went out to purchase the needed yarn to make the stocking.  Sounds easy enough but truth be told, yarn colors change just like fashion trends change and finding the colors I needed was not easy and in the end, I went with colors that are notably different from all of the stockings Joan and I had previously made.

IMG_2076
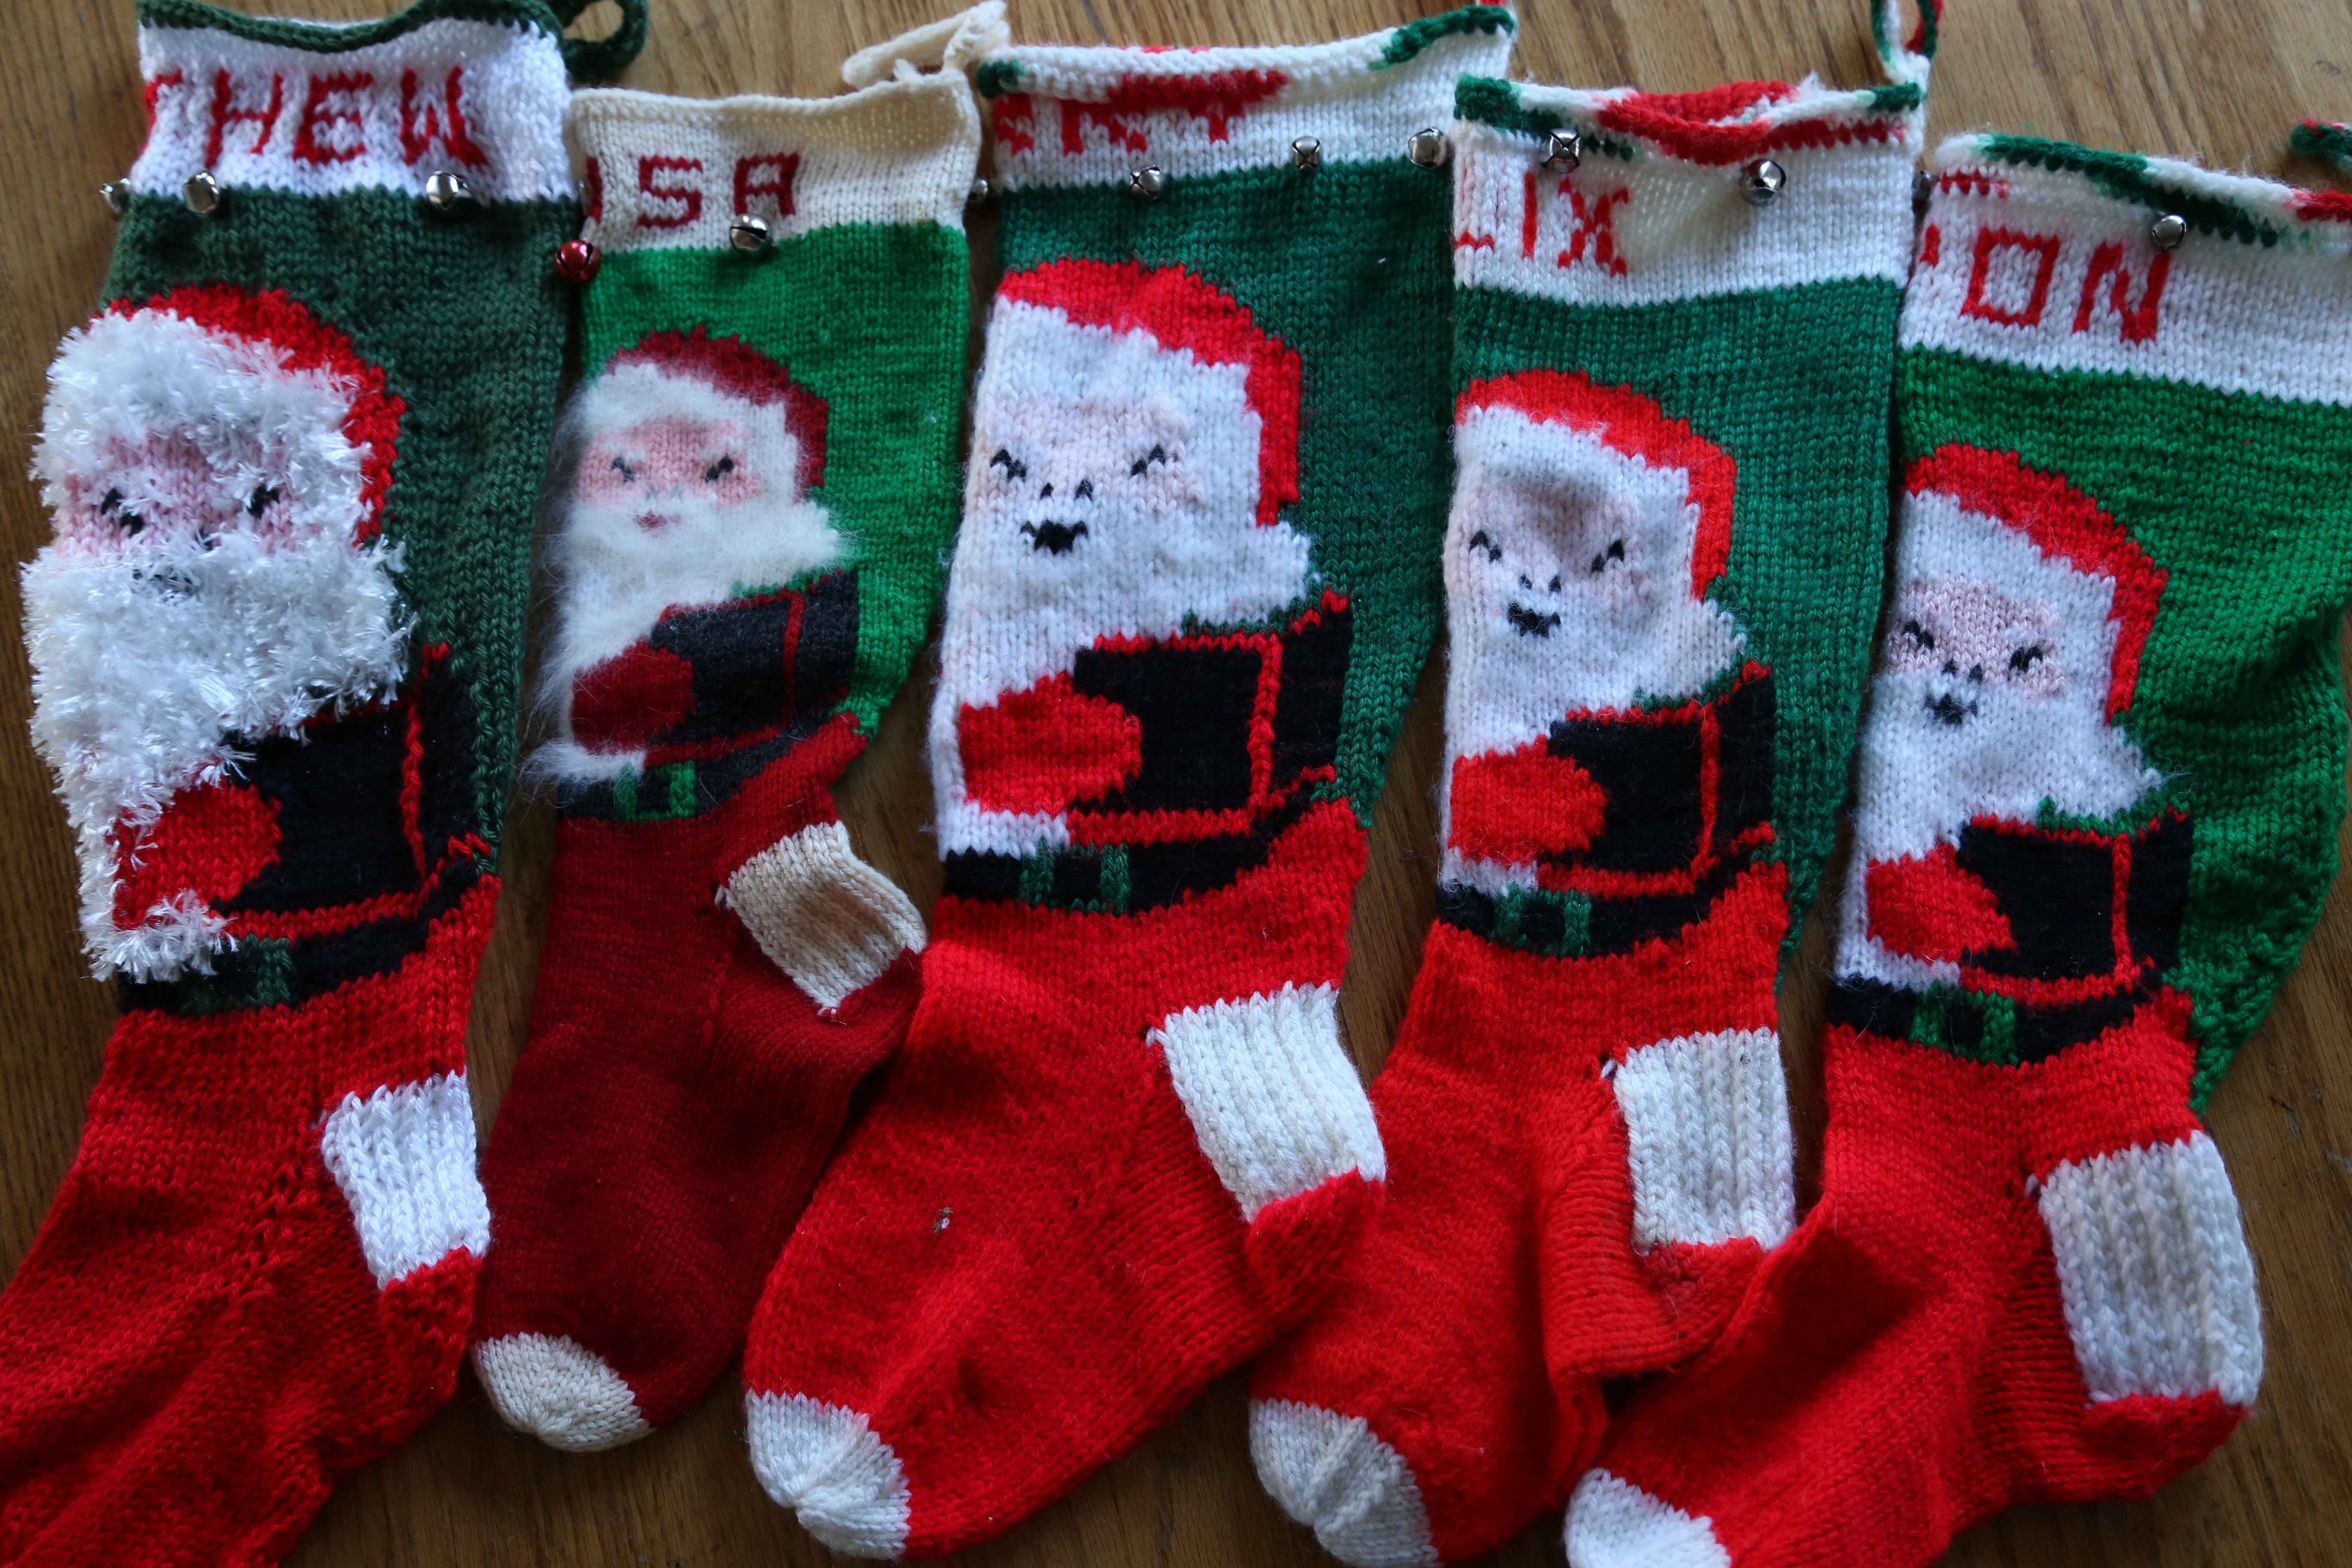
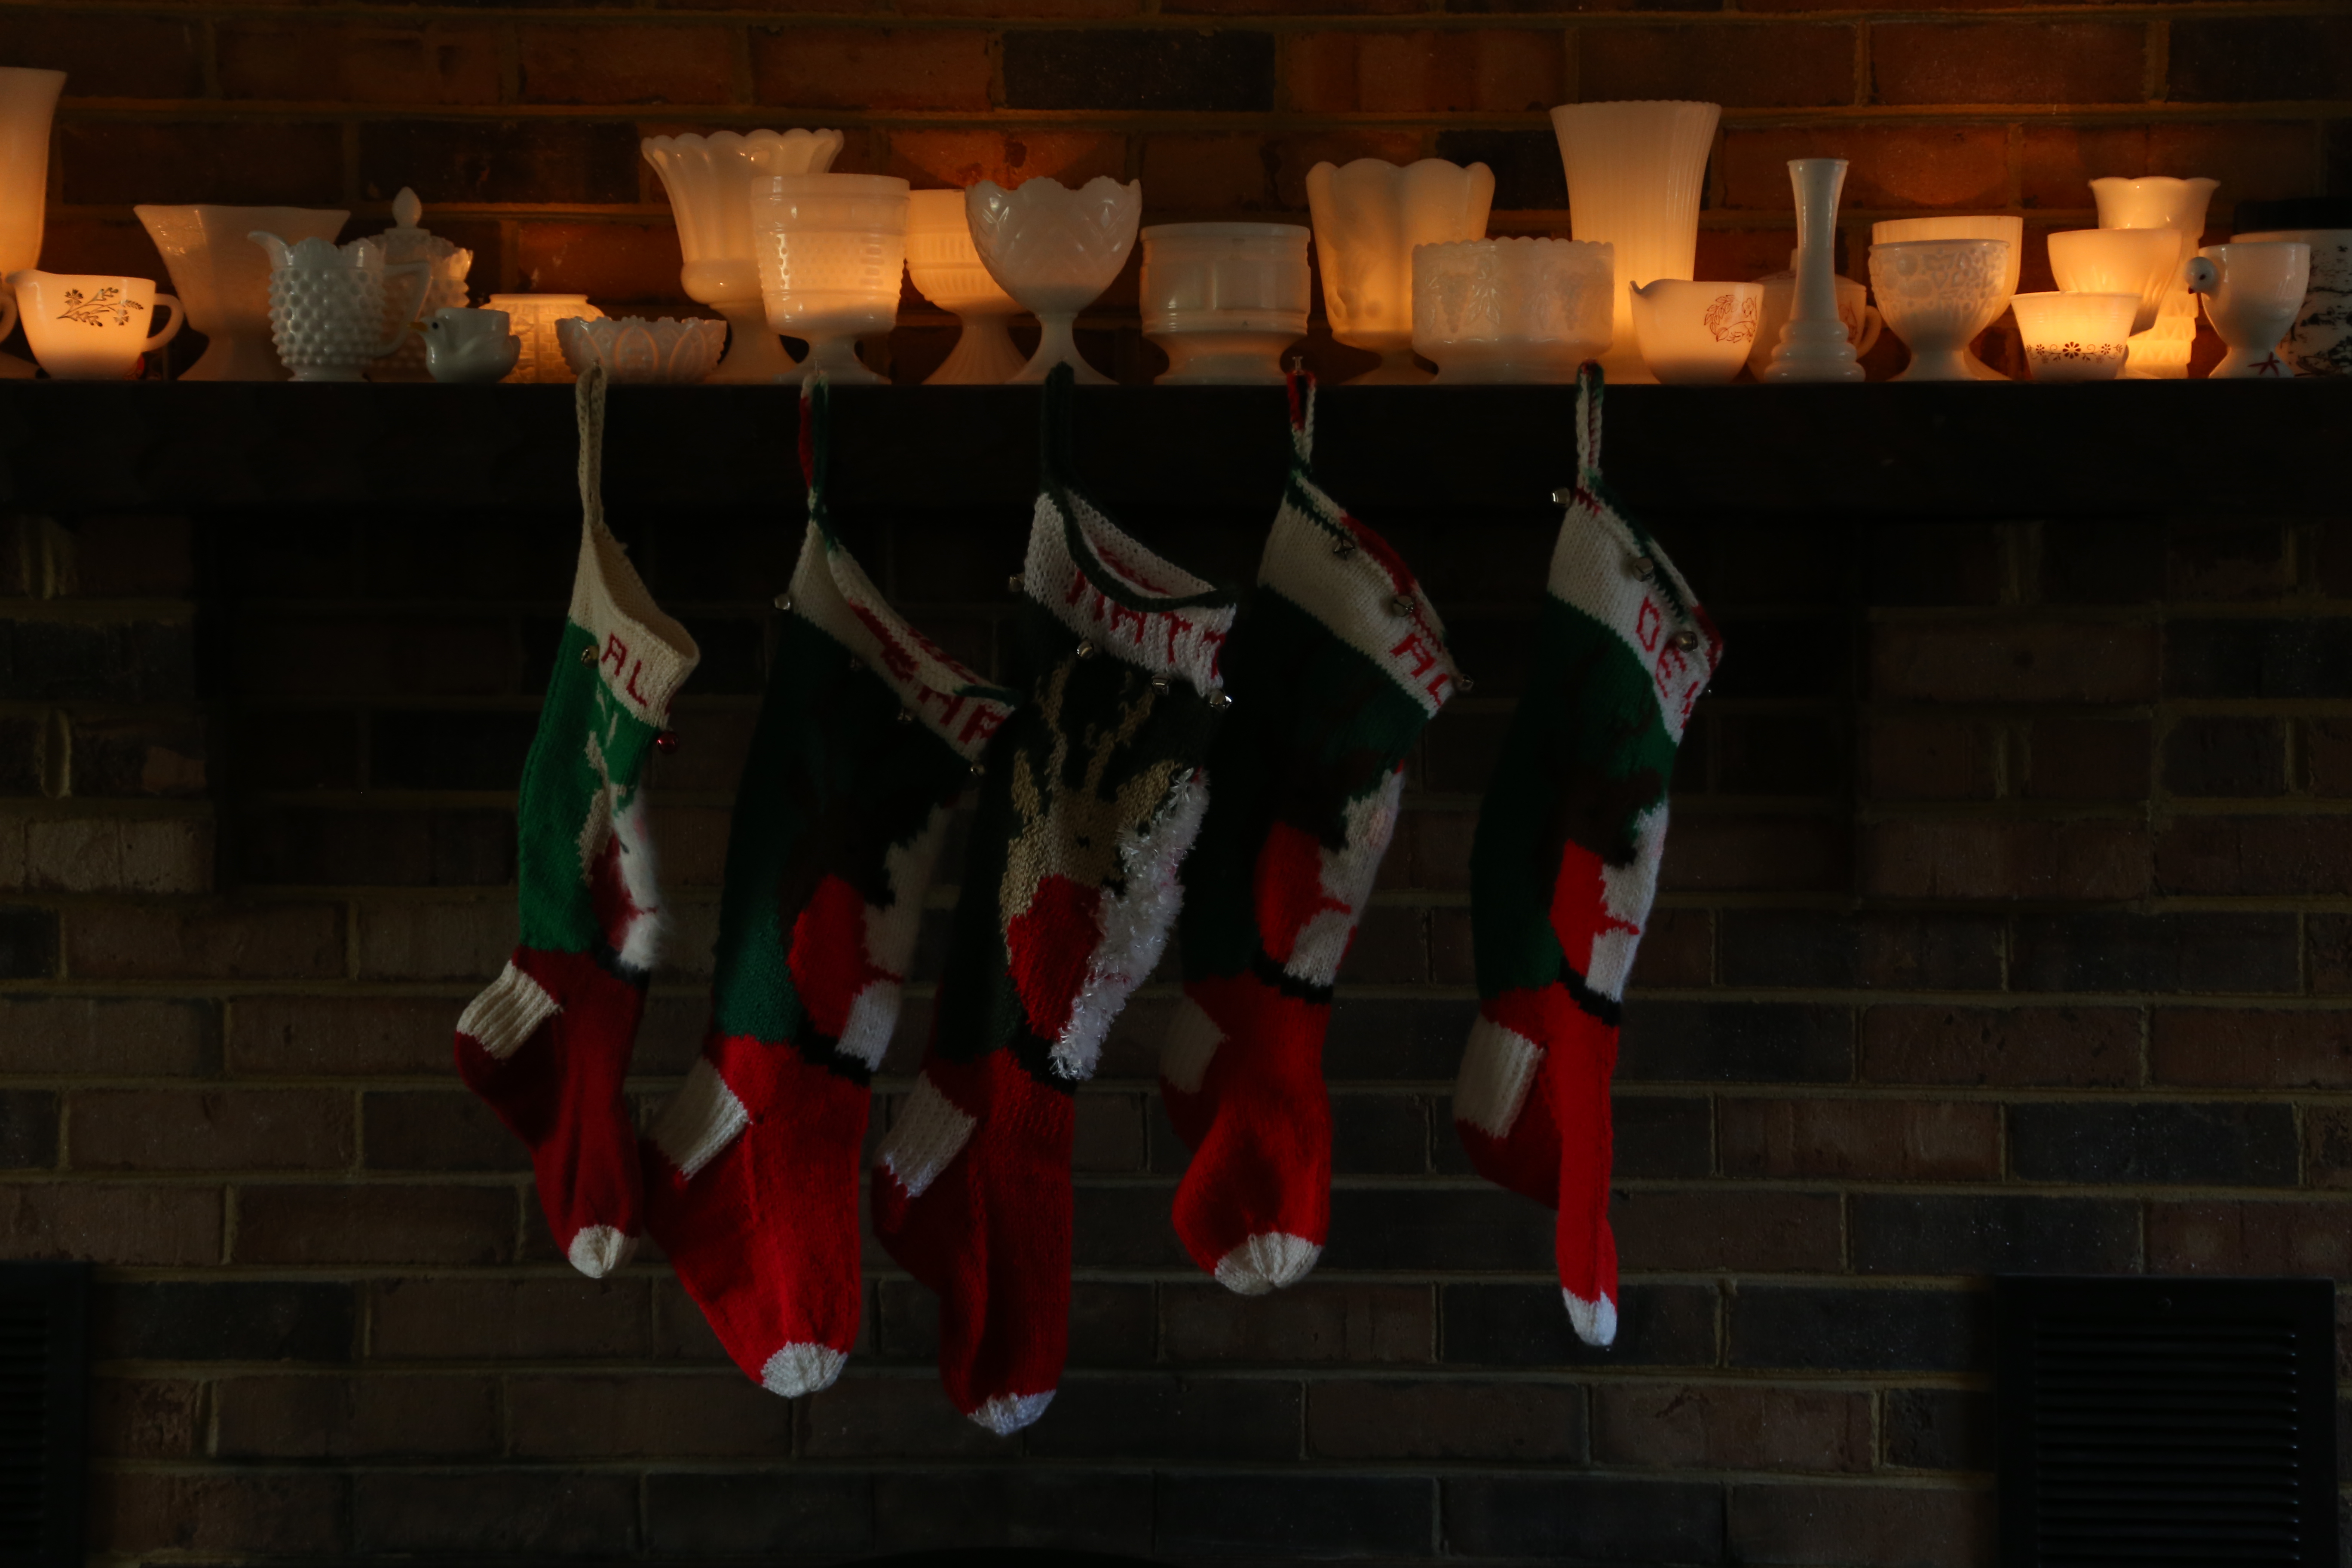
My stocking is over 50 years old now, and yes, it pains me to say that.  When Joan made mine, she used wool and angora and over the years, moths have damaged it.  Several years ago, I had to have mine repaired because moth larvae had eaten patches of the angora.  These days, the acrylic yarns available make avoiding wool and angora pretty easy which means that the stocking I knit will not become a target for moth larvae.  To make the beard and fur trim, I used a ball of Bernat Boa yarn and it was a little challenging to work with.  Not only is it fluffy and bulky, it gives off a lot of fibers and it is difficult to actually see the individual stitches which is an important part of following a graph to knit a pattern like this one.  In the future, I may try to find a yarn that is a little less textured.

IMG_2075

Every knitter using the same pattern is bound to have different results.  Like handwriting, how you hold the needles and the tension you keep on the yarn can have many different results.  The different yarns can only further change things.  All I know is that it is a tradition I am glad to continue and I hope to keep knitting them as the family grows.  It makes the holiday a little more special to look at the collection of stockings hanging in our house and I can only hope my work lives up to Joan’s!


IMG_2086Before I sent the newest member of the family his stocking, I hung it from the mantle in our living room with the collection of stockings Joan knit for us.  Looking at the stockings hanging there together, knowing that I made one, a certain feeling of satisfaction came over me.  More importantly, I was excited to send it on its way so that Chris and Rosemary could hang a stocking for Matthew.  Then a thought occurred to me, I missed one.  It seems that someone in that small family is missing a stocking; don’t worry, Rosemary, I’m on it!

Merry Christmas everyone!