granola cake; a tuesdays with dorie post

img_7316Back in September, I learned we were relocating again.  After a few bumps in the road, we have landed back in Nashville and are settling into our new home.  During the move, one of the things I missed the most was being able to bake in my own kitchen and now that I have a kitchen again, I am also baking again!

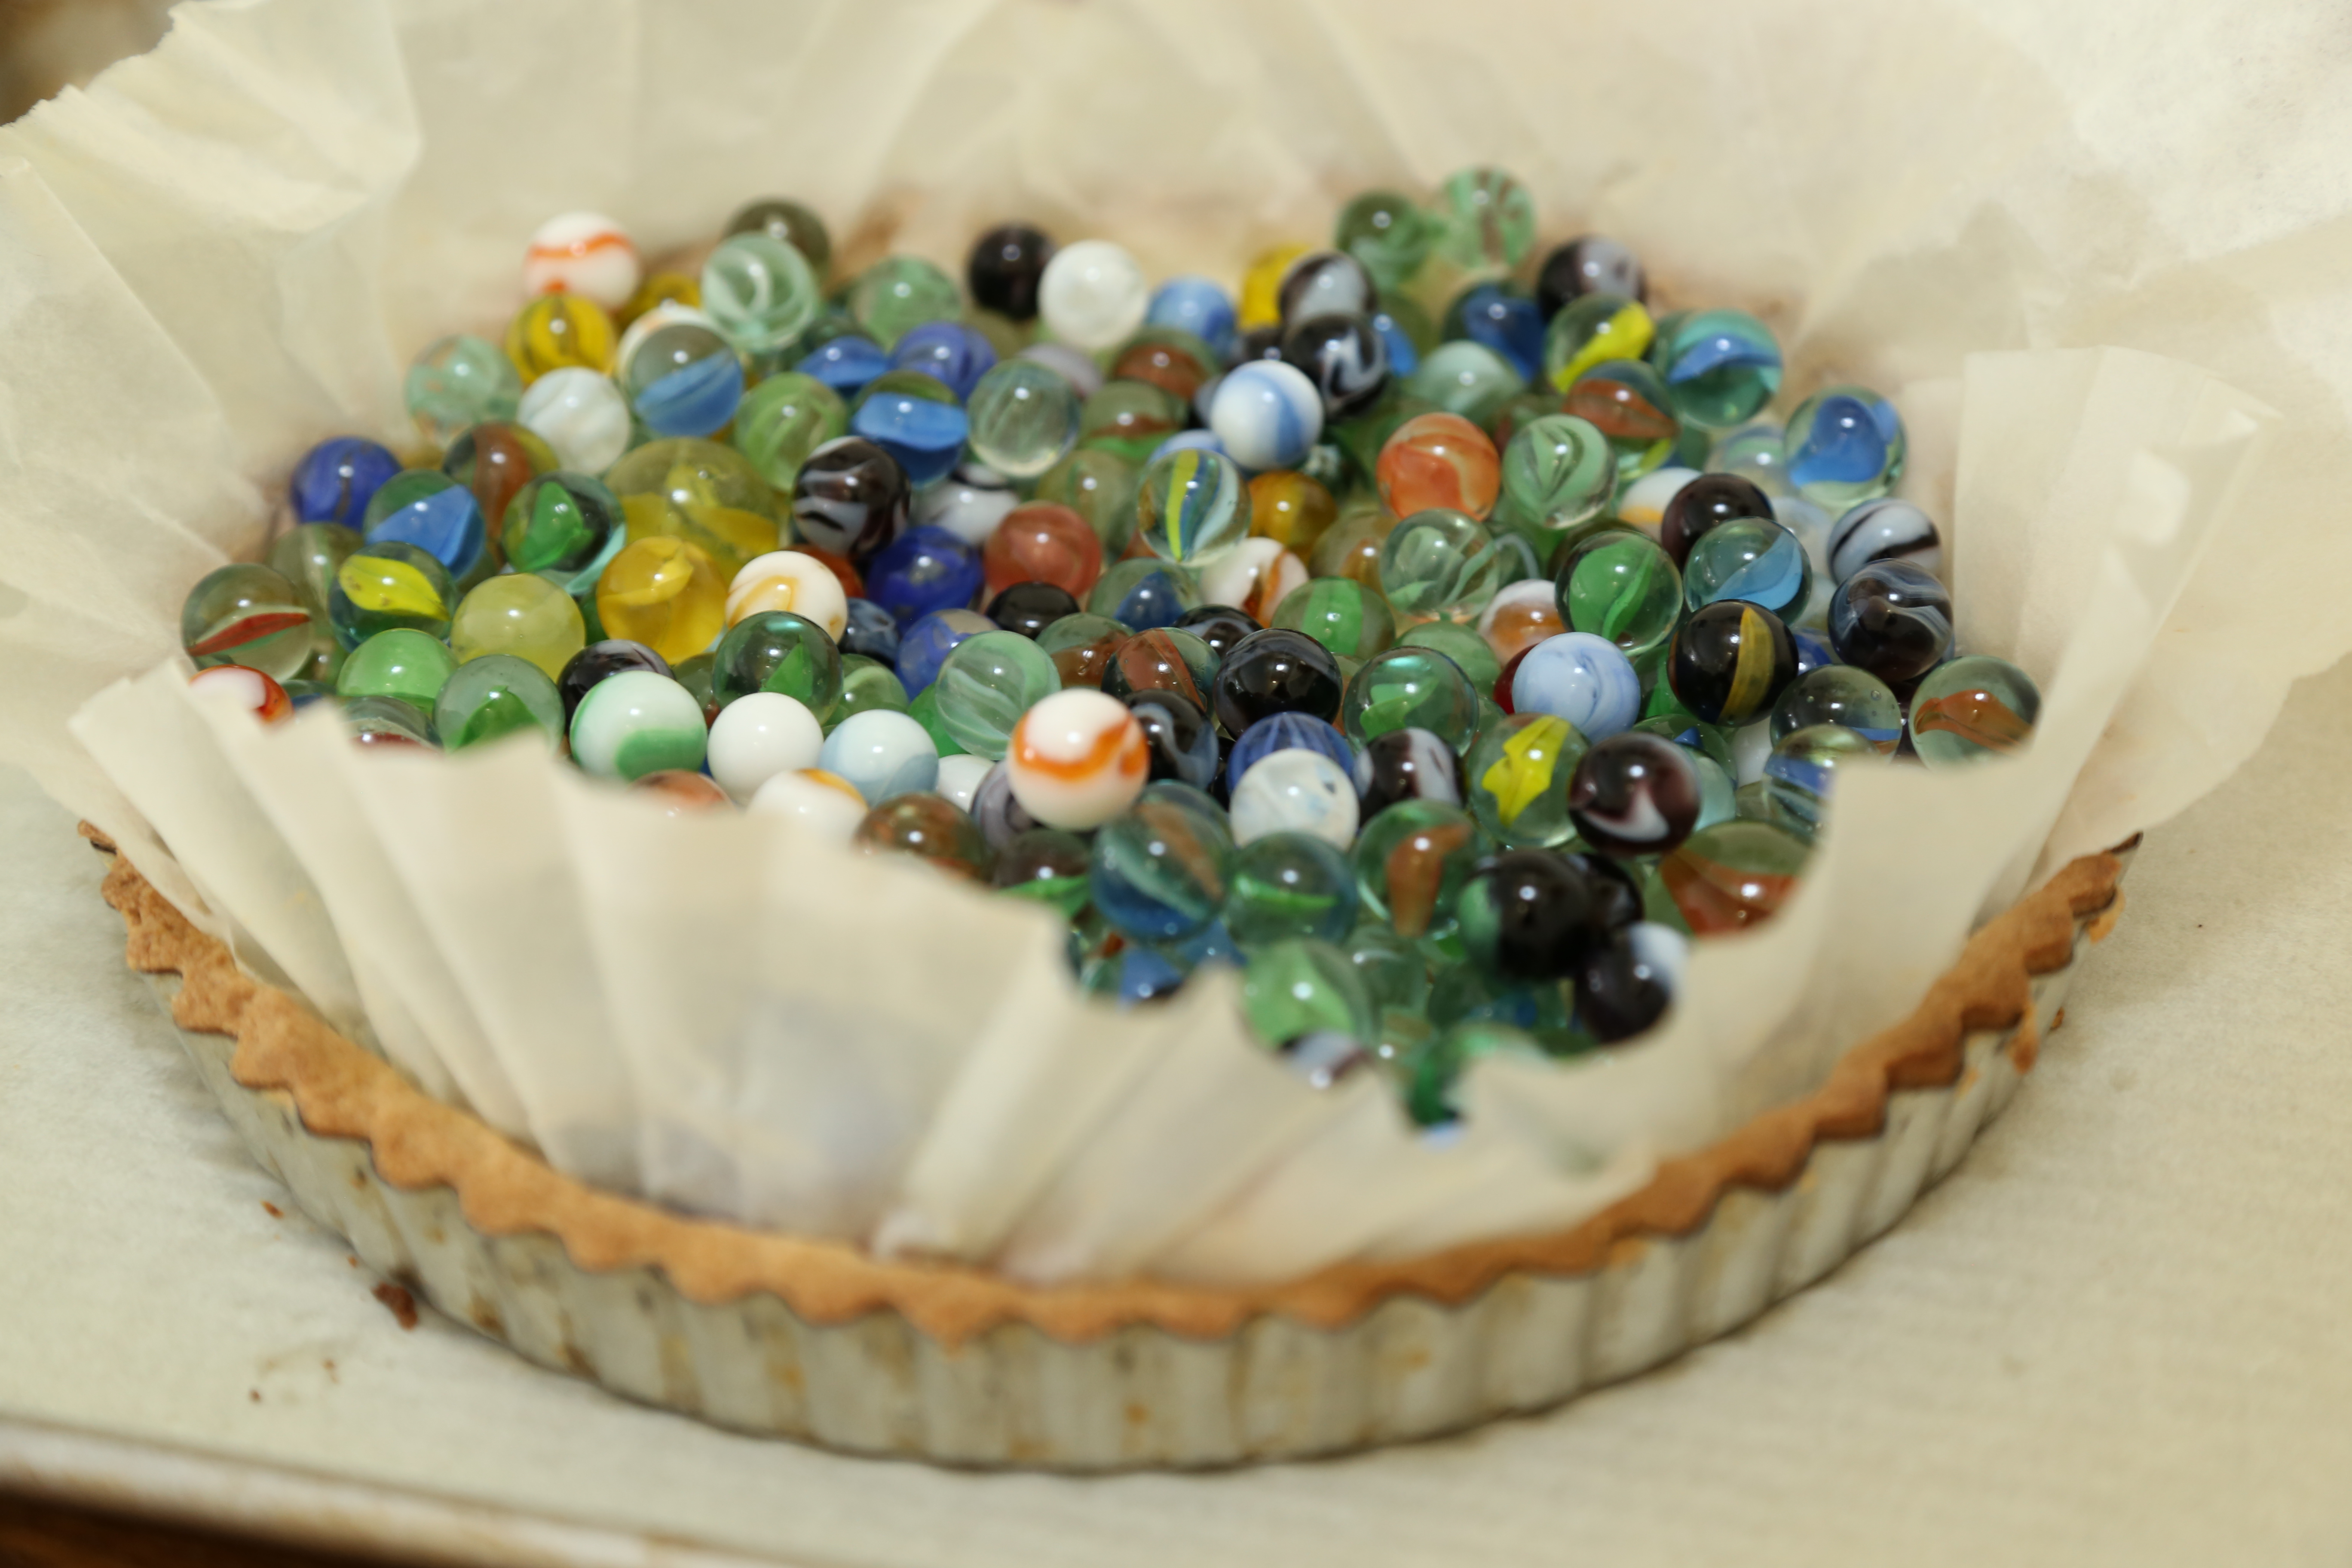
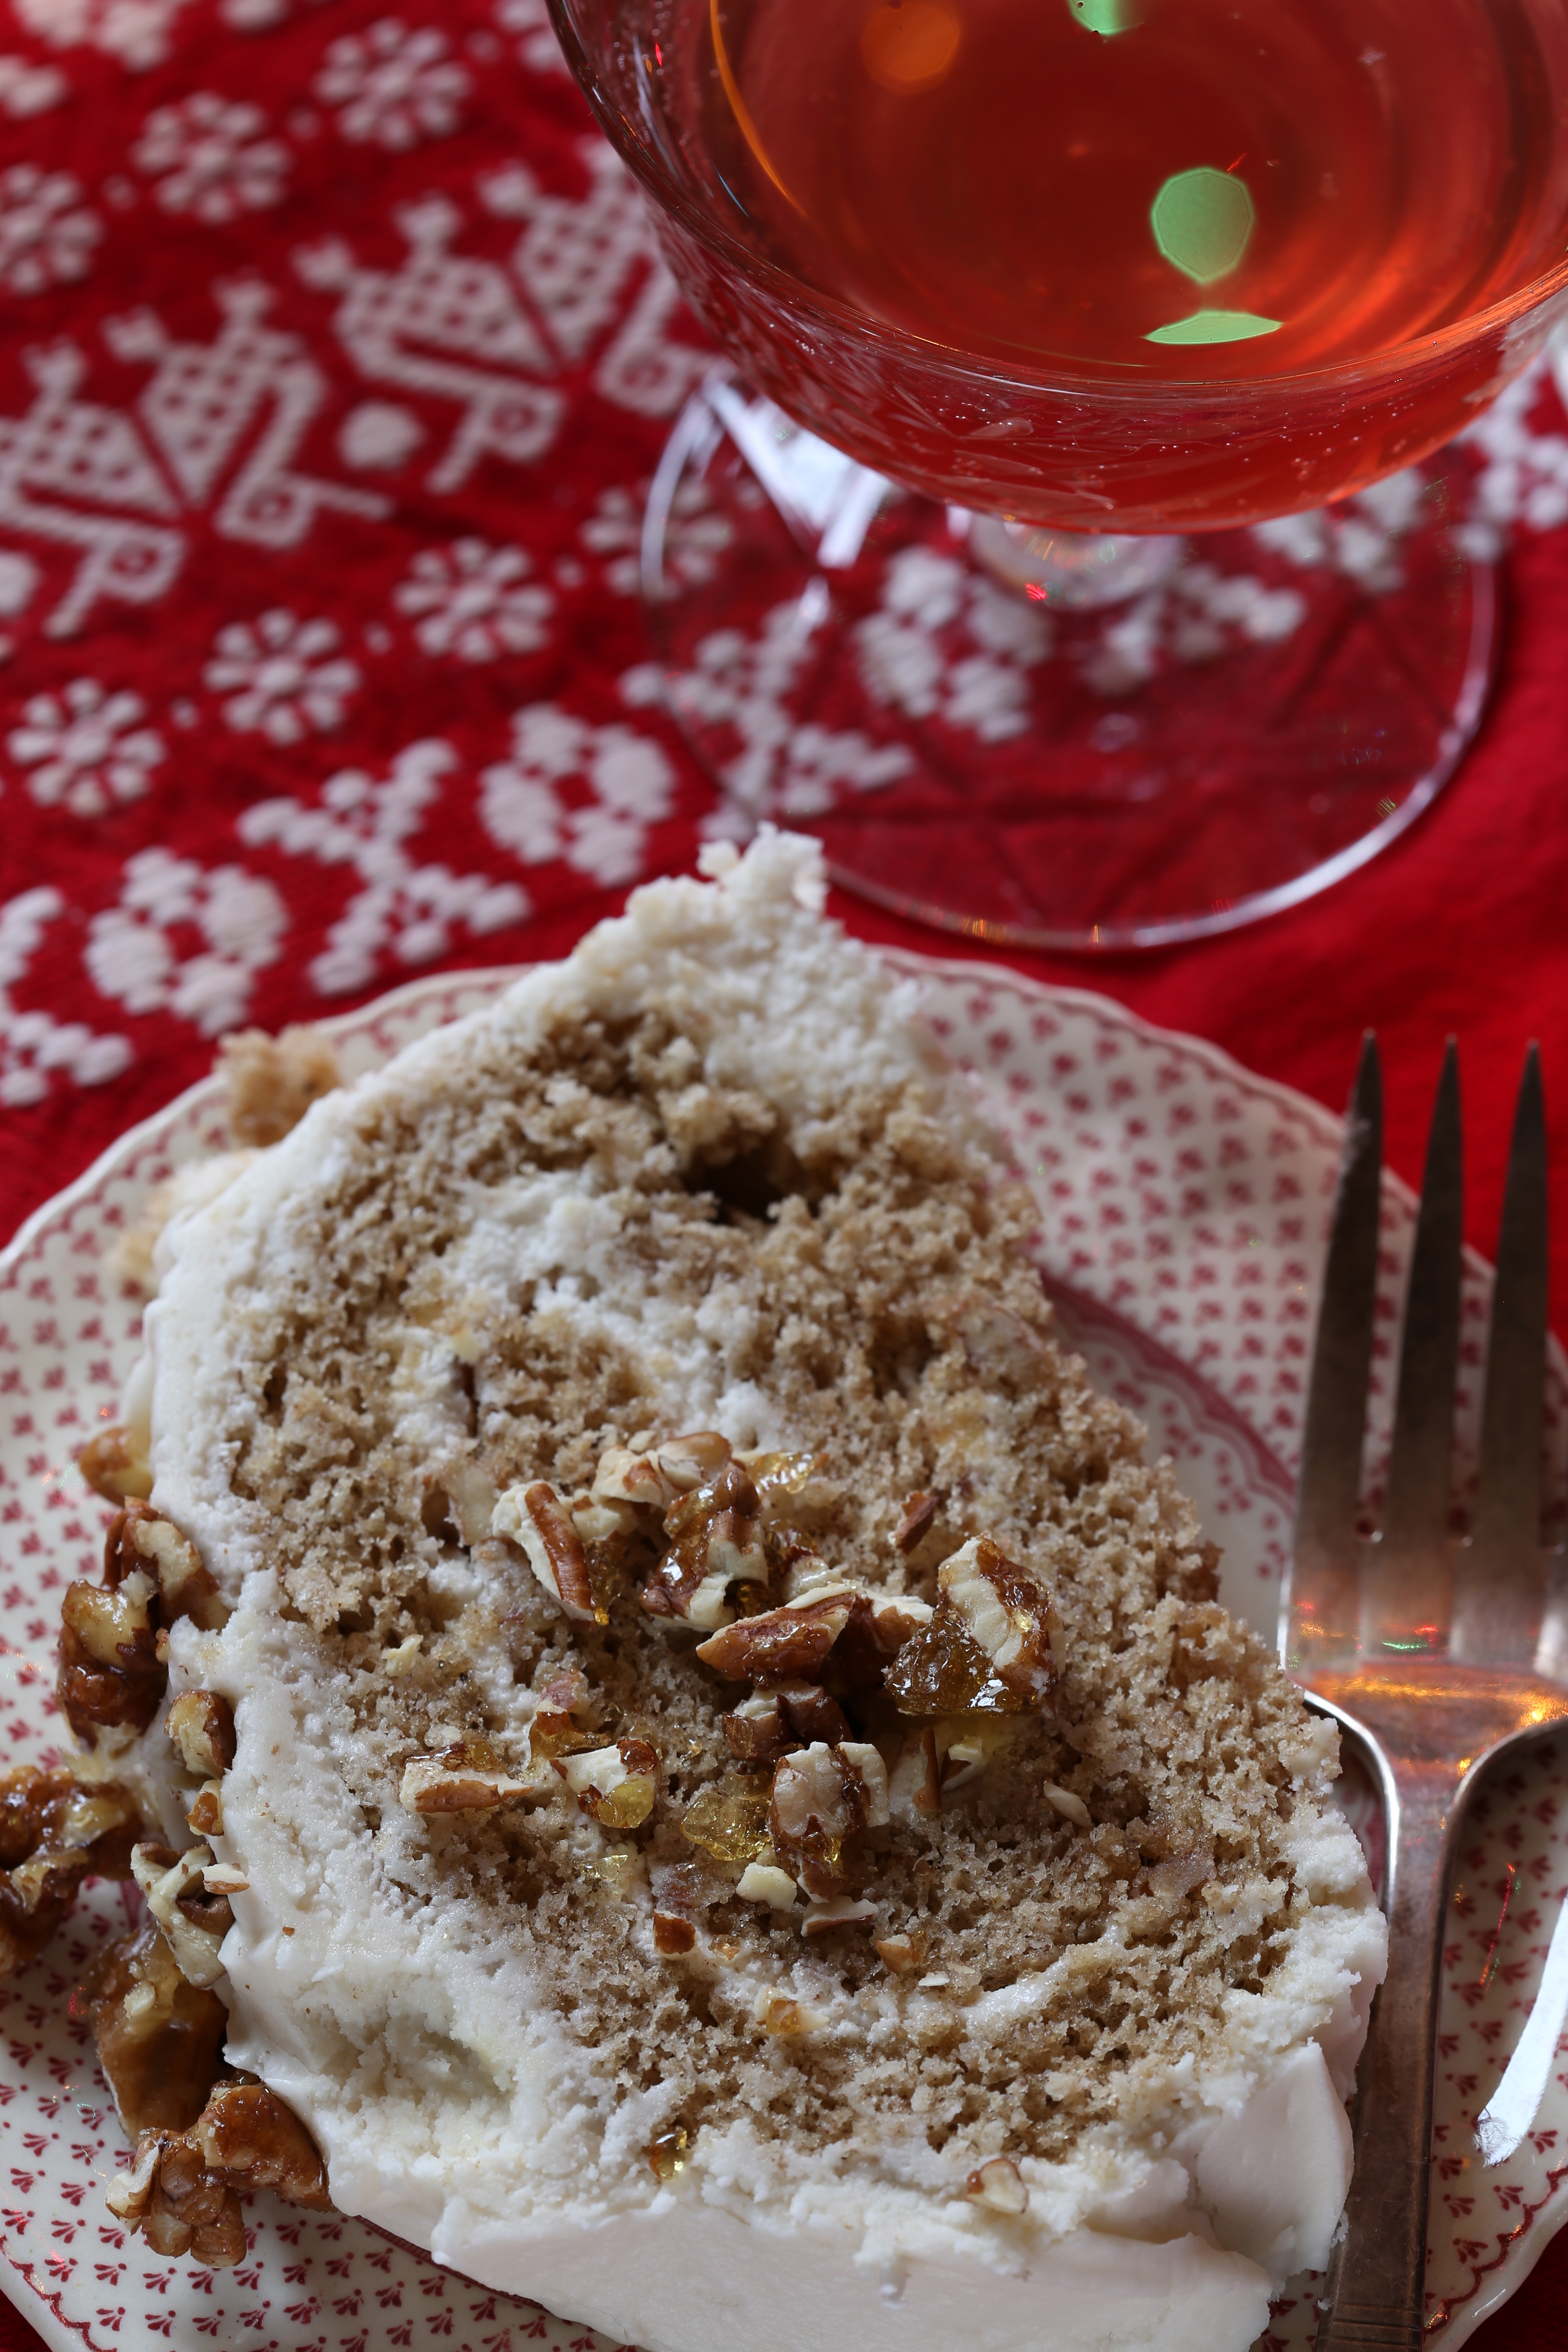
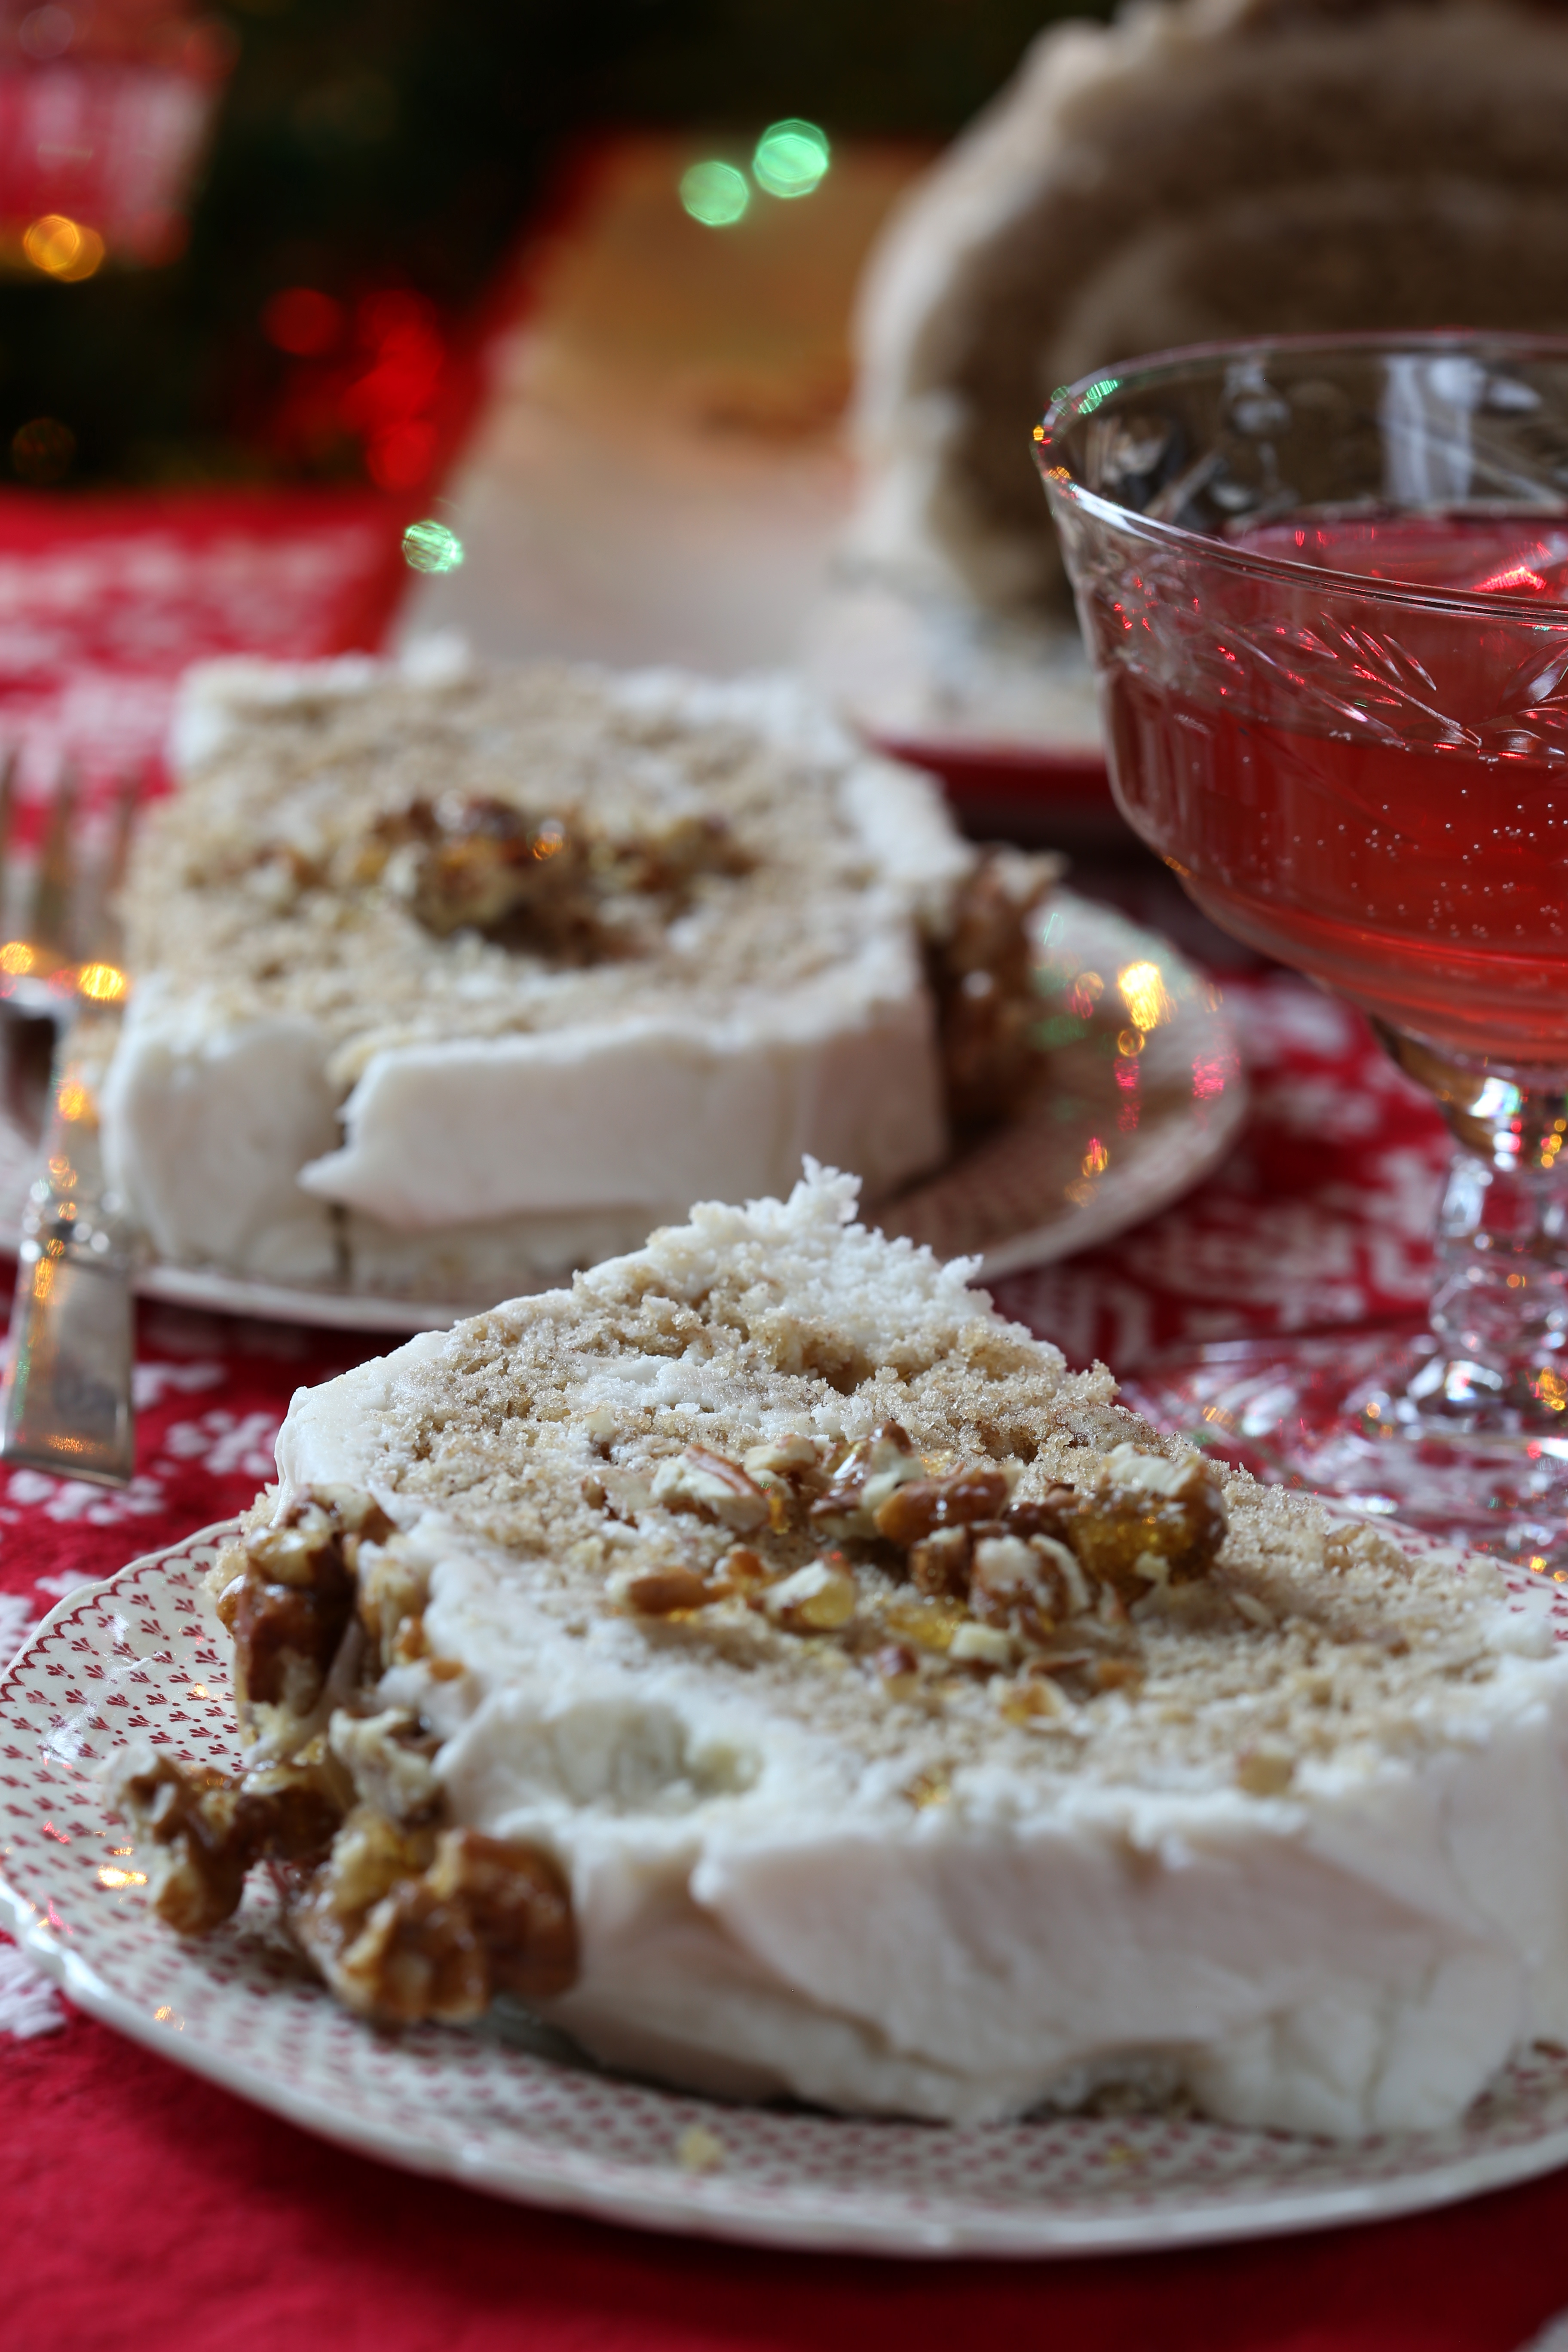
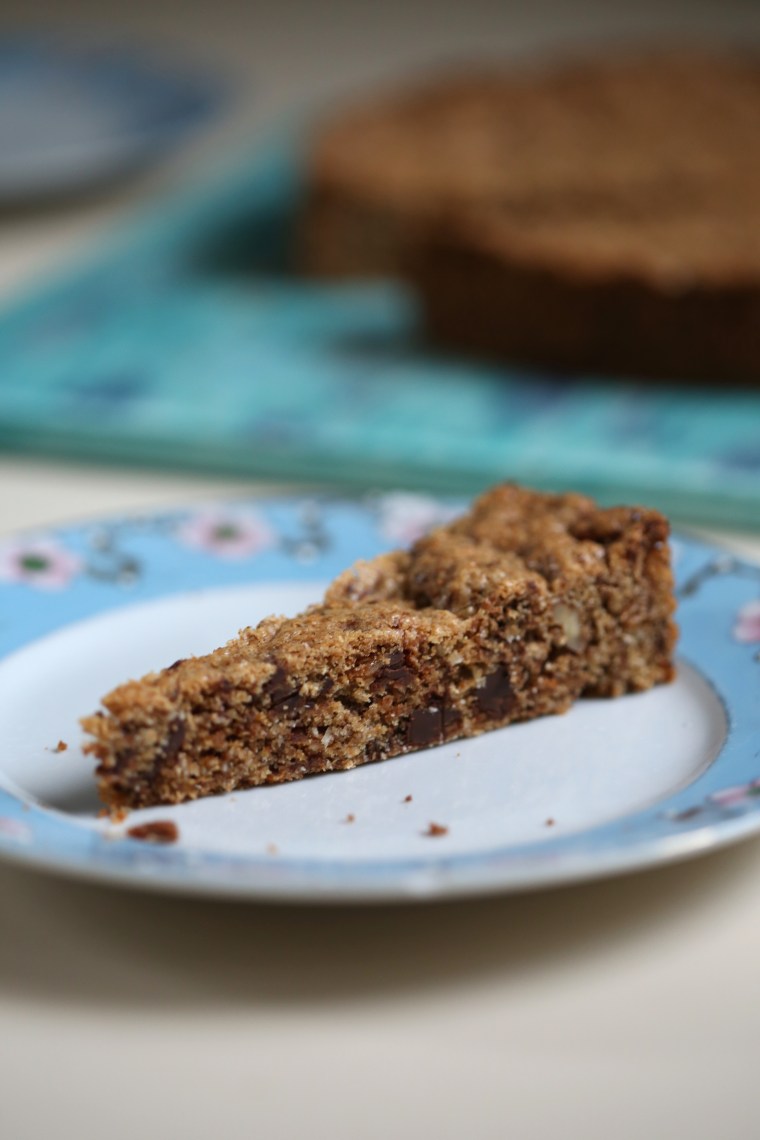
First up; granola cake.  Actually, this recipe comes from Baking Chez Moi by Dorie Greenspan and not only is it the first cake I have baked in a while, it is the first time I have been able to join the Tuesdays with Dorie bakers since we started packing up for the move.  Since we are back in Nashville, we are active with the Master Gardener program and this cake was a great choice for the potluck dinner we have each month.  Having cut the cake into thin slices, I placed the cake on the dessert table and didn’t have any trouble convincing folks to try it!

img_7318
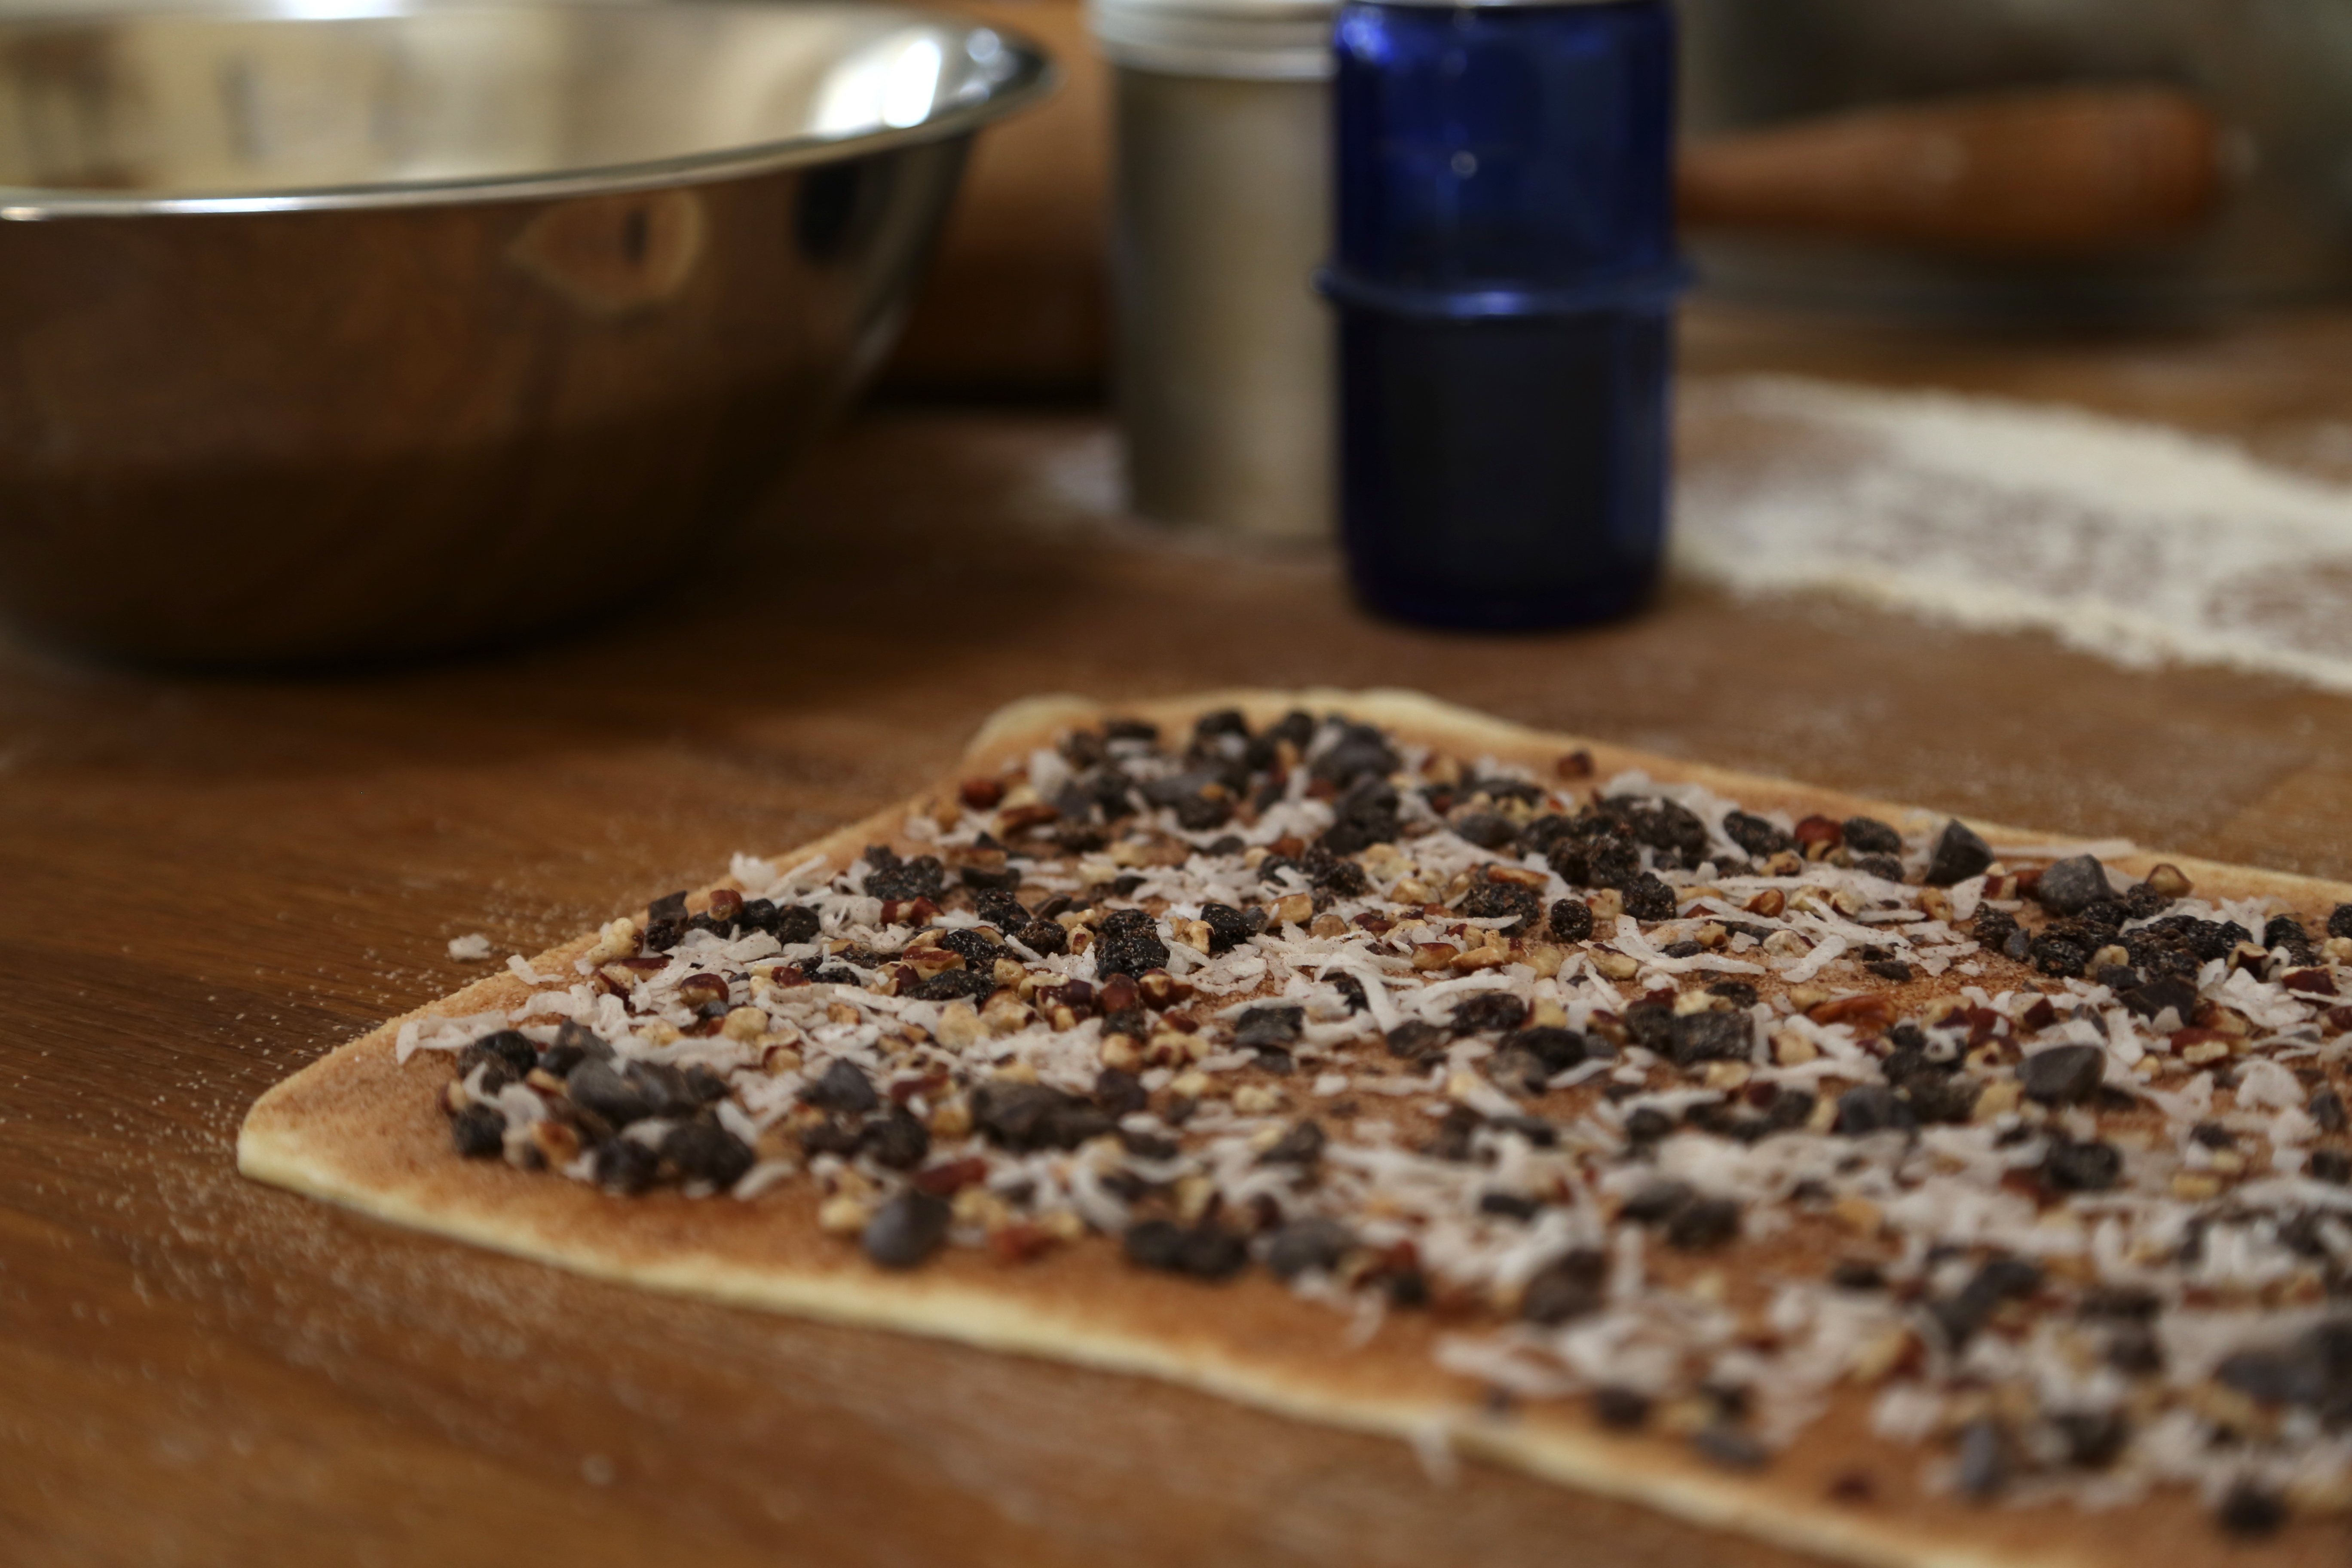
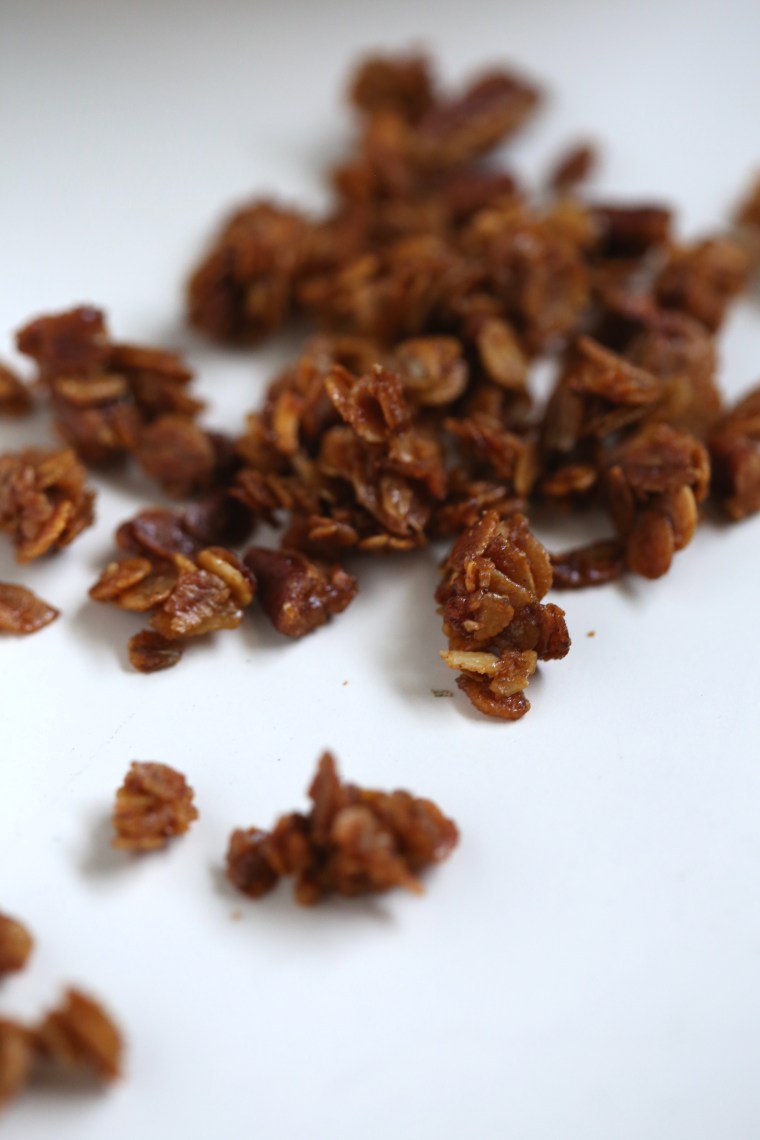
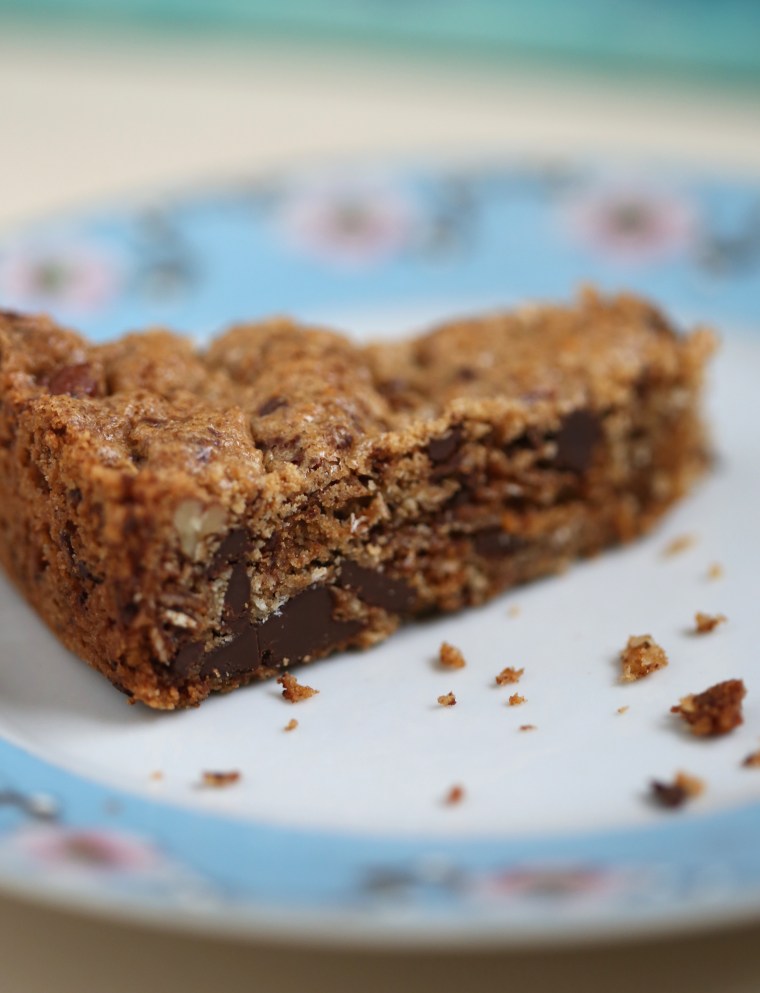
The recipe calls for bittersweet chocolate, shredded coconut and granola which all combine to make the flavor similar to an oatmeal cookie with coconut and chocolate chips.  The only thing you need to know, use a good quality granola because it is a large part of the flavor and texture of the cake.  With this in mind, I made a small batch of my own granola rather than buy it.

While I am not posting the recipe for the cake, we do not post the recipes from the book out of respect for the author, I am posting the recipe for the granola that I used in the cake.  This recipe is the one that I made for years when I was working at the Loveless Cafe and I suggest you mix up a batch-it’s that good!

img_7330Granola

This small recipe makes about 2 cups of granola and can easily be doubled or tripled, just store it airtight and use it within a month.  My preference is to use a combination of wildflower honey and sorghum but you can use just one for the total amount.  If you can’t find sorghum, molasses will work but will give it a little more color.

3/4 oz light brown sugar

1-3/4 oz pecan pieces

5 oz whole rolled oats

1/4 teaspoon cinnamon

3 tablespoons unsalted butter

1 tablespoon honey

1 tablespoon sorghum

Preheat the oven to 350. Line a baking pan with parchment paper. In a heat proof bowl, stir together the brown sugar, oats, nuts and cinnamon, set aside.  In a small pan, combine the butter, honey and sorghum and over low heat, stir until the butter melts and the mixture is heated but not boiling.  Pour the melted butter mixture over the oats and stir until it is combined.  Dump the mixture onto the prepared pan and spread it out evenly.  Bake for about 10 minutes, stir it well and continue baking for another 10 minutes or so.  The time depends on how thin the layer is in the pan.  Keep a close eye on the granola and stir it frequently until it turns a nice deep amber color.  When the granola is the color you want, remove it from the oven and let it sit for 5 minutes.  Using your hands-it will still be hot and it needs to be pretty warm for this to work, break up the granola so that it will be free flowing when it cools off.  Gently rub the clumps between your fingers to separate the large lumps-they will be pretty hard once cooled so do not be tempted to leave them in tact.  Allow it to cool completely and store it airtight.

img_7326Want to bake along with us?  Pick up a copy of the book, visit the website and get to work!

pink grapefruit tart; a tuesdays with dorie post

IMG_3138

While procrastinating, a favorite pastime of mine, I came across a list of what people were planning to give up for Lent.  My favorite answer on the list; winter.  Yes, I think giving up winter for Lent sounds like a great idea and as I sit here on my couch watching more snow fall and accumulate, I really cannot wait for winter to end!  Even so, there is one good thing to come from winter other than Christmas presents, it is actually peak season for citrus fruits.

Growing up, my mother would always treat us to grapefruits, usually white ones, and I can remember cutting them in half, pouring sugar over the top and eating the sections.  When I went out on my own, I found I preferred ruby red grapefruits to the white ones from my childhood but these days, I skip the sugar and just peel them and eat the segments.  Occasionally, I will pick up some juice but, I buy small quantities so that it does not go to waste.  However, taking those lovely fruits and making a cooked curd filled tart topped with yet more fresh grapefruit segments never really occurred to me.  After reading the recipe, I was rather skeptical that this would work for me.


IMG_3099

Even though I read the recipe before starting on this tart, I was surprised by just how much time it took to come together.  The recipe calls for using a food processor to make the dough for the tart shell, my favorite method for tart and pie dough.  My other favorite tart/pie method; using coffee filters and marbles when prebaking the shell.  Believe it or not, coffee filters are really the best choice for the task.  Parchment paper becomes brittle when baked, creases in a piece of foil can cut the shell and break it and wax paper is covered in wax-who wants that in a tart shell?  Coffee filters are very strong; they hold the weight of wet coffee as water pours through it.  If you can get restaurant sized filters, you will only need one otherwise you will need to use about 4 of the 8-12 cup filters.  The butter in the tart shell will keep the filter from sticking to the dough but if the shell is frozen and allowed to thaw before baking, give the inside of the shell a spritz of spray.  Keep in mind that the flour you rolled the dough out with and any condensation that forms on the surface make a thin layer of paste that can glue the filter in place making it difficult to remove and you could either leave some of the filter behind or it could take sections of the crust with it.  So if you are worried, err on the side of caution and give it a spritz.

Then there is the question of marbles as pie weights.  Well let’s just call them a solution to a dilemma I had; I couldn’t justify using a bag of beans or rice once and then tossing them when I remembered I had a collection of glass marbles.  The marbles stepped up to the plate and I have been using them ever since.  They conduct heat pretty well, they do not shatter in the oven-at least mine haven’t in all the years I have used them as weights and they are easy to clean.  The only down side; marbles bounce.  Trust me, if you drop them, they will bounce a few times before disappearing and finally rolling down the basement stairs for the cat to play with…Yes, I have lost a few of my marbles over the years but, I still have enough to do the job.


IMG_3146

The whole point of this post is the tart, so how did it taste?  Let’s just say that it is not my most favorite tart ever.  The use of two fillings may seem excessive but it is actually close to genius if you ask this pastry chef.  The lemon-almond filling serves to buffer the crust from the moisture of the grapefruit cremeux.  There is nothing worse than realizing that your crust is soggy and gummy from the filling!  The lemon-almond filling is almost like a frangipan and I toasted the almond flour to give it a little more flavor.  The grapefruit cremeux was extremely flavorful but I wonder if it could be made more like a curd and stiffer without the use of gelatin, something I do not enjoy working with-especially now that I do not have a microwave in my kitchen.  At first, I wondered about the addition of Campari; I was not sure of the actual flavor of it and decided to taste it and I suggest you learn from my experience and do not drink it straight.  However, I am now completely aware of why it is called “bitters” and I was shocked at how well it blended with the grapefruit flavor of the cremeux without making it bitter.

The final step is to slice up the fruit so that you have segments to work with.  Because the grapefruits are so juicy, they need to be laid out on paper towels and allowed to dry for a few hours.  The dry segments are arranged over the two fillings in the baked shell.  My fruits varied in color and I was hoping to make an ombre pattern over the top but had to settle for just two shades of pink.  All the components come together to give you a strong grapefruit flavor with creamy and sandy textures wrapped around the fresh fruit.  It was nice, but not my favorite.  Having seen a few photos of some of the other bakers tarts as they prepared them this past weekend, I thought the use of blood oranges or tangerines just for the top might have been better.  However, If I make this one again, I am thinking I might like to use fresh raspberries on top of the grapefruit cremeux.  
IMG_3163

You can see the layers; the crisp tart shell, the softer and sandy lemon-almond filling, the creamy grapefruit cremeux and the fresh grapefruit segments.  The bright flavors of winter’s bounty will have to get us through the snowy weather and cold temperatures but let this be a warning to that rodent in Pennsylvania-your days are numbered…


IMG_3151To see how the other bakers fared with this recipe, be sure to visit the Tuesdays with Dorie website.  Want to bake with us?  Pick up the book and get to work!  We post the upcoming recipes on the website and you can bake some of the recipes or all of them-you decide.  Our only request, buy the book because we do not post the recipes.

marquise au chocolat and salsa quitza; a tuesdays with dorie post

IMG_3055

After a weeks absence, I am back in the kitchen, completely.  Let’s just say that if you have the chance to avoid the flu-do it.  It has been more than 10 years since I was that sick and honestly, I hope it doesn’t happen again for a long time!  The simplicity of this recipe was the perfect way to ease back into the kitchen.

The recipe for Marquise au Chocolat makes a large, rich loaf of frozen chocolate mousse which is meant to be served in slices.  Since there are just two of us, I cut the recipe and made only a quarter of the batch and since it was so small, I made the decision to press the filling into a six-inch round cake pan that I had lined with lady fingers.  This will be the perfect little pick-me-up since I also spiked it with some single barrel Kentucky Bourbon.  Finally, a drizzle of blackberry syrup and a few plump berries and dessert is served!  Something tells me my husband will not think twice about eating this one!


IMG_3046

As I mentioned earlier, I was sick last week, came down with it all so that I was too sick to make the Salsa Quitza which was my plan for Superbowl Sunday.  We were supposed to go to a friends house to watch the game but since we were both miserable, we sprawled out on the couch and did not move all day.  Needless to say, my plan of making the quitza to bring to the party was cancelled.  If you ask me, that wasn’t such a bad thing.  Honestly, I was doubting the results as stated in the recipe and after reading the comments from plenty of the other bakers last Tuesday, I am glad I had a chance to follow my personal instincts.

The idea of spreading the dough out into a large cake pan and topping it with cream cheese had me thinking it would be messy to eat and for the two of us, just too cheesey.  My bakers sense (kinda like Spiderman’s “spidey” sense…) had me thinking it would make a nice focaccia.  Guess what-it did!  With just half a batch of dough, I made a quarter sheet pan sized piece of focaccia that was the perfect side dish for our dinner of grilled swordfish and salad.

IMG_3042If you want to make this the way I did, use blue corn meal.  Believe it or not, it doesn’t lend any color to the dough but it does add a nice nutty flavor along with dark flecks and crunch.  Several bakers commented on the salsa being really wet and I honestly think that the recipe probably should call for “pico de gallo” and not chunky salsa.  If you aren’t familiar with pico de gallo, it is a fresh mixture of finely chopped tomatoes, peppers, onions and cilantro with lemon juice.  I measured out nearly a cup and let it sit in a strainer for about an hour to drip dry and then sprinkled it over the top of the dough after shaping.  A generous topping of shredded Mexican cheeses over the salsa and then into the oven it went.  It baked up fast, just 20 minutes and it was done.  After cooling for a while, I sliced off strips and cut them into diamonds; two-bite pieces to pair with dinner.

The dough itself was fairly easy to make with a mixer if you do not have a bread machine.  It was a bit soft and sticky but after mixing it for about 2 minutes, I turned the mixer off and let the dough sit in the bowl for 10 minutes.  This rest, autolyse is the technical term, let the dough absorb all of moisture and as a result, it was not quite as sticky as it could have been.  This is definitely a dough recipe worth having in my repertoire.  It just might make another appearance in my kitchen.

To see what the other bakers came up with, visit the Tuesdays with Dorie website and look for the LYL (leave your links) page.  If this seems interesting to you, consider baking along with us as we prepare each of the recipes in Baking with Julia and Baking Chez Moi.  You will have to purchase or borrow the books if you do not already have them; out of respect for the author, we do not publish the recipes!

brown butter and vanilla bean weekend cake; a tuesdays with dorie post

IMG_2932

Another dreary, rainy weekend, but it still put a smile on my face.  For a change, I would have perfectly diffused light to take photos.  As I rummaged through drawers searching for the exact linens needed, I came across an envelope.  Tucked inside was a pretty little square of Swedish bobbin lace that my mother-in-law brought home from one of her trips to Europe.  For years, that envelope has made appearances as I shuffled things from drawer to drawer and today, with a flash of inspiration I can only blame on the rain, I thought it would be the perfect stencil for my cake.

The recipe for the cake calls for baking it in a 9″x5″ loaf pan but I wanted to make just half the batter-which is still too much for the two of us.  After picking through boxes and pans, I settled on a small granite-ware skillet which would make a nice, round cake; a perfectly boring round cake…Luckily, with that flash of brilliance and a tub of powdered sugar, the cake would be anything but ordinary in appearance. 
IMG_2931

While I have no idea how bobbin lace is made, I am envious of those who are skilled in the craft.  The photos I have seen show slender, intricately carved bobbins made from wood or bone and weighted with spangles of glass beads as well as pins, lots of pins.  The work is intricate and obviously time-consuming but the results are lovely and delicate; a true work of art.


IMG_2933

A lucky break-the square fit perfectly over the cake and left very little space uncovered.  The hearts are my favorite part of the design.  The way the threads between them make a star or a flower depends on how you look at it.


IMG_2948

Sifting powdered sugar using a large wire mesh is the best method.  If tapped gently, you can cover a large area with a fine layer of sugar.


IMG_2950

Now for the tricky part, removing the lace without ruining the pattern.  This is a one and done method.  If it doesn’t work the first time, it is unfortunate because once there is some sugar on the surface, you can not move the lace and try again.  With fingers crossed, I gently lifted the lace making an effort not to smear the design or dump any of the excess sugar off the lace and onto the surface of the cake.


IMG_2953

It truly was my lucky day!  Not only did the design transfer well, I was able to lift the lace without incident!!!


IMG_2956

The flower pattern between the hearts transferred nicely and so did the delicate scalloped edge.  But that square in the center…I just love the little beads of sugar and that barely there dusting in the center.  This may not be what the lace was intended for but I can say that I will use it again.


IMG_2959It almost seemed sacrilegious to cut it but I have no will power where cake is concerned!  So how did it taste?  Well, the recipe calls for browning the butter and I did that, but I think I should have gone a little further with it.  Since my supply of vanilla beans is really sparse and I am not sure of a reasonably priced local source, I decided to go with vanilla extract and because we did not have any rum, I used the next best thing, bourbon.  In my opinion, it could use more flavor and I do not think it is worth sacrificing a vanilla bean to get that extra punch.  Personally, I think a little more butter, maybe an extra tablespoon, browned to a color no less than my tabletop in the photo would help add flavor and a little more moisture.  Also, the added fat can help prevent the gluten from developing as the flour is mixed in; my cake had tunnels in it that I am sure were caused by over mixing when I whisked in the flour as directed by the recipe.  The amount of vanilla extract initially seemed excessive but now, maybe not, however, it was strong enough that the bourbon was not noticeable.  In the future, I might cut the vanilla by 25% and increase the bourbon by 50%.  This is a recipe that I can see myself using again when I need a simple cake and because it is basically a blank slate, I can also see it being the base of a shortcake or part of a trifle.  And lastly, serving it plain with a simple dusting of sugar is good but I have a feeling it could also stand up to being slathered with buttercream frosting.

If you enjoy reading my Tuesdays with Dorie posts, be sure to visit the website and look for the “LYL” post to see how the other bakers made out with the recipe, and if you are feeling left out, JOIN US!!!  Pick up a copy of Baking Chez Moi or Baking with Julia and bake along with us as we work towards our goal of baking every recipe in the two books.

tuesdays with dorie

Mixed starter bread from Baking with Julia, baked in early December 2014.

Each Tuesday, the members of the Tuesdays with Dorie blogging group post photos and comments on the challenge of the week.  If you are not familiar with the group, we are currently baking our way through two of Dorie Greenspan’s books; Baking with Julia and Baking Chez Moi.  The recipes are chosen by the members each month and we post them on alternating Tuesdays, two recipes from each book.

This week, we are posting about our experiences with the Inside-out, Upside-down Tiramisu recipe from Baking with Julia.  However, I chose not to make this recipe.  Crazy, I know, but over the years, I have made so many batches of tiramisu that I just did not want to make it.  We just do not eat that much dairy and with just the two of us, I could not see the point in making it.

Fear not, I will be back again for the second Baking with Julia recipe this month because I love rye bread and the scheduled recipe is the Eastern European Rye bread on page 98.  As I mentioned above, I also participate in the Baking Chez Moi recipe challenges and next week, we are baking the Granola Energy Bars on page 328 and they sound interesting enough to me that I am looking forward to the results.

If you are interested in baking along, pick up a copy of either book and visit the website to see the schedule.  Be sure to visit the website each Tuesday and look for the “leave your links” post to read the experiences of all the participants.  Not only will you get tips and tricks to use when baking, you will get first hand reviews of each recipe, insider information if you will.  However, you will have to buy or borrow the books, we make it a rule not to publish the recipes.  Join us, we’d love to have you bake along with us!

gingerbread buche de noel; a tuesdays with dorie post

IMG_2398

To keep it seasonal, the Tuesdays with Dorie bakers chose to make the Buche de Noel from Baking Chez Moi.  This traditional holiday cake roll is frequently decorated to look like a tree log complete with textured bark, leaves, pinecones and even mushrooms.  Thankfully, this rendition was much simpler and the only ode to the holiday was the gingerbread spices added to the cake.

Just as you might expect, the holidays came and went faster than anyone could believe was possible.  Why is that?  Why are we in such a rush to get it done, get it finished so quickly that we scarcely have time to enjoy it?  Whatever the reason, I propose that shift it into slow gear for next year, I would really like to enjoy the day a little more!  Regardless, I finally had a chance to get the Buche de Noel finished although, it was two days after Christmas; better late than never, right?


IMG_2395For those of us who work in or have worked in bakeries, we know that Yule log cakes are pretty common.  Usually, it is a yellow cake spread with a thin layer of chocolate filling and rolled up so that a slice resembles the rings in a tree log.  The recipe in Baking Chez Moi is unusual in that the filling is simply a mixture of cream cheese and butter sweetened only with a small amount of finely chopped pecan praline.  The differences continue with the use of a marshmallow frosting and a sprinkling of coarsely chopped praline pieces.   Somehow, the idea of spreading a mixture of cream cheese and butter into a delicate sponge cake seemed a little heavy to me and I knew I would be making changes.  My choice was to whip up a nice, fluffy batch of cream cheese frosting and I am glad i did;  we thought it was the perfect filling and frosting for my Buche de Noel.

However, before I could do anything, I needed to get the cake baked and that my friends, was just the beginning of my troubles!  To get things started, I decided to make the cake using my hand mixer because all of the parts of my stand mixer were in the dishwasher.  Can I just say that using a hand mixer is not an option when making a genoise.  No matter how much I whipped, with the beaters first and then the whip attachment, the eggs and brown sugar just never formed a ribbon which is essential for a genoise.  In my opinion, the use of brown sugar did not help since I feel it affected the ph balance of the mixture and prevented the eggs from reaching the proper ribbon stage.

My solution to the whole matter was to make the cake a second time but with a different method.  First of all, I used room temperature eggs and white sugar.  Heating the eggs and sugar and whipping them on high-speed is the common approach but my experience is that a better, stronger structure is formed from room temperature eggs whipped a little slower.  Brown sugar is tricky to use in this instance simply because every brand is different.  Have you ever held the different bags together and looked at the colors of them?   Even bags from the same manufacturer can be a different shade when compared side by side.  There just does not seem to be a true standard of color for light and dark brown sugar.  In my book, it makes brown sugar a bit of a wild card and not my first choice for a recipe as fickle as a genoise.  The fact that my first cake turned out to be a two toned sheet of rubber confirmed my suspicions and not only will I not use brown sugar but I will also not ever try this with a hand mixer either!!

IMG_2391

With a fluffy sheet of genoise cake subtly spiced with ginger, cinnamon, cardamom, cloves and black pepper, I set to work on rolling the sheet as per the directions.  Can somebody please tell me why this is done?  Over the years, I have made many rolls of cake without ever pre-rolling a single one.  I’m sorry but if you ask me, it is a bad move.  Just as I suspected, the cake cracked into pieces when I unrolled it to fill it.  This really annoyed me after the trouble I had with the cake itself.  In the future, I will store my layers in the fridge flat-out on a pan until I need them.  As it was, I carefully spread some of my cream cheese frosting over the cake taking care not to damage it any further.  To keep it in the spirit of the original recipe, I sprinkled the finely chopped praline over the frosting and rolled the cake back up.  Then to finish it off, I spread a generous layer of frosting over the entire log and topped it all of with the remaining praline pieces.


IMG_2388

We enjoyed thick slabs of the cake topped with sprinkles of praline while sitting by the fire, the room glowing from the lights of the tree.  Finally, we had the chance to enjoy Christmas, too bad it wasn’t until a few days later…

So, here’s to a happy and prosperous New Year!  Check out the Tuesdays with Dorie page to see how all of the other bakers made out with the recipe! 
IMG_2396

the rugelach that won over France; a tuesdays with dorie post

IMG_2207I have been baking rugelach for at least 25 years.  It all started when I worked in a bakery just north of Sausalito, California.  We did everything by hand there and the rugelach dough was rolled out into large circles, topped with butter, cinnamon sugar, chopped walnuts and currants.  Each round was cut into 12 wedges and then rolled up into crescents.  We made them by the hundreds and after the first taste, I was hooked.

Over the years, I have made rugelach to sell in my bakery and to give as gifts during the holidays.  While the purpose of making them has changed from time to time, one thing hasn’t, the filling; I always made them with the same combination of ingredients that I first learned years ago.  Whenever I would see them for sale with jam fillings, I was always so excited by the choices but in reality, disappointed by the results.  I’ve always thought that cinnamon sugar, walnuts (or pecans) and currants make the perfect filling but this week’s recipe for the Tuesdays with Dorie bakers put that filling combination to the test.

Upon reading the ingredient list for the filling, I was completely skeptical, a little worried actually; my mother was visiting and she would be tasting them too.  While sharing rugelach with your mom sounds harmless, keep in mind that rugelach is one of her favorite things and she likes them the way I make them; no filling upgrades needed or wanted.  How could I possibly dump chocolate, coconut and cherries into her idea of perfection?  So I compromised.  After mixing up a double batch of dough so I could send mom home with a plate of goodies, I rolled out the first portion with cinnamon sugar, pecans and currants.  For the second portion, I combined cinnamon sugar, coconut and chocolate chips.

The directions call for rolling out a very thin sheet of dough that is 12″x6″ and then topped and shaped into a foot long spiral that is about an inch or so thick as well as tall.  If you cut them as instructed, you get a lot of single bite pastries making this a great treat to give as gifts or share at a cookie swap.  But for rugelach connoisseurs like us, bite sized wasn’t going to cut it.

IMG_2152

The secret to perfect rugelach, use lots of flour to roll it out but brush it off both sides or it will make them taste doughy.

IMG_2146

As I mentioned, I compromised, I added currants rather than cherries but kept the coconut, pecans and chocolate and spread them over a liberal dusting of cinnamon sugar.

IMG_2155

In my opinion, the more pronounced the spiral, the better the flavors blend.  To achieve this, I rolled out the rectangle of dough a little wider so that mine was about 12″x 8″ and only about 1/8″ thick.  Despite this fact, the dough was still cool enough to work with and it rolled up easily.

IMG_2151

One step I completely eliminated was to freeze the rolled and filled dough.  Honestly, that sounded like a disaster waiting to happen.  With my spiral still on the table, I quickly cut it into thick slices, on the bias.  This change affected the yield greatly; my batch of dough only made about 18 thick slices.

IMG_2165

One other change I made, no egg wash.  The leftover melted butter wasn’t going to be wasted on my watch and I brushed it over each roll along with a dusting of cinnamon sugar before they went into the oven.

IMG_2169

Once again, the recipe called for baking the rolls at 400F and that worried me.  When I prepared the last Baking Chez Moi recipe, Cranberry Crackle Tart, the instructions to bake at 400F turned out badly for me.  Perhaps the oven in our new home is a little hot, or maybe Dorie’s oven is a little cool, either way, I wasn’t taking any chances and I baked them at 375F.  Oddly enough, at this temperature, they baked in the time called for in the recipe.  Looks like I will be paying close attention to the oven temperature in the recipes from now on!

IMG_2199And as Dorie suggests, the perfect companion to a cup of tea on a dreary winter day.

To see what the other bakers came up with, be sure to visit the Tuesdays with Dorie website and if you like, buy one of the two books we are baking from and bake along with us!

cranberry crackle tart; a tuesdays with dorie post

IMG_2028

Cranberries are a vital part of the holiday season for many Americans.  In my family, we cook them up into a sweet sauce flavored with oranges, vanilla bean and spices and the kids eat them by the bowl full.  It is one tradition that I really will miss this holiday season.  We relocated from Nashville to Williamsburg and our family group that gathered together each Thanksgiving and Christmas is now separated by nearly 700 miles.  Even so, I couldn’t resist buying a bag or two, or four of cranberries and had to find a tasty way to use so many fresh cranberries.  Thankfully, this recipe used more than half of a bag, and now I only have 3 and a half more bags in the fridge…

The recipe gives you some good options and I decided to test some of them out.  With two different dough recipes to choose from,  I decided to mix up a batch of the sweet tart dough and as I mixed it, I chose to follow the recipe suggested in the “Bonne Idee” sidebar; it gave the option of using a small portion nut flour in place of the all purpose flour called for in the recipe.  It was quick to mix up in the food processor but I really think the amount of dough it produces was about double what was needed to make the pie shell.  As a result, I formed a patty with the leftover dough and tucked it away in the freezer.

As a person who literally has rolled out hundreds of pie shells by hand, this dough was very pleasant to work with and I did not have any sticking or crumbling or tearing.  It was so easy to work with that I had the crust rolled and in the pan in a matter of minutes.  Where I had issues, the baking time.  When I read the instructions and saw 20 minutes at 400, I was skeptical, it seemed like a long time for such a high temp.  In hindsight, I wish I had listened to my inner voice.  My crust came out of the oven a little black around the edges.  Luckily, I had not trimmed it down by one-third as the recipe called for and had enough to trim away the burnt edges and still have a side crust.

The filling of a marshmallowy meringue was such a small amount that I had trouble mixing it in my 6qt kitchen aid bowl; it just wasn’t enough volume for the beater to really come in contact with it at first.  After a really long time, it finally came together.  Since I did not want to buy any jam-I have two dozen jars of homemade blackberry jelly in my pantry, I just used some of my own from the open jar in the fridge.

As the tart baked in the oven, it puffed and cracked and finally, it was a nice, light golden shade and had a few deep cracks across the top. Carefully, I removed the pan from the oven, closed the door and set it down to cool.  A quick glance at the clock, 11:12pm; we wouldn’t be tasting this pie tonight.  Off to bed, to sleep and to dream of crunchy, crackly meringue and tart pockets of ruby red berries…

IMG_2029

palets de dames, lille style: a tuesdays with dorie post

Can you believe that it has been more than two years since we began working our way through Baking With Julia?  Twice a month we prepare a recipe from the book and it has been a lot of fun to try all the different techniques.  When the Tuesdays With Dorie gals announced that we would also be baking from Dorie’s new book, Baking Chez Moi, I did not hesitate to order a copy of the book.
For our first recipe, we chose palets de dames, lille style.  To see the recipe, I always encourage folks to support the author by purchasing a copy or borrowing the book from a library, but the recipe has been available on the amazon.com page for the book.
Let me first say that not only do I love the simple but elegant look of the cookies, I really love the fact that the recipe is an easy one!  The directions were easy to follow and the results were exactly as described.  While it may not seem like much to rave about, I am baking in a new kitchen with an electric range and it is almost like learning all over again.  

 Follow Dorie’s advice and use a scoop to portion the cookies.  Trust me, not only will it be much quicker and less messy than rolling the dough into little balls but the cookies will be much more consistent in size.  That little hint will keep you from having overbaked and underbaked cookies on the same tray.

To dip the cookies in white glaze was too easy, almost boring if you ask me.  So just to make them a little more colorful, I tinted the glaze with a bit of purple hoping for a nice lavender shade.  Let me just say that no matter how hard you try, it almost always ends up looking a little too much like grey. To prevent that from happening, I also added a tiny amount of red to the mix.   A little sprinkle of clear sugar crystals on top gives them a bit of sparkle too!

If you add sugar crystals, let the glaze set a bit until it is just a little tacky.  If you put it on immediately, it sinks in and doesn’t sparkle.  To see what I mean, compare the cookies at the top of the photo to the ones on the bottom.

So, this is all fine and dandy but the true test is tasting them.  Drum roll…Yeah, well, not my favorite cookie.  Hard to say but I really wanted these cookies to be incredibly good but all I tasted was sweet.  The texture is nice, almost cakey but to be honest, I just do not see how a 1/4 teaspoon of vanilla could have added any flavor to the dough.  Usually, I tend to change or add flavors but this time, I followed the recipe exactly as written.  If I make these again, and I probably will because they are great for gift giving, I would pump up the flavor to a teaspoon of vanilla or even rosewater or add some freshly grated lemon zest.

The only part of the recipe that did not work out for me was the glaze.  The 1 1/2 tablespoon of milk called for was something I did not have so I subbed half and half.  The glaze required more like 2 tablespoons and even so, I still had about a dozen cookies without glaze.  Since the cookies reminded me of a childhood favorite, New York Black and Whites, I decided to mix up white and chocolate glazes to finish the batch; a perfect solution to my dilemma!

Not sure what a black and white is?  You can read about the history of them in this article by Robert Sietsema.  To make a batch of your own, use the palet de dames cookie recipe and mix up some chocolate and vanilla glazes or try this recipe from the New York Times.

In the meantime, be sure to visit the Tuesdays with Dorie page to see what the other bakers came up with!