 Each holiday seems to have a specific dessert associated with it. For me, Easter always brings visions of coconut cakes smothered in shredded coconut, Christmas calls out for cookies of all kinds and Thanksgiving is the day that pies are front and center of the dessert table. No pie is more synonymous with Thanksgiving than Pumpkin Pie and with the current proliferation of all things pumpkin spice, I have decided not to include it in this small collection of recipes and instead, focus on a few others that are guaranteed crowd pleasers!
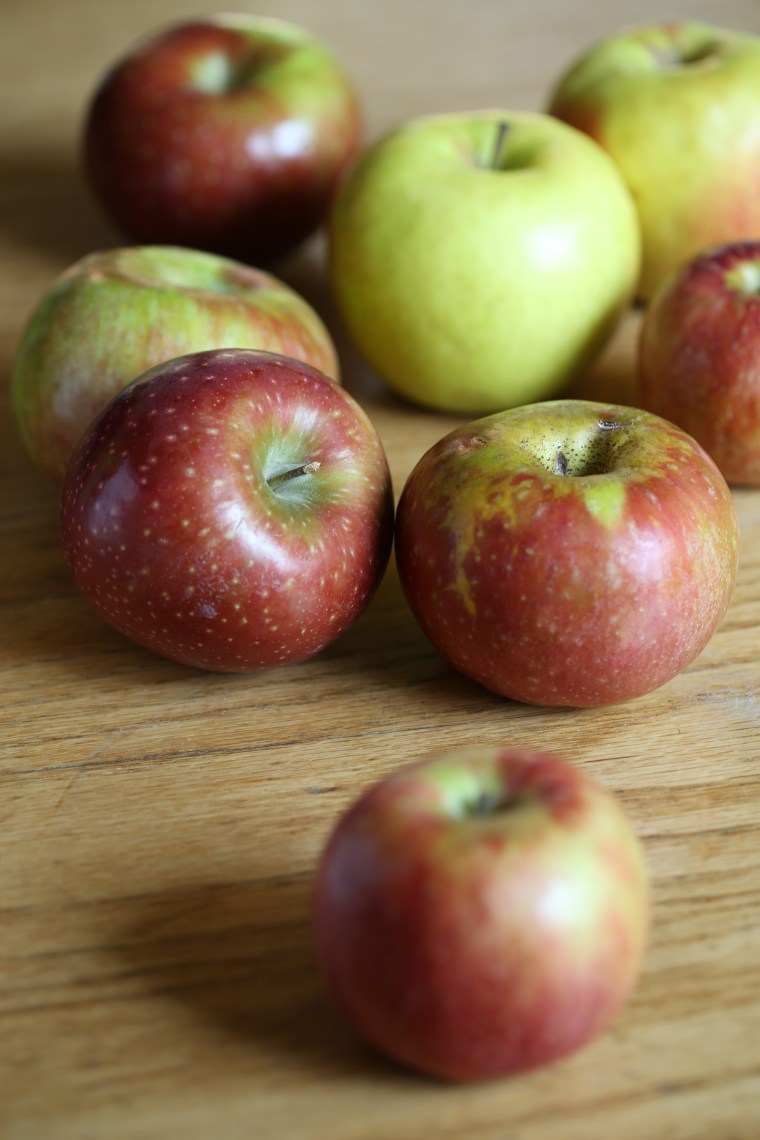
Right about the time of the onslaught of pumpkin spice laden goods, apples come into season. While just about every pumpkin pie is based on a creamy, custard based filling recipe, apple pies are much more flexible. Pumpkin is pumpkin but each variety of apple has its own characteristics and by simply switching out varieties, you can completely change the flavor of the filling. Personally, I prefer to blend apple varieties to create a full flavored pie that has plenty of juice to keep the pie from being dry and enough heft in the slices to prevent them all from falling apart while they bake.
 The skins of an apple contain pectin, which will make wonderful sauce or jelly, but is tough and chewy once baked, so be sure to peel and slice the apples as you make the filling. Do not worry about the browning that might occur because the sugar and spice will camouflage the color.
 For this pie, I chose Rome, Cortland and Golden Delicious. Each one had flesh of a slightly different color. The yellow hue of the Golden Delicious apples made the slices resemble rutabegas! The Cortlands were a bit green and the Romes were bright white. The texture and flavor of each was also different and ranged from crispy and tart to soft and sweet with a lovely scent. If you aren’t sure of what varieties are suitable for pie, this comprehensive chart from Pick Your Own will be very helpful.
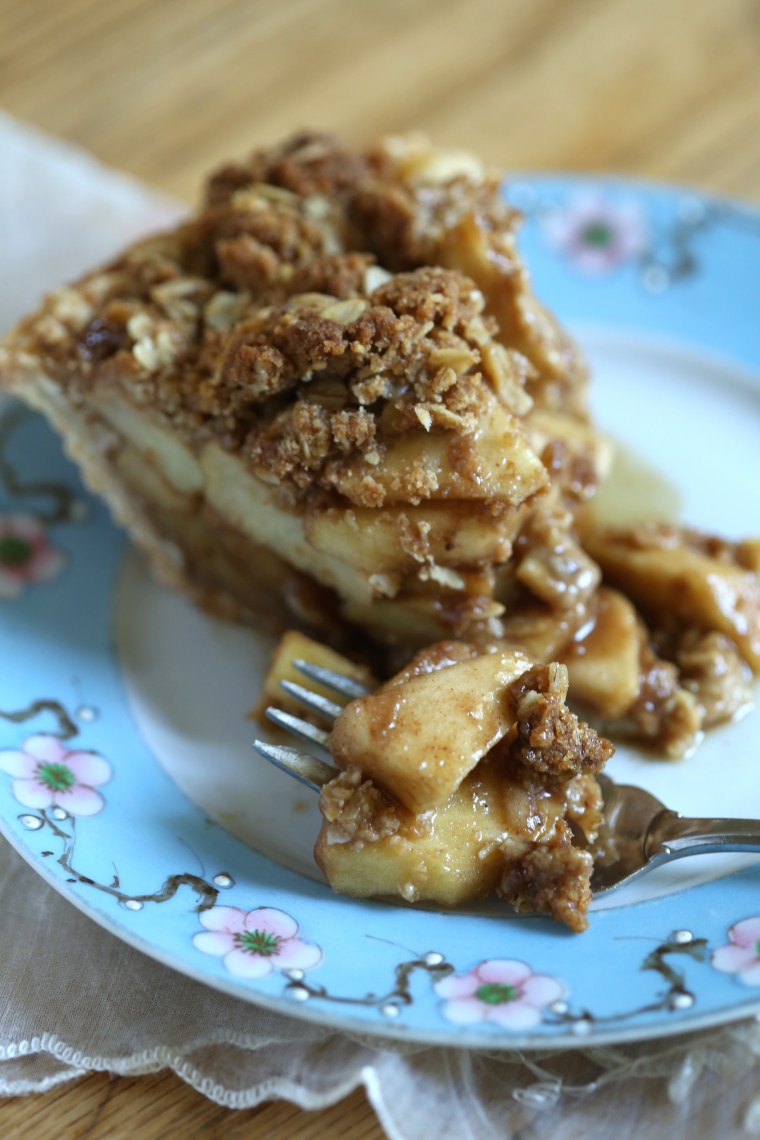
 With my kitchen packed up for the move, my options were limited and I decided to skip the top crust and just go with a streusel topping. That dome of apples looks a bit ridiculous but the truth is that the apples used for pies always juice out and collapse a bit in the baking. For this monster, I had two and a half pounds of apple slices in the fillings-something I do not recommend for a 9″ crust! For a pie that size, don’t go over two pounds.
One other thing I would like to mention, if you are intimidated by the idea of making your own crust or simply do not have the time or desire, don’t make one-buy one! Usually, I mix up a large batch of dough divide it into the portion, roll out what I need for the pie I am baking and then freeze the leftovers. This way, I always have a stash of dough to pull from the freezer any time I want to bake a pie. Because we are in the process of a long distance move, I have run through my stash and had to purchase a crust for this pie.
 A spicy crumb topping is a quick way to dress up a pie and to add a little crunch to the texture along with flavor. It is also a lot easier to handle than a top crust which makes it the perfect solution if you are not keen on working with pie dough. The recipe included with this post is one of my favorite crumb toppings and it works just as well on cobblers, crisps, muffins and coffee cakes as it does on this pie so be sure to keep it handy!
 Crumb Topped Apple Pie
makes one 9 inch pie, serving 8-10
2 pounds fresh apple slices-any variety suitable for baking
8 ounces brown sugar
2 tablespoons of apple (or pumpkin) pie spice or you can blend your own spices by combining 1 tablespoon cinnamon, 1 teaspoon nutmeg, 1 teaspoon ginger, 1/2 teaspoon cardamom and 1/2 teaspoon cloves
1/4 cup all purpose flour or 2 tablespoons corn starch if you prefer starch to flour
Preheat the oven to 350. On a sturdy baking sheet that will not warp and buckle in the oven, place a sheet of parchment paper and give it a spritz of grease. Toss the apple slices with the sugar, spices and flour and pour it into the crust. Cover it with the crumb topping, pressing it down lightly to pack it and to prevent it from falling off. Put the pie onto the prepared baking pan and bake the pie until the juices are bubbling and have thickened, about 1 hour to 1 hour and 15 minutes. Allow the pie to cool until room temp so that the juices set and it will be much easier to slice.
My Favorite Crumb Topping
1/2 cup unbleached all purpose flour
1/2 cup rolled oats
1/3 cup dark brown sugar (honestly, can be light or white, I just prefer dark)
1/2 teaspoon cinnamon or apple/pumpkin pie spice blend
1/8 teaspoon baking soda, optional-using it will make the crumbs lighter, omitting it will keep them crunchy


To call this a collection, I must include other recipes and these are two of my absolute favorite pies! Rather than print the recipes here, I am including the links to my food52.com page; Masala Spiced Pear Pie with a lattice top and Roasted Butternut-Maple Pie with Smoked Pecans
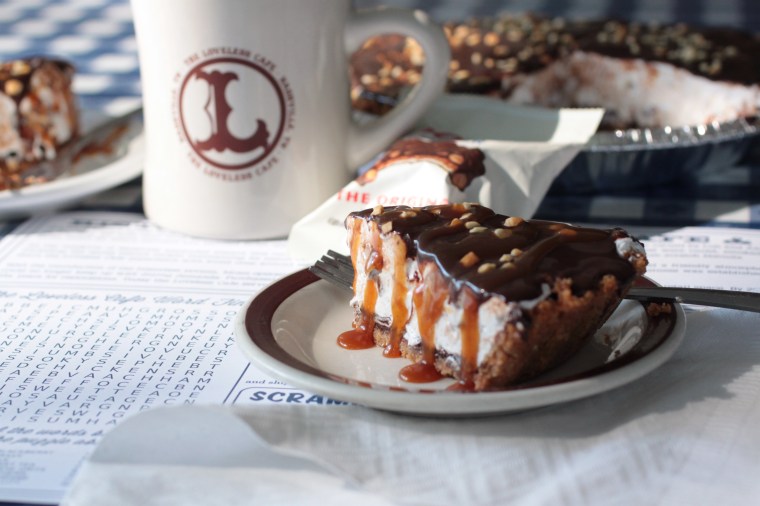 For the adventurous bakers, this gem from my days as the pastry chef of the Loveless Cafe, a Goo Goo Cluster Marshmallow pie is an unbaked pie but it does require making the crust, a ganache and a cooked marshmallow filling. While a little time consuming, it is well worth the effort if you are a marshmallow fan, the recipe is also posted on my food52.com page and can be found here. If you can’t find Goo Goo Clusters, visit the website and stock up or search for a store that sells them near you!
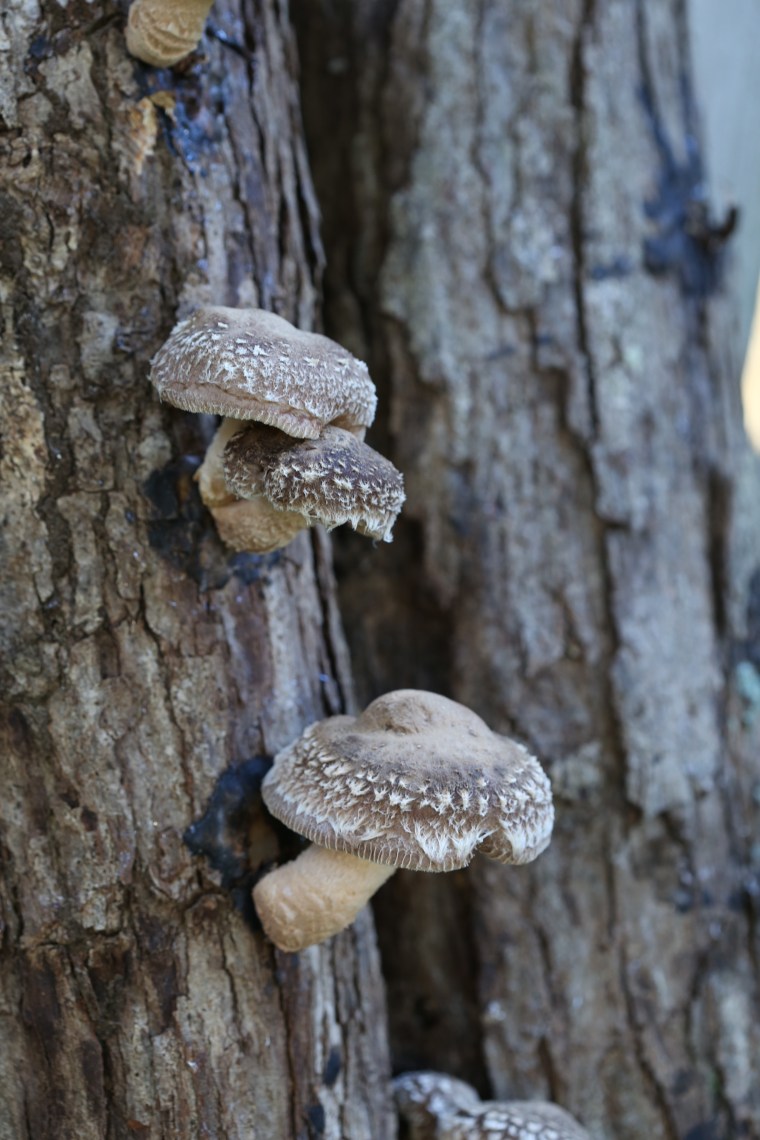 We have grown mushrooms on many occasions. The kits available make it easy to grow shiitake, oyster and buttons but for serious hobbyists, purchasing innoculated plugs and loose spawn are the preferred methods. Last year in the spring, Darry innoculated some oak logs with shiitake plugs and 16 months later, we are harvesting mushrooms for the first time here in Virginia. It takes a long time for the mycelium to spread out within the log and when conditions are right, it produces fruit; mushrooms are the fruit of the mycelium.
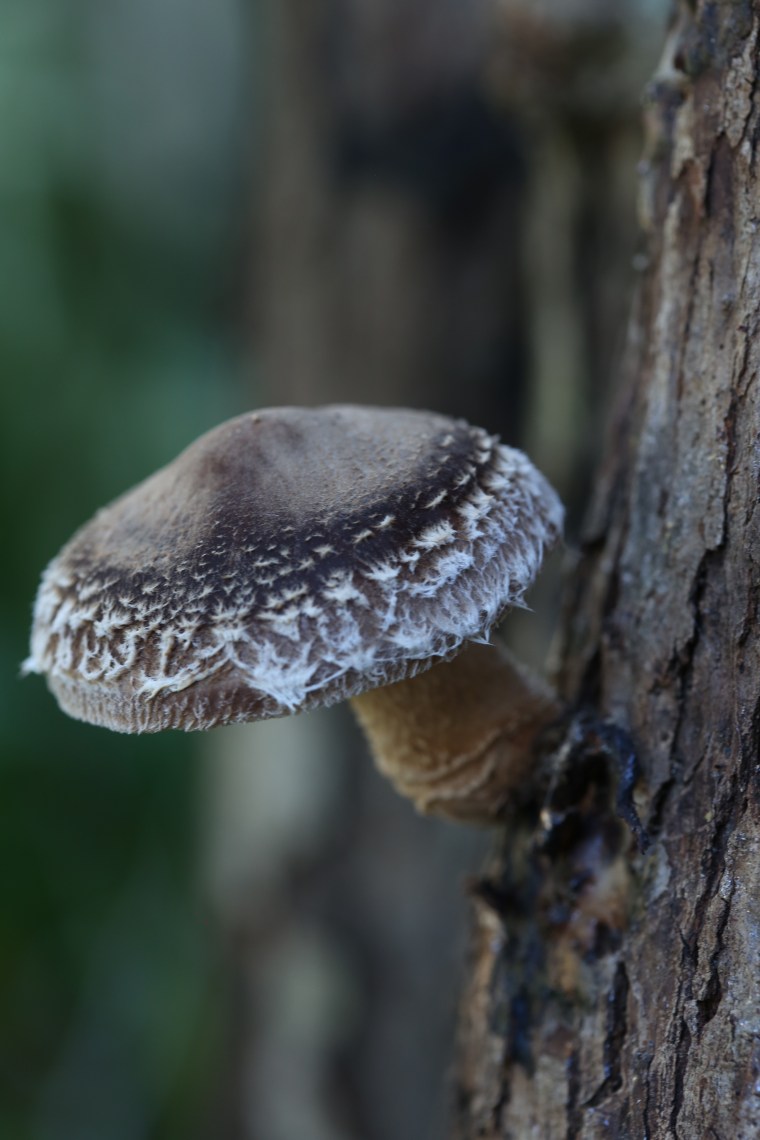 Fresh shiitake look very different from the ones commonly found in the supermarket. Notice the shaggy appearance of the cap? It was surprising to me as well-I forgot about that!
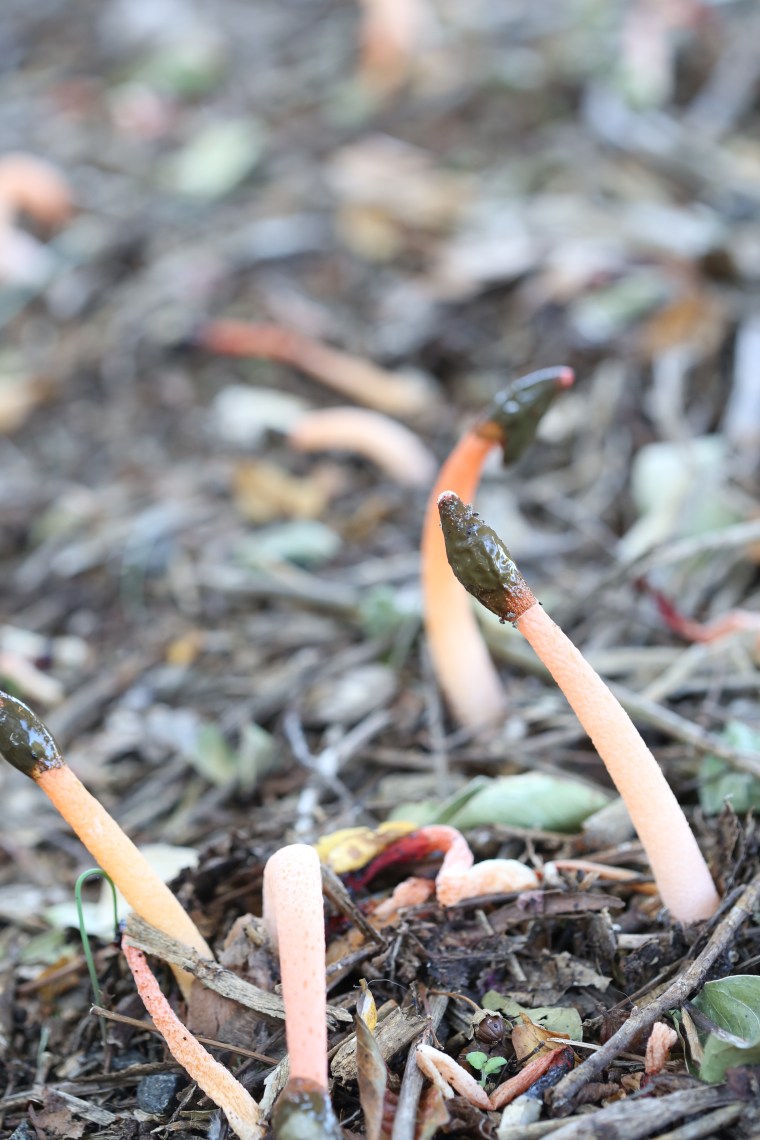 While many mycelium grow in wood, many more grow in the ground. The mycelium for a web that spreads out under the soil surface and when the conditions are right, mushrooms pop up. Right now, stink horns are popping up all over the ground under our crape myrtle and in areas of our former vegetable garden. They are bright orange and are the subject of more than a few less than “tasteful” jokes in our yard. The greenish-brown top has a strong odor which attracts flies who in turn, spread the spores of the fruit. Without flies, these stink horns would not be able to reproduce.
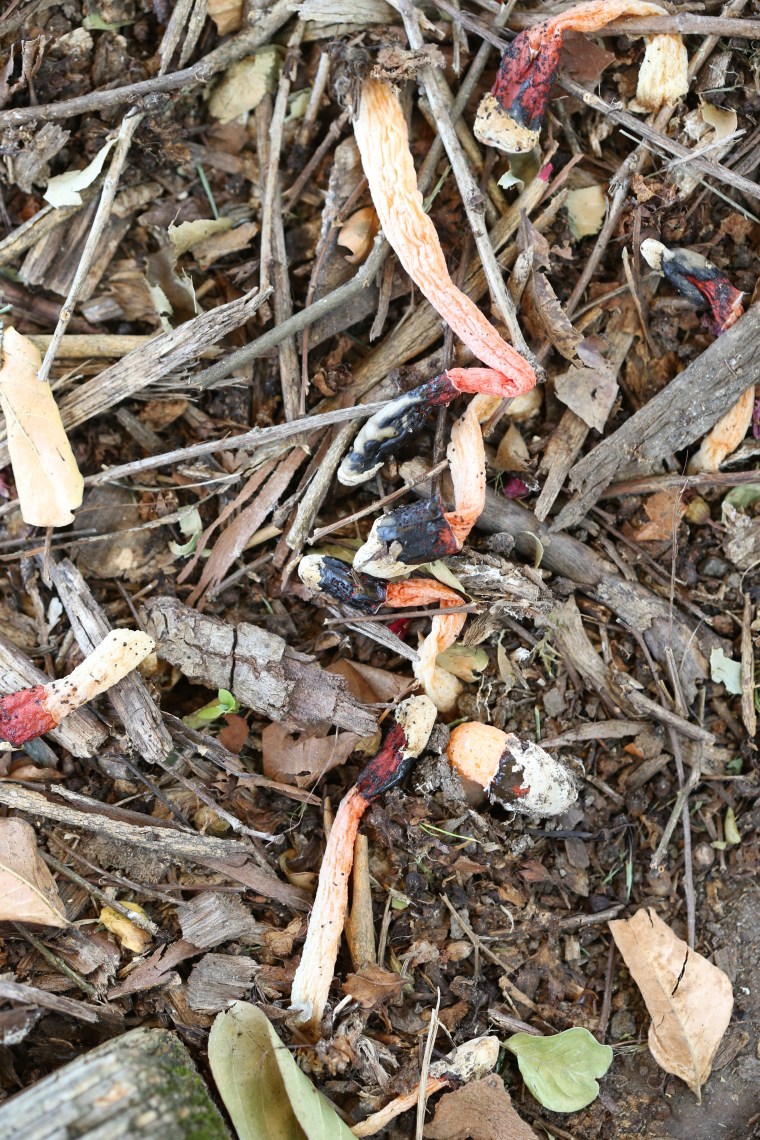 Stink horns are very fragile and do not last long. They come up early in the morning and by late afternoon, this is what they look like. The good news, mushrooms growing in the garden is not a bad thing. Not only are they good at helping to compost things like wood, they can also improve the soil in the garden and increase the yields of vegetable plants. When you see them growing in the garden, leave them there and enjoy the benefits of the mycorrhizae-the symbiotic association of the mushroom mycelium and the roots of plants as they grow in the same space.
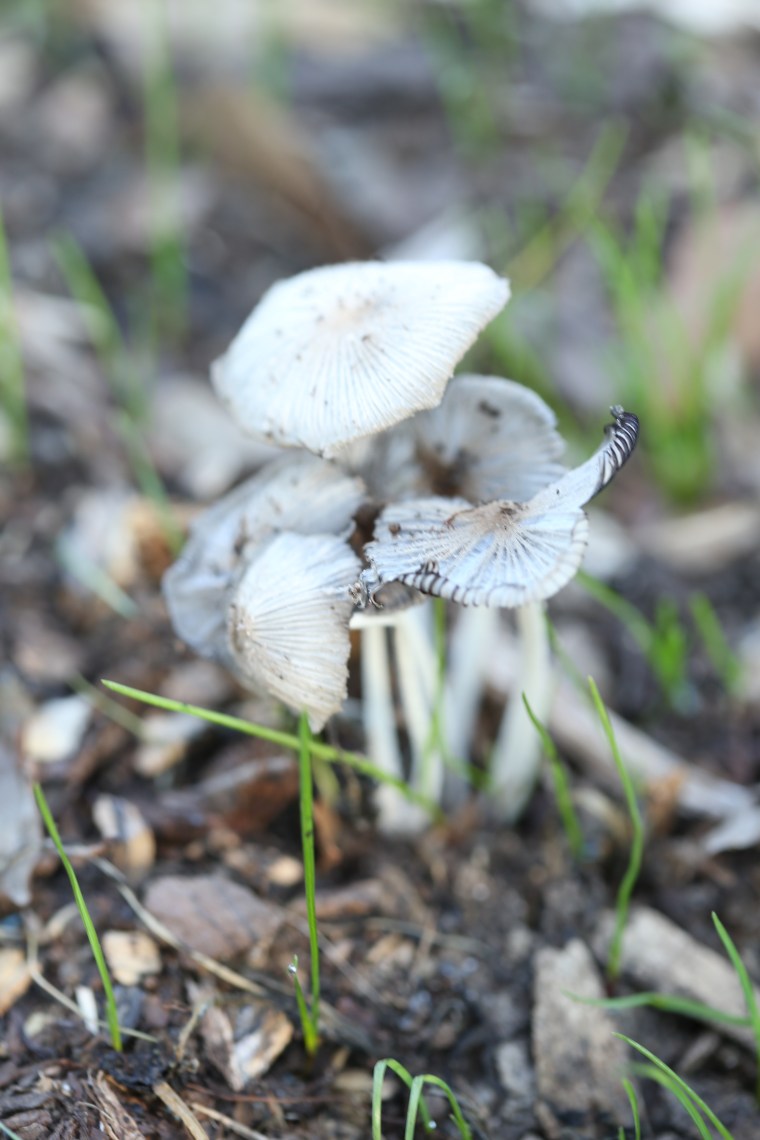 Along with the stink horns, our former garden is full of these fragile mushrooms. They are rather small, notice the blades of grass? And just like the stink horns, they do not last long and are generally gone by late afternoon. The mycelium for this mushroom is all over the garden area. They came up in beds and walkways and all over the front yard. We let them do their thing and left them to break down in the beds. This spread the spores and allowed them to spread and it also helped to improve the soil. If you are looking for good, organic garden soil, be sure to grab a bag with mycorrhizae in it and see the difference it makes when you have active and living soil in your garden!
 A few years ago, while we lived in Nashville, we went to an exhibit of Dale Chihuly’s work when it was at The Frist Museum. It was a wonderful show and we really enjoyed looking at the colors and the shapes of the blown glass pieces. At the same time, Cheekwood Botanical Garden and Museum of Art, also in Nashville, was featuring a night time exhibit of additional works, but as luck would have it, we never made it out there. When I went to Atlanta last month, I learned that the
 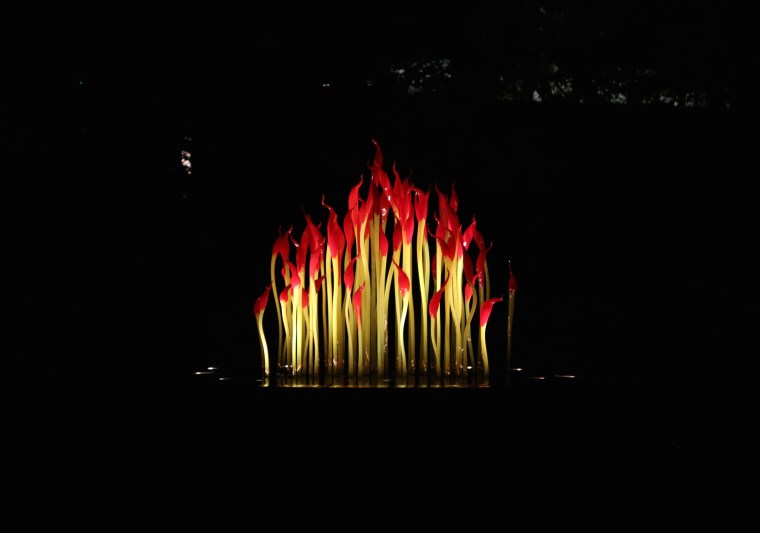 Using my camera, I took pictures as we walked around the garden and how I wished I could have used my tripod to get better shots! The glass works are pretty amazing in daylight but once the sun sets, the lights used in the displays give the glass a completely different appearance. For one, the colors glow.
 If you have ever visited ABG, you are familiar with the raised walkway that takes you high above the gardens. In this area, the view was almost magical.
 These white glass pieces almost look like balloons or torpedoes. Because I was using my camera hand-held, it was hard to really get all of the details.
 This looked like a giant succulent from above and below, it looked as if it was alive.
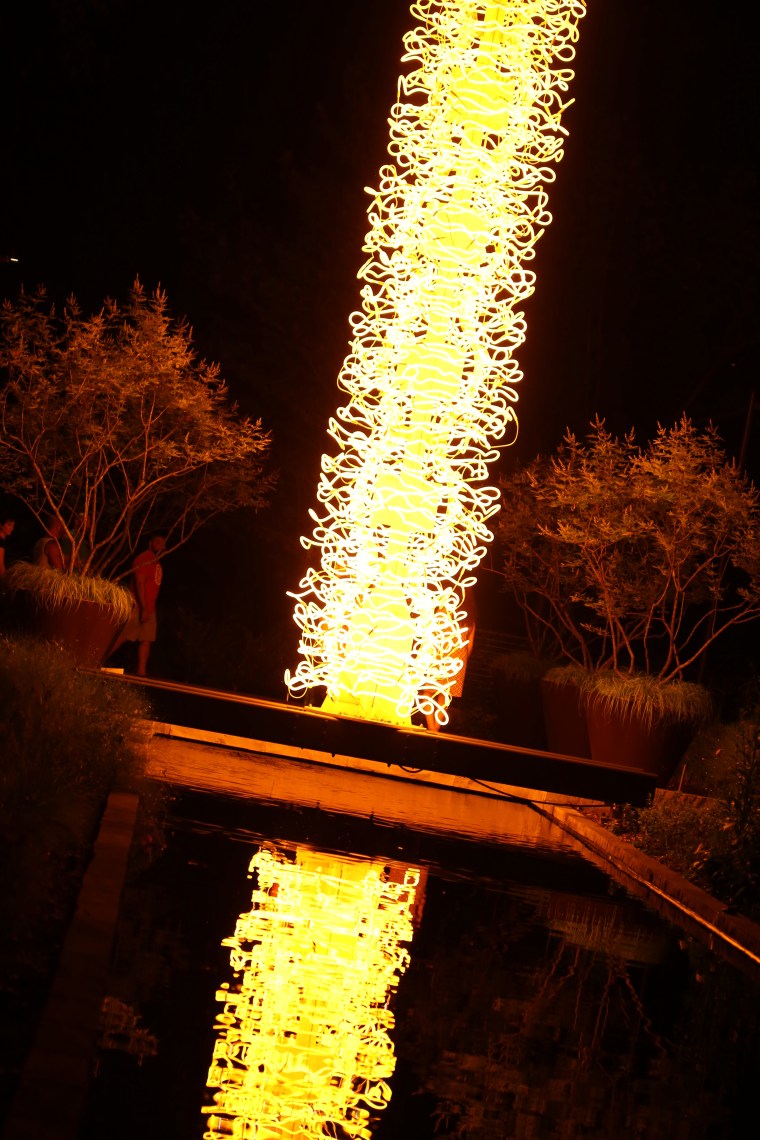 The reflection pool really captured the movement of the glass tubes.
 While I could see the tiny blue lights up close, they got lost in the distance. The entire area glowed orange, as if a campfire was nearby.
 This was one of the exhibits that the camera just couldn’t handle. Called a Fiori Boat, the large structure in the top pool was floating on the surface of the water with the large glass orbs, known as Niijima Floats. In the background is the Earth Goddes Sculpture whose hand forms a waterfall.
 Covered in moss and surrounded by water, she was an amazing sight in the dark.
 Water lends itself well to the glass and many of the exhibits were in a water setting. To really see the difference in the photos from the camera and my cell phone, compare this shot to the next one.
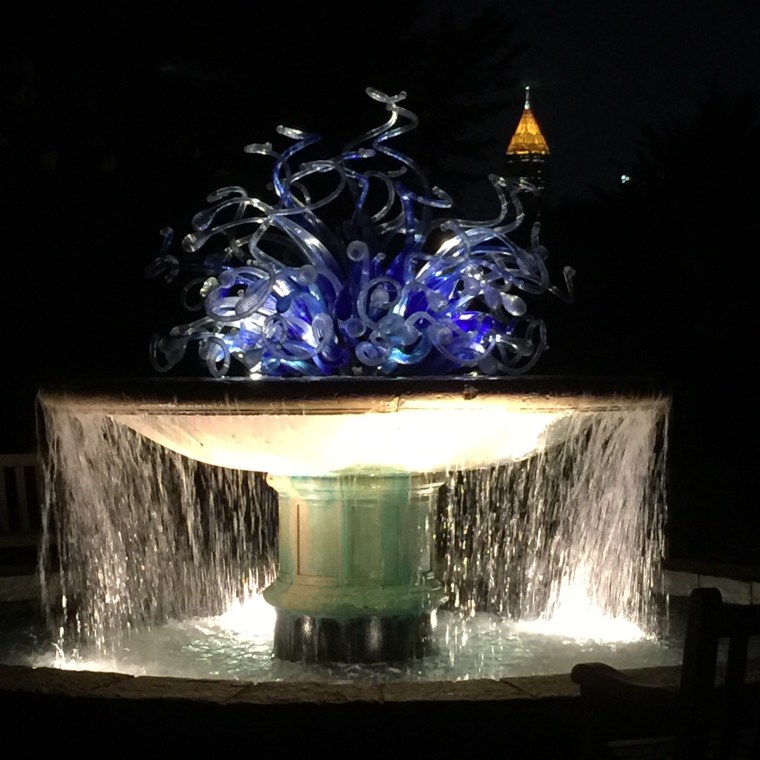 It would have taken me a lot of time to catch this look with the camera.
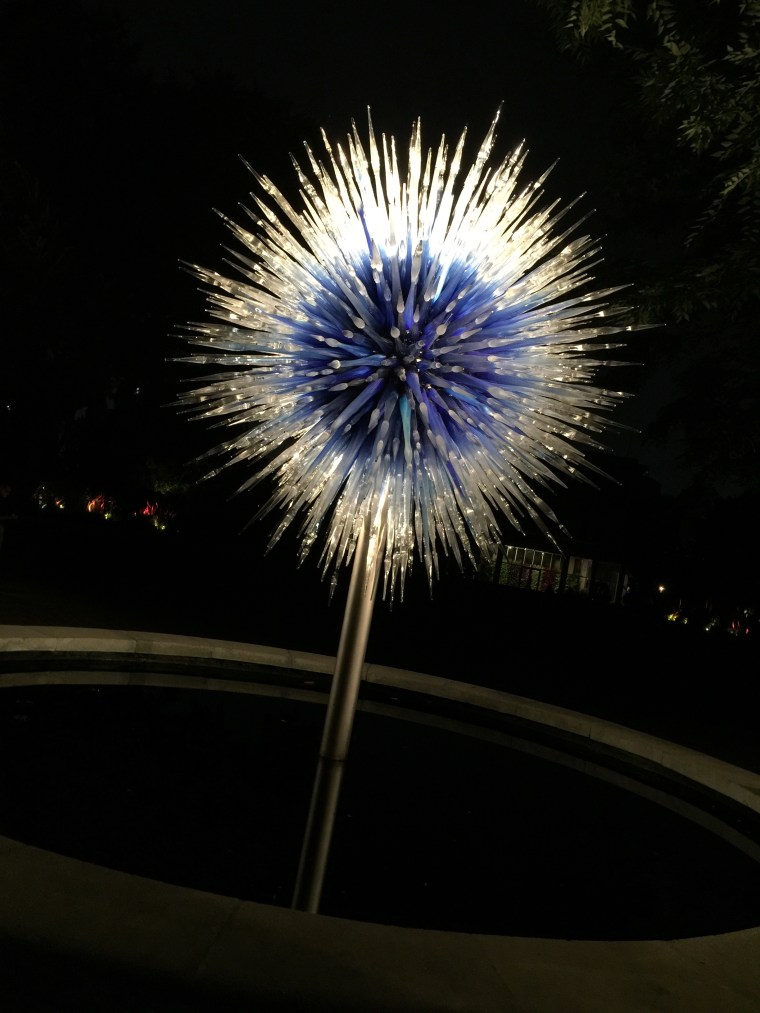 Looks like icicles to me.
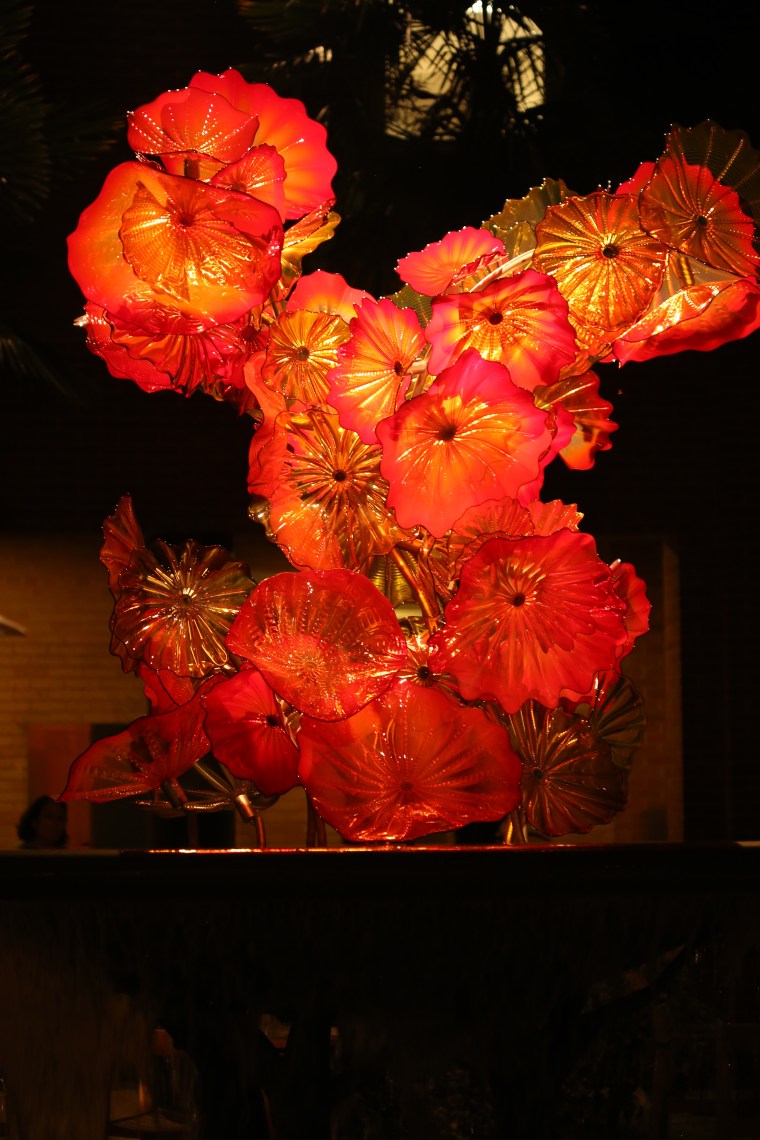 As we prepared to leave, a final sculpture greeted us near the gift shop. They look like blossoms to me! Truly art imitating life-garden life to be specific. Do yourself a favor, while you can visit during the day, buy a ticket to the show and go after dark. The show closes at the end of the month, hurry, don’t miss it!
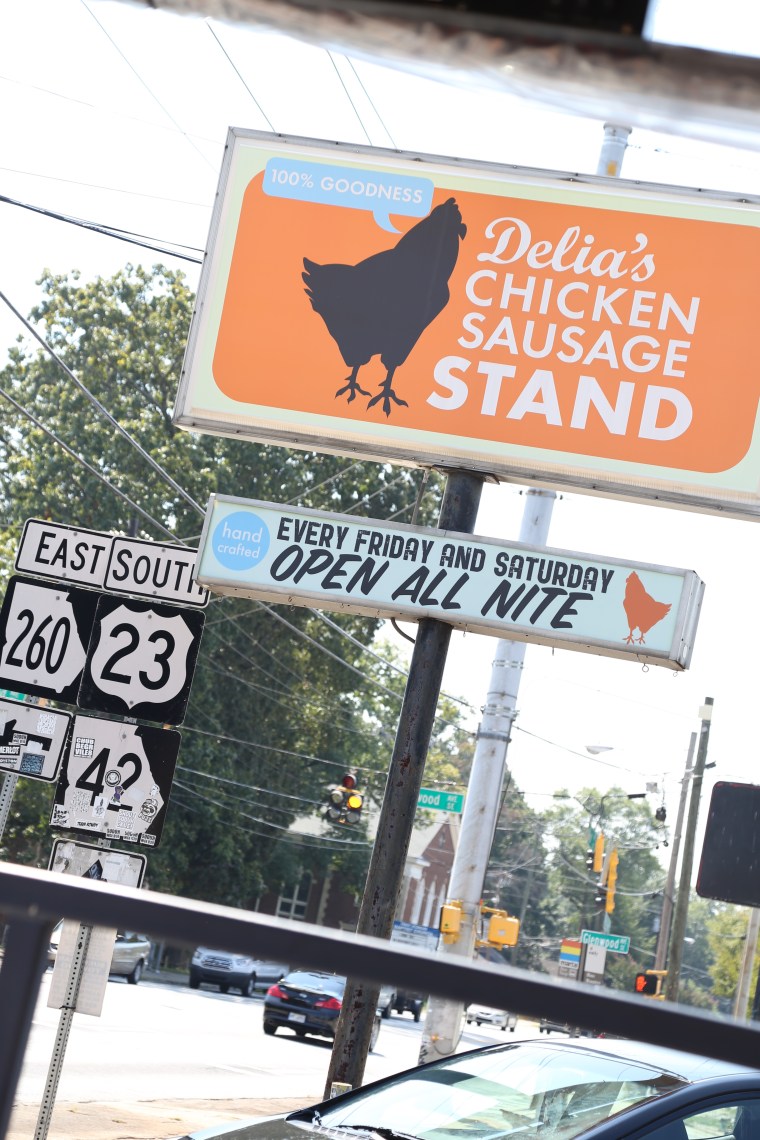 On my most recent trip to Atlanta, I had the chance to visit Delia’s Chicken and Sausage Stand. Like any other place that calls itself a “stand,” Delia’s is a little building with outdoor seating along the side of a very busy street. Don’t let the lack of indoor accommodations scare you away; this place is worth the trip!
 Having placed our orders, we went outside to grab a table. The seating area is covered which means that you will not bake in the sun and if it is raining, you can still sit down at a table and eat-personally, I hate eating a meal in the car!
 The staff is friendly and were a pleasure to deal with-they even let me take photos!
 Judging by the location of these seats, they must get pretty busy. These seats are near the parking area and in full sun during lunch.
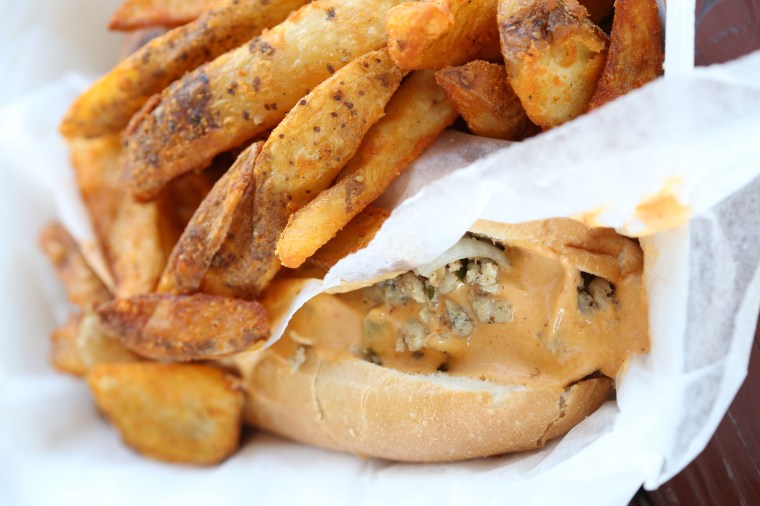 By now you must be wondering what chicken sausage is. The short answer; ground chicken with spices and herbs which is cooked up and tastes a lot like an Italian sausage but isn’t nearly as greasy. We both chose to order The Chickie Philly Classic which is chicken sausage with onions and peppers with classic sauce (cheese sauce) and chipotle mayo on a hoagie roll.
 However, I had mine without the cheese sauce-I just do not like cheese on my Philly sandwiches!
 The sandwiches are large and filling but those fries…my weakness for seasoned fries well documented. These were too good to pass up.
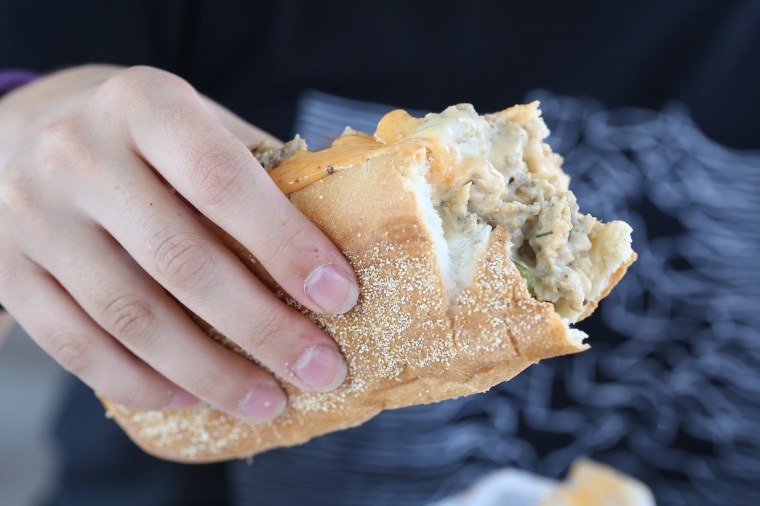 When I said the sandwiches were large, I wasn’t kidding! We were glad to have spent a couple hours walking on
 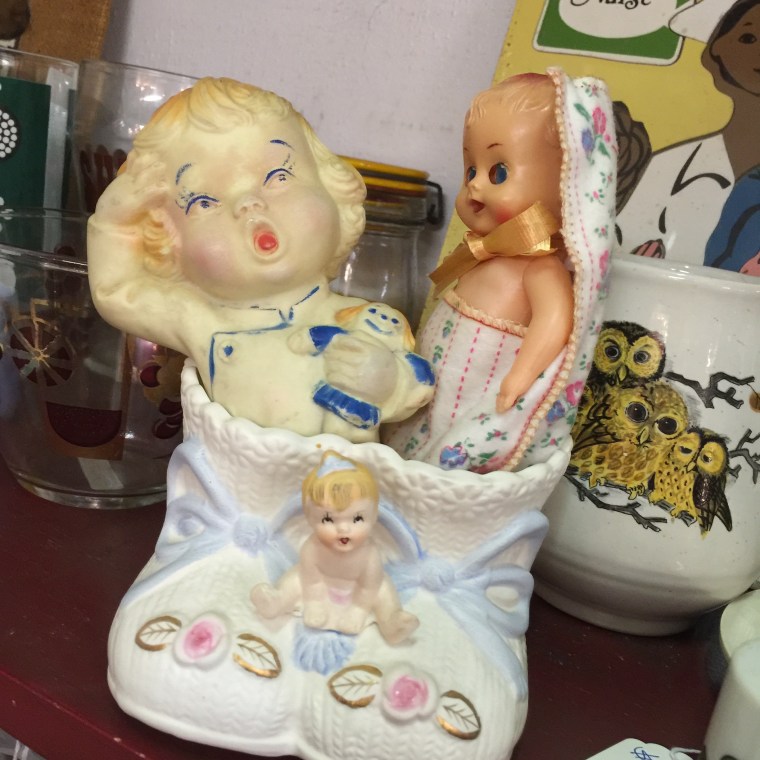 After lunch, we headed over to
  She looks so innocent…
 These were just so weird. The way they sat upside down…
 These were just creepy. The one on the right almost looks like a real baby while the one in the middle looks like an alien in need of new eyes!