Each holiday seems to have a specific dessert associated with it. For me, Easter always brings visions of coconut cakes smothered in shredded coconut, Christmas calls out for cookies of all kinds and Thanksgiving is the day that pies are front and center of the dessert table. No pie is more synonymous with Thanksgiving than Pumpkin Pie and with the current proliferation of all things pumpkin spice, I have decided not to include it in this small collection of recipes and instead, focus on a few others that are guaranteed crowd pleasers!
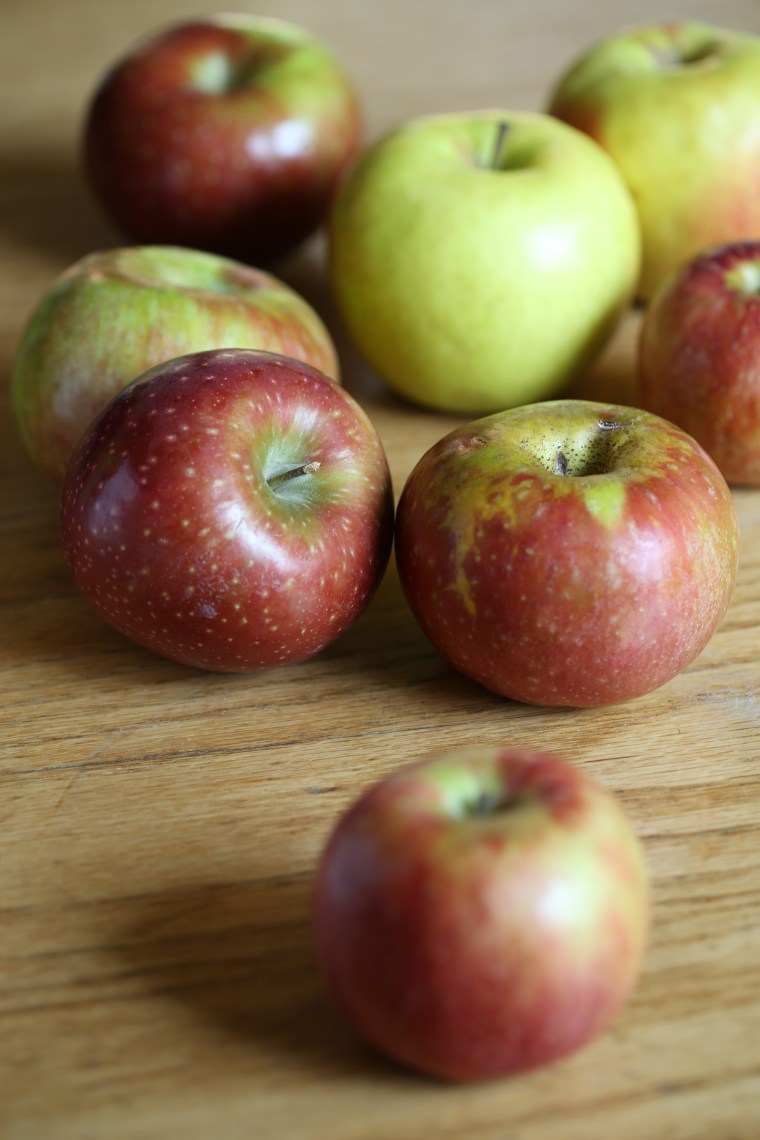
Right about the time of the onslaught of pumpkin spice laden goods, apples come into season. While just about every pumpkin pie is based on a creamy, custard based filling recipe, apple pies are much more flexible. Pumpkin is pumpkin but each variety of apple has its own characteristics and by simply switching out varieties, you can completely change the flavor of the filling. Personally, I prefer to blend apple varieties to create a full flavored pie that has plenty of juice to keep the pie from being dry and enough heft in the slices to prevent them all from falling apart while they bake.
 The skins of an apple contain pectin, which will make wonderful sauce or jelly, but is tough and chewy once baked, so be sure to peel and slice the apples as you make the filling. Do not worry about the browning that might occur because the sugar and spice will camouflage the color.
 For this pie, I chose Rome, Cortland and Golden Delicious. Each one had flesh of a slightly different color. The yellow hue of the Golden Delicious apples made the slices resemble rutabegas! The Cortlands were a bit green and the Romes were bright white. The texture and flavor of each was also different and ranged from crispy and tart to soft and sweet with a lovely scent. If you aren’t sure of what varieties are suitable for pie, this comprehensive chart from Pick Your Own will be very helpful.
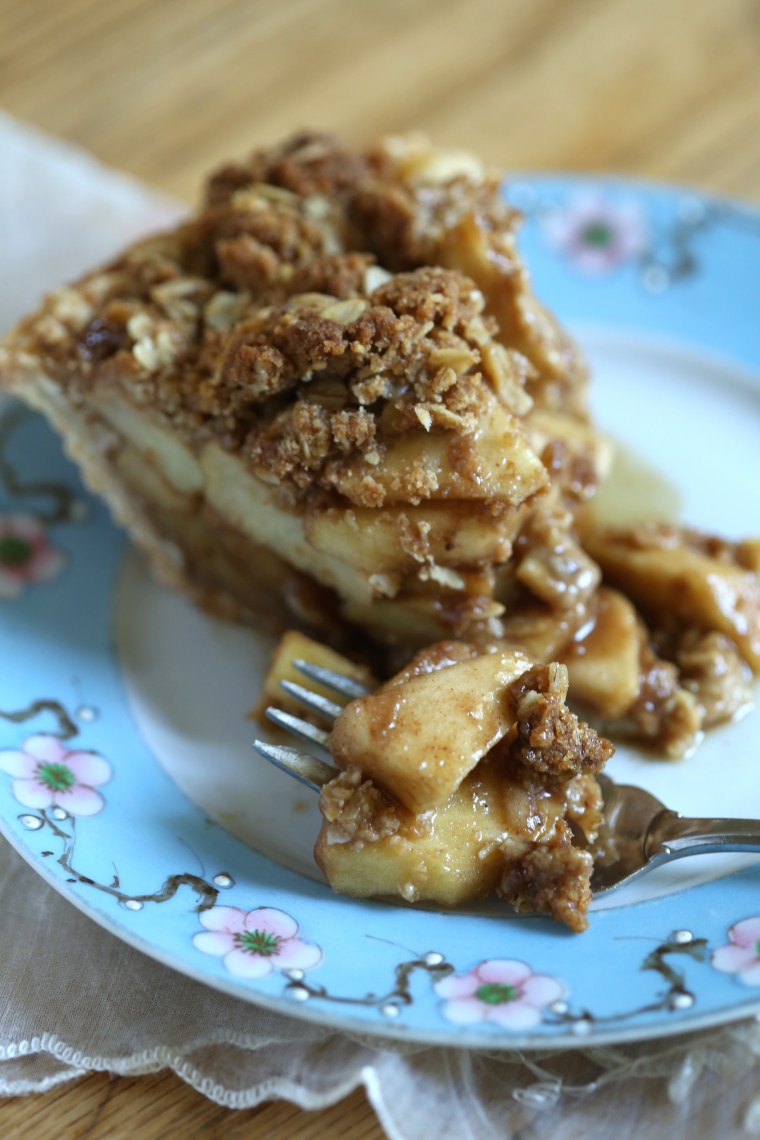
 With my kitchen packed up for the move, my options were limited and I decided to skip the top crust and just go with a streusel topping. That dome of apples looks a bit ridiculous but the truth is that the apples used for pies always juice out and collapse a bit in the baking. For this monster, I had two and a half pounds of apple slices in the fillings-something I do not recommend for a 9″ crust! For a pie that size, don’t go over two pounds.
One other thing I would like to mention, if you are intimidated by the idea of making your own crust or simply do not have the time or desire, don’t make one-buy one! Usually, I mix up a large batch of dough divide it into the portion, roll out what I need for the pie I am baking and then freeze the leftovers. This way, I always have a stash of dough to pull from the freezer any time I want to bake a pie. Because we are in the process of a long distance move, I have run through my stash and had to purchase a crust for this pie.
 A spicy crumb topping is a quick way to dress up a pie and to add a little crunch to the texture along with flavor. It is also a lot easier to handle than a top crust which makes it the perfect solution if you are not keen on working with pie dough. The recipe included with this post is one of my favorite crumb toppings and it works just as well on cobblers, crisps, muffins and coffee cakes as it does on this pie so be sure to keep it handy!
 Crumb Topped Apple Pie
makes one 9 inch pie, serving 8-10
2 pounds fresh apple slices-any variety suitable for baking
8 ounces brown sugar
2 tablespoons of apple (or pumpkin) pie spice or you can blend your own spices by combining 1 tablespoon cinnamon, 1 teaspoon nutmeg, 1 teaspoon ginger, 1/2 teaspoon cardamom and 1/2 teaspoon cloves
1/4 cup all purpose flour or 2 tablespoons corn starch if you prefer starch to flour
Preheat the oven to 350. On a sturdy baking sheet that will not warp and buckle in the oven, place a sheet of parchment paper and give it a spritz of grease. Toss the apple slices with the sugar, spices and flour and pour it into the crust. Cover it with the crumb topping, pressing it down lightly to pack it and to prevent it from falling off. Put the pie onto the prepared baking pan and bake the pie until the juices are bubbling and have thickened, about 1 hour to 1 hour and 15 minutes. Allow the pie to cool until room temp so that the juices set and it will be much easier to slice.
My Favorite Crumb Topping
1/2 cup unbleached all purpose flour
1/2 cup rolled oats
1/3 cup dark brown sugar (honestly, can be light or white, I just prefer dark)
1/2 teaspoon cinnamon or apple/pumpkin pie spice blend
1/8 teaspoon baking soda, optional-using it will make the crumbs lighter, omitting it will keep them crunchy


To call this a collection, I must include other recipes and these are two of my absolute favorite pies! Rather than print the recipes here, I am including the links to my food52.com page; Masala Spiced Pear Pie with a lattice top and Roasted Butternut-Maple Pie with Smoked Pecans
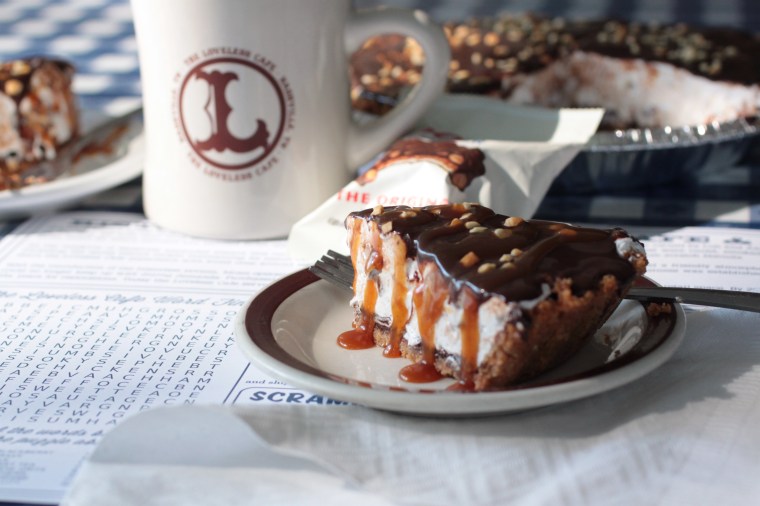 For the adventurous bakers, this gem from my days as the pastry chef of the Loveless Cafe, a Goo Goo Cluster Marshmallow pie is an unbaked pie but it does require making the crust, a ganache and a cooked marshmallow filling. While a little time consuming, it is well worth the effort if you are a marshmallow fan, the recipe is also posted on my food52.com page and can be found here. If you can’t find Goo Goo Clusters, visit the website and stock up or search for a store that sells them near you!
 Summer fruit pies are one of my favorite things. When the fruit season is at its peak, freshly picked, ripe and juicy, fruits just about beg to be baked into a pie. With a dozen peaches and a basket of blueberries in the house, I couldn’t resist the temptation and I baked a pie, a whole 9″ pie just for the two of us!
 Of course, I also used homemade pie dough. Before you start panicking, before you go on about how you just cannot roll out pie dough, let me tell you that you can, you absolutely can!!! First, make the dough ahead of time and chill it for at least an hour. Take it out of the fridge and let it soften until it is pliable but not sticky or squishy. Now do you see all of the flour on my table? That’s the secret, cool dough, lots of flour and short strokes with the rolling pin. Lift the dough and turn it as you go, spread out more flour on the table if it sticks, don’t worry you can brush it off before you put it into a greased dish. Make sure the circle of dough has an overhang of at least 2 inches to make the pleats like I have in the photo. Start by taking one small section and folding it in over the fruit but leave the center open. Section by section, fold the dough in towards the middle of the dish, creating the pleats until you get to the last section. Lift the first pleat up and carefully tuck the last one into place and lay the first one back down. Then brush it with some egg wash and sprinkle on some sugar before baking.
 To get a deep, even color, just use one temperature in the oven. Many recipes tell you to start high and drop it down low but I think one temperature is better. It prevents that “OH I FORGOT TO TURN DOWN THE OVEN” disaster and also prevents uneven coloring. My pies only bake at 350F.
 For this pie, I chose peaches and blueberries but you could easily switch out the blueberries for raspberries or blackberries and if you are lucky to have rhubarb on hand, it would be lovely too! Sweeten the pie according to taste but you will want at least half a cup of sugar, and if you use rhubarb, you will have to increase the sugar.
 Peach-Blueberry Deep Dish Galette
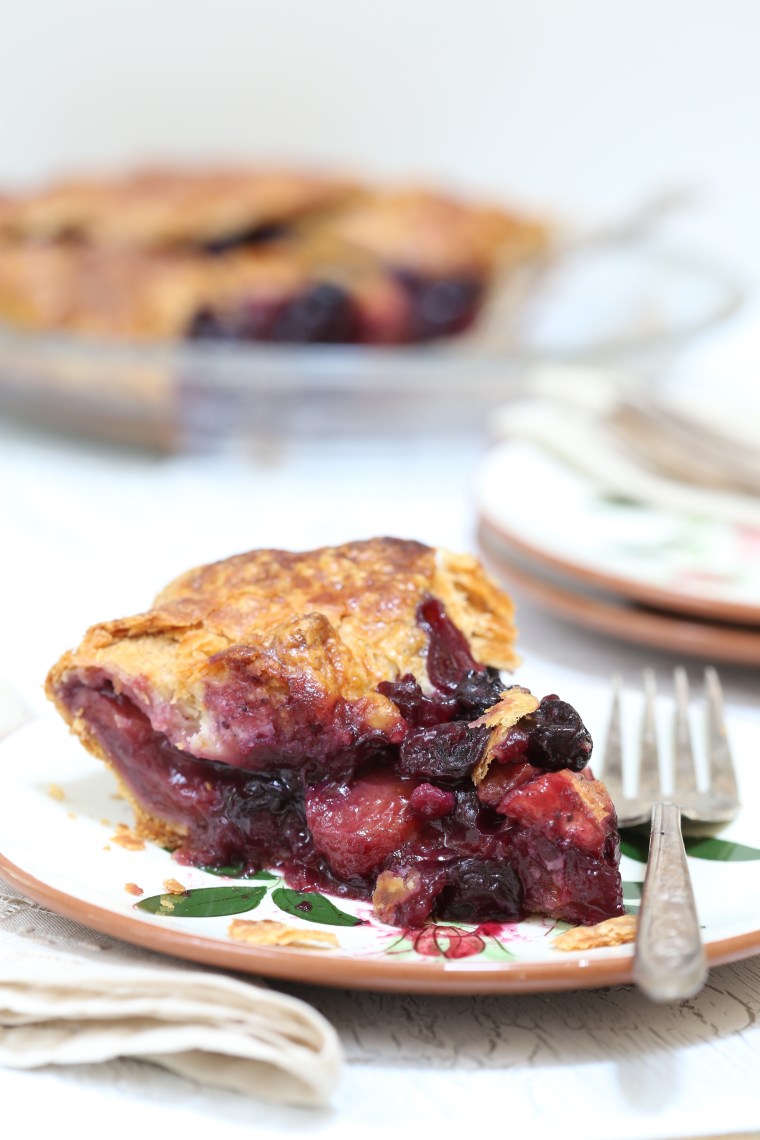 Preheat the oven to 350. Place the sugar, cornstarch, vanilla seeds, lemon zest and spices into a bowl and rub them together. Peel and slice the peaches, you need a pound of them-the extra weight is for the skin and pits you remove. Add the peaches and blueberries to the sugar with the lemon juice and toss them to coat them. Place the rolled out pie dough into a greased 9″ pie plate. Scrape the mixture into the pie crust and fold as directed above. Place the pie plate on a sheet pan and bake until the juices are bubbling in the center and the crust is a deep caramel color, about 1 hour. Allow it to cool for a few hours before cutting so the fruit can set up a bit. We enjoyed it like this but a generous scoop of ice cream would also be nice!
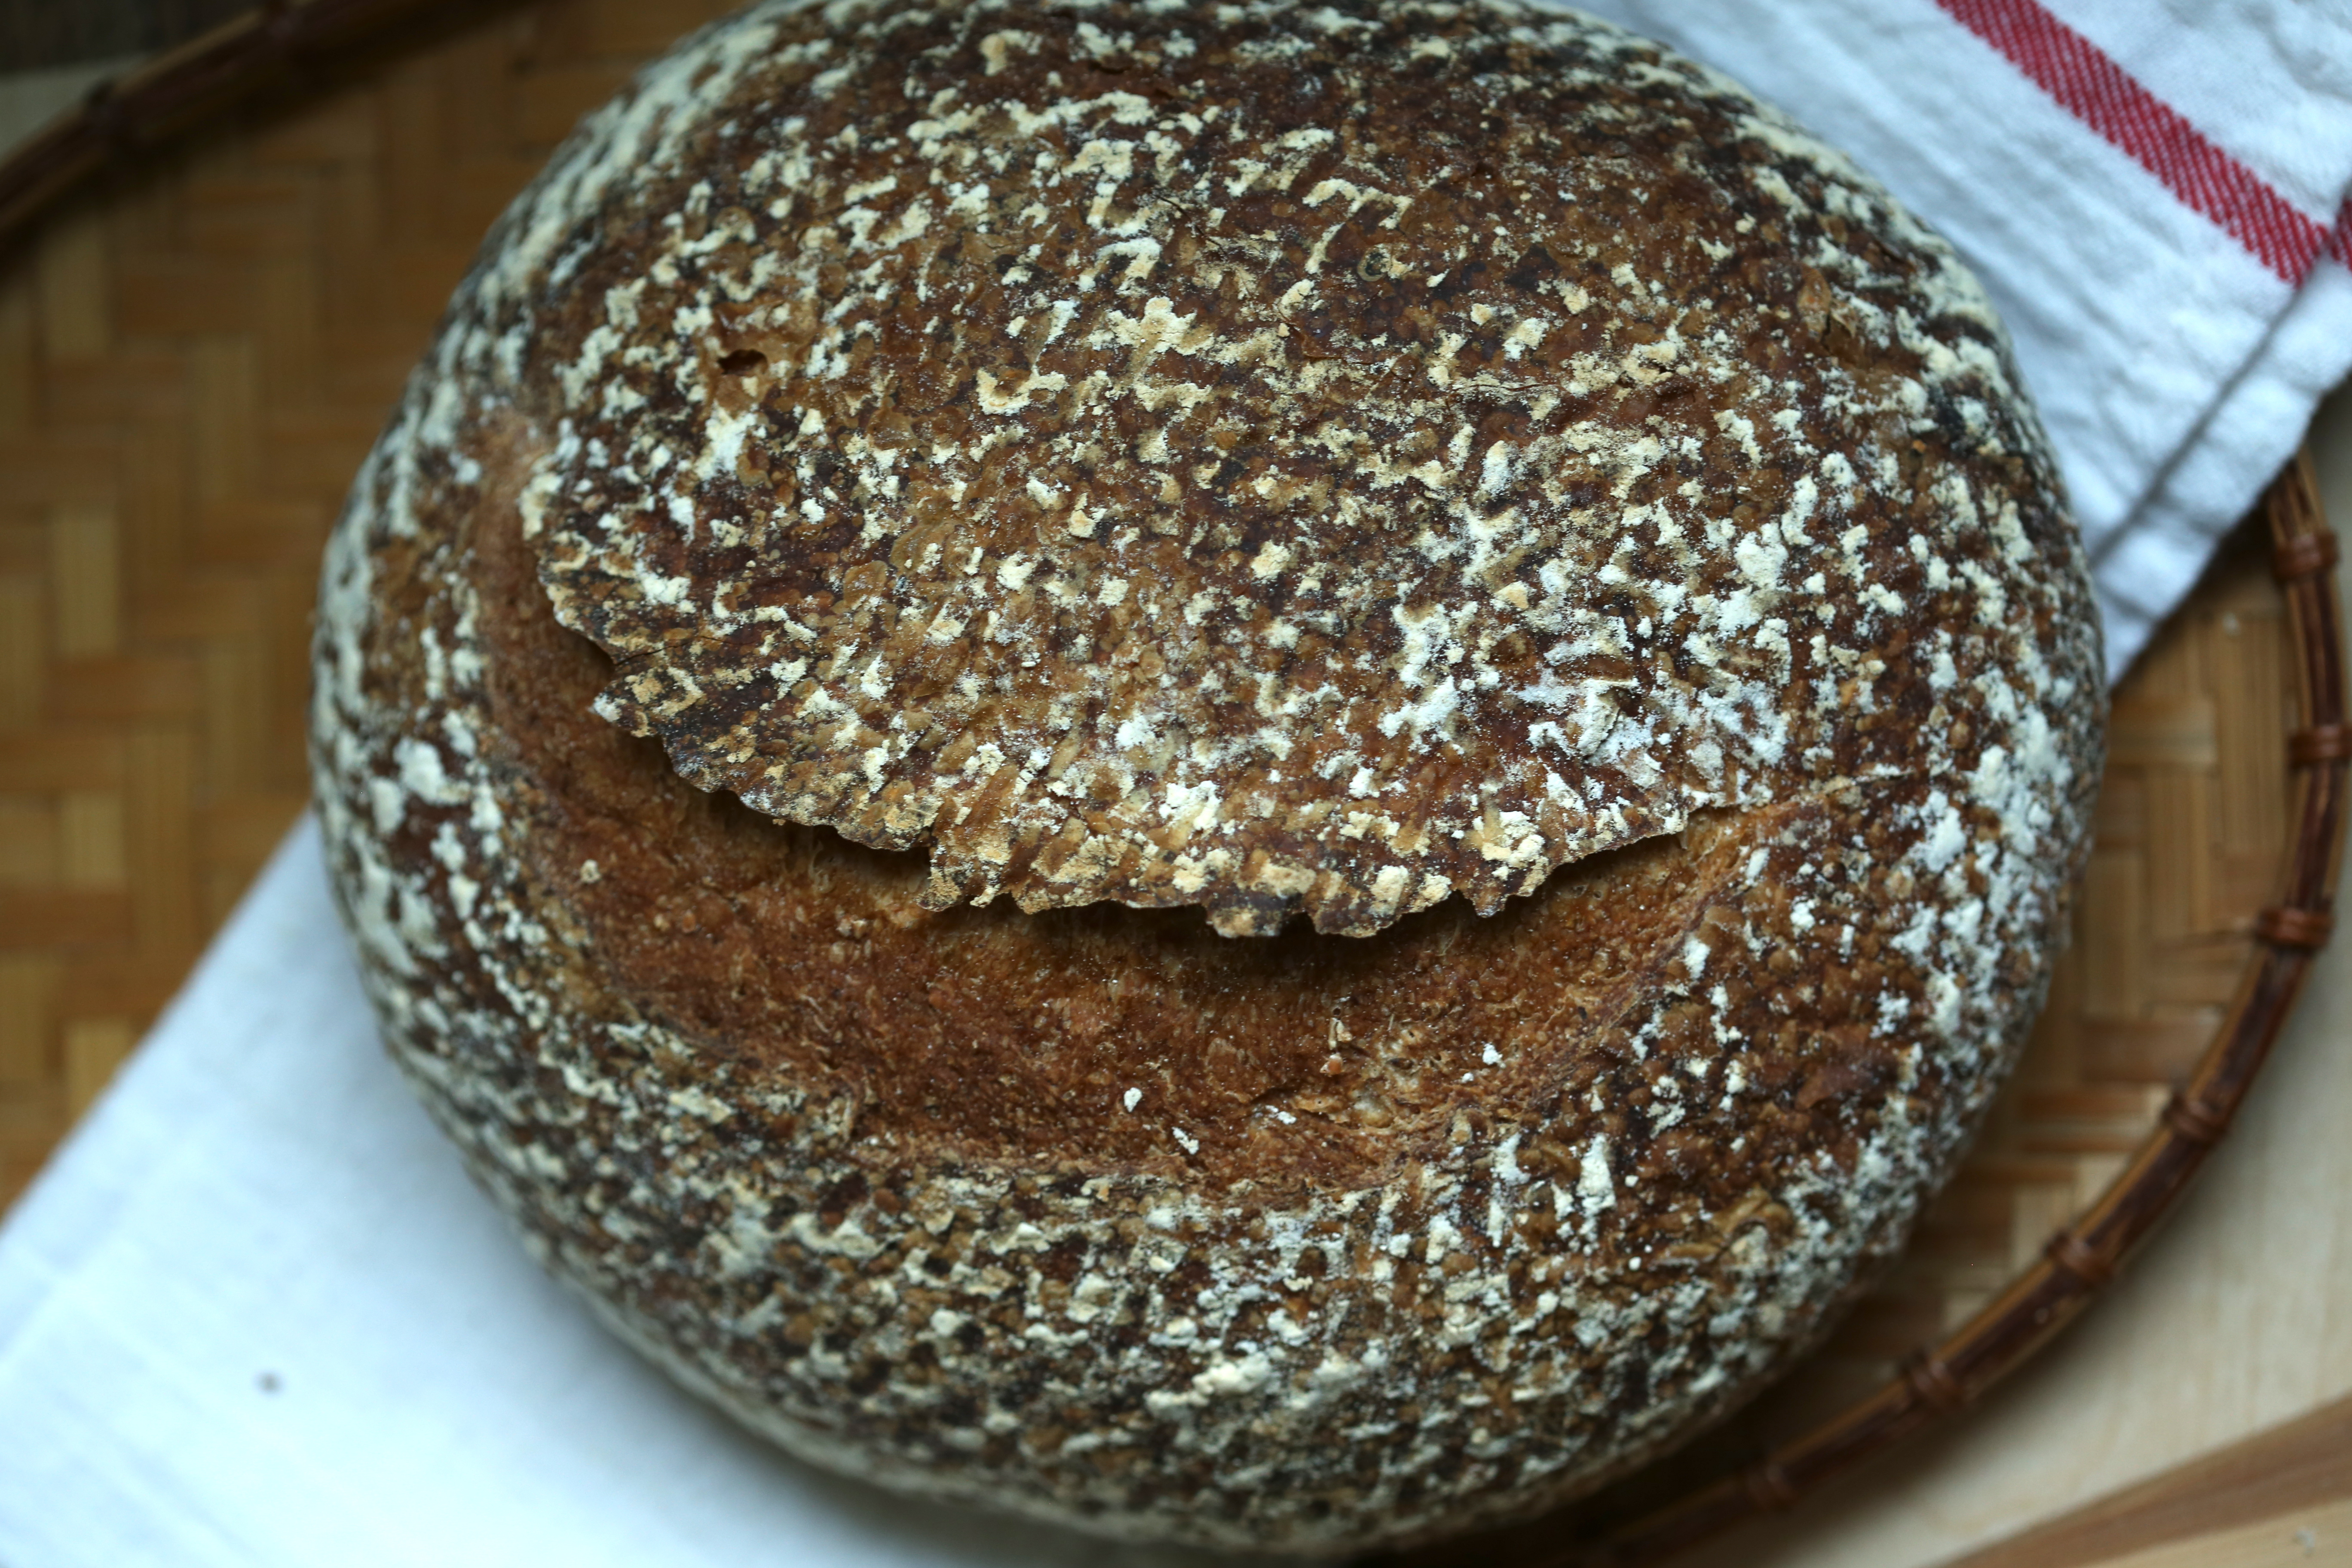
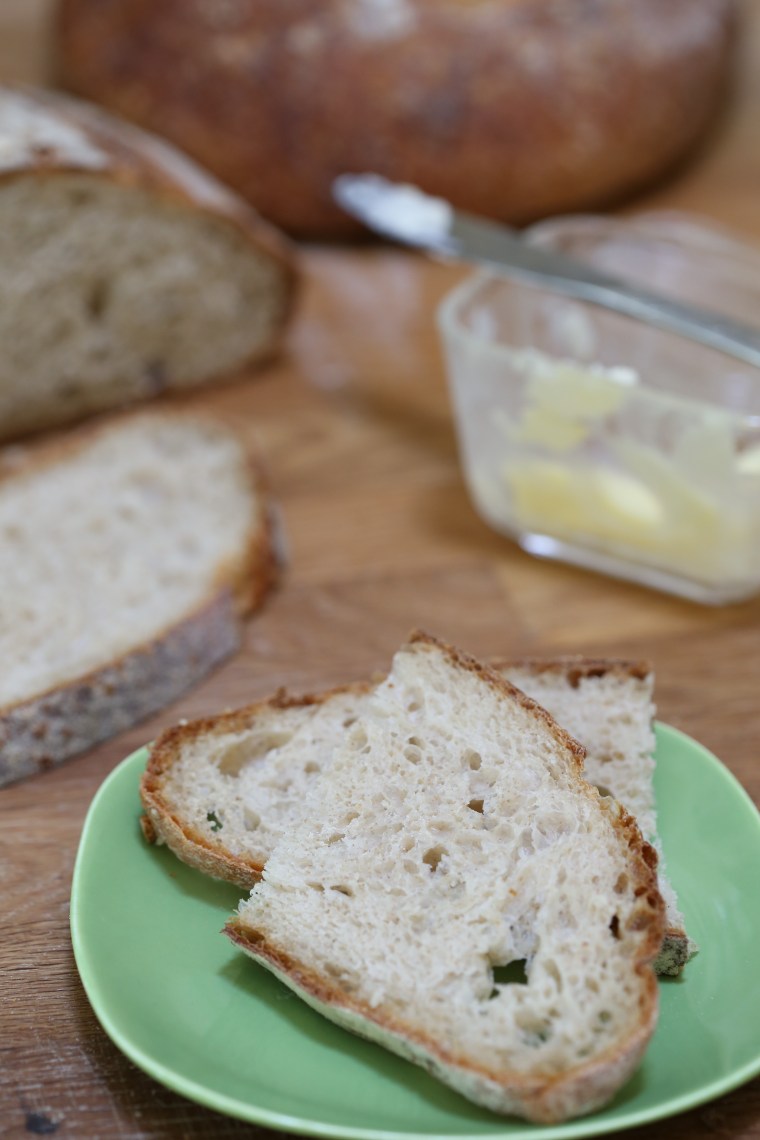 On my last birthday, my husband gave me a copy of the Tartine Bread book. We were out on a rainy Saturday, wandering through the shops in Merchant Square and I had a chance to look through a copy of the book. The cover shot, the dark loaf with the blistered crust…Yes, it was bread lust at first glance. However, I suspect my husband was also lusting over that loaf of bread and now that I have made the Country Bread, I am sure of it!
 The only step I did not follow was creating a starter to leaven the bread because I have a starter that I grew from grapes that were growing in the Demonstration Garden that I worked in when I lived in Tennessee. The starter has been in use since 2009 and when we moved in 2014, it was one of the things I was most worried about losing! We had a 12 hour drive, stopped multiple times for the dog and for the night in the middle of that drive, the entire time the starter was tucked in a cooler with some ice. It made the trip like a champ and nearly 2 years later, I am still using it.
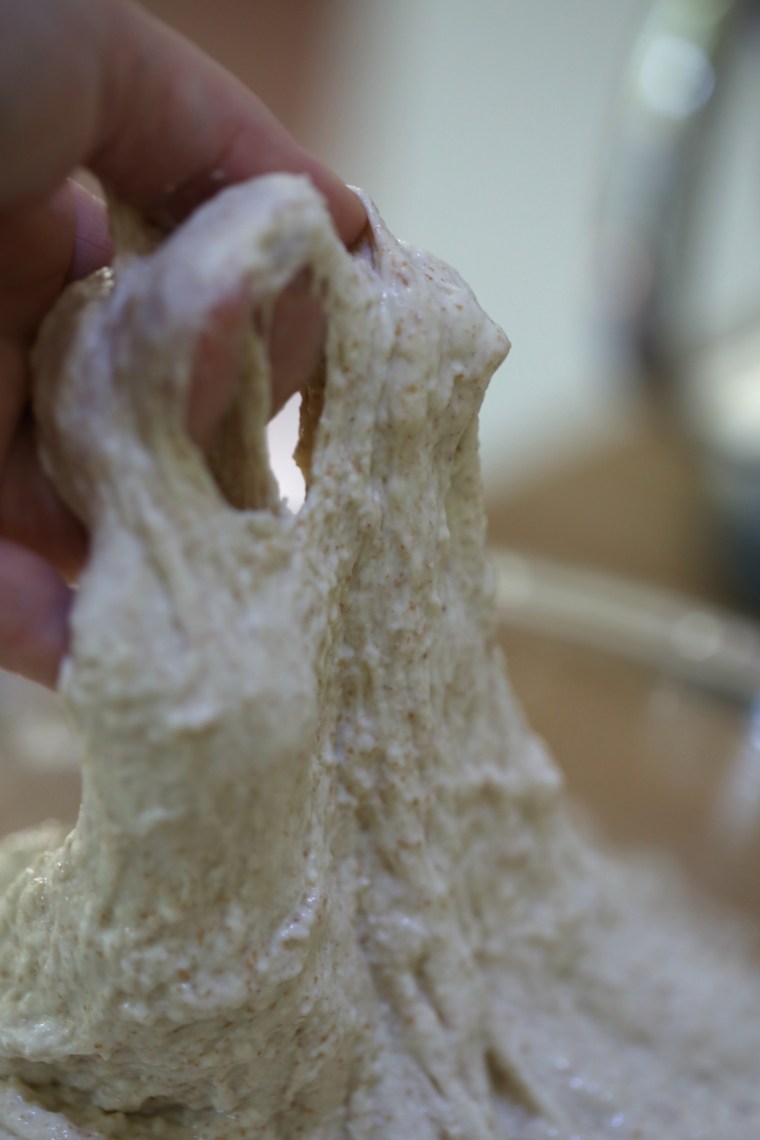 There are two schools of thought on adding salt to flour dough. One says add it to the dough as you add the flour, one calls for holding it back and adding it later because it can affect the structure of the dough. At Tartine, they hold the salt and a small amount of water back and add them after the initial mixing and resting period. The salt is sprinkled over the dough, water is poured on and using your hand, you squeeze and squish and work the dough onto itself to mix it all in.
 As the dough develops during the bulk fermentation, bubbles form around the sides of the bowl. Rather than dumping it onto a table and forcibly kneading it, the dough is “turned” in the bowl every thirty minutes for three hours.
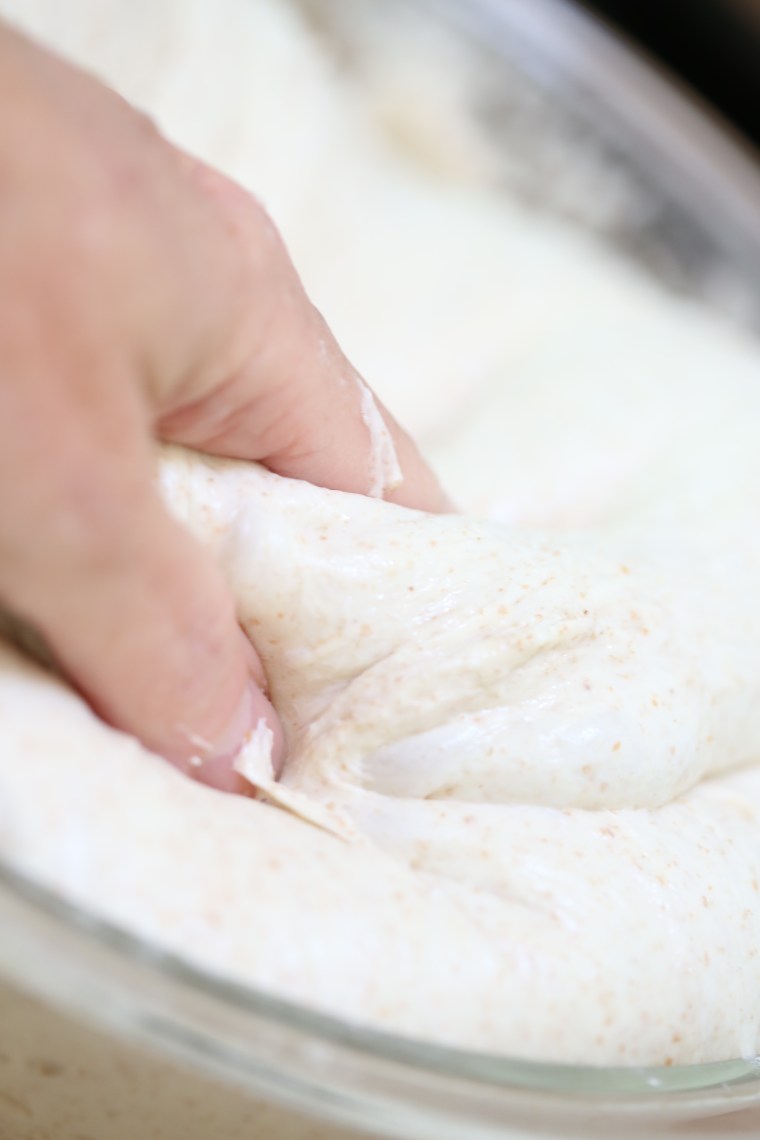 Using a wet hand, the dough is pulled up from the bottom of the bowl and stretched across itself, turning it. This is done 2-3 times each half hour, each time is called a “turn” and it is all the kneading the dough will get.
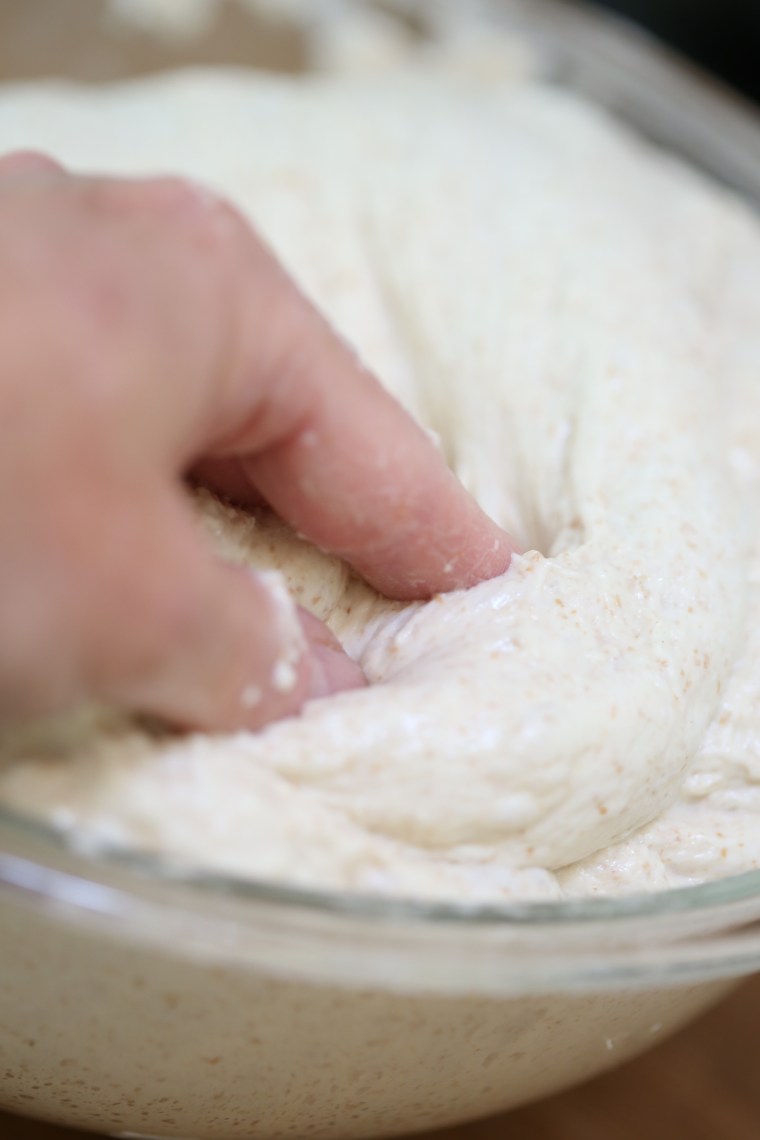 As the dough develops and rises, it gets softer and lighter and you need to take care not to press the air out in the process of turning the dough.
 When it is ready, dumped onto a table and cut in half. A minimal amount of flour is used to help with shaping. The folding and shaping is probably the most complicated step and it is completed with one hand and a bench knife. Lifting and stretching the dough across it’s center, it is carefully shaped so that it is not deflated.
 After shaping, it is allowed to rise in a cloth lined bowl which has been floured.
 The loaves rise for about 3 hours and because most of us do not have two dutch ovens or even the ability to bake with two of them simultaneously, you will want to hold one back by placing it in the fridge for a while.
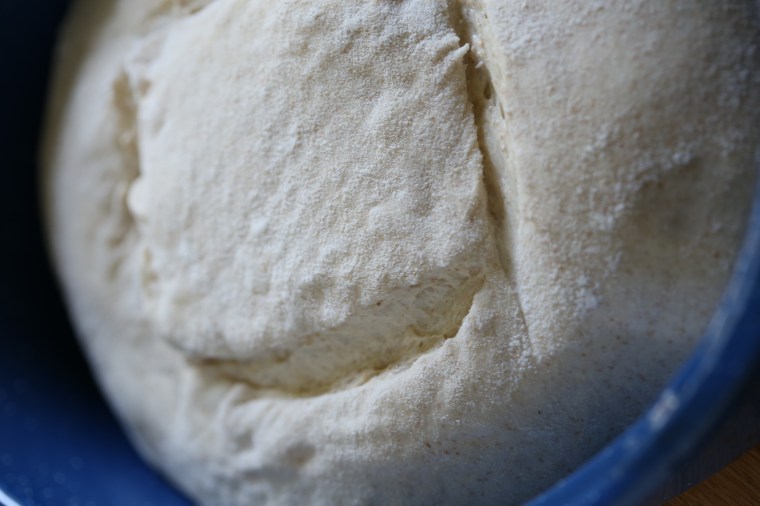 Once the oven and the dutch oven are heated properly, flour the surface of the dough (do not forget this step-it will not come out of the pan if you do!) and turn it into the hot pan. Using a lame or a very sharp blade, score the dough, cover it and place it in the oven. Twenty minutes covered, twenty minutes uncovered and it will be ready to take from the oven.

 Beautifully colored, perfectly blistered. Let it cool completely before cutting into the loaf.