bread baking day #49-grissini

it’s spring, the weather is just warm enough and the garden is bursting with lettuce and greens.  for tonights dinner, i chose to make a salad using the different lettuces and spinach from my garden.  the best part of the dinner, the grissini, or bread sticks if you prefer, to go with the salad.  when i checked out the challenge for this month’s bread baking day, i was thrilled to see that it was simply to bake a pizza or an italian bread.  so simple that it took me over a week to decide!

the challenge for april is being hosted by manuela of cravo e canela and there is still time to submit a bread if you want to participate.

when i would like to bake authentic italian style breads, there are only a couple of books i reach for.  while trying to find some inspiration, i pulled my copy of the modern baker by nick malgieri off the shelf and opened it to a random page.  it just so happens that the recipe i turned to was for grissini.  not just grissini but the easiest and most fool proof recipe for grissini i have ever tried.
the dough is mixed up in less than 5 minutes by using a food processor.  after letting it rise for an hour, the dough is deflated and allowed to rise again for as little as an hour or as long as 24 hours.  after sitting in the fridge for about 18 hours, i took it out and began the process of shaping the grissini.
first the dough is deflated and shaped into a square on a floured surface.  

 the dough is then cut into evenly sized pieces

 the sticks are shaped by rolling them with your palms as if you were making play-dough snakes.  so easy, too easy really, and fast.  with a recipe like this, you have no excuse not to make a batch.

sesame grissini
adapted from the modern baker by nick malgieri
makes about 24 (15″) bread sticks
2 cups unbleached all purpose flour
1 teaspoon salt
3 1/2 tablespoons olive oil
1 tablespoon sesame seeds
2 1/2 teaspoons active dry yeast
1/3 cup warm water-110F
1/3 cup cold water
cornmeal for dusting
place the flour, salt, oil and sesame seeds in the bowl of a food processor.  pulse it to combine and distribute the oil evenly.
whisk the yeast into the warm water and add to the flour mix.  pulse it 2 to 3 times.  add the cold water and pulse the dough until it forms a ball.  continue pulsing for 10 seconds.  remove the dough and place it in an oiled bowl and cover it with plastic.  allow it to rise until doubled, about 1 hour.
scrape the dough out of the bowl on to a floured surface and fold it over on itself a few times to deflate it.  once again, place it in an oiled bowl, cover it with plastic and place it in the fridge to rise for as little as 1 hour or as long as 24.  
preheat the oven to 325.  line two baking sheets with paper and dust with cornmeal.  place the dough on a lightly floured surface and flatten it into a square with an even thickness.  use a knife to cut the dough into quarters.  take each of the quarters and cut it into 6 pieces by first cutting it in half and then by cutting each half into thirds.  you should have 24 pieces in all.
place one piece of the dough on the table and using your palms, roll the dough back and forth to make a rope.  keep rolling it and using gentle pressure to make each one as long as the baking pan-about 15″ in length.  carefully lift and place the stick on the pan.  
place the two pans in the oven and bake(no rising needed) for 10-12 minutes.  rotate the pans and continue baking the sticks until they are golden brown and crispy, about 10-15 minutes.  this took a little longer in my oven so keep a close eye on them to ensure that they are not over baked.  
this is a simple recipe that proves things do not need to be complicated to be tasty!  here’s to you nick for a recipe well done!!!  be sure to try baking a bread or a pizza and joining us.  thanks to manuela for giving me an afternoon filled with yeasty goodness.

tangzhong style bread, wishful thinking and bread baking day #46

it has been way too long since i participated in a bread baking day challenge.  each month, a host is selected and a theme is announced.  this month, the challenge is being hosted by noor of ya salam cooking and when i read it, i couldn’t wait to bake a loaf of bread.  i know, what a party animal; she bakes bread for fun.  no really, i am but the theme for this month is to bake a loaf of bread from a place you would like to visit.  so if you want to go to france, bake a croissant.  if you want to go to italy, bake a loaf of pannetone.  you get the idea, i know you do.  so did i and i finally had a reason to try the recipe i had bookmarked for tangzhong bread.  tang-what?  it is the most unusual bread technique i have encountered and it comes from a place i hope to visit some day; china.  the technique is credited to a  chinese woman, yvonne chen, who wrote a book titled 65c bread doctor.  in this book the technique of making a “water roux” starter is demonstrated.  while the technique is attributed to the chinese, it is apparently very popular in japan too.  so either way, my bread is a nod to a place i would like to visit, and if somebody wants to buy me a ticket, i’ll go to either china or japan, i’m not that picky!

i discovered the technique by accident.  i was trying to find a conversion table for ingredients so that i could convert a recipe in ounces to grams when i stumbled upon the website christens recipes.  while looking at some of her recipes, i found the tangzhong recipes and bookmarked the page for a day when i had the time to test the recipe.  for all of you that know me, you know that i can bake-i do it for a living but bread is not my specialty and as much as i have worked with bread, it still intimidates me.  well, after making two loaves with this technique, i may not ever be scared again!

 my first batch of tanzhong bread, hokkaido milk bread using the recipe 
found on kirbie cravings
 my second batch was a multi grain loaf from une-deux senses

 look at the beautiful crumb of this bread!  so light and moist and easy to slice.  wait until the next day and you will get picture perfect slices-no one will believe you made this at home!  the best part, no chemicals, no stabilizers or conditioners and nothing artificial!  the extra boost in moisture from the tangzhong helps to keep the bread fresh.  the only thing i would suggest, if you do not like your bread to taste sweet, cut the sugar.  for the multi grain loaf, i reduced it from 3 tablespoons to 2 and i like it much better than the white loaf.  the white loaf is still very good, just not my first choice for a savory sandwich but i bet it would make great french toast!

the two loaves side by side.  i will make this again and i hope to find the book someday-reading it will be a challenge though…

since there are several important steps to take when making this style of bread, i am not printing the recipes here but rather including the links to the websites i used.  on all of these pages, you will find valuable information along with detailed step by step photos that would do so much better than anything i could post here so i encourage you to use these sites and make a batch of wonderful bread!

kirbie cravings-milk bread
une deux sensés-multi grain bread
christine’s recipes-bacon and cheese bread
65c bread doctor by yvonne chen

a big thanks to noor for such a wonderful way to spend an afternoon.  feeling brave, bake a loaf and head over to ya salam cooking and join in on the fun!

bread baking day #39, roundup

the moment you have all been waiting for!  the salt rising bread round up.  well, it’s a short one.  it seems that many of the usual bread baking day participants were reluctant to try this bread.  i don’t blame them-it can be rather stinky and difficult.  not everyone in the roundup had a bread to show for it.  no matter, i enjoyed trying something new-hosting a challenge and baking something i had never baked before.

for all of you who stop by, visit zorra, the founder of bread baking day and see what the challenge for june is.  here is a hint, it is the 4th anniversary for bread baking day in june and zorra is hosting the challenge!  happy baking!!!

real italian garlic bread 
 swathi of zesty south indian kitchen located in texas, usa
3 different loaves; plain, cheese and dandelion
miss nirvana of creating nirvana in the midwest, usa was especially busy with this recipe!
salt rising bread recipe #2
baked by astrid of paulchens food blog in austria, vienna
bernard clayton’s salt rising bread
baked by judy of judy’s gross eats in ventura, california, usa
strong smelling doorstopper
is how zorra described her loaf!!!
as you know, zorra is the founder of this blog, she does her baking in andalucia, spain and you can read all about her bread and even watch a video about salt rising bread on her website, 1x umruehren bitte.
salt rising bread, recipe from a master’s thesis by delene clark holbrook
baked by cathy of bread experience in atlanta, georgia, usa
this blog post is worth reading-lots of info on the history of salt rising bread!

besides the two loave i baked for the announcement, i also baked this loaf.
buckwheat salt rising bread

one other baker deserves a mention.  connie, from thailand, emailed me to tell me that she just could not get a loaf from any of the starters she made.  perhaps it was the ingredients-she may not have been able to find the right cornmeal.  either way, she made an effort and i appreciate that, too bad it didn’t work!
many thanks to all the brave bakers who accepted my challenge and thanks to zorra for giving me the opportunity to host this event!  see you next month when we all bake again!

salt rising bread with buckwheat flour-bbd#39

as the host of this month’s bread baking day event, i was given the chance to choose the theme.  i have a coworker who talks about the salt rising bread his grandmother made.  they called it stinky bread because of the cheesy scent that it has.  i have always wanted to try it but have been reluctant because many of the recipes tell you how hard it is to get the starter going.  james beard, in his book beard on bread, almost tells the reader not to bother with it due to the fickle nature of the starter.  honestly, i have made three batches of this bread and all three have worked perfectly.

a recent trip to the whole foods across town gave me an opportunity to pick up some different flours.  i chose buckwheat flour and organic blue cornmeal.  rather than use the standard cornmeal for the starter, i went with blue cornmeal and the recipe for salt rising bread #2.   it took approximately 24 hours for the starter to become active.

to make the sponge, i followed the recipe but made a substitution.  i measured 2 tablespoons of flax seed meal, placed it into a measuring cup and then filled the cup with buckwheat flour.  this mixture was added to the sponge in place of one cup of flour.  i then proceeded with the recipe as it is written-use the link above for the recipe.  the photo shows the sponge as it looked after sitting overnight.

the dough after kneading and waiting to be shaped

waiting to be baked
fresh from the oven
warm bread, mmmmmm…..
follow the link and join us, there is still time-deadline is may 1.

hostess with the mostest-bread baking day #39, salt rising bread

Bread Baking Day #39 - Salt Rising Bread (last day of submission May 1st, 2011)it’s that time again.  what time is that you ask-why it is bread baking time and luckily for you, i am hosting this month’s bread baking day celebration.  for those of you not familiar with bread baking day, it is a monthly event for bread bakers of all skill levels which was created by none other than zorra of kochtopf.  each month, the chosen host picks a theme and the participants bake a bread to match the theme and then blog about it.  at the end of the month the host posts a round up featuring photos of what each participant has baked.  since the theme changes each month, there is always something new to look at and learn about.  still not sure, then hurry over to cindystar’s blog to check out the round up for march.  
baking bread is something i truly enjoy.  there is something magical about turning a wet, sticky mess into a smooth and elastic dough and finally watching as it rises in the oven.  better still is the chance to do this without adding a bunch of yeast by growing your own natural leavener.  but honestly, sourdough has been done-over done to some extent and that is why i have chosen to go to the next level.  the theme for april 2011 is salt-rising dough.  a mixture that can include potatoes, stone ground cornmeal and milk is allowed to ferment and the resulting bacterial growth leavens the bread.  so before you think this is sourdough, it is different in that it uses yeast as well as bacteria for the leavener and it does not ferment long enough to actually be sour tasting.  it is also notoriously fickle and difficult to make.  everything i read about it stated that i may or may not get bread.  that sounded like a challange, almost a dare so i had to jump in and give it a shot.

for those of you that have not heard of this bread, i am posting two recipes at the end of this post that you can use.  however, feel free to use any salt rising bread recipe that you like and to include it in the post with as many helpful hints as possible.  anyone brave enough to bake along needs to know a few rules for participating:
  1. please keep in mind that i speak and read in english-when you contact me, do so in english please. also, please have your blog post in english or at least partially in english and if you can add a translator button to the nonenglish parts of your blog-wonderful.  
  2. post your entry on your blog and link back to this page.
  3. email me with the following information:  name of your blog, the permalink for the post, your name, country and city and a 300x300pixel photo of your bread.
  4. the deadline is may 1, 2011.
  5. email me at bakinbabe116@aol.com and be sure to put bbd#39 in the subject line.

good luck bakers, may the power of bread be with you!

salt-rising bread #1
one note about this process-it has an incredibly strong odor!  when i say that, i mean it really smells bad from the moment that the starter begins to ferment to the moment that it finishes baking.  you may think something has gone wrong but do not worry, it has a pleasant flavor with no hint of the stink!  it truly lives up to the reputation of having a cheesey smell and taste. 
adapted from the fannie farmer baking book by marion cunningham
3 (8x4x2) loaves
starter
2 medium potatoes-peeled and sliced thin (i forgot to peel mine!)
1 quart boiling water
1/4 cup stone ground cornmeal-needs to be whole grain cornmeal
2 tablespoons sugar
1 teaspoon salt
place the potatoes in a bowl and add the water.  stir in the remaining ingredients and place this somewhere that the temperature will remain warm constantly-i used my oven with the light on.  allow this to sit for 24 hours which will give it time to get foamy on top and develop the bacteria and the cheesy smell.  remove the potatoes and discard them.

the potato starter fully fermented-warning:it smells strongly!

sponge
1 1/2 cups milk
the starter
1/4 teaspoon baking soda
3 1/2 cups all purpose flour
heat the milk until it is a little warmer than body temperature.  add the milk, baking soda and the flour to the starter and mix until smooth.  cover and set it in the same warm spot until it doubles in bulk-about 2-3 hours it will be creamy and light when ready but do not let it go too long because it will begin to sour and that will change the flavor.

the sponge made from the potato starter

dough
4-6 cups all purpose flour
2 1/2 teaspoons salt
6 tablespoons shortening
the sponge
place 4 cups of the flour and the salt in a mixing bowl and rub in the shortening thoroughly.  add the flour mixture to the sponge and mix it until combined.  using the remaining flour, knead it into the dough as required to form a smooth and slightly heavy dough-about 10 minutes.  divide into 3 pieces, shape them into loaves and place into greased loaf pans.  allow to rise until about 1/3 larger and expect this to take as long as 3 hours-i did it overnight in the fridge and then let it sit on the counter until room temp.  bake at 350 until golden brown, 45-55 minutes.  turn out of the pans and cool on a rack

the bread baked from the potato starter has a dense crumb and while it loses the smell during the baking, it retains a cheesy aroma

salt rising bread #2
adapted from the american woman’s cookbook-wartime edition, 1944
this is an old book but not a completely uncommon one-i have two different editions and have seen others in stores that sell old books.
2 loaves

starter
1 cup milk
2 tablespoons stone ground cornmeal-whole grain cornmeal
1 teaspoon salt
1 tablespoon sugar
heat the milk but it is not necessary to get it hot, stir in the remaining ingredients.  pcover the bowl and place it somewhere warm-again i used m oven for this step.  let it rise until it starts to get bubbly-the recipe states this will happen in 6-7 hours, i let mine go almost 24 hours to get it bubbly.

the milk starter at the beginning on top and fully developed on the bottom

sponge
1 cup warm water
1 teaspoon salt
1 tablespoon sugar
2 tablespoons shortening, oil or butter-melted and cooled if solid
2 cups all purpose flour
add the ingredients to the starter and mix until smooth.  allow the sponge to rest, covered, in the warm spot until it gets bubbly-mine took about 4-6 hours.

dough
about 3 cups all purpose flour
stir in about 2 1/2 cups flour to make a soft dough.  using some more of the flour, turn the dough out onto a floured  surface and knead it until smooth and no longer sticky-about 5-10 minutes.  shape into loaves and place into greased loaf pans.  place the pans in the warm spot and let them rise until doubled

the bread baked from the milk starter has a slightly more open crumb and luckily, it never  gained the smell that the potato starter had. 

no knead bread, bbd #38

 each month, i look forward to the bread baking day challenge.  this month, we are baking no-knead breads thanks to cindystar, our lovely hostess.  if you have paid any attention to baking bloggers in recent months, then you most likely have heard about the no-knead bread from jim lahey of sullivan street bakery in new york city.  it was made famous by none other than mark bittman when he wrote about it in his new york times column.  as skeptical as i am, and trust me i am, i was sure this wasn’t going to work out well. bread loaves that aren’t kneaded, how could that possibly work out?  then i stumbled upon the recipe posted by jaden hair of the steamy kitchen.  the photos of her too cute 4 year old son andrew making bread had me thinking-if he can do it, certainly i can too.

 i didn’t take photos of the bread as i mixed it but this is the dough after sitting for the required 12- 20 hours.  i turned it out, shaped it and wrapped it in a cloth to rest again.

 my thrift store find-an enameled roaster with a cover.  it was a lucky day for me, the roaster was on sale for 50% off which made it less than $7.

 after following the recipe, i had a lovely loaf of bread!

my success with the first loaf and the fact that it disappeared quickly had me baking another loaf in no  time.  for this loaf, i substituted 1/3 of the bread flour with whole wheat flour and it baked up beautifully.  this bread is so easy and inexpensive to make that i intend to try it with different flours and i encourage anyone who makes it to do so as well!

no-knead bread
whole wheat flour adds a little color and texture to the loaf
adapted from the steamy kitchen
1 (8-9″) loaf
1 1/2 cups warm water
1/4 teaspoon dry yeast
3 cups bread flour-can substitute up to 1 cup whole wheat flour
2 teaspoons kosher salt
mix the ingredients in a bowl until combined.  cover tightly and let it rest at room temperature for 12-20 hours.  when the time is up, use a wet spatula to turn the bread out onto a floured surface.  using that spatula or your hands, turn the outside edges into the center a few times and then gently shape the dough into a ball.  place the ball of dough into a floured towel (not terry cloth) and rise it for 2 hours.
30 minutes before baking, preheat the oven to 450 and place a dutch oven, large covered casserole dish or other oven proof pot into the oven.  when the 30 minutes are up, carefully remove the pot from the oven and using your hands, turn the dough out of the towel and into the pot.  never mind how it lands-just put the cover on it and put it in the oven.  bake it covered for 30 minutes, remove the cover and bake until the internal temperature is 210F, about 20-30 minutes.  remove the bread from the pot and cool completely on a rack before cutting.
just in case you are skeptical like me, go to the steamy kitchen and look at the photos of cutie pie andrew making that loaf of bread.  they photographed each of the steps and they make a good reference for the first attempt.
thanks to cindystar for the wonderful challenge!

sourdough rye; bread baking day #37

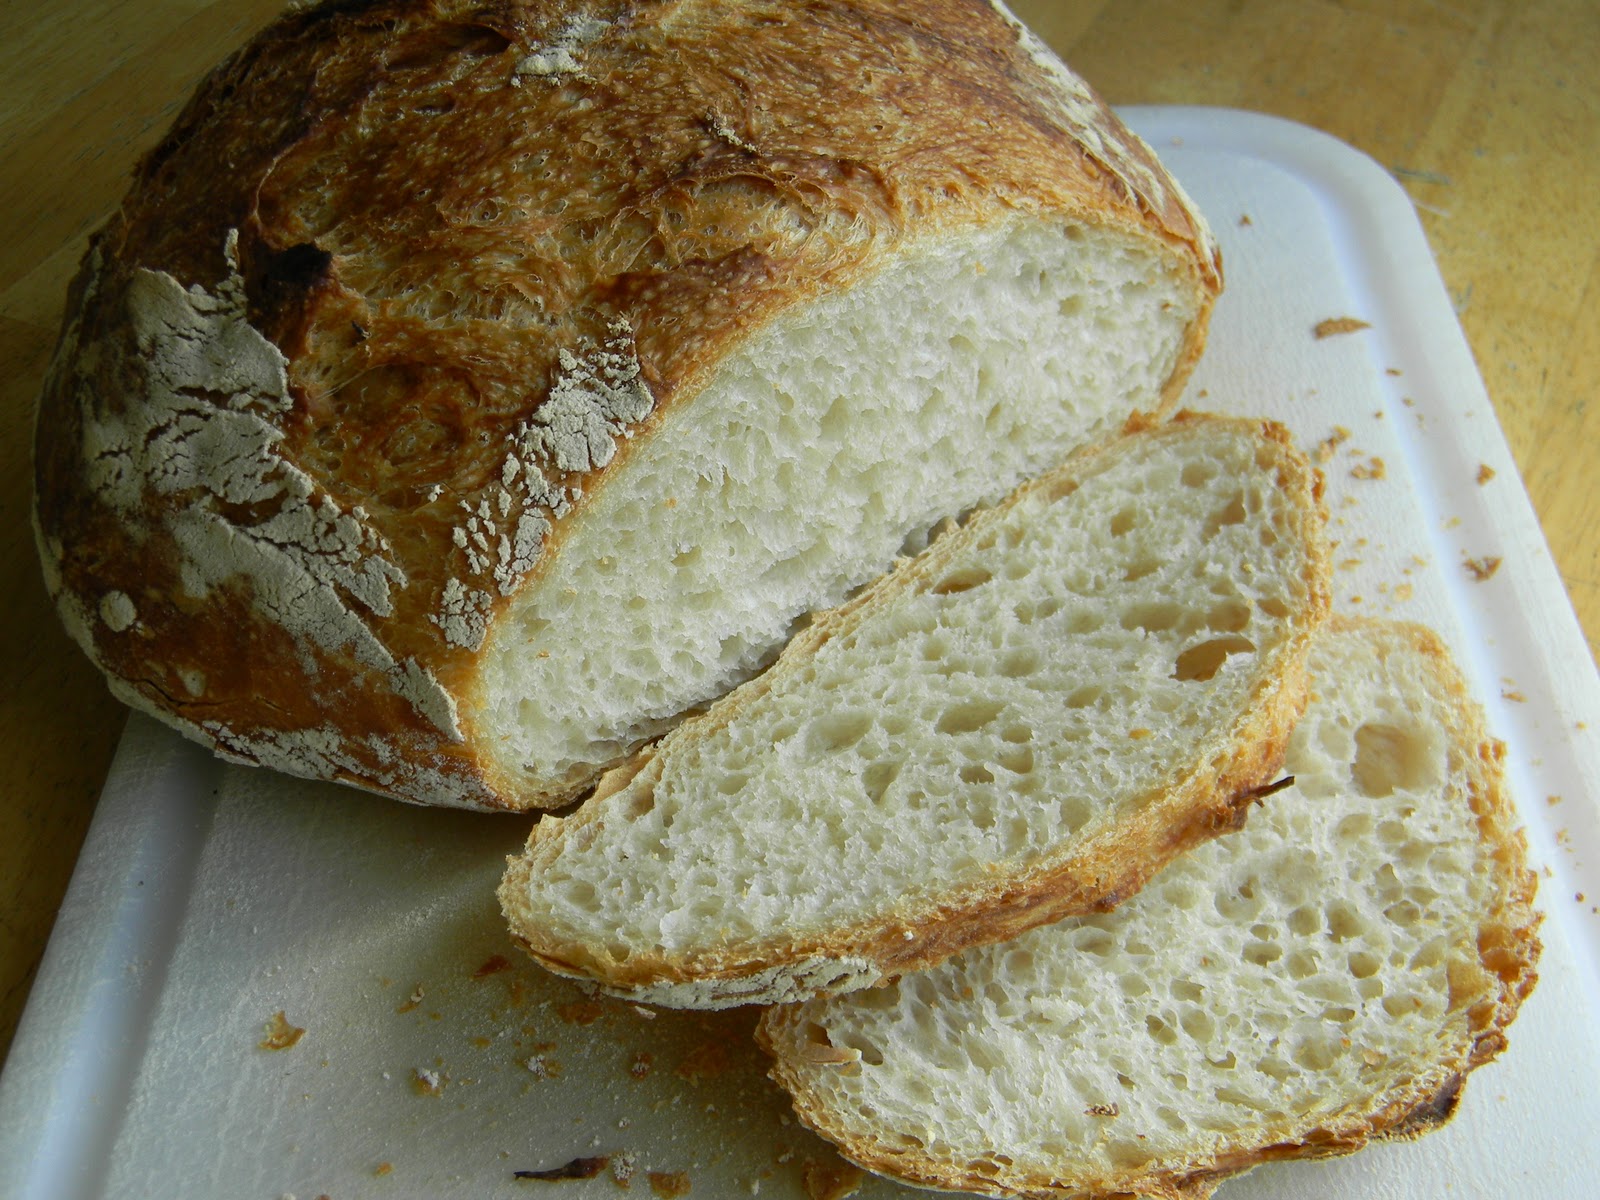
sourdough bread has always been one of my favorites.  as a kid, my grandmother took me to san francisco and i have been in love with the flavor since then.  with a slightly tangy flavor and a thick and chewy crust, authentic san francisco sourdough bread has always been the bread of choice for me.  of course, if you do not live there, you can only savor the memory once you leave because finding the same bread outside of the bay area very rarely compares.  the naturally occurring yeast in the starter has unique qualities much like a new york pizza-nearly impossible to duplicate once you leave the region.

over the years, it has been 16 years since we left san francisco, i have experimented many times with starter but never had much success until one day when our daughter needed to do a project for the science fair at school.  i suggested natural yeasts and several different types of starters and thus began a trial and error project that produced one of the best loaves of sourdough bread we had eaten in years.  we used grapes to make the starter and for several months, the starter lived in our fridge until i neglected it and it died.  years later, i found myself working in a garden as a volunteer for the local master gardeners association and in this garden, grapes were growing.  more importantly, organic grapes that i could use to make a new starter.  using a recipe that has been credited to nancy silverton of la brea bakery, i proceeded to use those grapes to grow the best starter i have ever had and a year and a half later, it is still going strong.  the starter worked out so well that i split it and i now have a jar of white starter and a jar of rye starter.

my fascination with bread also led me to bread baking day.  each month for the last 3+ years, the followers of bread baking day pick a host who choses a theme or a specific recipe and everyone bakes bread and posts the results on blog pages worldwide.  at the end of the month, the host of the month posts a roundup of all of the breads produced by the participants.  over the last year or so, i have sporadically participated in the monthly event.  when i saw that this months theme was a bread that used a sponge or ferment, knowing that my rye starter needed a feeding, i baked a loaf of sourdough rye.

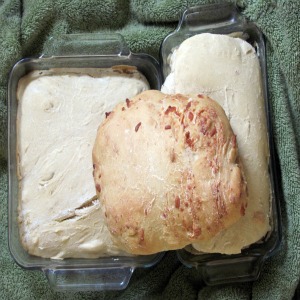
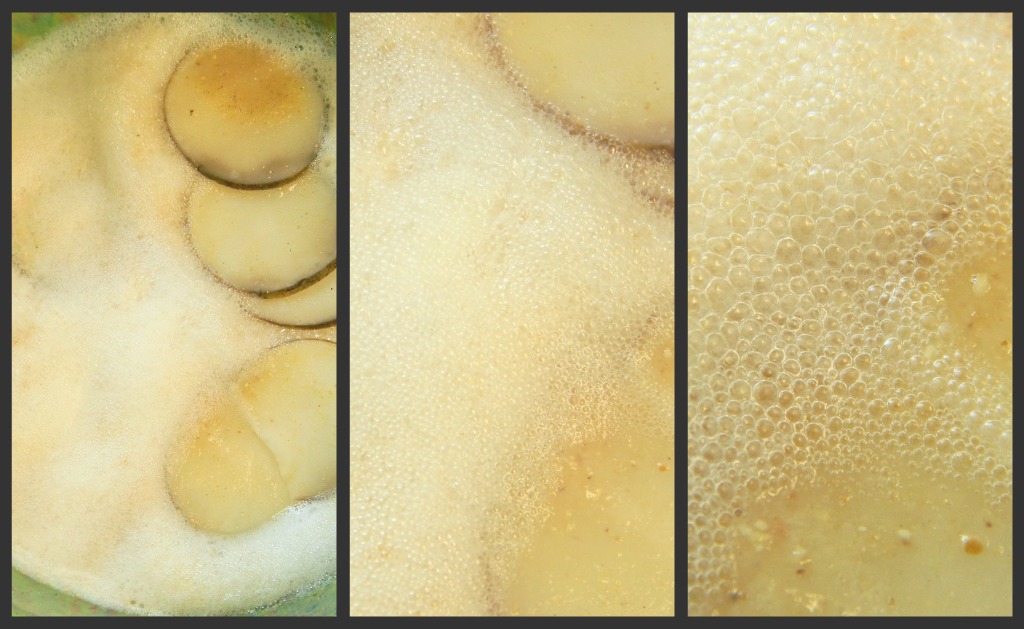
freshly mixed sponge

first i took a cup of the starter and placed it in a bowl with some water and flour.  it makes a soft dough when it is mixed and this is then allowed to sit and age to develop a sour flavor.  on the left is what the sponge looked like in the bowl and the right is a close up view-you can see the caraway seeds and the bits of the rye grains in the flour.
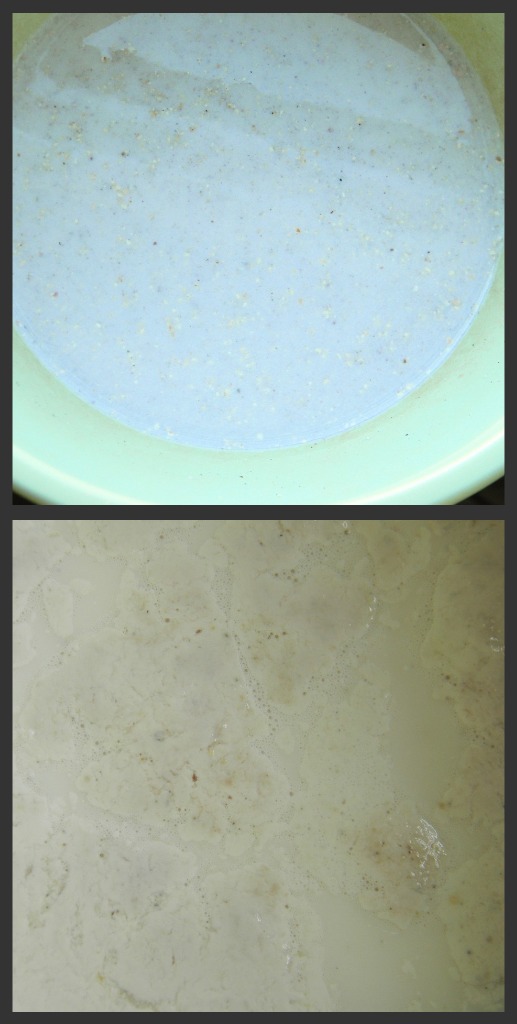
after 24 hours

it has been cold here and as a result, my starter grew very slowly.  so slowly that i decided to let it go an extra day.  here it is before i stirred it(on the left).  after sitting out for 24 hours, it became rather runny but it still had some structure from the plain bread flour that was mixed in.

after 48 hours                                                        

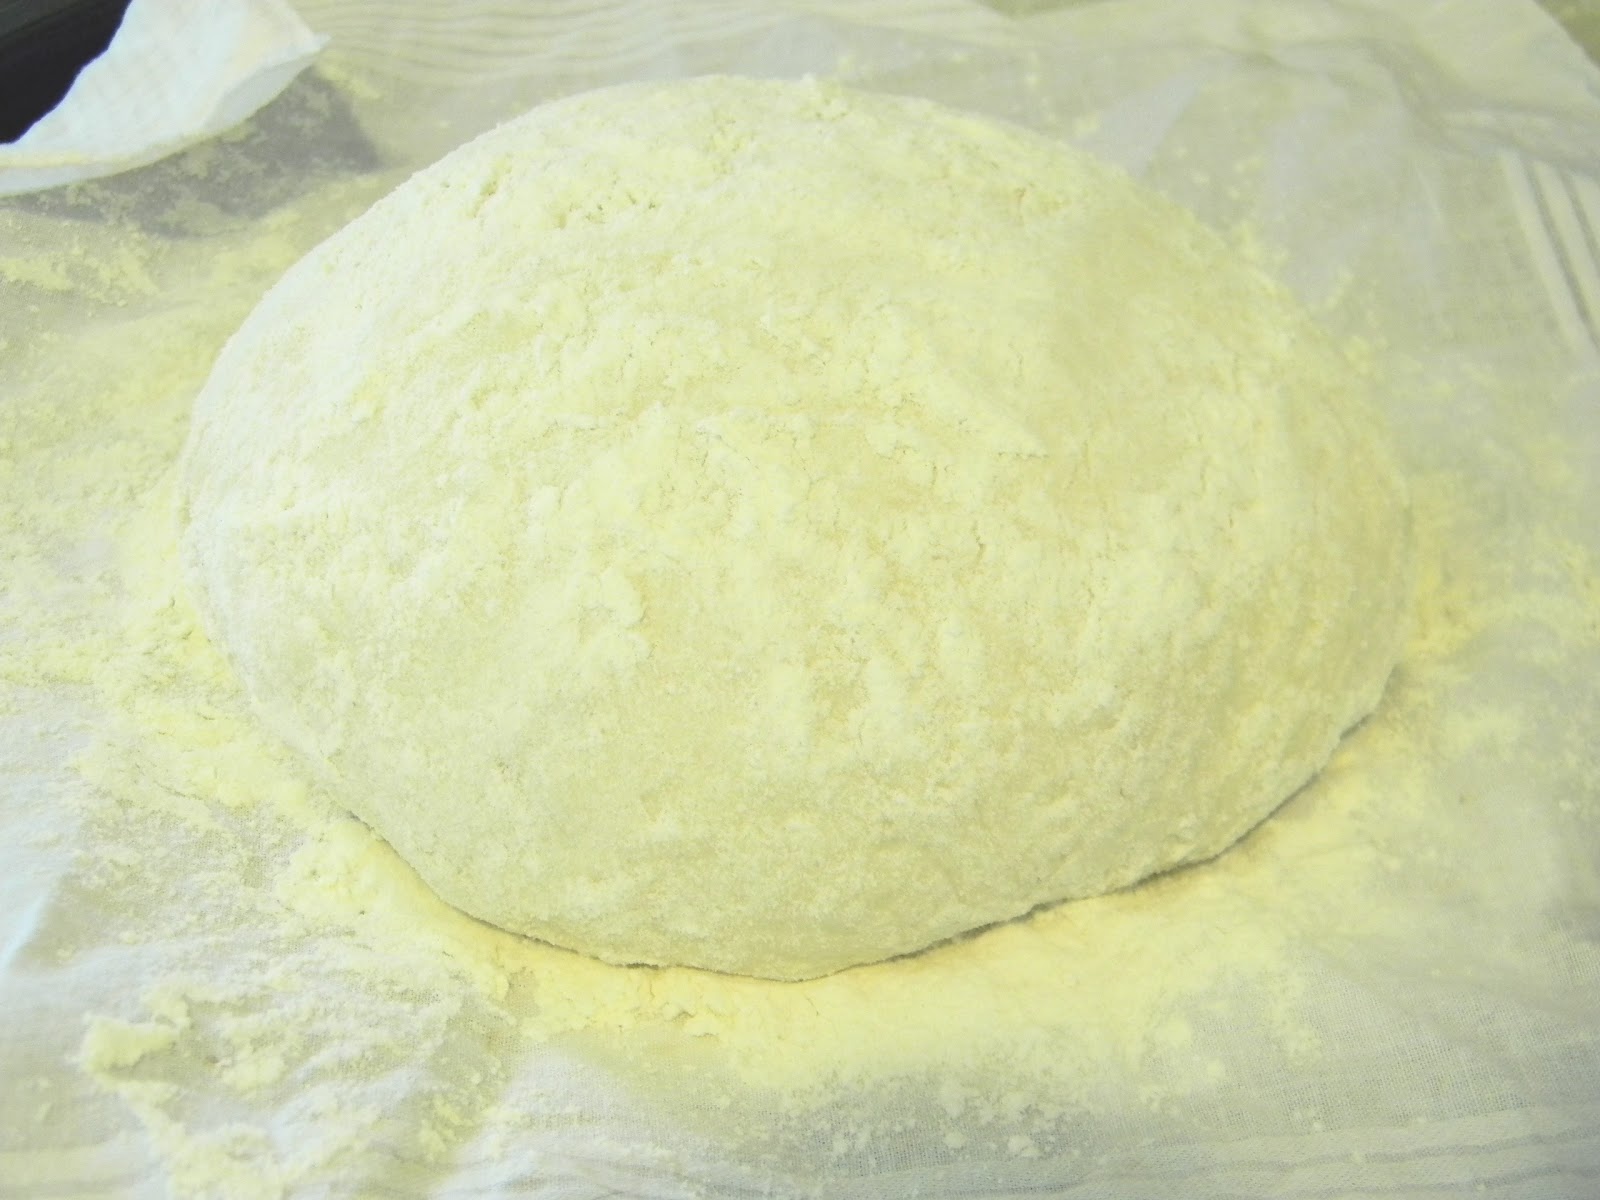
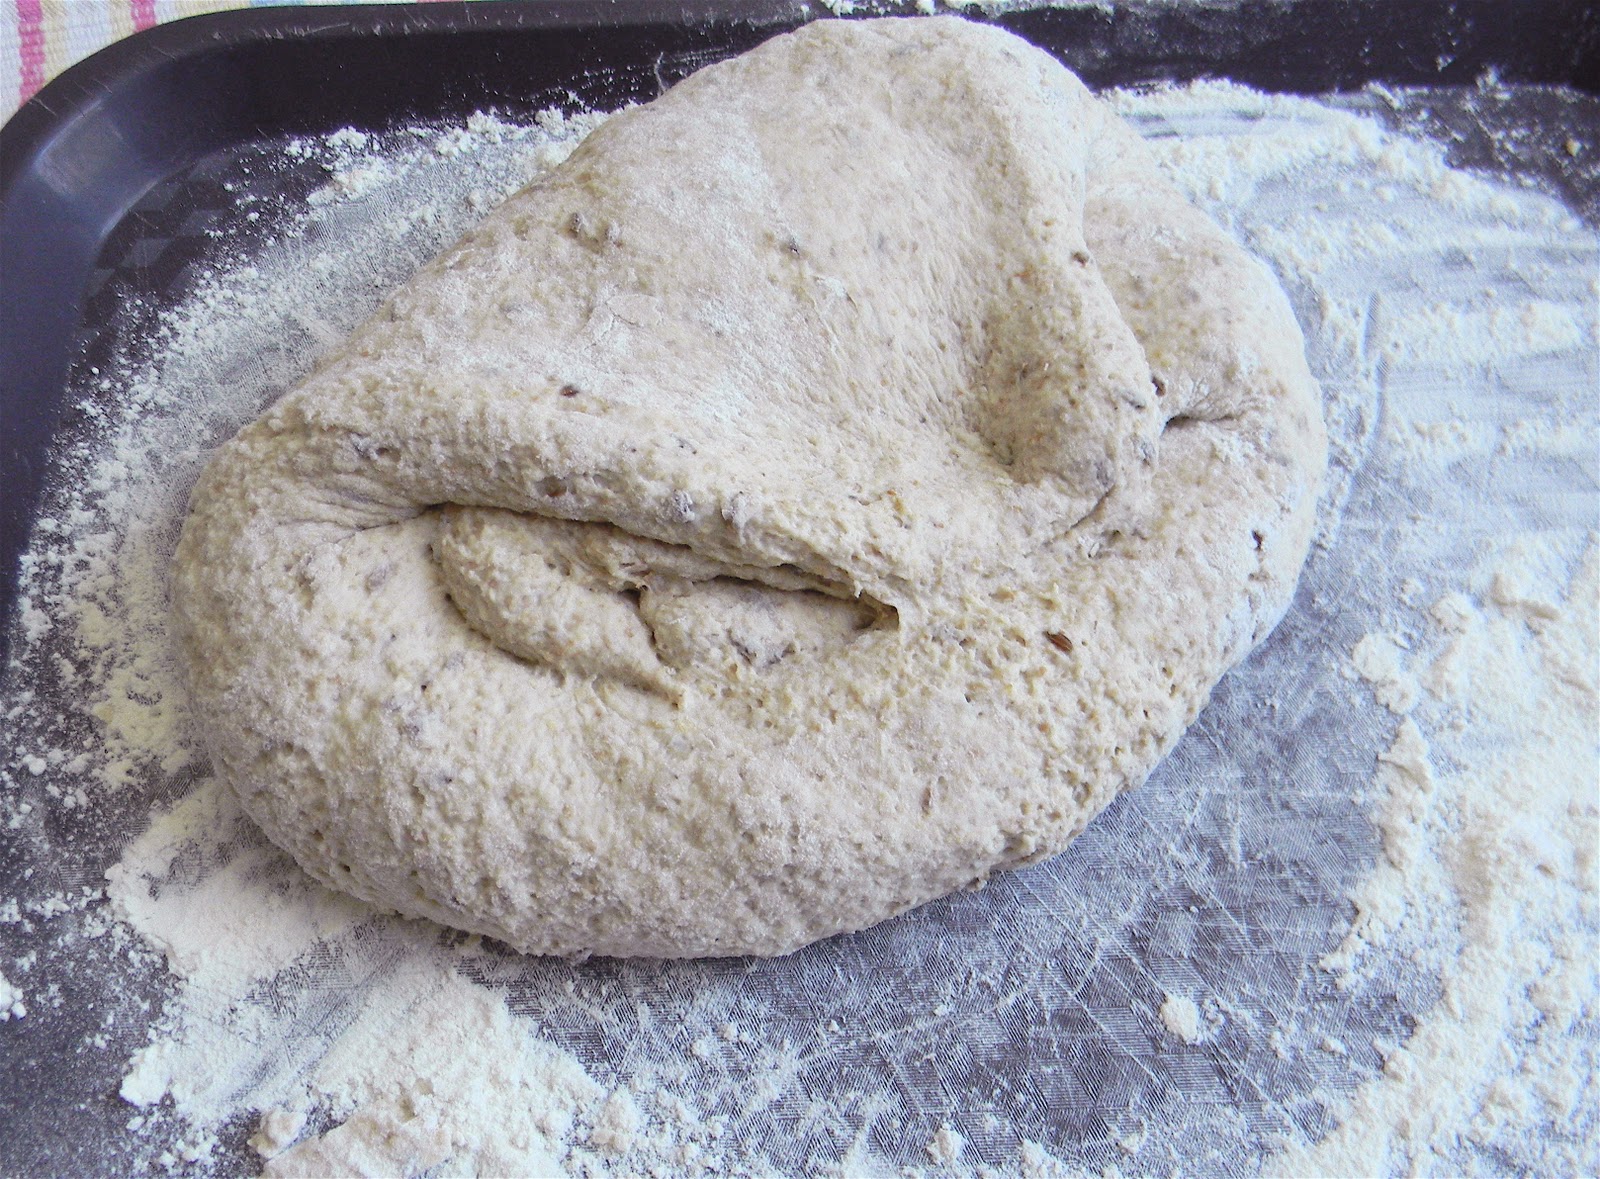
on bake day, i added some salt and bread flour and prepared to knead the dough by hand.  using a spatula, i mixed in as much flour as i could and at this point, the dough had the consistency of a soft biscuit dough.  i turned it out onto the tray and started kneading.

after 3 minutes of kneading
the dough is beginning to show some structure and it is still a bit sticky and soft.

 after 7 minutes kneading
the dough is no longer soft-it has definite structure and is just a little sticky from the friction of kneading.

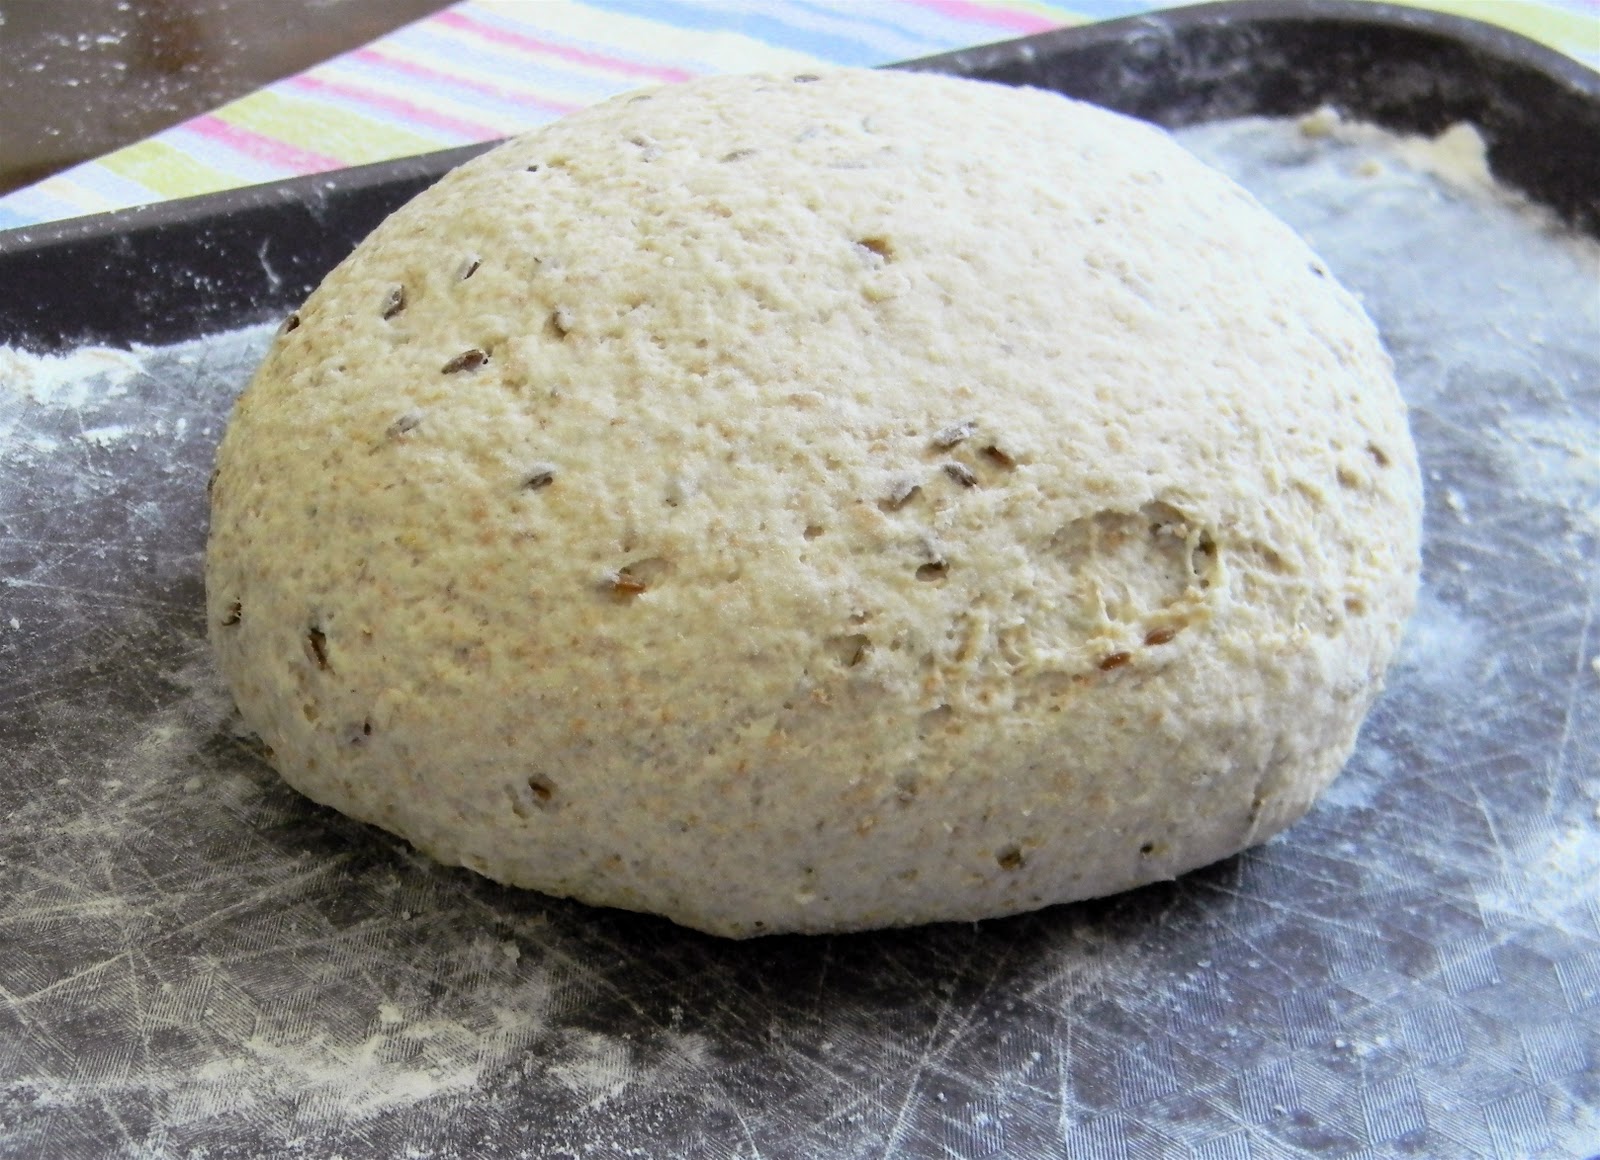
after 10 minutes kneading
the dough holds its shape and is elastic.  the grains from the stone ground rye prevent it from looking smooth but it is ready to rise in an oiled bowl until about double in size.

remember what i said about the kitchen being cold? well, i do not have a gas range in my kitchen and i cannot use the heat of a pilot light to rise bread.  however, my oven does have a light in it and it is the perfect place to rise a bowl of dough.  since it is in the closed oven, there are no drafts and the light quickly heats up the space.

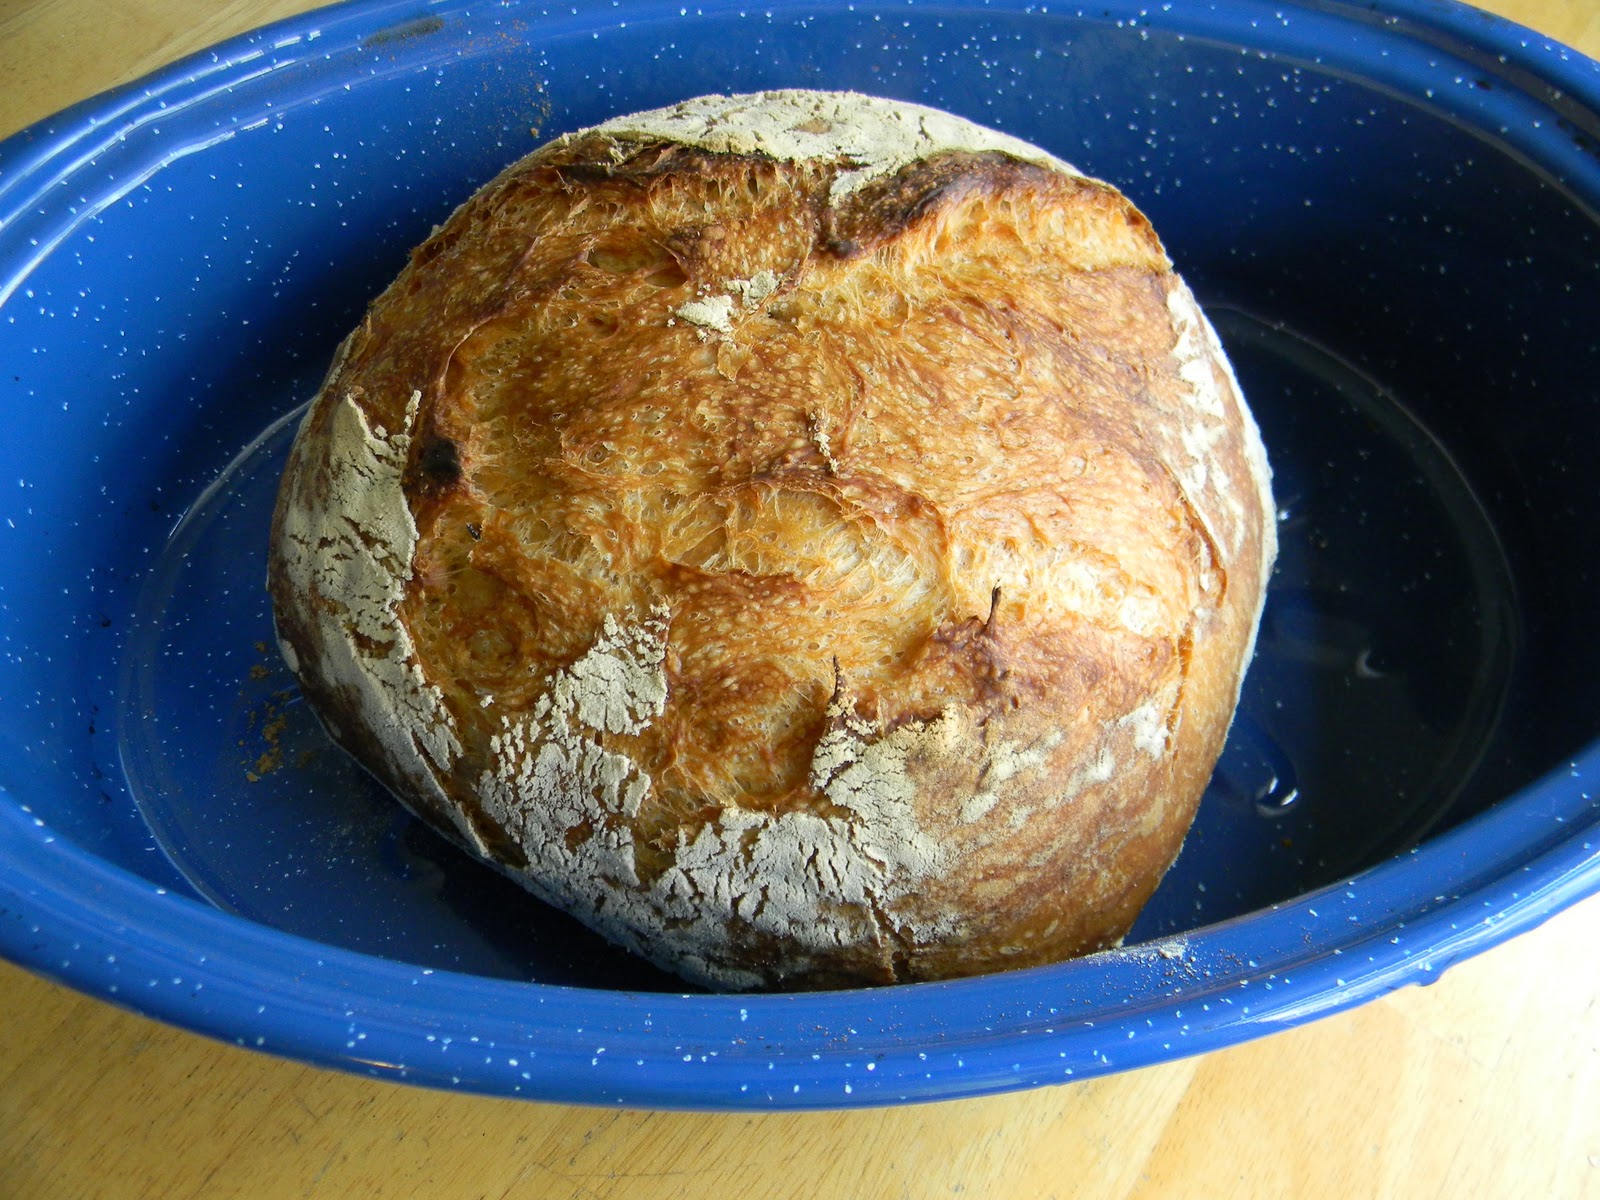
to give the finished bread a textured surface, i like to do the second rise in a floured basket.  it makes a unique pattern on the surface of the dough during the rising and that pattern is retained after baking.

after the rising, i turn it out onto my peel and slide it into the hot oven where it was baked on a stone.

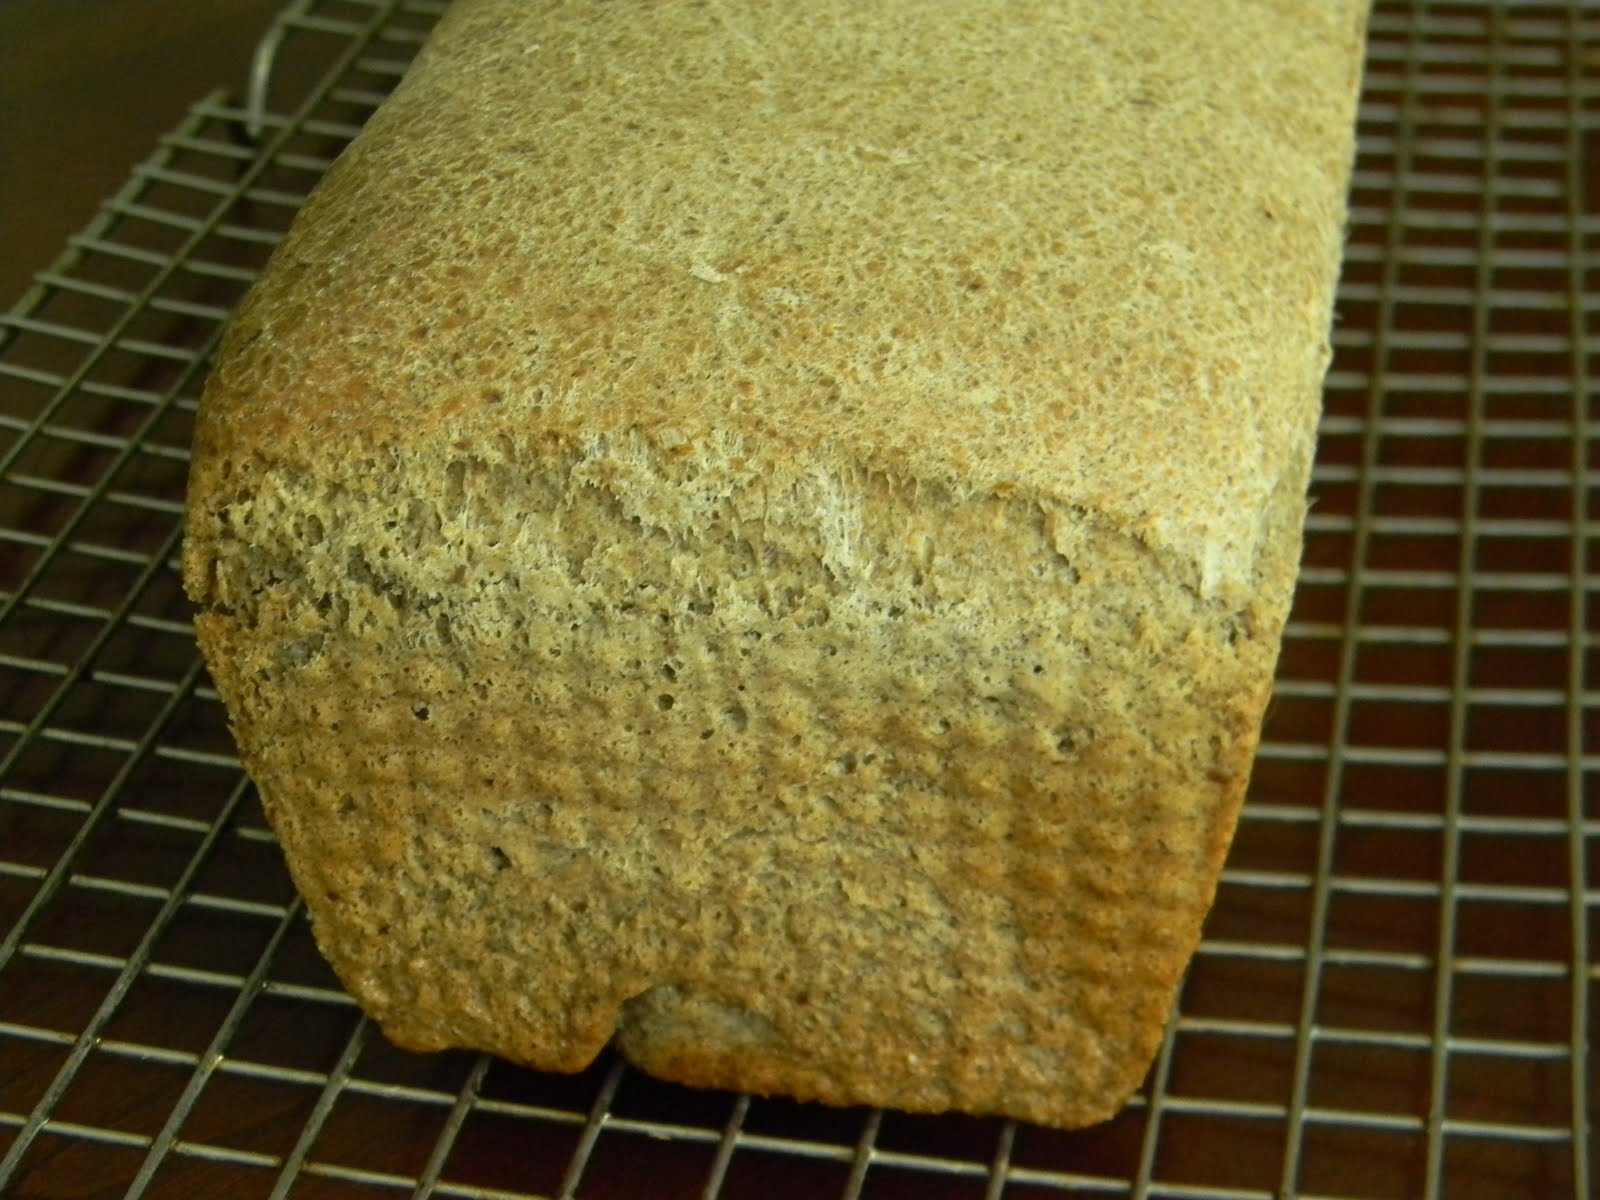
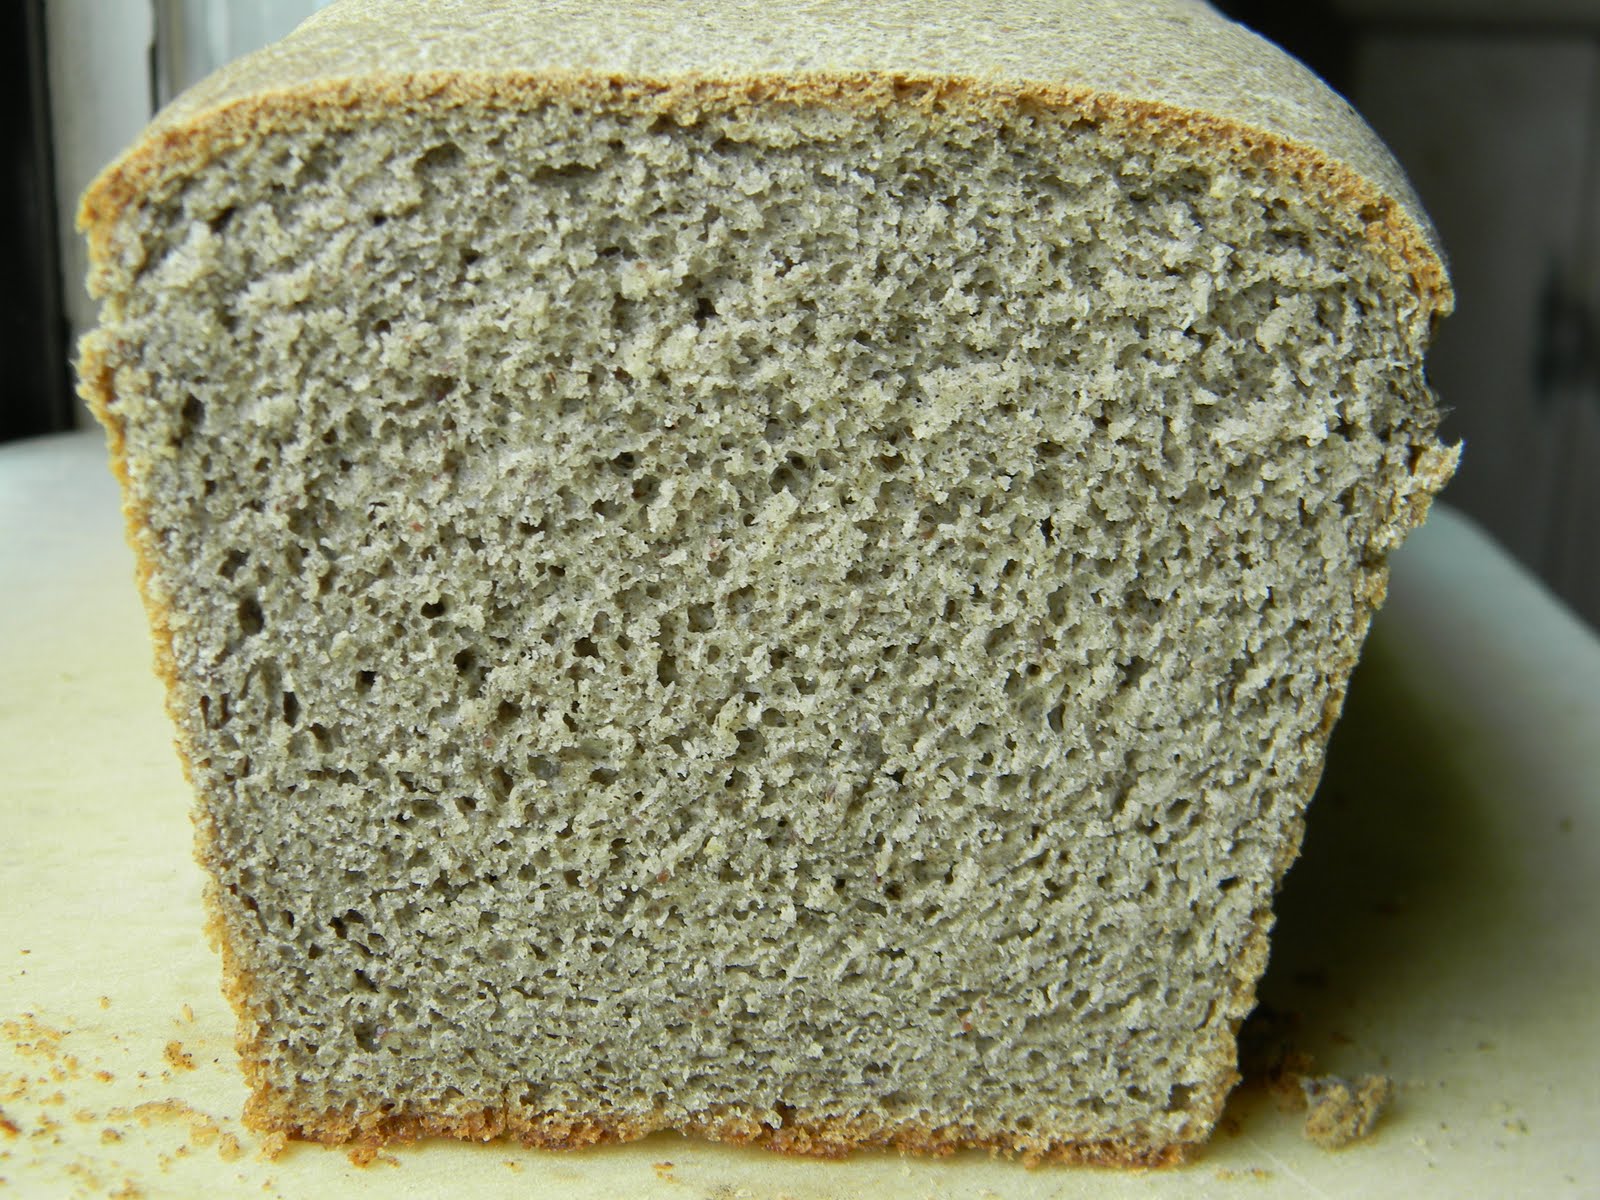
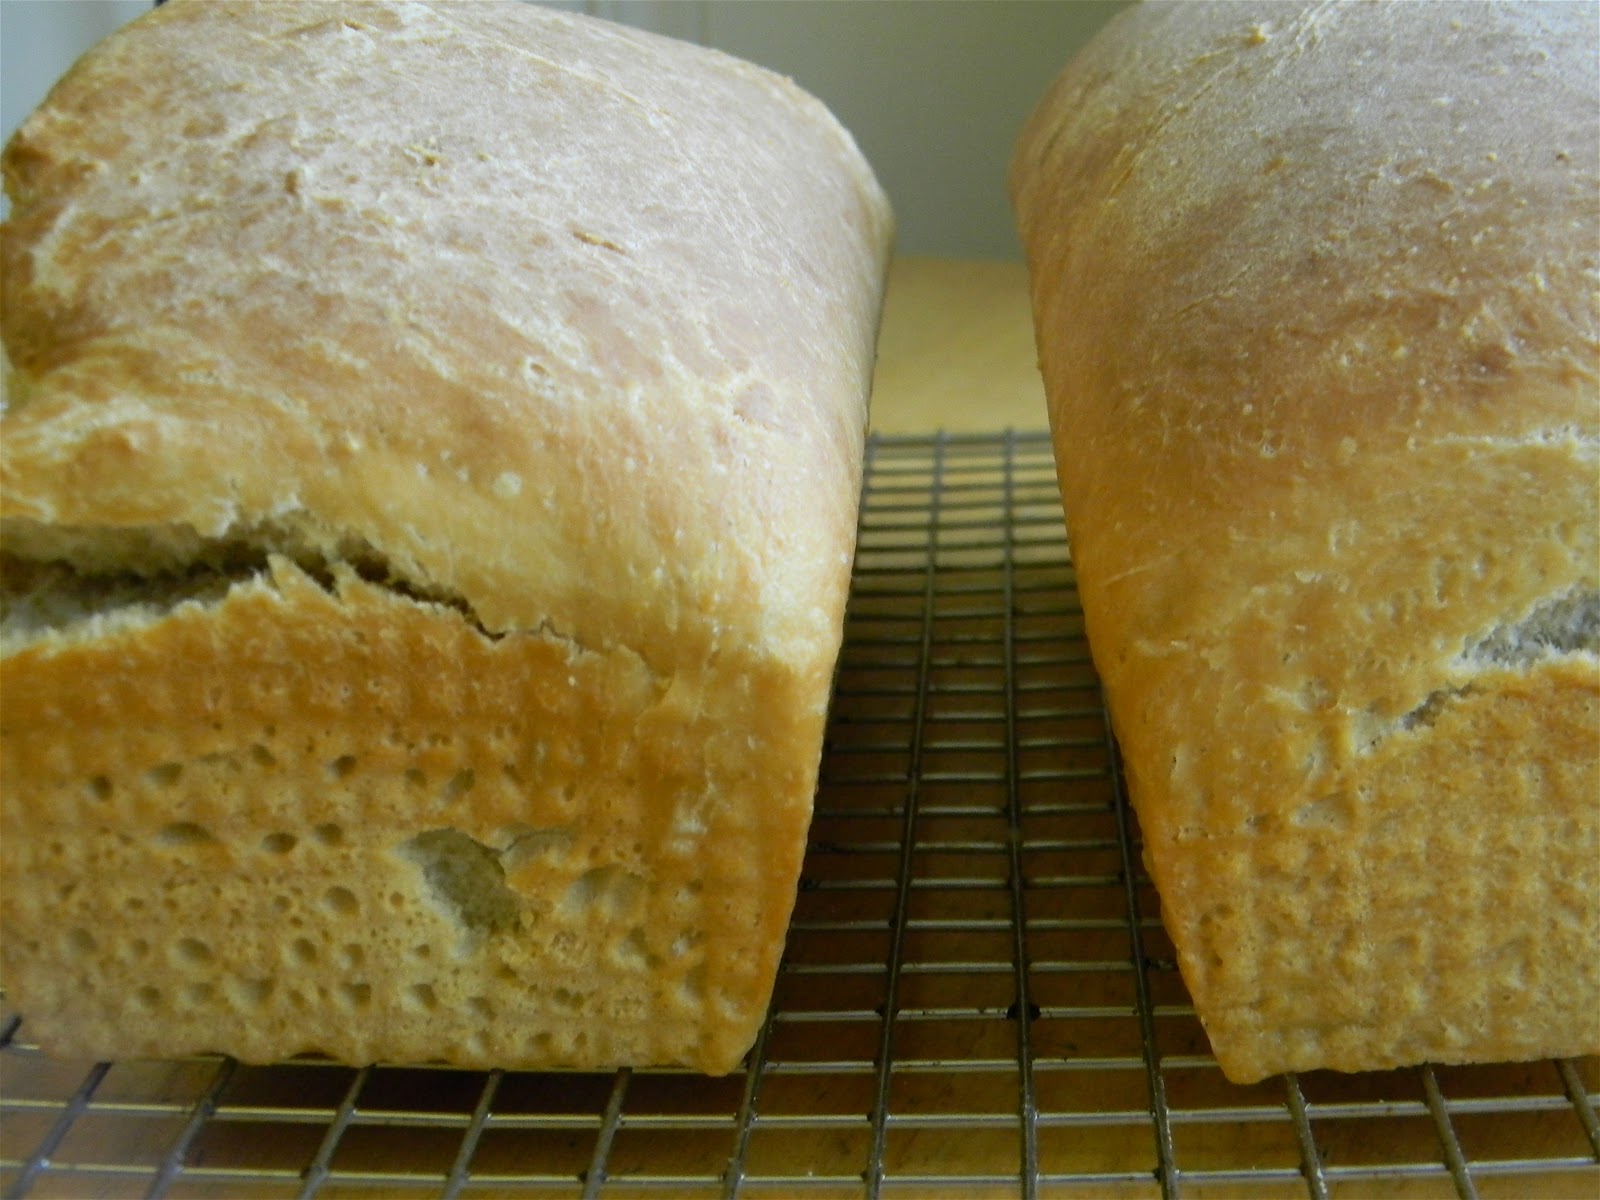
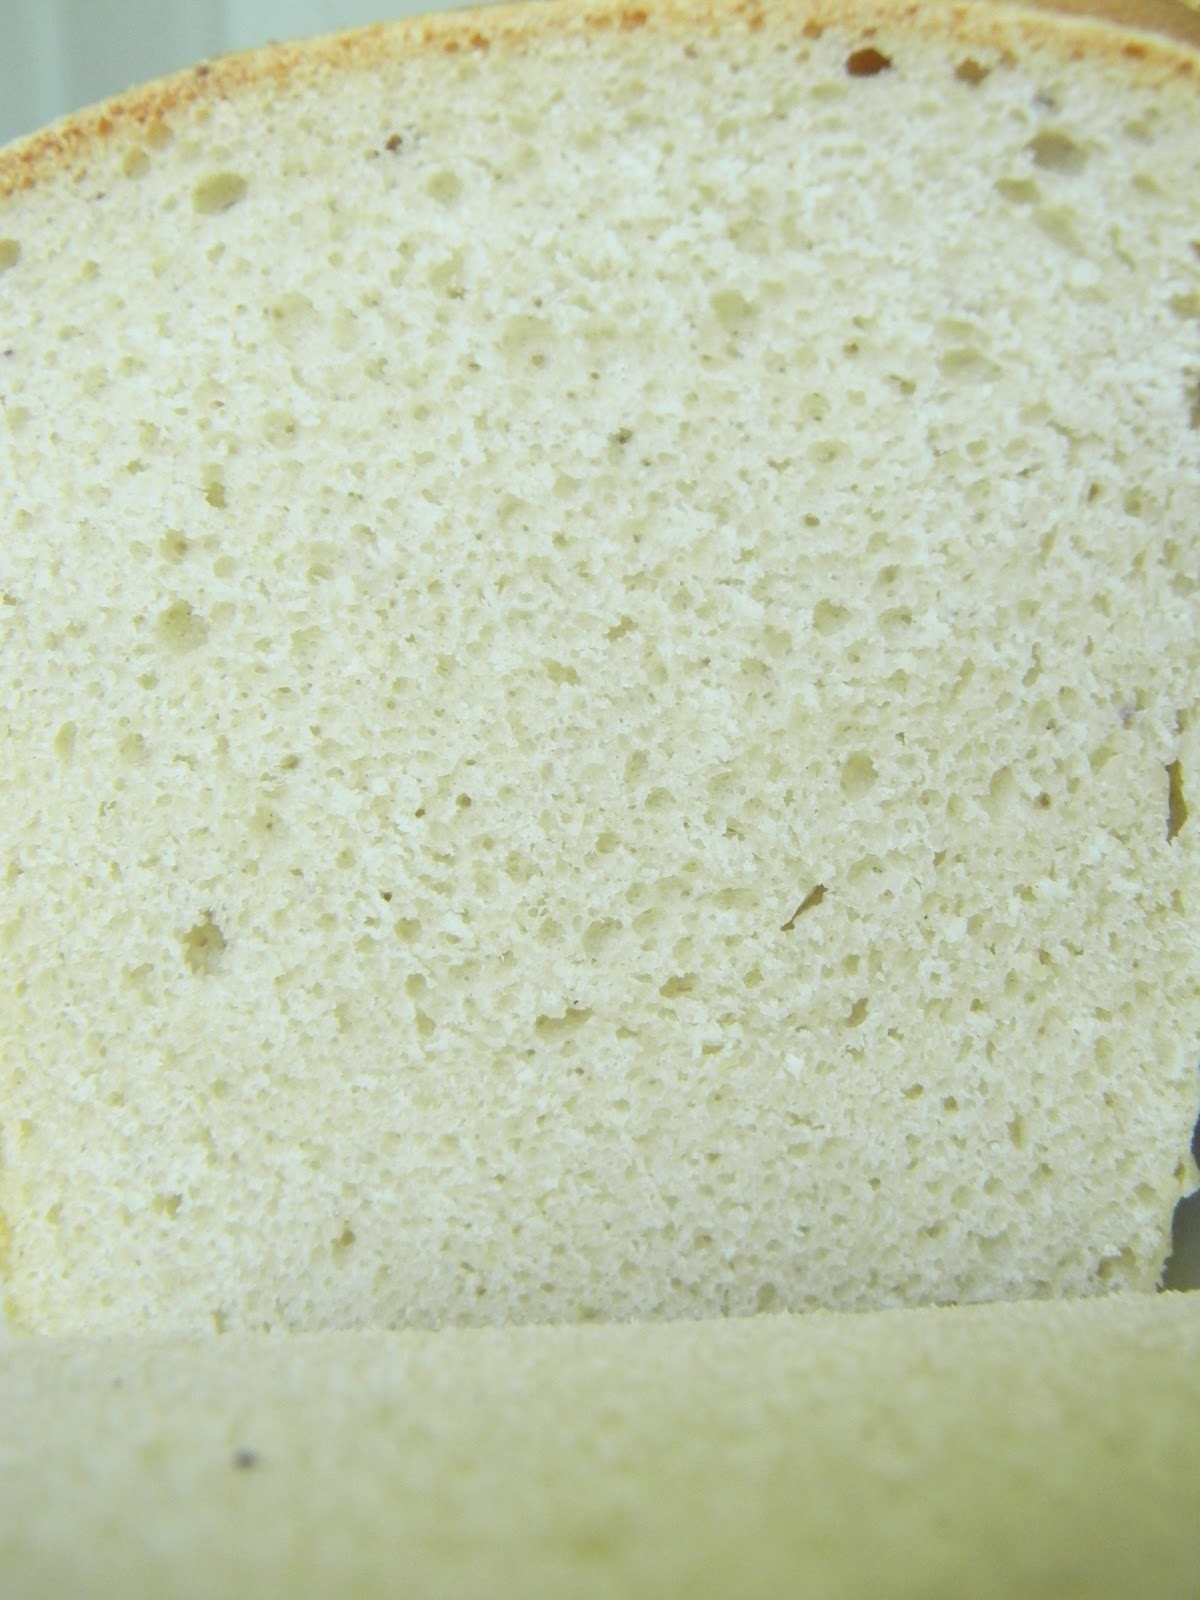
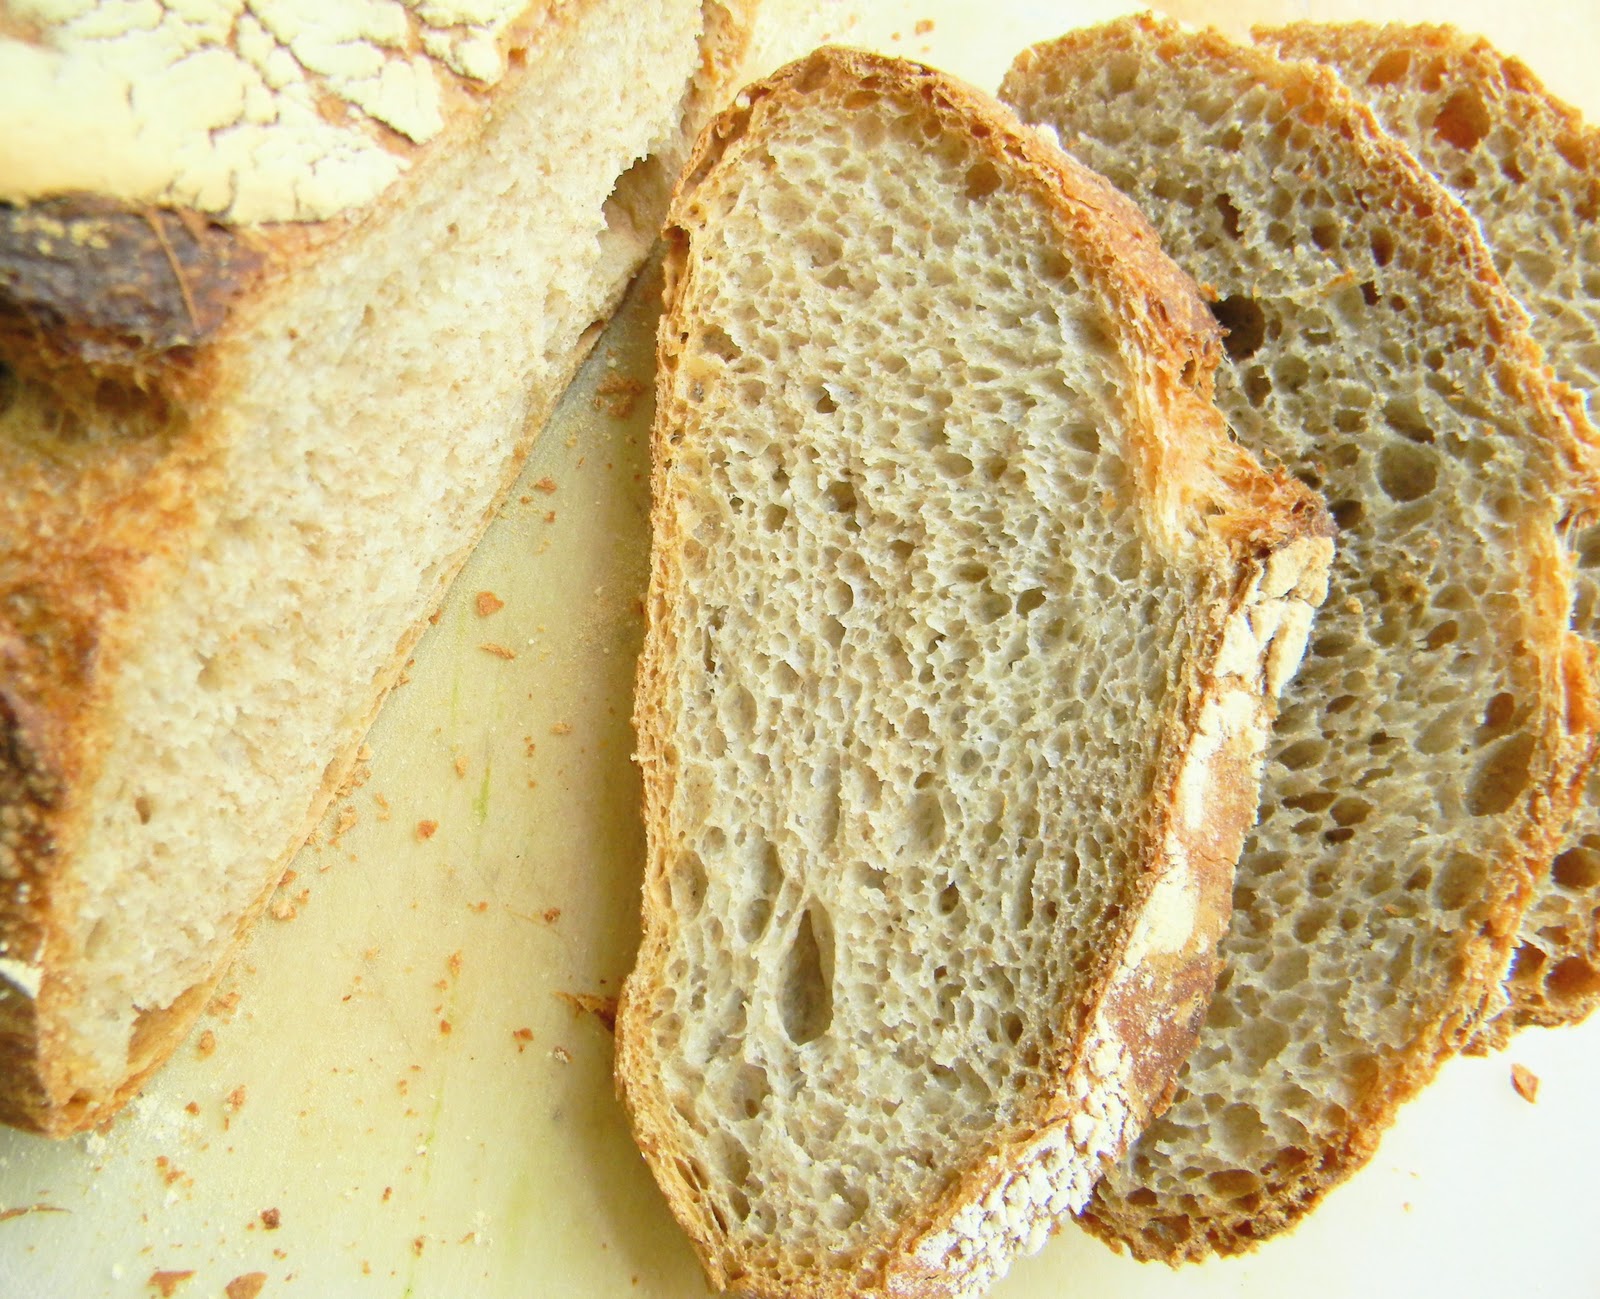
the finished bread-ready to eat
Sourdough Bread
adapted from How to Bake by Nick Malgieri
sponge
1 cup water
1 cup starter-any kind but preferably a rye sour
1 1/2 cups bread flour
1/2 cup stone ground rye flour
1 teaspoon caraway seeds
combine in a bowl and cover it. allow it to sit and ferment for at least 8 hours and as long as 36 hours at room temperature.
dough
to the sponge, add:
2 teaspoons salt
1-1/2 cups to 1-3/4 cups bread flour
mix together and turn out onto a floured surface. knead the dough by hand adding flour as needed for at least 5 minutes and up to 10 minutes. place the dough in an oiled bowl, cover it and allow it to rise until doubled, at least one hour.
preheat the oven and baking stone if you have one to 500 F. at this time, place a baking pan in the bottom oven if you want to have steam during the baking process. turn the dough out of the bowl and shape it into a tight ball. place the dough, seam side up, in a floured basket or a cloth lined bowl that is also floured and allow it to rise until doubled-about an hour. turn the loaf onto a pan or a bread peel that is sprinkled with cornmeal. place the bread in the oven, toss some ice cubes on to the pan, reduce the heat to 450F and bake for 20 minutes. reduce the heat again to 350F and bake until a thermometer reads about 210F, this could take 20 minutes and as long as 35 minutes. the bread will be nicely colored. cool completely on a rack before slicing.
notes:  whole grain flours make dense breads so use them with bread flour to make them a little less work on the jaws.  the recipe is very flexible and it is possible to start the sponge with up to 1 cup of any other flour and 1 cup of bread flour.  in the past, i have used whole wheat flour, rye flour, corn meal and semolina to make tasty loaves.  once, i even made it a little sweet with brown sugar and cinnamon and stirred in some plumped raisins-now that was some awesome cinnamon raisin bread!  if you choose to bake a loaf, follow along and submit your recipe to bread baking day, the deadline is march 1.

Sourdough Rye on FoodistaSourdough Rye