blue corn-pecan biscotti dipped in Mexican chocolate

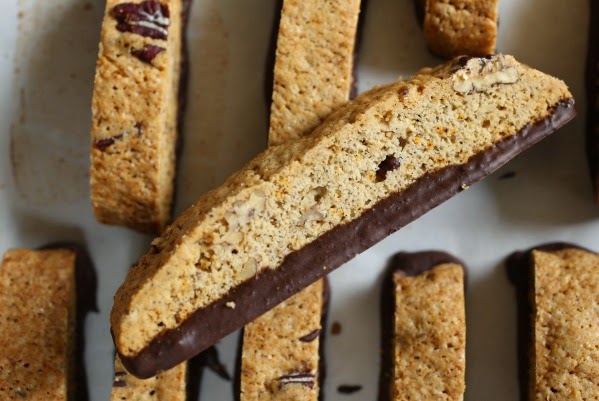
When my husband and I first opened our wholesale only bakery, we specialized in biscotti. With a couple tried and true base recipes, we were able to offer our customers more than 20 different flavors with a choice of chocolate dips. My personal obsession with organic blue cornmeal led me to develop a recipe that included pecans and spices and I would dip them in a blend of Mexican and semisweet chocolates which gives the chocolate a slightly grainy appearance from the sugar crystals. While they weren’t our top selling flavor, they certainly were one of our favorites. The bakery has long since closed and we have moved on but those biscotti, they make appearances in gift packages frequently. 

In my opinion, biscotti should not be so hard that they need to be dunked to enjoy them. The cornmeal in the recipe helps to increase the softness of this recipe and to add a slightly sandy texture. The combination of cinnamon and ground chili give a depth and warmth to the flavor profile while the pecans add a little more crunch along with their wonderful buttery-nut flavor. Then there is the chocolate used in the dipping; Ibarra chocolate has long since been a secret weapon in my baking arsenal. Do yourself the favor and seek it out for the most authentic tasting Mexican chocolate. However, if blue cornmeal is not available, use any other whole grain cornmeal, white or yellow, but make sure it is just cornmeal without any other ingredients such as leaveners or lime added. When baking biscotti, don’t be tempted to use pretoasted nuts. The second bake to dry the biscotti can scorch the nuts and give them a bitter taste so always use raw nuts. 

The dough can be shaped into 2 large logs or 4 small logs and when I am sharing these, I will bake them into small logs so that I have plenty to fill the packages. The secret to perfect slicing is to let the logs sit overnight before cutting them. The moisture in the log will distribute evenly and soften the edges preventing them from crumbling as you slice, of course it also goes without saying that using a sharp, serrated knife will also ensure clean cuts. Since biscotti are dried, they have a long shelf life making these the perfect gift to share since you can make them well ahead (as long as a month) of the madness and store them air tight till it is time to pass them out!

Mexican chocolate tends to be a bit grainy.  The reason is that most of the popular brands are meant to be used to make hot chocolate drinks and the sugar crystals which are whole and visible when you chop up the disks, melt when heated.  Usually, the chocolate is flavored with cinnamon and at times, almonds to further add depth and character to hot chocolate or any other item you might make with it.

When I blend in Mexican chocolate to dip biscotti, the crystals remain visible since the chocolate is not heated enough to melt them.  While some may find this objectionable, I like the texture it adds and it gives the final product a unique appearance.

biscotti have long been a favorite homemade gift for sharing in my kitchen.  they hold up well for weeks if kept air tight and that means they are around after the holidays when you may actually have time to brew a cup of tea or coffee and actually enjoy them.  to package them, buy a tea cup and saucer set from the thrift store and fill it with biscotti.  depending on how large the cup is, the one above is actually pretty small, you could also throw in a few tea bags or a sample size packet of coffee.  wrap it in cello and tie it up with a ribbon-picture perfect!

you could also just stack them and wrap them like the biscotti on the left and in the center.  if you are frugal, save the trays that produce comes in, wash them and fill them as I did in the package on the right.  the black box came with mushrooms in it and when we used them up, I simply washed and dried it and lined it with tissue paper before filling it biscotti.

blue corn-pecan biscotti dipped in Mexican chocolate
makes 40-80 pieces
10 tablespoons unsalted butter
2 1/2 cups unbleached all purpose flour
1 1/4 cup sugar
2/3 cup pecans-roughly chopped
1/2 cup blue corn meal
1 1/2 teaspoon baking powder
1 teaspoon cinnamon
3/4 teaspoon ancho chile powder
1/4 teaspoon baking soda
1/4 teaspoon salt
4 eggs
2 teaspoons vanilla-Mexican if you can find it

Preheat the oven to 350. Line to half size baking pans with parchment paper and set aside. Melt the butter over low heat taking care not to boil it. In a large mixing bowl, stir together the flour, sugar, pecans, cornmeal, baking powder, cinnamon, chili, baking soda and salt until completely combined.


In a small mixing bowl, whisk the eggs with the vanilla to combine them. Pour the eggs and the melted butter over the dry ingredients and stir to form a soft dough. Do not hesitate to use your hands to knead it slightly to form a soft dough but keep in mind, the more you mix it, the tougher it will be in the dry stage.

To shape the biscotti, divide the dough into 2 or 4 equal pieces. Stretch the dough out so that it is the length of the pan, about 16″ long, and then pat it down to about 3/4 inches in height. The larger sized logs will be nearly 3 inches wide while the smaller ones will be around 1 1/4 inches wide. If the dough seems too sticky to work with, moisten your hands with a small amount of cold water and then shape them. Bake the logs until they are slightly firm and spring back when pressed, about 25-28 minutes for the large logs and 20 minutes for the smaller ones. Allow them to cool for at least 4 hours, or over night before slicing.

Preheat the oven to 350. To slice the logs, place them on a cutting board and carefully trim away one end using a sharp serrated knife. Slice the biscotti 3/4 inches apiece and place them back onto the sheet pan so that they are standing up. Place the pans into the oven and turn it off. Do not open the door for at least one hour. To check for dryness, gently squeeze a slice, if it gives, it isn’t dry. Repeat the process by heating the oven to 300 degrees, return the biscotti to the oven and turn off the heat. Check them after 15 minutes. Do this carefully to be sure you do not over bake them. Allow them to cool completely before dipping or packing them.

Mexican chocolate dip
12 ounces semisweet or bittersweet chocolate, chopped
4 ounces Mexican chocolate, chopped

Place the chocolates into a heat proof bowl and set it over a pot of barely simmering water. Stir to melt the chocolate and when it is half melted, turn off the heat. Continue to stir until most of the chocolate is melted and then remove it from the heat. Stir until the chocolate is completely melted and is slightly warmer than body temperature.


Dip the bottom of each cookie into the chocolate and place it upright on a tray lined with parchment paper to set. If it is a warm or humid day, refrigerating it for 5-10 minutes will speed up the process but do not leave the pans in the fridge any longer than that or you will lose your shine on the chocolate.

When the chocolate is fully hardened, remove the biscotti from the paper and pack them up airtight to keep them crispy. Be sure to keep them away from warm or sunny spots to prevent the chocolate from melting.


this recipe also appears on food52.com where it is currently entered in the best edible gift contest.  to see it, follow this link and be sure to visit my food52.com page

chocolate peanut butter cake; another birthday, another version

Yes, I’ve posted this cake before so why post it again?  Because this time, it’s different; the cake is a vertically positioned roll rather than the standard stacked layers.

Every year, I bake cakes for my girls on their birthdays or as close as I can get to the actual day.  Last year, I made this cake for Alix but made the traditional stacked layer version and the link to that post with the complete recipe is here.  For this version, the only thing I changed was the cake.  Because I was planning on rolling the cake up, I chose to make a sponge-like cake so that it would be easier to work with.

For those of you who are interested, please visit the link to read the full history on this cake.  It is one that I am proud of and probably the best cake in my first book, Sky High.

The cake recipe worked out fairly well.  It was not hard to roll but I do think that because I made this in stages, the cake dried out a little and some cracking occurred.  In the future, I will make my frosting ahead of time so that the cake can be rolled up while it is still fresh.

So the shape was not perfectly round, but most of that was hidden in the frosting/glazing.

 This version made a 6 inch round cake and would easily have served 8 people.  We snacked on that cake all week by slicing little slivers at a time.  Don’t worry, even though the slices were thin, this cake packed quite the punch in flavor and it was so rich that we didn’t attempt thick slices.

 Don’t you just love the vertical stripes?  This was so much fun that I will try this again with other cake recipes.  It looked like a regular cake on the outside, my daughter expected stacked layers and surprise, surprise!

 Honestly, with this configuration, the ratio of frosting to cake is very different.  With this method you get more frosting which is great for frosting lovers.

 Creamy peanut butter frosting and dark chocolate ganache-heavenly!

To make the stacked layer cake, visit the original post.  To make this version, the adjusted recipes follow.

Chocolate-Peanut Sponge Roll Cake
Cake recipe is adapted from Chocolate Cloud Roll recipe in The Cake Bible by Rose Levy Beranbaum, frosting and glaze recipes are from Sky High

1/4 cup plus 2 tablespoons sugar
6 eggs, separated
1/2 teaspoon cream of tartar
4 ounces bittersweet chocolate
1/2 cup roasted peanuts
2 tablespoons cocoa powder
peanut butter frosting, recipe follows
chocolate glaze, recipe follows

Preheat the oven to 350.  Line a half sheet pan (17 inches x 12 inches) with parchment and spray grease, set aside.  Melt the chocolate and set aside.

To grind the peanuts, place them in a food processor with a tablespoon of sugar and pulse until finely ground.  Do this carefully so that you do not make peanut butter.  Whisk the yolks with 3 tablespoons sugar until light and fluffy, about 5 minutes.  Fold the chocolate and peanuts into the egg yolks.  Sift the cocoa over the top of the batter and gently fold in, set aside while you prepare the whites.

Whip the egg whites until foamy.  Add the cream of tartar and continue whipping until peaks start to form.  Gradually add the sugar as you continue to whip and whip until the peaks are almost completely stiff.  Do not take them as far as they will go, they need to be just a little soft at the bottom of the bowl.  This will allow the air bubbles to expand in the oven; taking the mixture to the stiffest point will not allow for the bubbles to expand and can actually make the cake collapse.

To finish mixing the batter, fold 1/4 of the whites into the batter to lighten it and then gently fold the remaining whites in.  Scrape the batter into the prepared pan and bake until a pick inserted into the cake comes out clean, about 15-18 minutes.  Allow the cake to cool and use immediately.

Cut the cake into three equal strips, lengthwise.  Spread 1/2 cup of frosting over one strip and begin rolling it up from one short side.  Spread another 1/2 cup of frosting over the second strip and place the rolled cake on top of the layer at one short side and roll it up.  Repeat this with the last strip.  Place the cake onto a flat plate and freeze until very firm.  Ice the outside of the cake with the remaining frosting and freeze it to firm up the frosting.

Decorate the cake by spreading small amounts of glaze over the top so that it slides down the side of the cake in large drips.  Chill to firm the ganache.  Keep cake refrigerated but do set it out at least 30 minutes before serving for the best flavor.  To get neat slices, dip the knife in hot water, wipe it dry and slice it with the hot knife, clean the knife between slices.  Top with mini peanut butter cups just before serving, if desired.

Peanut Butter Frosting
8 ounces cream cheese, at room temp 
3 ounces unsalted butter, at room temp 
4 cups confectioners sugar, sift after measuring if lumpy 
1/2 cup smooth peanut butter 

In a large bowl with an electric mixer, beat the cream cheese and butter until light and fluffy.  Gradually add the confectioners sugar, 1 cup at a time, mixing thoroughly after each addition and scraping down the sides of the bowl often.  Continue to beat on medium speed until light and fluffy, 3 to 4 minutes. Add the peanut butter and beat until thoroughly blended.

Chocolate Glaze
5 ounces semisweet chocolate, chopped coarsely
2 tablespoons smooth peanut butter
1 tablespoon light corn syrup
1/3 cup half-and-half

In the top of a double boiler or a bowl set over simmering water, combine the chocolate, peanut butter and corn syrup.  Heat, whisking often, until the chocolate is melted and the mixture is smooth.

Remove from the heat and whisk in the half-and-half, beating until smooth.  Use while still warm.

decadent triple chocolate brownies

cloudy, dreary days call for brownies.  actually, every day calls for brownies but on a rainy day, they seem to be just the thing to brighten the day.  maybe it is just the impending move and the many goodbyes i have had to share with friends that left me craving chocolate.  it could have also been the need to clean out the cupboards of many small quantities of ingredients; brownies were the perfect solution.

when it comes to brownies, there are some pretty polarizing views.  for some, they must be cakey while for others, fudgy is the only option.  personally, i like them a little fudgy and a little chewy but not at all cakey.  finding that perfect fudgy-chewy balance is challenging.  the fudgy factor comes from using unsweetened chocolate and butter in larger percentages than cakey recipes call for while the chewiness comes from a higher ratio of sugar.

let’s face it, unless there are extra goodies like nuts or chocolate chips added, it doesn’t matter how fudgy or chewy the brownies are because they are just plain boring.  when i make brownies, i love them to have nuts and chips. to make them a little extra chocolatey without making them any more dense, some unsweetened cocoa powder folded in with the flour works wonders.

remember how i mentioned i was cleaning out the cupboards?  i came across some odds and ends that i normally might not have thought to add to brownies.  first of all, i am not a fan of milk chocolate; i love the bitter flavor of nearly unsweetened (think 75% to 85%) chocolate.  as i pulled out the contents of my baking stash in the pantry closet, i came across a partial bag of milk chocolate chips, roughly 2/3 cup and then i found 3 milk chocolate hershey bars (1.75 oz each)  with almonds.  what on earth would i do with them???  no time for smores and no smoldering fire or marshmallows…i kept digging and pulled out an opened bag of golden raisins that were a little dry.  i put the milk chocolate chips, the hershey bars and the raisins on the counter and gathered the rest of the ingredients for the brownies.

raisins are another ingredient that you either love or hate.  personally, i prefer golden raisins because they taste less raisiny and i almost always have a bag in the pantry.  even though i was a little skeptical, i decided to go ahead and blend my dark, fudgy brownies with milk chocolate chips and candy bar pieces along with some golden raisins.  before i could proceed, the raisins needed to be plumped so i put them in a pot, covered them with water and brought them to a simmer.  after letting them soak for 5 minutes, i drained them and prepared the recipe.  while you may not notice them in the pictures, the raisins are there and they add the perfect amount of chewiness to the bars without being obvious; from now on, they will be my secret weapon in brownies!

one last note, since i am in the middle of preparing for a move from nashville, tn to williamsburg, va, i was only able to use a scale for this recipe so the weights are in ounces with the digital conversion-sorry, no cups this time!

decadent triple chocolate brownies
makes 1 (9″x13″) pan
32 (1 1/2″x 2″) bars 
8 ounces (.50#) unsalted butter
4 ounces (.25#) unsweetened chocolate
2-3 ounces (.12#-.18#) golden raisins (measure before plumping)
15 ounces (.94#) granulated sugar
1 teaspoon vanilla extract
4 large eggs
6 ounces (.38#) all purpose flour
1 1/2 ounces (.15#) unsweetened natural cocoa powder
1 teaspoon baking powder
3 (1.75 ounce) hershey’s milk chocolate bars with almonds, chopped 
3 ounces (.18#) milk chocolate chips
preheat the oven to 350.  grease a 9″x13″ pan, line the bottom with paper or foil and grease the paper.  set the pan aside while you prepare the batter.
place the butter and the unsweetened chocolate into a heat proof bowl and carefully melt it over a pot of almost simmering water.  take care not to let the bowl touch the water or receive direct heat from the flame/heat source.  while that melts, place the golden raisins into a sauce pot and barely cover them with water.  heat the pot over a medium flame until it starts to simmer.  turn the heat off and let the raisins sit for 5 minutes.  drain the raisins and let them cool while you finish preparing the batter.
when the chocolate is melted, remove it from the heat and stir in the sugar and vanilla.  whisk in the eggs, one at a time, and continue mixing until completely combined.  place the flour, cocoa powder and baking powder into a sifter or mesh strainer and sift over the batter.  fold the batter together until no flour streaks are visible.  finally, fold in the raisins, chopped candy bars and the chocolate chips and scrape the batter into the prepared pan.
bake until the brownies rise up about 1/4 inch above the pan and a crust forms across the top, about 40 minutes.  remove from the oven and cool completely before cutting.  for the best results during cutting, chill the brownies for at least 2-3 hours or overnight.  by chilling them, you will get nice, smooth cuts without crushing the brownies.
if you chill the brownies, the best way to get them out of the pan is to gently heat the bottom of the pan a bit and flop them out onto a cutting board.  remove the paper from the bottom of the brownies and place a second board over the brownies.  invert the boards, remove the top cutting board and cut the brownies, marking them first using a ruler to get a consistent size and smooth cut.

pennington’s triple chocolate truffle bars

by now, you should have figured out that i have a thing for pennington’s strawberry rye.  yes, i was given a bottle for free, but, and that is a big but, i am not being paid or compensated in anyway to do this.  the truth is, i am a light weight; i cannot drink large amounts of alcohol and one drink is usually my limit when it comes to mixed drinks.  as a result, i generally prefer to use it in a dessert where i can savor the flavor without getting a hangover.  and if you saw the other two recipes i posted that feature pennington’s strawberry rye, ice box cake and strawberry tea-ramisu (links below), you know how well it blends with other flavors.  so just imagine how well it blends with chocolate…

the recipe is a simple one; a quick to mix brownie base that is baked and cooled and topped with a dark chocolate ganache that is loaded with pennington’s strawberry rye.  the final touch is a swirl of white chocolate and then off to the fridge they go to set the ganache so that they can be cut into bars.  so easy that anyone could make them-and i urge you to do so!

pennington’s truffle brownie bars
makes 1 (8″x8″) pan yielding 32 (1″x2″) bars
brownie base
5 tablespoons unsalted butter
1 1/2 ounces unsweetened chocolate, chopped 
1 whole egg plus 1 extra yolk
2/3 cup sugar
1 teaspoon vanilla
1/2 cup unbleached all purpose flour
3 tablespoons unsweetened cocoa powder-either dutched or natural
1/4 teaspoon baking powder
1/3 cup semisweet chocolate chips
preheat the oven to 350.  lightly grease the 8″x8″ pan and line the bottom with parchment paper.  
carefully melt the butter with the unsweetened chocolate so that they do not scorch-a microwave may be the best options for such small amounts.  
in a mixing bowl, whisk the egg with the sugar and vanilla until combined.  add the melted chocolate and whisk until smooth.  
place the flour, cocoa powder and baking powder in a sifter or a mesh strainer and sift it over the batter in the bowl.  fold it together gently taking care not to over mix the batter.  
fold in the chocolate chips last and scrape it into the prepared pan.  bake until the top feels slightly firm but not at all stiff or hard, about 20-25 minutes.  allow the brownie to cool completely in the pan.
ganache topping
1 pound bittersweet chocolate, chopped
3/4 cup plus 1 tablespoon heavy cream 
2 ounces white chocolate, chopped
place the bittersweet chocolate into a heat proof bowl with the 3/4 cup heavy cream.  set the bowl over a pan of nearly simmering water without allowing the water to come in contact with the bowl.  stir the chocolate occasionally to help it melt.  
while the chocolate melts, prepare the brownies by removing them from the pan by inverting them onto a platter.  line the pan with clean paper so that it comes up the side of the pans by at least an inch; you will need the excess to help you remove the brownies after the ganache sets.  replace the brownies in the pan on top of the clean paper and set the pan aside.
when the chocolate is mostly melted, remove it from the heat and stir in the pennington’s.  whisk it until smooth.  scrape this mixture into the prepared pans and smooth it out so that it is level across the top.  
prepare the white drizzle by placing the white chocolate in a small microwave save bowl with the 1 tablespoon of heavy cream and carefully heat it on the lowest setting for 10-15 second intervals until it begins to melt.  stir the mixture to finish the melting process.  drizzle the mixture over the top of the chocolate ganache in a random pattern and use a toothpick to swirl it.  place the pan in the fridge for several hours or overnight to set it completely.
to remove the brownies from the pan, gently heat the bottom of the pan on the stove top and lift them out using the excess flaps of paper.  carefully peel away the paper away from the sides and bottom of the brownies.  using a sharp knife, cut the brownies into 1″ strips and then cut each strip into 2″ pieces.  to keep the bars looking neat, clean the knife with hot water between cuts and wipe it dry before cutting again.  serve at room temp but store them in the fridge-if they last that long…
like cooking with booze or want some quick and easy no-bake desserts?  check out the other recipes with pennington’s strawberry rye!

chocolate chip bundt cake in caroll’s garden

sunday mornings are perfect for gardening.  there is a certain sense of peace that the demonstration garden has early in the day which i find comforting.  today i went out to the garden with a chocolate chip bundt cake and spent a few hours weeding the beds and chatting with my fellow master gardeners.
as master gardeners, we spend time preparing gardens for tours and on occasion,  those gardens are our own.  it is a chance to share our most prized possession with fellow gardeners.  this afternoon, i had the pleasure of visiting the garden of one of my fellow demonstration garden volunteers.

caroll has a backyard that consists of a large wooded slope.  the run off that was produced by the paved driveway, the house and the nature of gravity itself was eroding the slope.  over the last 3 years, she has spent countless hours correcting drainage and preventing erosion by building an intricate system consisting of perforated pipes to harvest the water.  the hillside now features beautiful rock walls that help sculpt and terrace the yard which is now home to many mature, shade loving perennial plants.  in a word, the view from the bottom of the slope up to the house, is jaw dropping.  thinking about how many hours she spent just observing the landscape at all times of the day and during each season as well as during heavy rain, leaves me awestruck.

there is nothing she has not considered.  there are features to attract and nurture wildlife and the yard is a certified wildlife habitat.  and because caroll is who she is, there is also a touch of whimsy and that blue bottle tree is just a small taste of all the accent pieces that are scattered throughout the yard.

her selection of plants was carefully considered.  these firepinks “pink coral” (silene virginica) combine beautifully with the native geraniums, cranesbill “tiny monster

here is caroll leading a tour of the area beyond her yard.  the area is actually woodland that contains a spring which is one of the area’s well known “seven springs” which also gives the area it’s name and helps form a wetland.  the nearby apple creek feeds into mill creek which is a major part of the watershed in this area and home to an endangered crayfish species.

visitors to the demonstration garden will recognize this guy.  he is a miniature version of jimi tindrix, the tin man who lives in the herb garden.  caroll saved many cans for fellow master gardener shirley, and in return, shirley made a tin man to hang in her garden.

just one of the many views from below looking up at the house.
the bear’s breeches were putting on quite the show for us.
the lady herself, in the garden with cake, as it should be.  we all snacked on cake as we walked around the various parts of the garden and listened to caroll tell the story of the garden.

for this part of the garden, caroll had 10 yards of topsoil delivered and she sculpted it to form a level area suitable for sitting and enjoying the landscape.  her plan is to add a fire pit to this area and if you ask me, that would be perfect for cold weather use of the garden.  nothing like a roaring fire to cozy up to and enjoy the evening in the fall.

love the blossoms on the bear’s breeches.
chocolate chip bundt cake

1 small bundt cake serving about 12
(or 40 if they are gardeners limiting themselves to tiny slivers of cake…)
2 ounces almond paste, buy the kind in an 8 ounce can and remove it from the can by opening both ends and pushing it through.  cut it into four equal pieces and save the remaining pieces by wrapping them in plastic and storing them in the freezer; thaw it as needed.
1 1/4 cup sugar
4 ounces unsalted butter, softened

1 teaspoon vanilla
1 teaspoon almond extract
1/4 teaspoon salt
2 eggs
2 1/4 cup all purpose flour
2 teaspoons baking powder
2/3 cup chocolate chips
2/3 cup buttermilk
4 tablespoons cinnamon sugar

preheat the oven to 350.  grease and flour an 8 cup bundt pan and set it aside.  place the almond paste and the sugar into the bowl of a food processor and pulse it to cut up the almond paste.  allow the machine to run so that the almond paste is finely chopped.

add the butter, vanilla, almond extract and the salt and process until a smooth paste is formed.  with the machine running, add the eggs, one at a time and process to combine.  scrape the bowl and run again until the mixture is smooth.  scrape the batter into a mixing bowl.

place the flour and the baking powder into a sifter or a mesh strainer and sift it over the batter.  sprinkle the chocolate chips over the flour and fold the mixture a few times.  drizzle the buttermilk over the batter and fold the mixture together until no streaks of flour remain.

using a large spoon, dollop 1/3 of the batter into the prepared pan.  resist the temptation to smooth this out and dust the top of the batter with 2 tablespoons of the cinnamon sugar.  repeat this process once more and then top it all off with the remaining amount of batter.  this time, smooth the batter out so that it is level across the pan-it will bake more evenly this way.

bake until a pick inserted comes out clean, about 55 minutes.  allow the cake to cool in the pan for 15-20 minutes and then turn it out onto a rack to cool.