decadent triple chocolate brownies

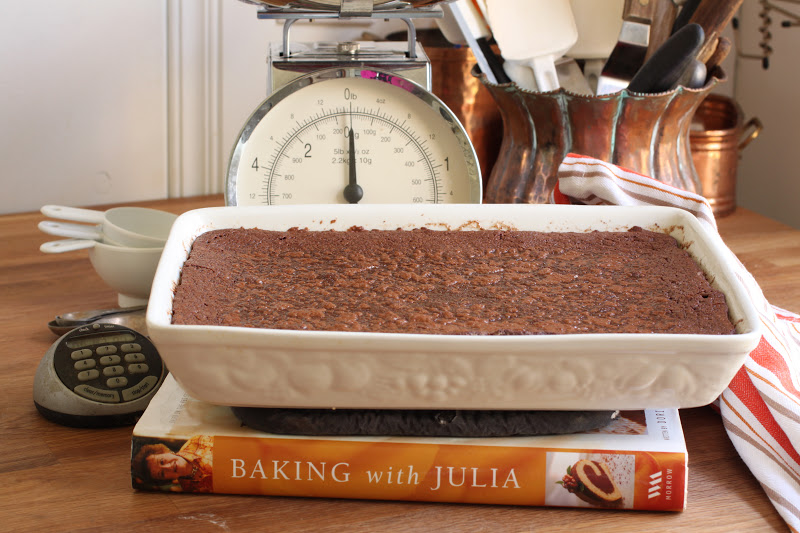
cloudy, dreary days call for brownies.  actually, every day calls for brownies but on a rainy day, they seem to be just the thing to brighten the day.  maybe it is just the impending move and the many goodbyes i have had to share with friends that left me craving chocolate.  it could have also been the need to clean out the cupboards of many small quantities of ingredients; brownies were the perfect solution.

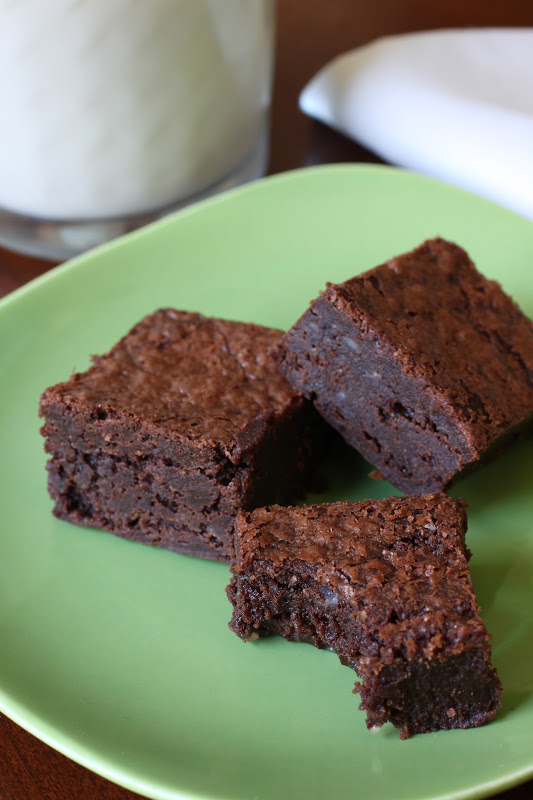
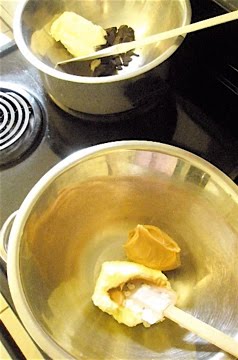
when it comes to brownies, there are some pretty polarizing views.  for some, they must be cakey while for others, fudgy is the only option.  personally, i like them a little fudgy and a little chewy but not at all cakey.  finding that perfect fudgy-chewy balance is challenging.  the fudgy factor comes from using unsweetened chocolate and butter in larger percentages than cakey recipes call for while the chewiness comes from a higher ratio of sugar.

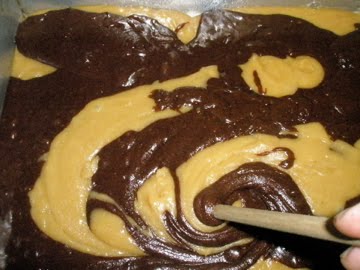
let’s face it, unless there are extra goodies like nuts or chocolate chips added, it doesn’t matter how fudgy or chewy the brownies are because they are just plain boring.  when i make brownies, i love them to have nuts and chips. to make them a little extra chocolatey without making them any more dense, some unsweetened cocoa powder folded in with the flour works wonders.

remember how i mentioned i was cleaning out the cupboards?  i came across some odds and ends that i normally might not have thought to add to brownies.  first of all, i am not a fan of milk chocolate; i love the bitter flavor of nearly unsweetened (think 75% to 85%) chocolate.  as i pulled out the contents of my baking stash in the pantry closet, i came across a partial bag of milk chocolate chips, roughly 2/3 cup and then i found 3 milk chocolate hershey bars (1.75 oz each)  with almonds.  what on earth would i do with them???  no time for smores and no smoldering fire or marshmallows…i kept digging and pulled out an opened bag of golden raisins that were a little dry.  i put the milk chocolate chips, the hershey bars and the raisins on the counter and gathered the rest of the ingredients for the brownies.

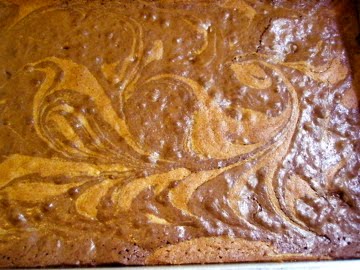
raisins are another ingredient that you either love or hate.  personally, i prefer golden raisins because they taste less raisiny and i almost always have a bag in the pantry.  even though i was a little skeptical, i decided to go ahead and blend my dark, fudgy brownies with milk chocolate chips and candy bar pieces along with some golden raisins.  before i could proceed, the raisins needed to be plumped so i put them in a pot, covered them with water and brought them to a simmer.  after letting them soak for 5 minutes, i drained them and prepared the recipe.  while you may not notice them in the pictures, the raisins are there and they add the perfect amount of chewiness to the bars without being obvious; from now on, they will be my secret weapon in brownies!

one last note, since i am in the middle of preparing for a move from nashville, tn to williamsburg, va, i was only able to use a scale for this recipe so the weights are in ounces with the digital conversion-sorry, no cups this time!

decadent triple chocolate brownies
makes 1 (9″x13″) pan
32 (1 1/2″x 2″) bars 
8 ounces (.50#) unsalted butter
4 ounces (.25#) unsweetened chocolate
2-3 ounces (.12#-.18#) golden raisins (measure before plumping)
15 ounces (.94#) granulated sugar
1 teaspoon vanilla extract
4 large eggs
6 ounces (.38#) all purpose flour
1 1/2 ounces (.15#) unsweetened natural cocoa powder
1 teaspoon baking powder
3 (1.75 ounce) hershey’s milk chocolate bars with almonds, chopped 
3 ounces (.18#) milk chocolate chips
preheat the oven to 350.  grease a 9″x13″ pan, line the bottom with paper or foil and grease the paper.  set the pan aside while you prepare the batter.
place the butter and the unsweetened chocolate into a heat proof bowl and carefully melt it over a pot of almost simmering water.  take care not to let the bowl touch the water or receive direct heat from the flame/heat source.  while that melts, place the golden raisins into a sauce pot and barely cover them with water.  heat the pot over a medium flame until it starts to simmer.  turn the heat off and let the raisins sit for 5 minutes.  drain the raisins and let them cool while you finish preparing the batter.
when the chocolate is melted, remove it from the heat and stir in the sugar and vanilla.  whisk in the eggs, one at a time, and continue mixing until completely combined.  place the flour, cocoa powder and baking powder into a sifter or mesh strainer and sift over the batter.  fold the batter together until no flour streaks are visible.  finally, fold in the raisins, chopped candy bars and the chocolate chips and scrape the batter into the prepared pan.
bake until the brownies rise up about 1/4 inch above the pan and a crust forms across the top, about 40 minutes.  remove from the oven and cool completely before cutting.  for the best results during cutting, chill the brownies for at least 2-3 hours or overnight.  by chilling them, you will get nice, smooth cuts without crushing the brownies.
if you chill the brownies, the best way to get them out of the pan is to gently heat the bottom of the pan a bit and flop them out onto a cutting board.  remove the paper from the bottom of the brownies and place a second board over the brownies.  invert the boards, remove the top cutting board and cut the brownies, marking them first using a ruler to get a consistent size and smooth cut.

pennington’s triple chocolate truffle bars

by now, you should have figured out that i have a thing for pennington’s strawberry rye.  yes, i was given a bottle for free, but, and that is a big but, i am not being paid or compensated in anyway to do this.  the truth is, i am a light weight; i cannot drink large amounts of alcohol and one drink is usually my limit when it comes to mixed drinks.  as a result, i generally prefer to use it in a dessert where i can savor the flavor without getting a hangover.  and if you saw the other two recipes i posted that feature pennington’s strawberry rye, ice box cake and strawberry tea-ramisu (links below), you know how well it blends with other flavors.  so just imagine how well it blends with chocolate…

the recipe is a simple one; a quick to mix brownie base that is baked and cooled and topped with a dark chocolate ganache that is loaded with pennington’s strawberry rye.  the final touch is a swirl of white chocolate and then off to the fridge they go to set the ganache so that they can be cut into bars.  so easy that anyone could make them-and i urge you to do so!

pennington’s truffle brownie bars
makes 1 (8″x8″) pan yielding 32 (1″x2″) bars
brownie base
5 tablespoons unsalted butter
1 1/2 ounces unsweetened chocolate, chopped 
1 whole egg plus 1 extra yolk
2/3 cup sugar
1 teaspoon vanilla
1/2 cup unbleached all purpose flour
3 tablespoons unsweetened cocoa powder-either dutched or natural
1/4 teaspoon baking powder
1/3 cup semisweet chocolate chips
preheat the oven to 350.  lightly grease the 8″x8″ pan and line the bottom with parchment paper.  
carefully melt the butter with the unsweetened chocolate so that they do not scorch-a microwave may be the best options for such small amounts.  
in a mixing bowl, whisk the egg with the sugar and vanilla until combined.  add the melted chocolate and whisk until smooth.  
place the flour, cocoa powder and baking powder in a sifter or a mesh strainer and sift it over the batter in the bowl.  fold it together gently taking care not to over mix the batter.  
fold in the chocolate chips last and scrape it into the prepared pan.  bake until the top feels slightly firm but not at all stiff or hard, about 20-25 minutes.  allow the brownie to cool completely in the pan.
ganache topping
1 pound bittersweet chocolate, chopped
3/4 cup plus 1 tablespoon heavy cream 
2 ounces white chocolate, chopped
place the bittersweet chocolate into a heat proof bowl with the 3/4 cup heavy cream.  set the bowl over a pan of nearly simmering water without allowing the water to come in contact with the bowl.  stir the chocolate occasionally to help it melt.  
while the chocolate melts, prepare the brownies by removing them from the pan by inverting them onto a platter.  line the pan with clean paper so that it comes up the side of the pans by at least an inch; you will need the excess to help you remove the brownies after the ganache sets.  replace the brownies in the pan on top of the clean paper and set the pan aside.
when the chocolate is mostly melted, remove it from the heat and stir in the pennington’s.  whisk it until smooth.  scrape this mixture into the prepared pans and smooth it out so that it is level across the top.  
prepare the white drizzle by placing the white chocolate in a small microwave save bowl with the 1 tablespoon of heavy cream and carefully heat it on the lowest setting for 10-15 second intervals until it begins to melt.  stir the mixture to finish the melting process.  drizzle the mixture over the top of the chocolate ganache in a random pattern and use a toothpick to swirl it.  place the pan in the fridge for several hours or overnight to set it completely.
to remove the brownies from the pan, gently heat the bottom of the pan on the stove top and lift them out using the excess flaps of paper.  carefully peel away the paper away from the sides and bottom of the brownies.  using a sharp knife, cut the brownies into 1″ strips and then cut each strip into 2″ pieces.  to keep the bars looking neat, clean the knife with hot water between cuts and wipe it dry before cutting again.  serve at room temp but store them in the fridge-if they last that long…
like cooking with booze or want some quick and easy no-bake desserts?  check out the other recipes with pennington’s strawberry rye!

mocha brownie cake with whisper creek ganache: a tuesdays with dorie post

for this weeks challenge, the tuesdays with dorie bakers baked up marcel desaulniers mocha brownie cake recipe from the book, baking with julia.   with a texture more like a devil’s food cake, this rich little cake wasn’t much of a brownie for this chocolate fan.  did that make it a poor choice for a chocolate fix?  no, especially not with the thick coat of ganache on top of each little two-bite cake.  but truth be told, i would much rather have a traditional, dense and dark chocolate brownie.

the recipe calls this a mocha brownie cake.  that was a bit confusing since the cake itself had not a drop of coffee in it.  to punch up the mocha flavor, i tried to add a bit of coffee extract to it but did not add enough-my fear of over doing it cancelled out my good intentions.  the result was just a really strong chocolate flavored cake with the texture of a devil dog; remember those?  for the ganache frosting, i decided to switch the coffee, a mere 1/4 cup, for an equal portion of whisper creek tennessee sipping cream.  it seemed like the perfect choice for a dessert to be served at a pot luck dinner.  trust me, it was.  i came home with an empty plate.  good thing i stashed a few at home for my husband and me to indulge in!

as a rule, we do not post the recipes we bake from.  it isn’t fair to the author for us to give away the recipes without permission.  my suggestion, buy a copy of the book or borrow it from a library or a friend.  honestly, it isn’t hard to find; i found it on several websites with a quick google search.

the mini cupcake pan baked up 24 cakes plus a few large hearts to make a shamrock.  the ganache recipe was more than i needed to frost the tops of all of the cakes.  i had plenty left for the ones i stashed-we couldn’t skimp on the frosting for those!

yeah, it’s hokey.  so what, this green eyed irish girl (hey, i’m also italian-what a combo!) had to get a little festive for the pot luck!  not sure that anyone noticed it though…

and this is how the husband and i indulged; laid out on a silver platter with a bit of sipping cream to wash it down…perfect. chocolate. indulgence!!!

be sure to check out the tuesdays with dorie page to see how the other bakers fared.  perhaps, bake up a batch yourself.  if you do, the whisper creek substitution is worth trying.  and no, they did not pay me to say that-i do not do endorsements and do not accept payments or advertising.  but if someone wants to give me a bottle to bake with, i won’t turn it down!  the truth is that i happen to have an open bottle in the fridge and grabbed it rather than brewing up a pot of coffee just for a 1/4 cup, and i am glad i did!  bake on friends!

valentine’s day at the beard house

it has only taken a week but i think i may have finally caught my breath and gotten some sleep.  after a 17 hour bus ride up, two jam packed-action filled days and another 17 hour bus ride home, i can truly say i have had a real career moment!  at times, it was a little overwhelming-to just think about where i was and who else had been there.  at others, it was just plain fun; we were so well prepared that everything went off without a single hiccup.  however, since i was a little busy, i didn’t take many photos-but i have a link to lots of them at the bottom of this post.  these are a few of the photos i took.

the front door to the house doesn’t look like much, i expected something a little grander.  perhaps some stairs leading up to the door.  but in the end, this made loading in a whole lot easier.

 the kitchen, this is the backside of the pass.
 the view into the kitchen from the far side of the pass.

 the line.  it should really be called the tunnel-as short and thin as i am, i felt a little large in this space.

 red velvet cheesecake brownies.  as a parting gift for all of the guests, i baked up 4 pans (see them lined up on the pass in the photo above?).  need the recipe?  click here.

we were unbelievably lucky; our event was on 2/14 and there were not any events scheduled on the day before.  we were allowed to load in and prep the day before.  that meant we were not as rushed and had a little time to wander the area.  when we finished prepping on 2/13, a few of us hit the streets and headed to chelsea market on foot.

 like moths, we were drawn to the light…

i do not envy the person who had to attach all of those little lights.
we pigged out on gelato and sorbetto

 then we headed up to the high line for a nap.

 the old rail line that was converted into the high line park
 love the way the building is staddling the raised railway, as if it is stepping over it
 14th street-the meat packing district

 it always amazes me that the roads are still cobbled in some of the neighborhoods of manhattan.

the uneven sizes and angles of the glass on this building made wonderful reflections.  i could have spent hours photographing the building and the reflections.  we headed back to the house so that we could go to dinner as a group.

after a lovely dinner at mc cormick and schmicks, we walked to times square.  having grown up in new jersey and spending many, many days and nights as well as working in new york city, i must say that times square at night is always impressive.  a little overwhelming but always an adventure.

 and then it was time to head back to the hotel-we had a busy day in front of us…

to see tons more pictures of all the food and the beard house, follow this link.  and congratulations to tara(in the photo above)-she travelled with us and took all of the photos on the cafe’s website.  didn’t she do a great job?

best ever brownies; tuesdays with dorie

once again, it’s tuesday so that means it is time to bake with julia.  this week’s adventure is brought to you by monica of a beautiful mess.   if you read the title of this post, then you know we made the “best ever brownies.”  that is one opinion, just not mine.

first off, i did not care for the way the instructions were written.  it is always a challenge when a recipe is split onto more than one page but if those to pages do not face each other, it is even harder to prevent confusion or mishaps.  the instructions called for splitting the eggs and sugar, whipping some and incorporating the others and then finally, incorporating the whipped eggs into the batter.  that paragraph was written in such a way that i had to read it multiple times.  it would have flowed better if the exact  amounts of eggs and sugar  for each addition in that step were listed as they were to be added rather than just instructing you to add “half” of them.

while the baking times seemed to present more issues for many of the other bakers, i did not have any problems and they baked within the suggested time frame.  the results were more like a flourless chocolate cake and i really didn’t enjoy them.  honestly, i like brownies but i like mine to have more than just a fudge like texture; i like them a little cakey and these were no where near that.

be sure to visit monica’s page for the recipe but an even better idea would be to buy the book.  be sure to visit the tuesdays with dorie page to find the links of all the participants.

all american brownie pie, #31 of 52

so, it was the afternoon on july 4th.  we had already come back from the hot chicken fest-and were totally fried, literally(read the previous post) and i realized that i hadn’t baked my pie for our barbecue party.  my ideas of a fruit pie were shelved for something much simpler-a crustless brownie pie.  i know, that’s a bit lame to call it a pie but in my own defense, i was sun-fried and overheated not to mention short of time.  brownie pie it is…

some brownies recipes call for whipping the eggs and sugar, and this recipe is one that instructs you to whip them to a ribbon.  but just what is a ribbon?  it is easily defined as a slowly dissolving mound of batter as it falls from the beater.  if you look at the photo to the left, you can see that the batter is slowly mounding and that the mound is slowly smoothing out.  ok, some imagination is needed but keep in mind that i held the beater with my left hand and worked the camera (somewhat clumsily) with my right hand and in that time frame, the mound built and dissolved.

baking a brownie in a glass or pottery pie dish makes it easy to serve as a dessert-just cut into wedges and serve with ice cream, caramel, whipped cream or any other garnish that you like.  this quick recipe mixes up in less than 15 minutes and can be baked and ready to serve in an hour and a half.

quick and easy brownie pie
1 (9″) pie serving 8-10
3 eggs
3/4 cup sugar
1 teaspoon vanilla
3 ounces unsweetened chocolate
4 tablespoons unsalted butter
1/2 cup self rising flour
3 tablespoons cocoa powder-natural not dutched
heat the  oven to 350.  grease a deep 9″ pie dish and set aside.  in a mixing bowl on medium speed, whip the eggs with the sugar and vanilla until it forms a thick ribbon (see photo above).  while the eggs whip, melt the chocolate and butter in the microwave on the lowest setting.  fold the butter and chocolate into the egg mixture.  sift the cocoa and flour over the batter and carefully fold it until it is mixed and no streaks remain in the batter.  pour into the pie dish and bake until slightly fudgy when tested with a pick-about 40 minutes.  allow it to cool about an hour before cutting.  serve it with ice cream, whipped cream, hot fudge, caramel…the list goes on and on
and if you dare to bake one, snap a photo and send it to me, i will post it here!
bakinbabe116@aol.com

peanut butter brownies

consider this an updated and baked version of that old tv commercial. hey you got chocolate in my peanut butter-no you got peanut butter on my chocolate…no matter how you call it, the two go together like left and right. in other words, they’re incredible on their own and together a combination that can’t be beat. i love them in ice cream, it could easily be my last meal. in cookies, they are a favorite too. so it’s only natural that they would end up in a brownie that i have baked. years ago when i had my own bakery, they were a constant selection in our showcase. they are a little laborious but worth the effort. melt chocolate and butter in one bowl and peanut butter and butter in another

keeping the two separate batters warm is the key.
whisk in some eggs and sugar
fold in the flour and then move on to the chocolate batter
whisk in the eggs and sugar and a little coffee
fold in the flour and cocoa and a few chocolate chips
dollop the batters into a pan
take a wooden spoon handle and swirl them together
don’t over do it or you will lose the design
let them cool and cut them into squares. you may have to hide them, they tend to disappear.