 One of my favorite things about traveling to new places is the chance to try new restaurants. Trust me folks, Asheville did not disappoint! Every meal we had was well worth the visit. After our big hike up to Black Balsam Knob, we followed another recommendation from the wonderful folks at Local Provisions (the first being the hike up to Black Balsam Knob) and went to Gan Shan Station for a late lunch.
This small indoor space makes great use of the natural light and we were seated at a table that was next to the large wall of windows in the front of the restaurant.
 Having hiked at least 6 miles (did 9 miles of walking for the day), we quickly drained the water bottles placed on the table.
 This old building was perfect for camera play-I loved the light fixtures hanging above the tables.
 Sorry, couldn’t resist…
 My choice for lunch was a spinach and tofu salad. Trust me when I say that this is not what I expected. It was also as delicious as it was different, those crunchy bits on the top…Seriously though, this dish was only offered as a special and for those of you who visit the restaurant, I hope they offer it again! It had a little bit of a bite to it but the crumbled tofu and cooked spinach were well flavored and served cold-perfect and refreshing for the hot day and the hike we had just completed.
 The rest of our meal included pork dumplings and fried tofu. Be sure to check the special board to see what fillings are available for the dumplings because they change them frequently. We devoured them! The filling was a typical Asian style pork recipe with ginger and garlic and all of the other ingredients you would expect to find but it was the sauce that made them. It was a creamy peanut sauce with what I think was a touch of red curry and if we had been there alone, we might have fought over who was going to have it all.
The fried tofu was light and crispy, fried to perfection in a well seasoned starch mixture and again, the sauce was a big part of the success of the dish. It was not your typical salty-soy sauce and we used it freely as we ate the crispy sticks.
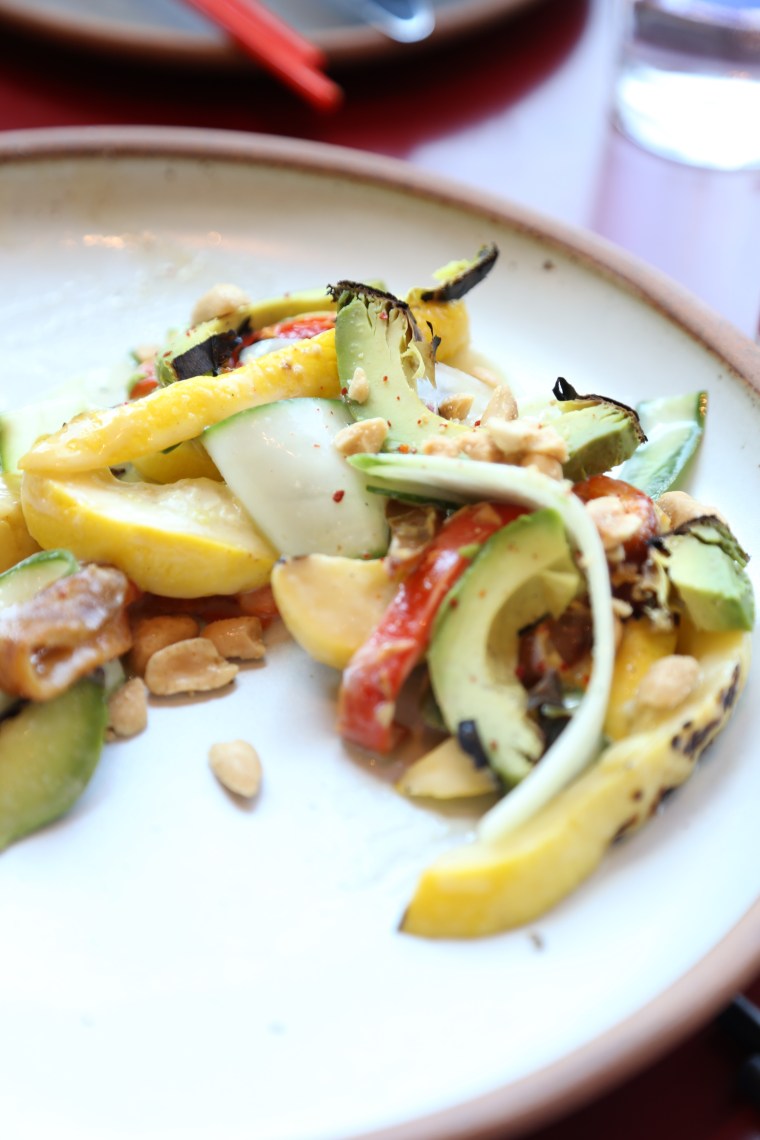 Between us, we also shared a grilled vegetable salad that included squash, peppers and avocados. This was the first time I ate a grilled avocado and honestly, I don’t think it made any difference to the flavor; ripe avocados are the food of the gods and nothing can improve that! Again, be sure to check the special board, that is where the good stuff is. At least it was on our visit because most of what we ate, was ordered off the board and not the menu.
 And if you need any proof, we joined the clean plate club and walked away feeling full but not stuffed! It was the perfect way to refresh ourselves after our hiking adventure.
 The verdict, if you are in Asheville, take the trip over for lunch, it isn’t in the downtown area but it is worth the time you will need to get there. My plan is to go back sometime and try the dinner menu.
 Remember that mention of Local Provisions? We were staying nearby and walked over for cocktails before heading out to dinner. When I read the description for the Midnight Voyage, I had to have one. It was the first time I have ever tasted Honeysuckle Vodka and I probably could have consumed a quart of this mixture! The cocktail is a blend of honeysuckle vodka, Creme de Violette, St. Germain and lime juice. It was a little sweet, very citrusy and just a bit floral; it was also like a glass of grown-up limeade that did not remind me of really bad margaritas, which is something lime juice generally does for me. They knocked it out of the park with the addition of a stem of begonia flowers. How is it that this gardener did not know that begonias are edible??? They have a tart flavor that will get you at the back of your jaw but in this drink, they were the perfect addition!
 Recently, I flew to Atlanta to visit one of our daughters. Once she had picked me up from the airport and we were on our way for some much needed coffee (it was only 7:30am at this point), she surprised me with the news that we were headed to Asheville. Hiking was on our list of things to do and we set off on the Blue Ridge Parkway. We stopped on several occasions just to admire the view.
 As we drove on, we gained altitude and the views just got better and better.
 We were lucky, the weather was perfect; sunny, clear and not too hot.
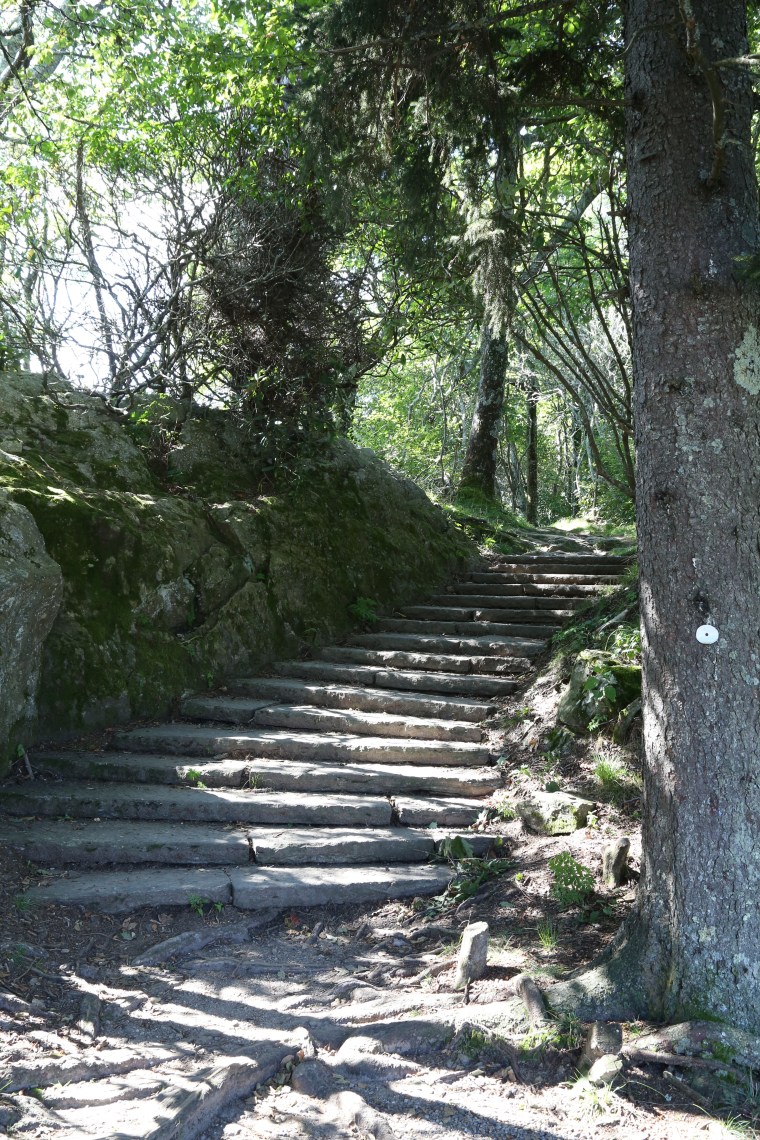 At one stop, the old Buck Spring Lodge site is near the Pisgah Inn on the Mt. Pisgah Summit and there are a few trails around the parking area. Take the stone stairs and follow the trail toward the inn, the views are worth the walk.
 We were headed for Black Balsam Knob and we drove on. These were spotted on the Flat Laurel Creek Trail. If anyone can identify these, please do-I have no idea what they are.
 Even though were around 6000ft, honeybees were present. While I am sure that the altitude was not an issue for them, I could only wonder if they were there because a beekeeper has hives out there somewhere or if there were feral bee colonies.
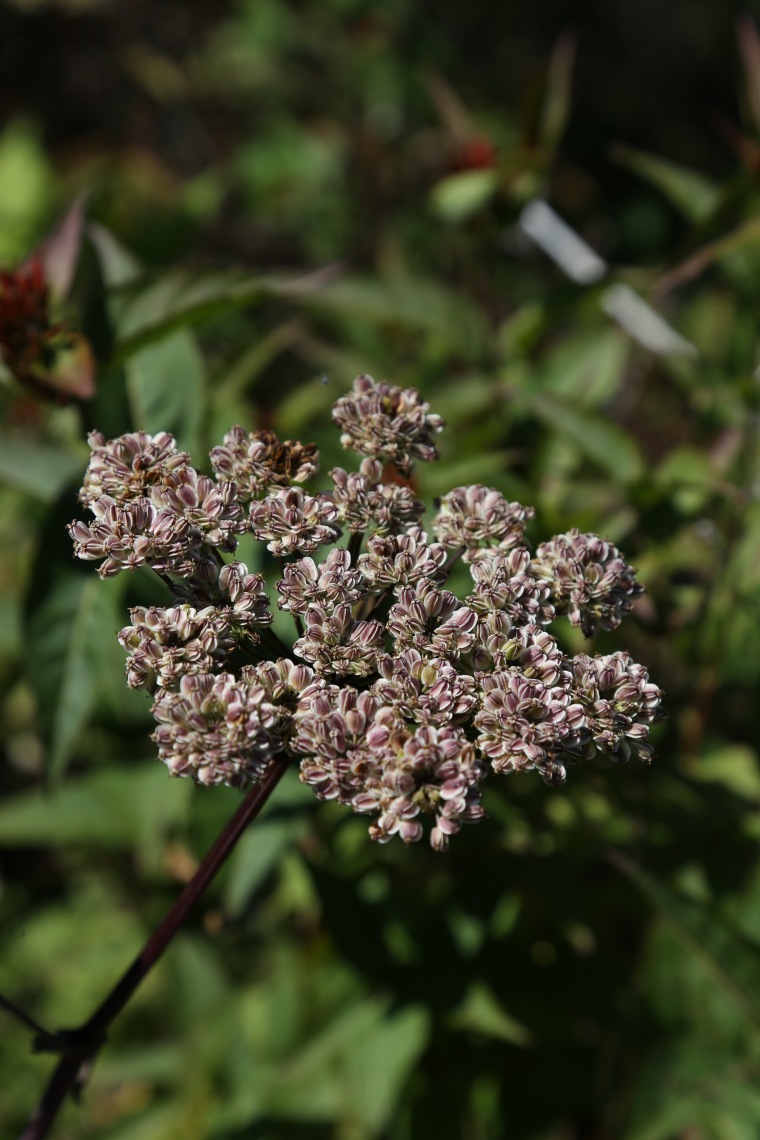 These were spotted along the Art Loeb trail as we hiked up to the top. They had finished blooming for the year and were loaded with seeds for next years blooms.
 There was no shortage of Mountain Ash berries.
 And with goldenrod in bloom, the bees had plenty of flowers for foraging.
 Again, I am looking for an assist on the ID, if you know what this is, I would love to know as well!
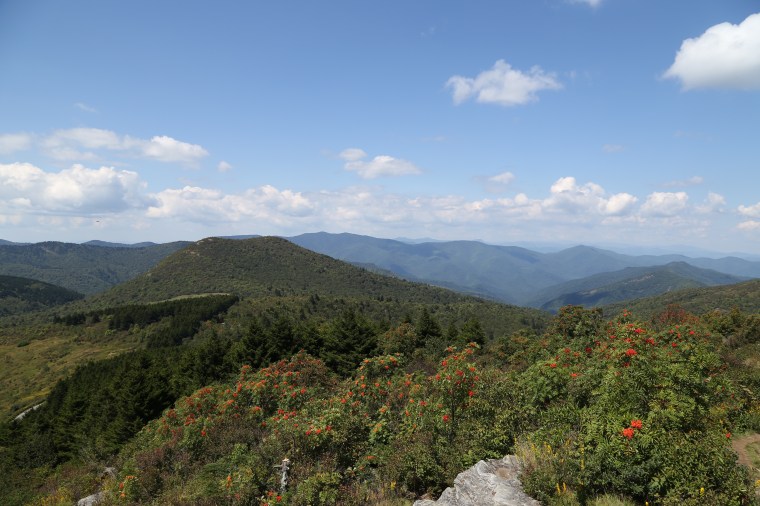
 When we finally did reach our goal, not the entire trail but a nice high elevation, we were standing on this rocky spot. The pattern in the surface of the stone is intriguing.
 We stopped for a bit and enjoyed the view. If you want to take a hike near Asheville, we highly recommend making the trip to


 My hiking partner, Alix. It was a wonderful surprise and it was a perfect afternoon!
 Remember those
  To make the jam, rinse, dry and pit 3 pounds of red tart cherries. Combine the cherries with 2 cups of sugar and the juice of 1 lemon in a bowl and let it sit for 30 minutes. Pour the mixture into a stainless steel or enamel pot and simmer for 30 minutes. Be sure to stir it frequently and skim off any foam that forms. Pour into a heat proof bowl, cover with parchment and chill overnight.
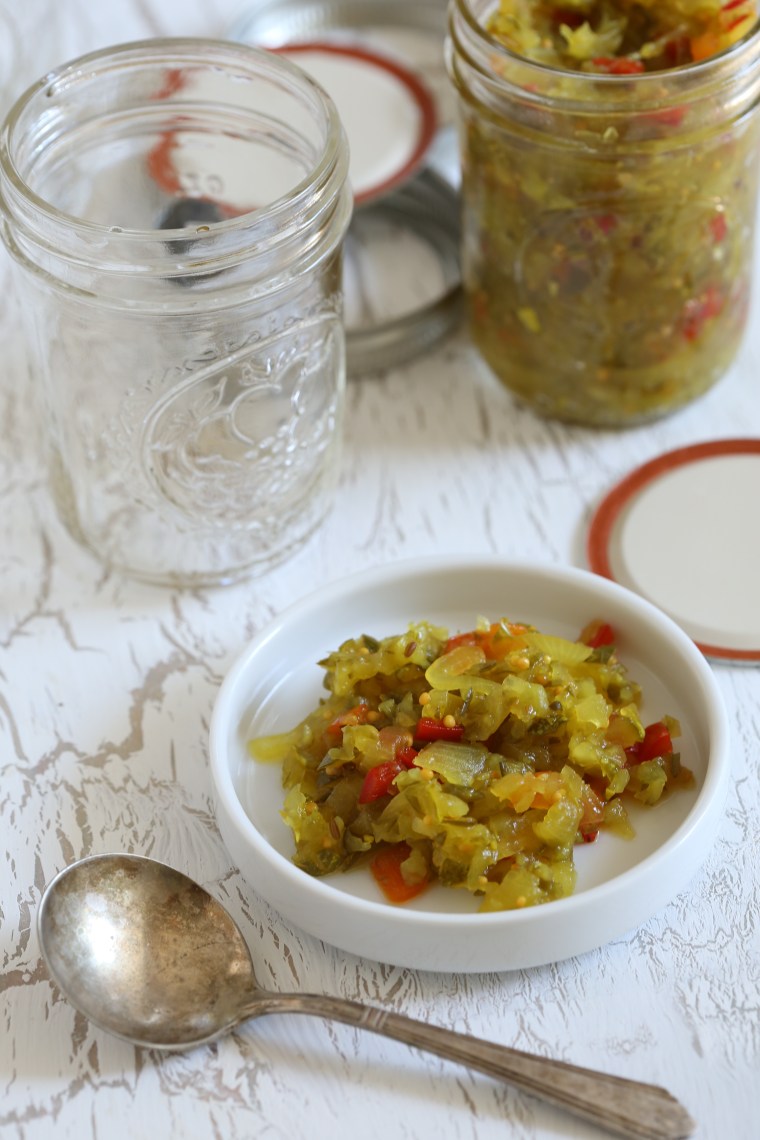 When it comes to sweet pickle relish, most people either love it or ignore it. Personally, I like it in very small quantities and really only as an ingredient and not a stand alone condiment. Tuna salad, Thousand Island dressing and potato salad are all likely to receive a dollop of sweet pickle relish in our kitchen but only my husband will eat it by itself and only if it is on a hot dog. My strange aversion to it is a little weird when you consider that I could probably eat a jar of bread and butter pickles all on my own and if you compare recipes, you will see that they are nearly identical in the ingredients used.
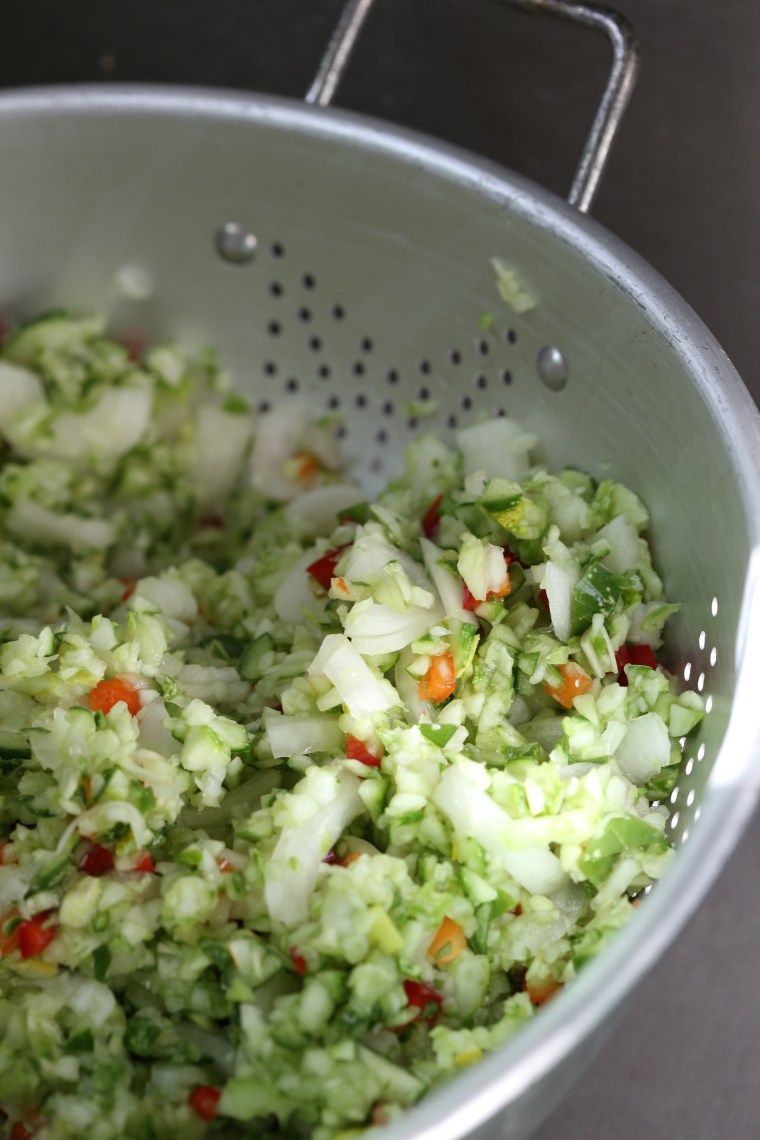 Making pickle relish is a new thing for me. My preference for avoiding it meant that I would rarely try one when available but with the goal of canning and preserving as much of the produce from the garden as I could, I decided to make some since Darry does enjoy it. The first batch I made was a small one and it filled only a few tiny jars and since he enjoyed it so much, I have now made two additional batches, both larger, and we have enough until the next cucumber harvest-a year away!
 First, the sugar and vinegar are heated to make a syrup. The spices and vegetables are added and over medium heat, allowed to simmer. It is important to stir it frequently so that the water can evaporate and to prevent sticking. As it cooks, the color changes.
 The longer it cooks, the more the golden color deepens.
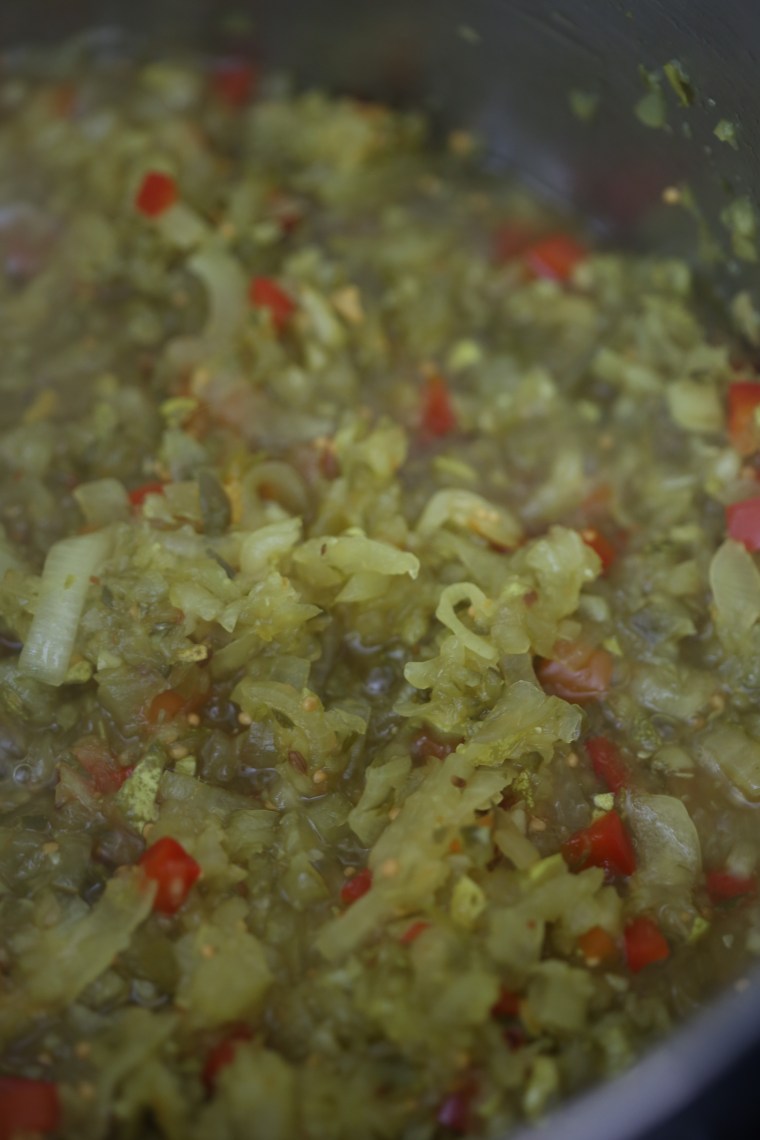 When finished, the vegetables will be mostly translucent and fairly even in color, except for the red peppers. My suggestion, make small batches and experiment with the onions and peppers; red, yellow or white onions, whether sweet or not could be used just as any type of peppers. Keep in mind, you are cooking it down and if you reach for the ghost peppers, it will be beyond fiery!
 Bread and Butter Relish
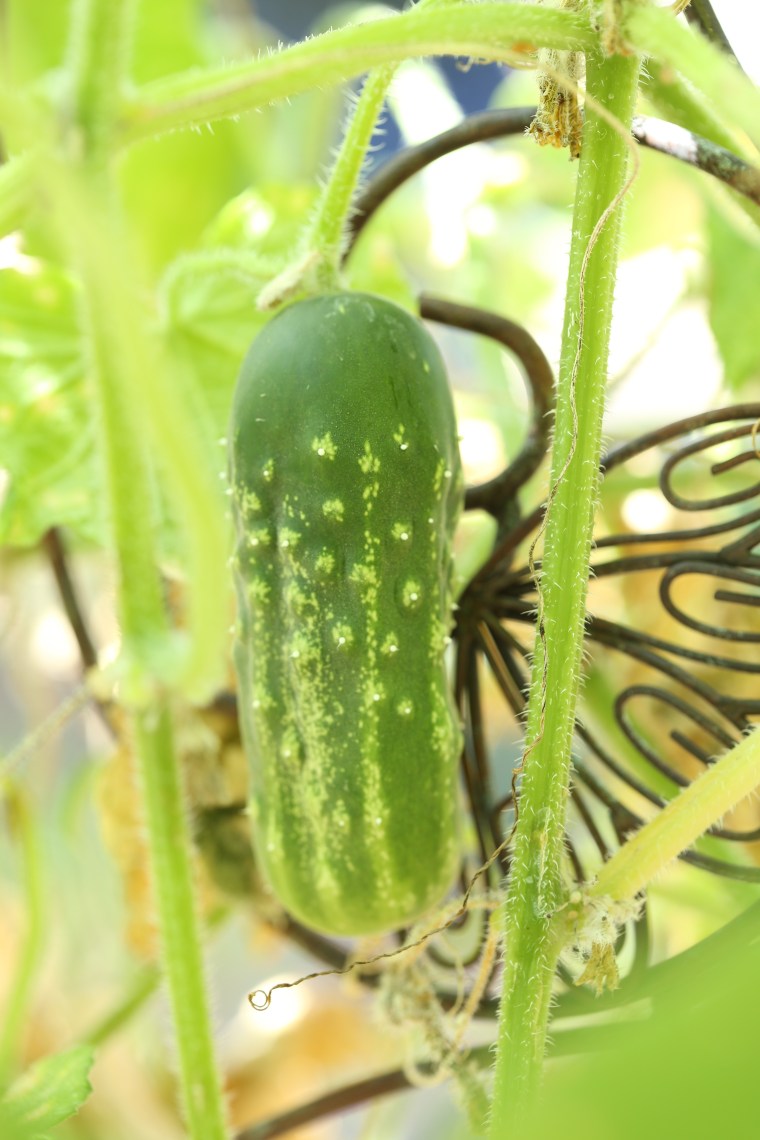 Gardeners have preferences when it comes to the plants chosen each season and I am no different than most. In my flower beds, I always include a mix of herbs and edible flowers as well as those that will attract beneficial insects and help repel the destructive ones. My vegetable garden follows the same plan and tucked in between the crops are many of those same herbs and flowers. Companion planting is another of my strategies in the garden but honestly, I haven’t seen a huge improvement by following the does and the don’ts of plant location.
 The previous photo is a Homemade Pickle and this one is Marketmore #76. In the past, Marketmore #76 has been a great producer, this year, not so much. My thoughts are that the weather has affected the yield but more importantly, I think the soil is still lacking. If you have been following this blog, you are aware that we started this garden from the ground up two years ago and this is the first year that we are planting in the ground. Lots of layering with materials such as compost, leaves, coffee, chicken litter from our hens and eggshells has greatly improved the structure but I think it needs to be amended further and turned as well as given a season off to let the nitrogen levels fix.
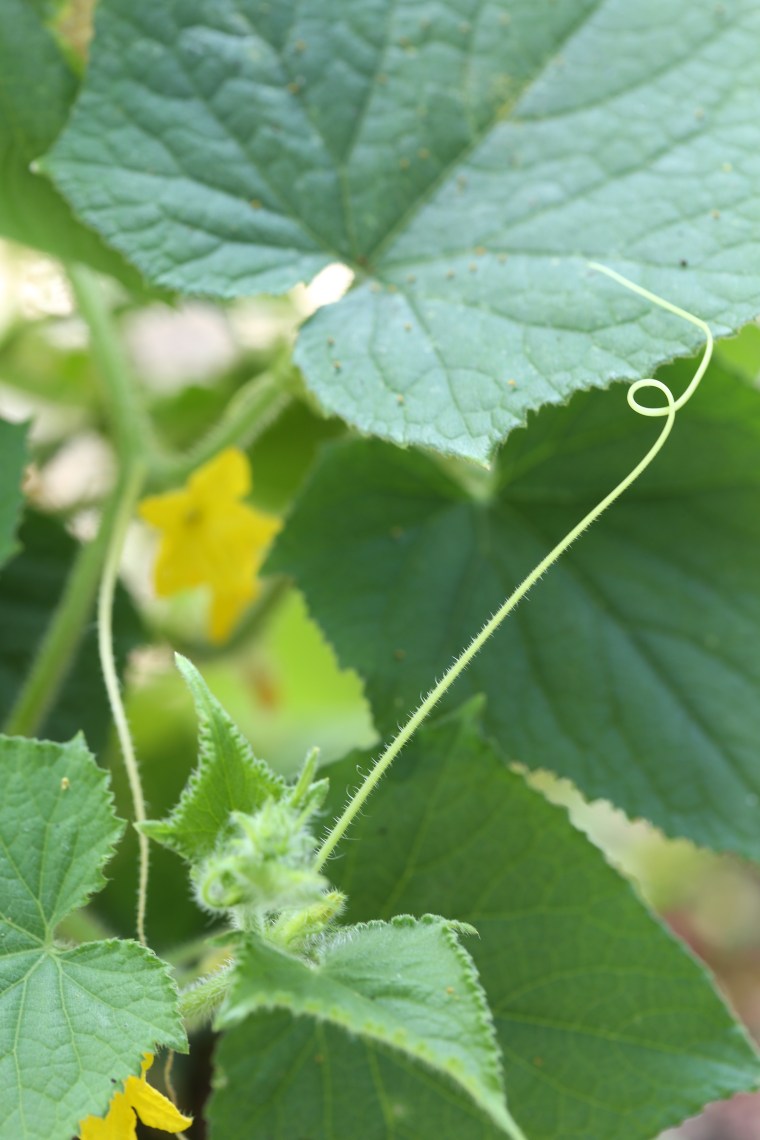 The tendrils are amazingly strong and these plants would sprawl out all over if I give them a chance.
 For my first batch, I peeled, seeded and pureed some cukes. The pale green liquid was added to a hard roll recipe and the dough was shaped into batards. My thought was to keep it simple and I added a few dill seeds to the mix.
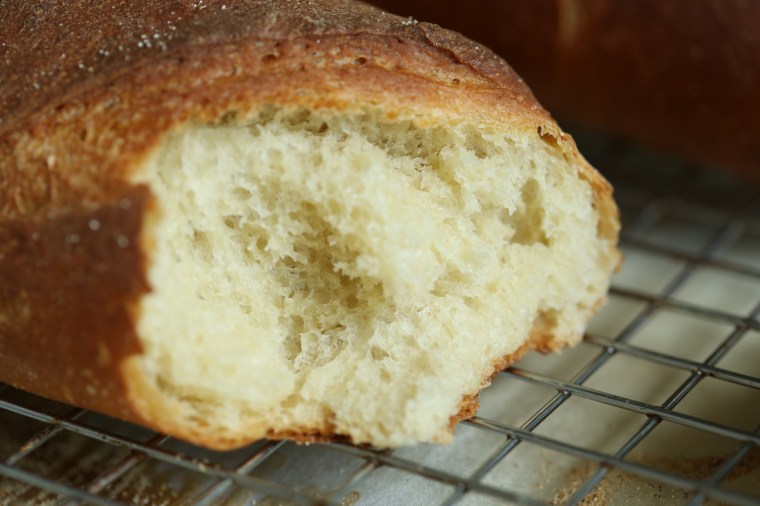 Once baked, it was nearly impossible to see that the cucumbers had an effect on the dough. The interior of the loaf is nearly white and the crumb is a tiny bit compact. Not the results I was hoping for but still a good loaf of bread.
 After giving it some thought. I started a second batch of dough using a different recipe. For this batch, I left the skin on the cukes but removed the seeds before pureeing. The liquid was a much darker shade of green and had little flecks of skin in it. For the dough itself, I settled on a recipe that used a Poolish style starter to develop more flavor in the dough. After letting the flour, water and yeast mixture age overnight, I mixed the dough using a method that does not include kneading the dough.
 As you can see, the inclusion of skin gave the dough a good amount of green color. The little flecks of skin provide some visual interest and a little texture, as well.
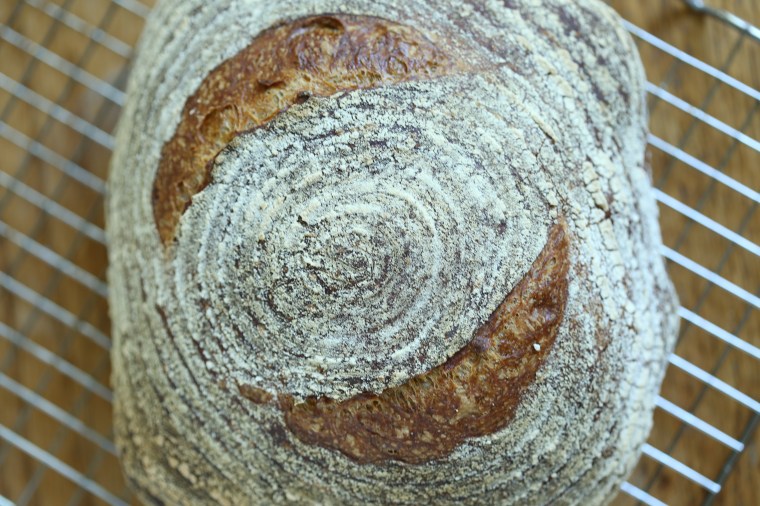 Using a lovely little banneton mold that my husband gave me, I was able to give the loaf a nice spiral pattern on the surface.
 As you can see, the interior has a tint of green to it and a few green specks here and there. The crust baked up crisply and it tasted wonderful while still a little warm. The problem, it just didn’t taste like cucumber, at least not while it was warm. Once the loaf cooled and sat for several hours, the flavor of caramelized flour and dough from the crust of the bread was no longer the predominant flavor. The subtle, earthy and almost sweet, flavor of the cucumbers was fairly obvious.
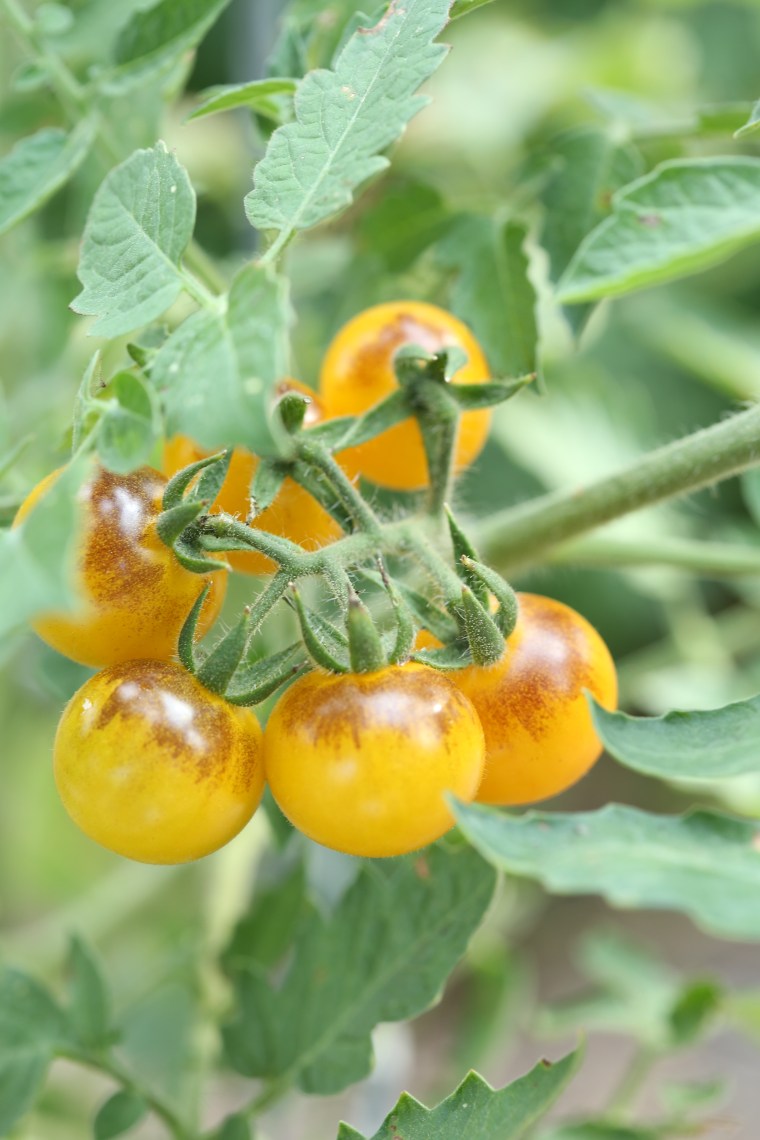 In the beginning of the spring, I was so hopeful that the garden would be producing enough vegetables to feed us for the year. Quite a few of the results are in and thanks to a cool, wet spring and a hot, humid summer (all above the norm), we would go hungry if the garden was our main source of vegetables. So many plants did not come close to expectations. Just about all of my squash plants rotted away from the moisture and the sole survivor has yet to produce a single squash that did not rot. Eggplants are struggling, barely producing and so are the peppers.
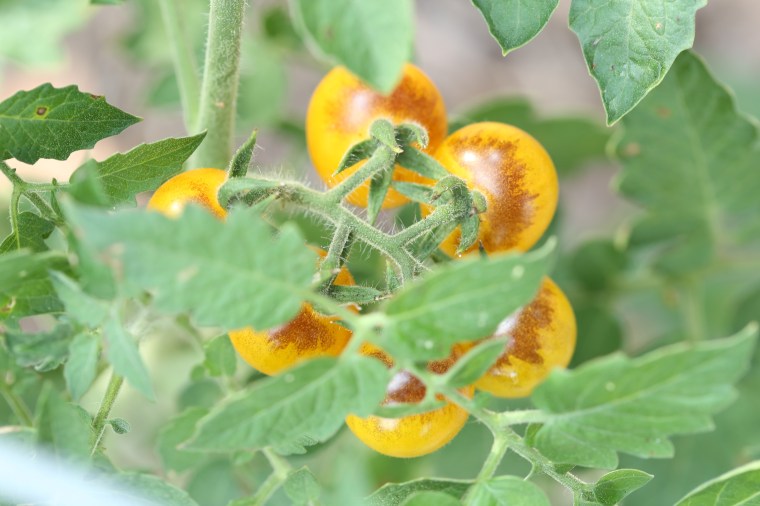 These are small cherry tomatoes, about an inch in diameter and they are a little on the tart side. The color is what I really love; that brown blush at the top, so unusual and so pretty!
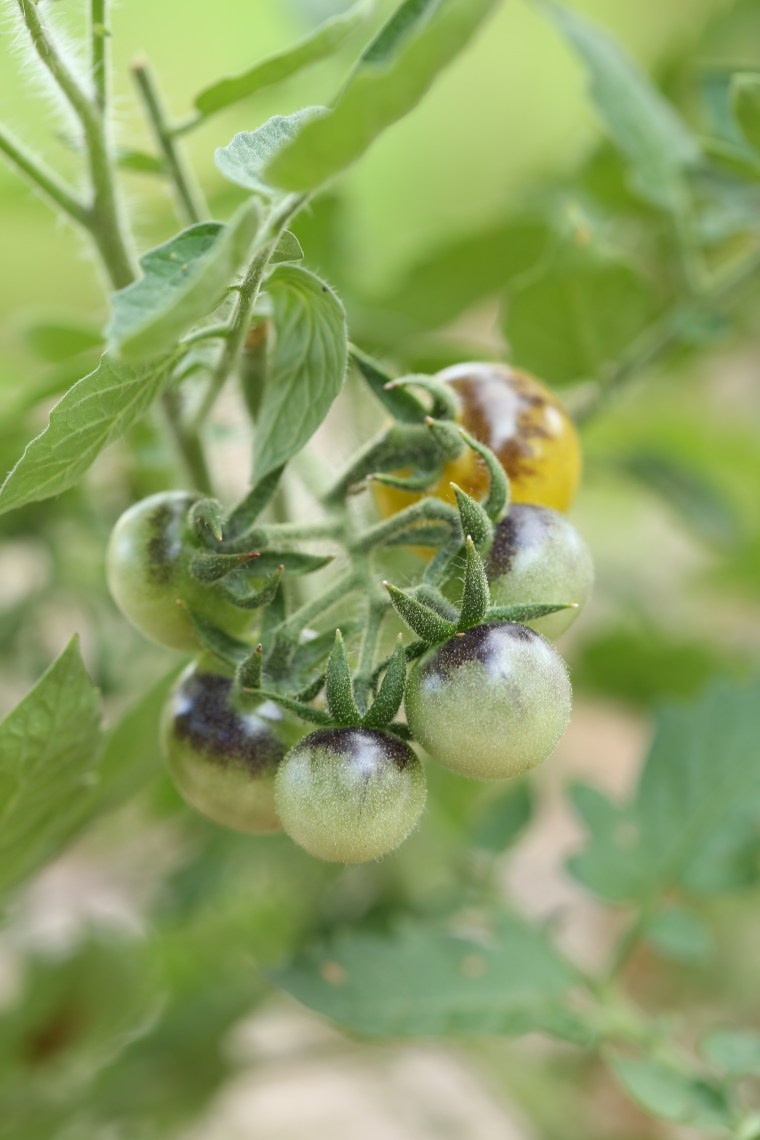 The color develops as the fruit grows rather than as it ripens. In technical terms, the color is on the “shoulders” of the fruit. Whatever you prefer to call that area, the seeds are available from my favorite source of heirloom seeds,
  One of the only other plants with fruit is the
 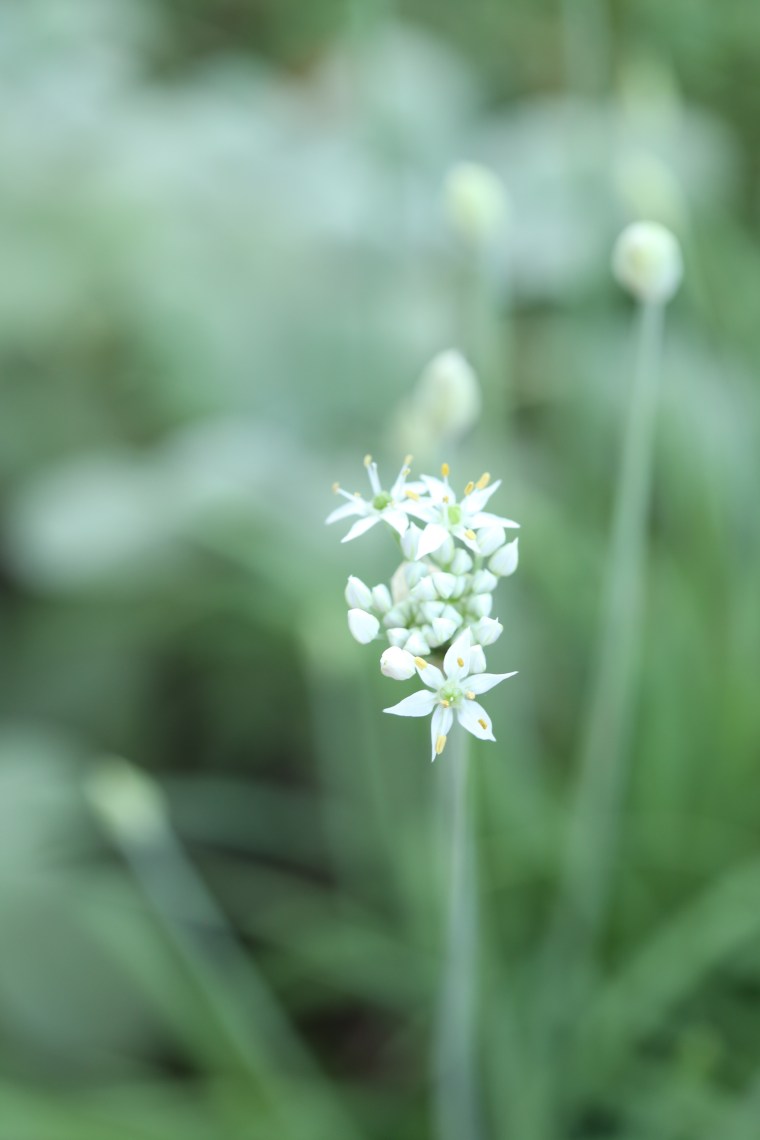 Garlic chive blossoms are so delicate but beware, if you let them flower, they will reseed and you will have chives everywhere. Honeybees like them so I am leaving these flowers in place, yes, I like to live dangerously and I ain’t afraid of plucking plants…
 While wandering the garden, I was surprised to find a
  Near the Charentais is another variety called
 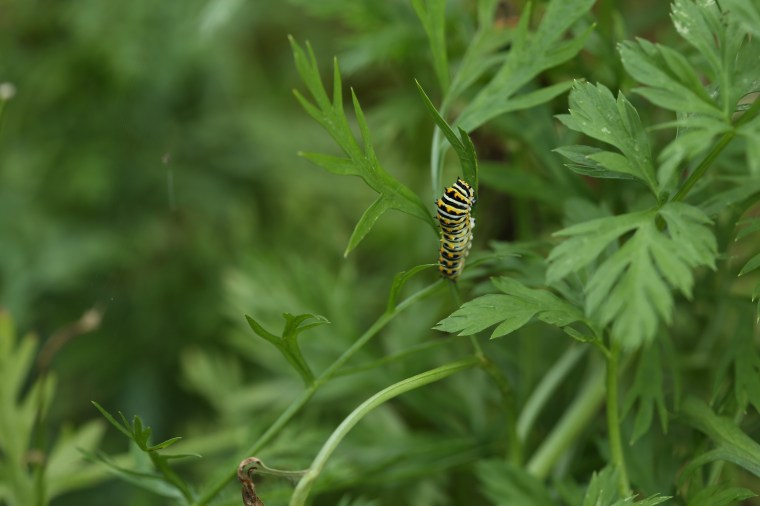 If you take a moment to look in all of the carrots and parsley, you will find swallowtail caterpillars. Lots of them actually, probably about two dozen or so out there now. We have a variety of swallowtail butterflies that visit the garden; zebra, tiger and spicebush swallowtails are abundant but these are zebra swallowtail caterpillars.
 The biggest surprise of the day was spotting this monarch caterpillar on a swamp milkweed plant. In the two years we have been gardening out front and with all of the butterfly plants we have added, we have seen so few monarchs. Finding this caterpillar was like winning the lottery!
 The abundant milkweed plants have also attracted this milkweed leaf beetle. They look a little like a monster sized ladybug and mainly eat the leaves of the plant.
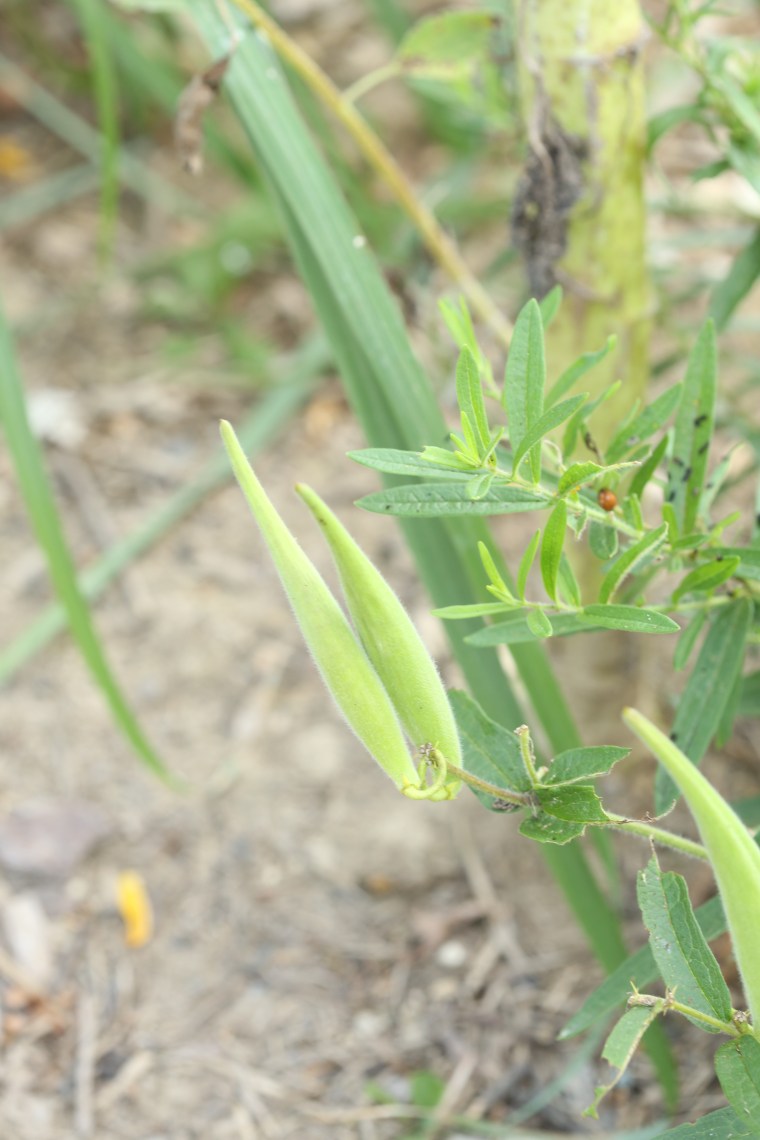 This butterfly weed, which is a native variety of milkweed, has set seeds and will soon explode and release them into the wind.
 One of my favorite plants, Ironweed. It too is a butterfly magnet, and I just love the color of the flowers. When we had our home in Nashville, I planted Ironweed on a slope in the yard and it spread by reseeding. With some luck, this will spread as well.
 And another one of my favorites for attracting butterflies, Joe Pye Weed. If you have an area that gets a lot of moisture and would like to try a rain garden, Joe Pye Weed can tolerate moist soil, a win-win!
 The fact that I have a sweet tooth is no secret, it should probably be called an unhealthy obsession. Generally, I keep it in control by not buying sweets and not baking them unless I am bringing them to someone else. It’s a good plan, most of the time. But every now and then, I cave. Lately, when that has happened, Darry and I have gone out for ice cream. With the extreme heat we have had lately, how could you blame us? In the evening, as the sun goes down, we like to go to the Village and visit the local ice cream shop and then walk around.
 Over the years, I have made oatmeal cookies with any number of added goodies. Dried currants are my favorite choice but dried peaches and figs are really good too. This batch has raisins, dark raisins but when I use raisins, I usually prefer the golden ones. My husband likes them with dried cranberries. While I love nuts, I hardly ever add them and more often than not, I see them with chocolate chips but even though I am a huge chocolate fan, I cannot stand oatmeal cookies with chocolate chips in them.
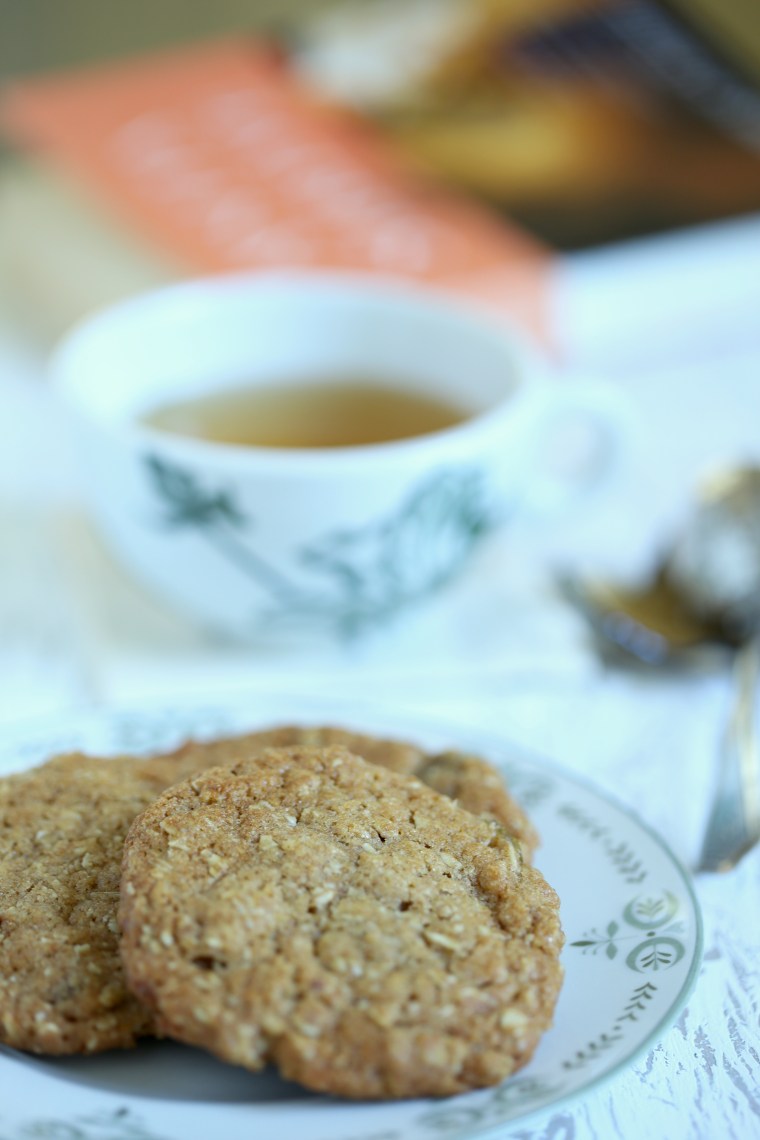 One of the nice things about oatmeal cookies, it is easy to hide whole grains in them. Besides using whole grain rolled oats, you can also use whole wheat flour and trust me, no one will know! The oats can also be swapped out for other whole/rolled grains. Trader Joe’s sells a mixture of rolled whole grain made from a mixture of oats, wheat, barley and rye and that would work in this cookie too!
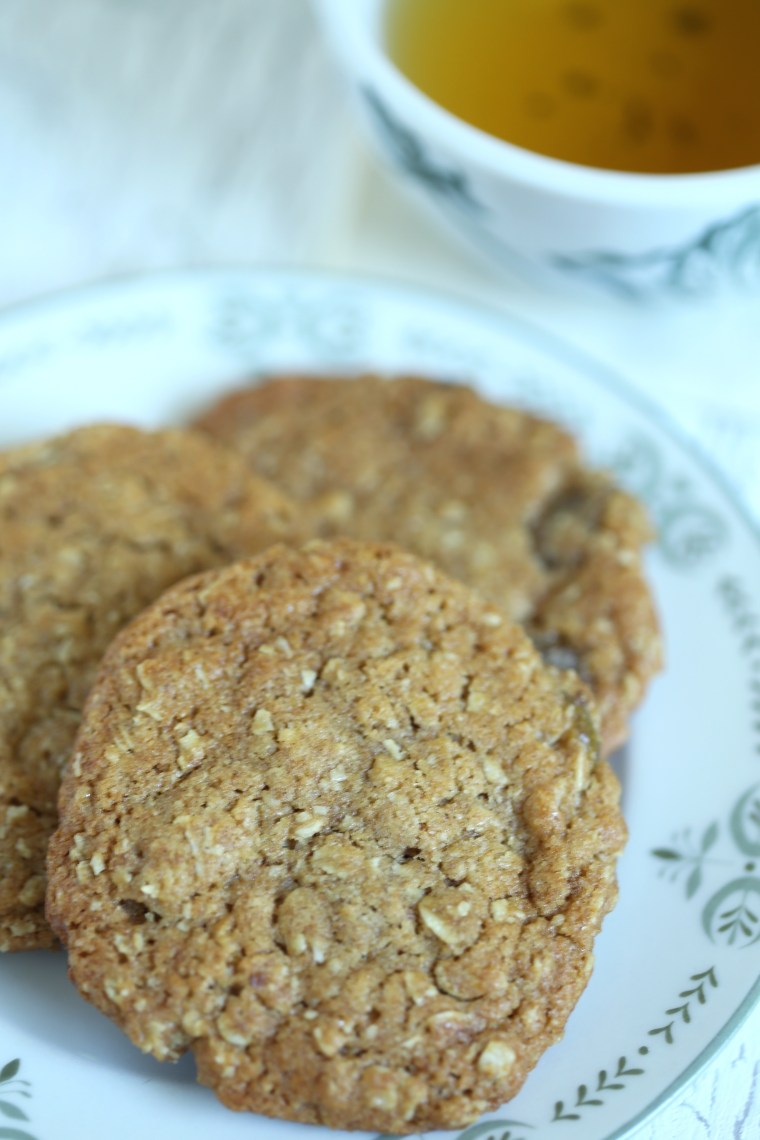 A few notes to ponder:
 Oatmeal Cookies with Raisins
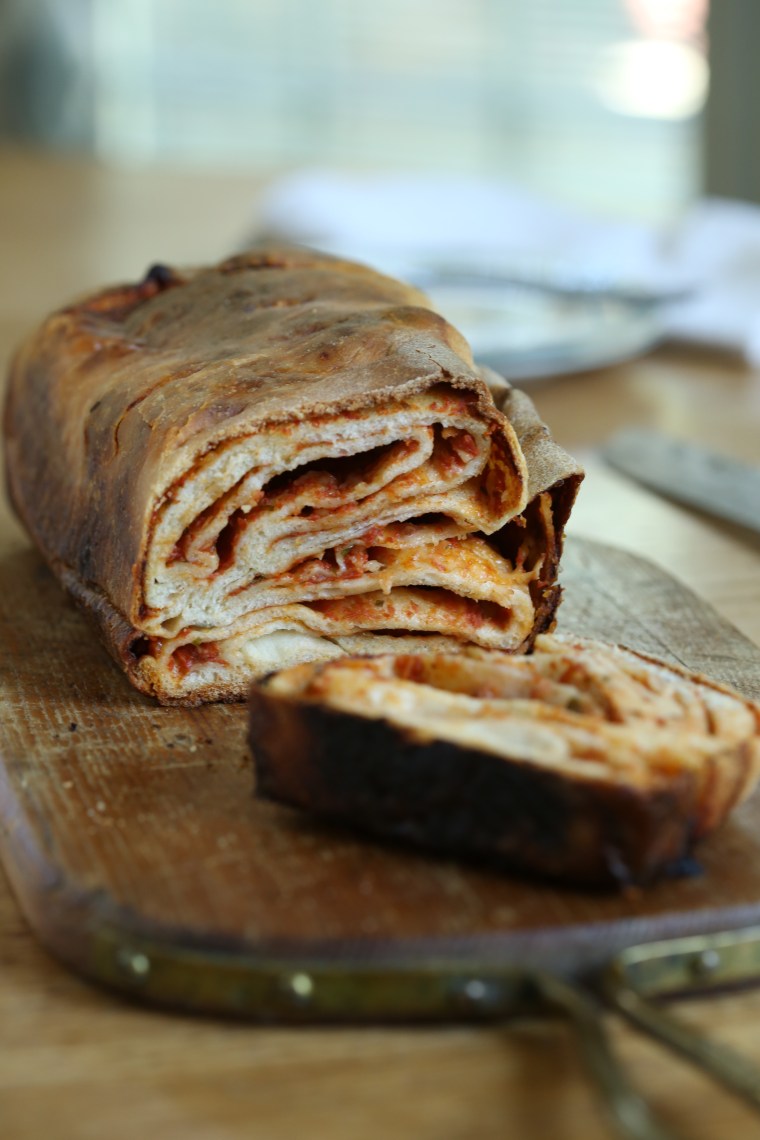 My mother gave me several issues of the magazine Saveur that she was finished with. They have been sitting on the coffee table in the living room for several months and recently, I found myself flipping through one, Issue 182 from April 2016. The cover promised a Taste of Sicily, and I went through the article in search of bread recipes and I wasn’t disappointed.
 Scaccia is favorite snack food in Sicily and can be easily found in shops and is made with many thin layers of semolina bread stacked with tomato sauce and a traditional cheese called Caciocavallo, a traditional stretched cheese curd. Having never traveled to Sicily, I will accept that fact and add this to it, it is not easy to find here! The recipe looked easy enough and after checking my pantry for semolina flour, I mixed up a batch of the dough. This recipe instructs you to also make the tomato sauce but I suspect that you could use just about any sauce, homemade or purchased. Caciocavallo, which translates as cheese on horseback in English, is similar to Provolone in flavor and is made from either sheep or cow’s milk and as much as I would like to try it, I didn’t go out in search of it and just substituted some grated Asiago.
 First, the dough is rolled out into a large rectangle. The result is a very thin sheet which gets topped with sauce and cheese before being folded up. Then more sauce and cheese, more folding and finally, a log of layered dough, sauce and cheese is folded in half and placed into a pan lined with parchment paper.
 The loaf is not given a rising period but I did let mine sit for at least 30 minutes while the oven preheated.
 Looking at the loaf, I was worried. Knowing that only 1/4 teaspoon of yeast was used to leaven the dough was obvious; it did not appear to rise much, if at all.
 After baking the loaf for nearly and hour, I was surprised to see that it did rise a small amount. The aroma that filled the kitchen was undeniably that of lasagna or of a similar baked tomato sauce and pasta dish. Having waited for about 20 minutes, I carefully sliced into loaf and revealed the layers of spongy dough, tomato sauce and cheese. Not only did it smell like lasagna, it tasted like it too, both in flavor as well as the texture of the interior.
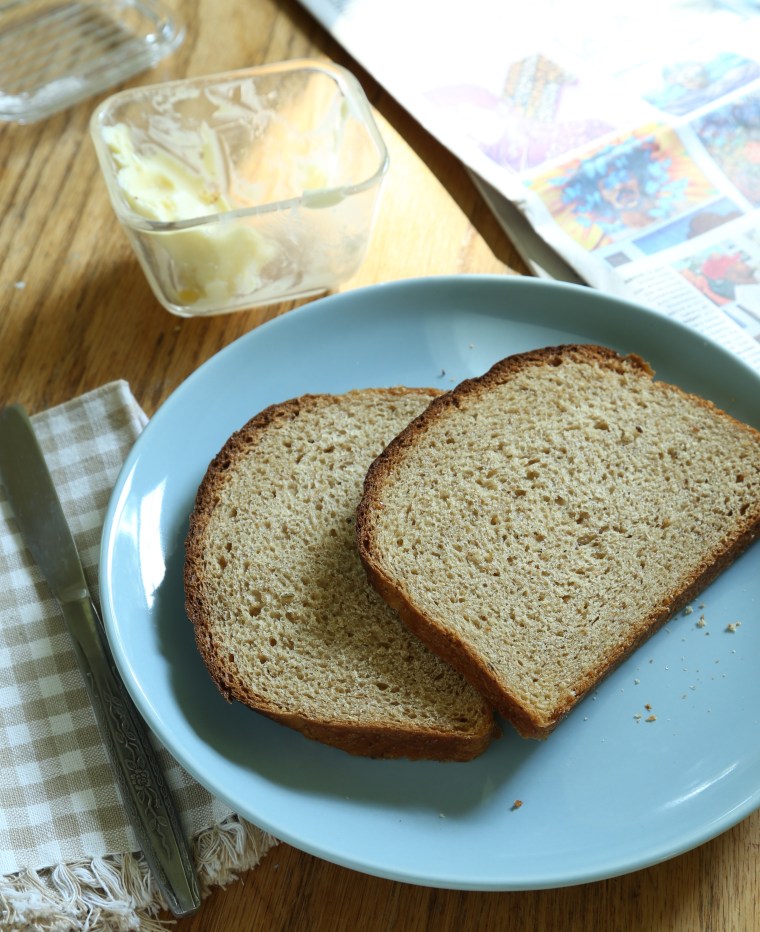 It has been quite a while since I have participated in the Tuesdays with Dorie baking. What can I say, life gets in the way? Partly, the other angle; having a pile of sweets in the house for just two of us means we eat way more than we should! When I saw the choices included a bread recipe this month, I decided to get in gear and give it a go.
 Rather than bake it in the round 9 inch pans the recipe calls for, I used 6 inch square pans. They made the most perfect cube shaped loaves and the slices were just large enough that two thin slices of toast were more than filling.
 My rye flour was stone ground and it added a nice texture to the crumb. Little flecks of rye and seeds, this one is a keeper. Since the recipe made two loaves, I froze one for later.
 My husband often teases me and calls me a hoarder. It is no secret that I am a collector of things. Vintage pottery and glass tableware, cookie cutters, cookbooks both old and new, bundt pans and baking tools; I have all of these things in larger quantities than I probably need. Each time he says something, I politely remind him that while I may own more than he prefers, we are in no danger of being buried alive by my things.
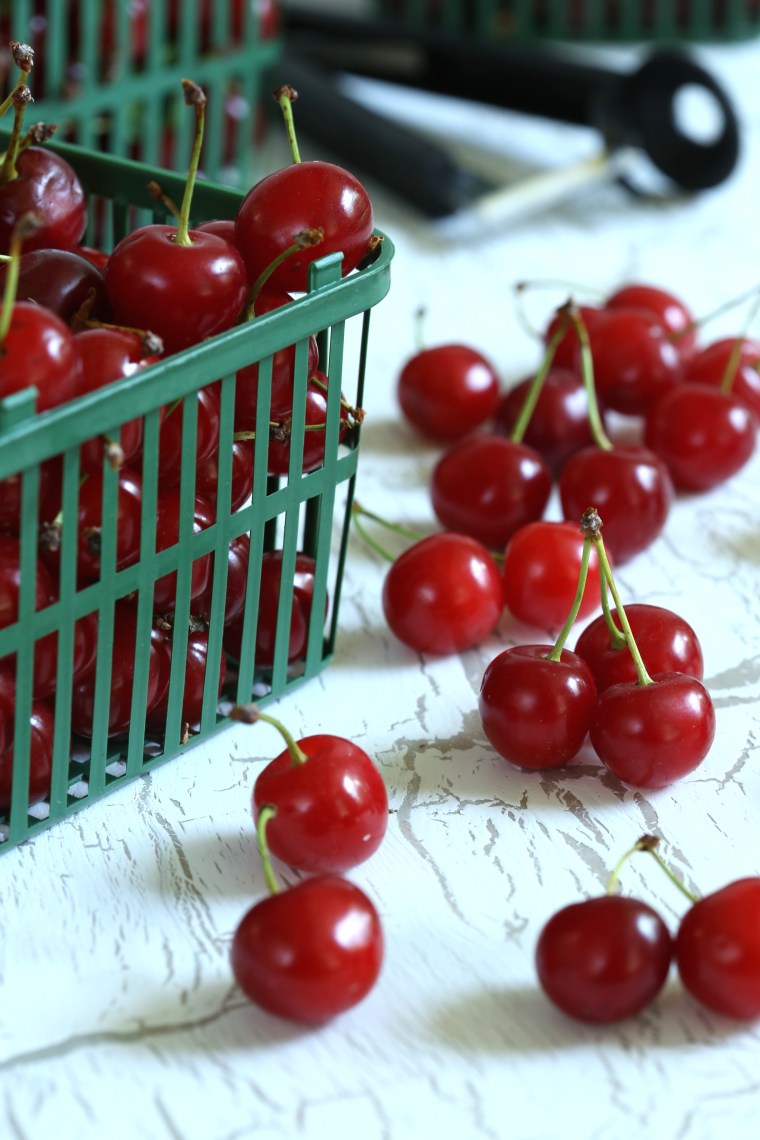 With 4 quarts in my cart, I finished shopping and headed home. Aside from the drunken cherries, I was going to make a tart and some jam! Cherries are not my favorite fruit, but they are definitely close to the top of the list, especially sour cherries. As much as I enjoy them, I prefer to eat sour cherries cooked into something. To surprise my husband, I made a lattice topped tart, which we proceeded to devour over the course of a couple days. The cherries I used for jam are now sitting in little jars and will most likely be given as gifts during the holiday season-yes, I try to get an early start if I can.
 The recipe I followed was written by
 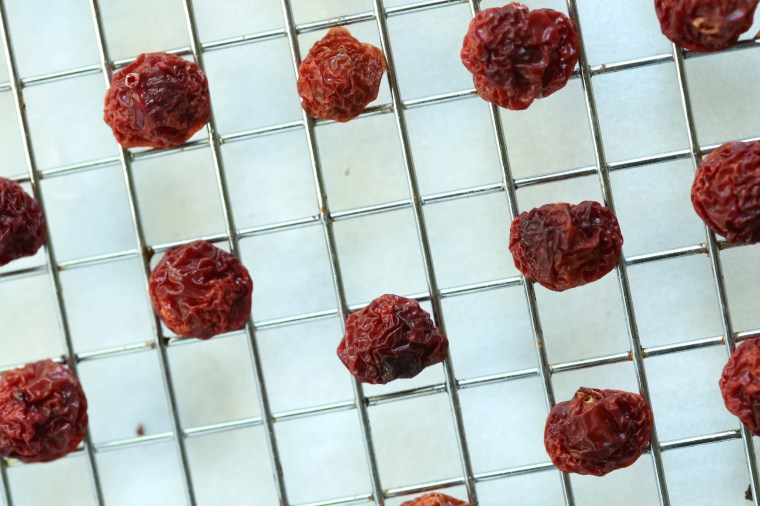 The instructions call for drying them to “about 1/3 of their original size,” and since these cherries were so small, I almost think I should have stopped them when they were half their size. To me, they still felt pliable and soft but the pit was a lot of the volume in each cherry.
 Once they are ready, the cherries are placed in a jar with superfine sugar to macerate for a few days. Because my cherries were so small, and I think I may have dried them a little too much, they never produced any juice to dissolve the sugar. After 4 days, I went ahead and added the alcohol to the jar and returned it to the pantry. While the recipe calls for mostly grain alcohol and a small amount of brandy, I used Boyd & Blair Potato Vodka that is actually only 80 proof rather than 100 proof and for the brandy, I broke into a bottle of
  By this point, the syrup was thick and had picked up a pink tint. The alcohol flavor had also mellowed but the cherries, which had begun to plump up, were still a bit tart. Knowing that they will continue to sweeten and take on the flavor of the booze is something I look forward to tasting in a month or so. These will make wonderful cocktail cherries and the syrup, I have some plans for that!
