 When it comes to sweet pickle relish, most people either love it or ignore it. Personally, I like it in very small quantities and really only as an ingredient and not a stand alone condiment. Tuna salad, Thousand Island dressing and potato salad are all likely to receive a dollop of sweet pickle relish in our kitchen but only my husband will eat it by itself and only if it is on a hot dog. My strange aversion to it is a little weird when you consider that I could probably eat a jar of bread and butter pickles all on my own and if you compare recipes, you will see that they are nearly identical in the ingredients used.
As I picked the last of the Homemade Pickle cukes from the shriveling vines in the garden, I wondered what I could make with them. Our pantry shelves already had dill slices, dill spears, bread and butter chips, sweet relish and relish with a bite so why make more? The answer is obvious when you think about the fact that it keeps and it also makes great gifts; more than a few folks I know will be getting a package of canned goods from the garden during the holiday season!
 Making pickle relish is a new thing for me. My preference for avoiding it meant that I would rarely try one when available but with the goal of canning and preserving as much of the produce from the garden as I could, I decided to make some since Darry does enjoy it. The first batch I made was a small one and it filled only a few tiny jars and since he enjoyed it so much, I have now made two additional batches, both larger, and we have enough until the next cucumber harvest-a year away!
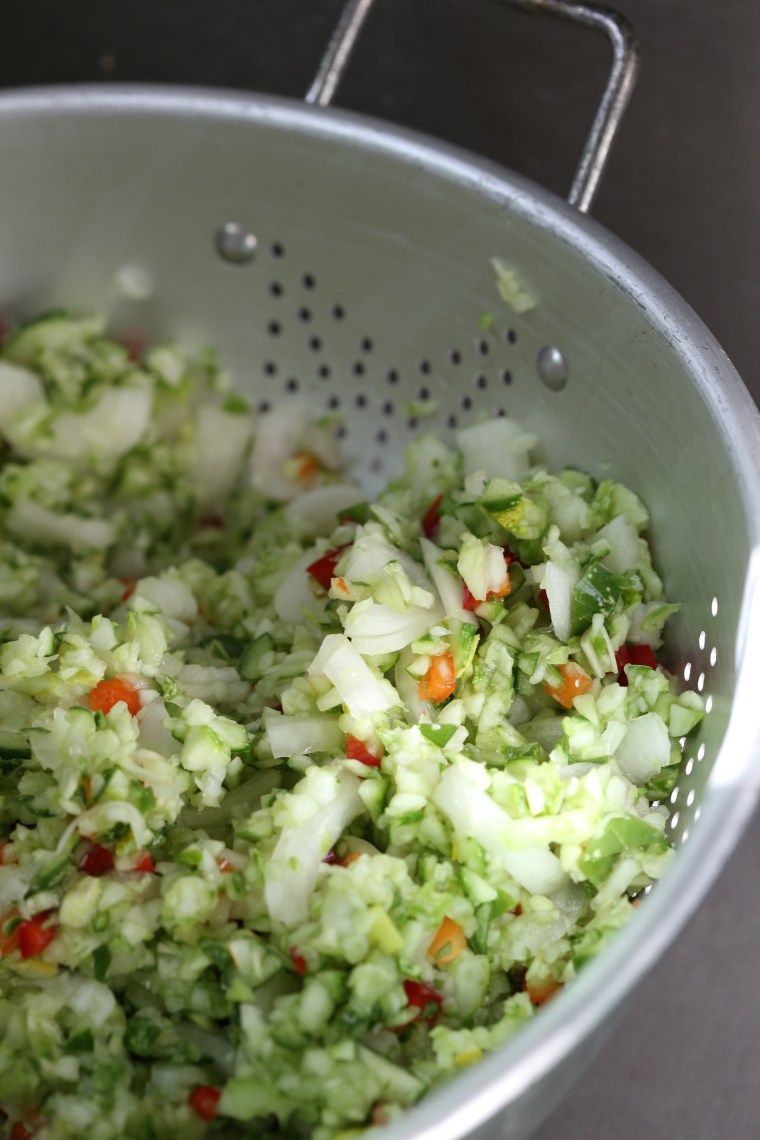
If you are familiar with relish, then you know that it is made with tiny pieces of cucumbers, lots and lots of tiny, little pieces. Bow down and thank the inventor of food processors, who ever that person(s) is, they just saved us from spending hours of slicing and dicing! You will first need to clean off the little spines on the outside of each cuke, then remove the blossom and stem ends, slice them lengthways and if the seeds are large and fully developed, scoop them out with a spoon. The jelly in the seed area can remain if the seeds have not formed yet or if they are tiny, similar in size to a sesame seed because they will be tender. Once cleaned, cut each piece into chunks so that the food processor will chop them evenly without reducing some to puree. Pulse the chunks in the processor, a portion at a time, until the pieces are smaller than peas. The mixture will be uneven in size to some extent but that is okay, you just do not want huge chunks and tiny pieces together because it will cook unevenly. If you find that it is hard to get a uniform size, pull the large chunks out and dice them further by hand.
In my batch in the photo, you will notice that I sliced the onions and left them in strips, I did this so that they would be more obvious in the finished relish. Honestly, half of the needed pound of onions came from our garden too, but they were so small, smaller than a golf ball, that I just sliced them and left them in strips because I could barely see through the tears! Cut your onions into what ever size you like; it is also acceptable to cut them into chunks and pulse them in the processor to match the size and appearance of the cukes.
One thing I would suggest, don’t use the machine for the peppers. They tend to juice out so much that dicing by hand is better. In this batch, I used jalapenos that had turned red but you can use green ones or any other type of pepper you prefer. Previous batches included dark green poblano peppers as well as green bell peppers. My intention was to make a hot and spicy batch but surprise, those jalapenos turned out to be the variety that isn’t so spicy. Even so, they gave it a little heat but more importantly, a lot of color.
Once the vegetables are all diced, toss them with the salt and let them sit in the fridge overnight. This helps the flavors blend together and develop and it also allows for the water to be released. When you are ready to make the relish, allow the mixture to sit in a colander and drain for at least 20 minutes, give it a press or two to help get the excess liquid out. Taking this step will help preserve the crunchy texture of the vegetables by removing the moisture and therefore shortening the cooking time.
 First, the sugar and vinegar are heated to make a syrup. The spices and vegetables are added and over medium heat, allowed to simmer. It is important to stir it frequently so that the water can evaporate and to prevent sticking. As it cooks, the color changes.
 The longer it cooks, the more the golden color deepens.
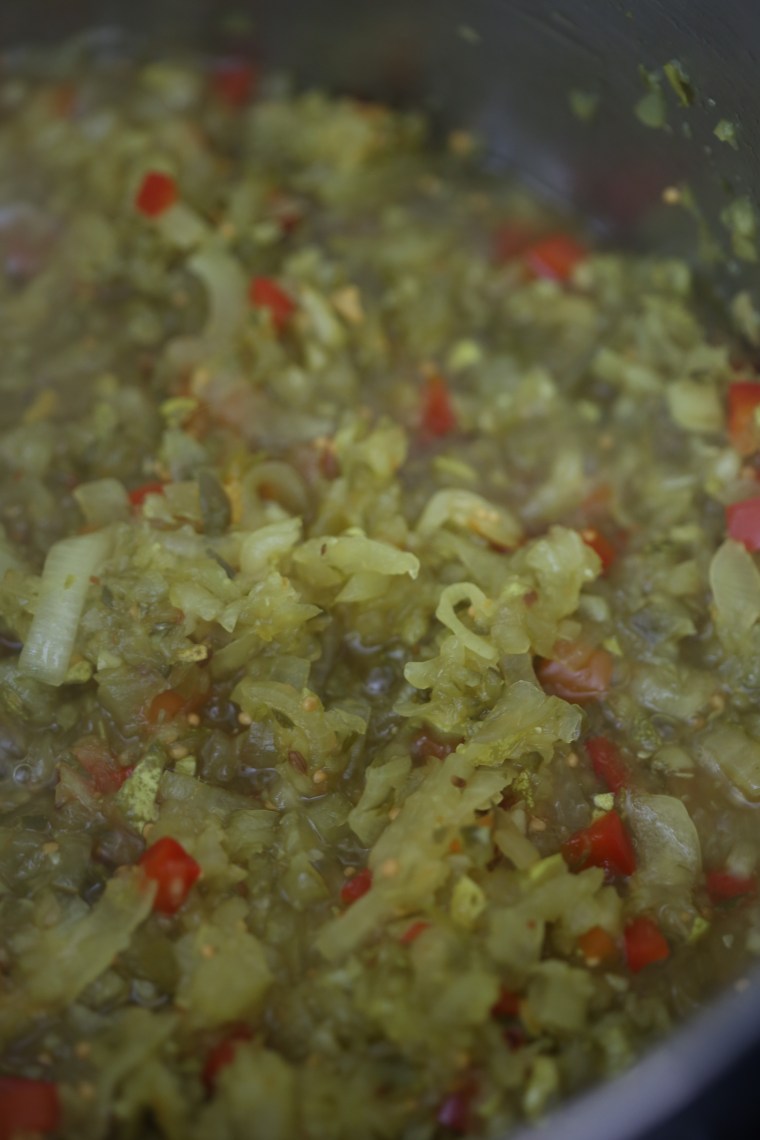 When finished, the vegetables will be mostly translucent and fairly even in color, except for the red peppers. My suggestion, make small batches and experiment with the onions and peppers; red, yellow or white onions, whether sweet or not could be used just as any type of peppers. Keep in mind, you are cooking it down and if you reach for the ghost peppers, it will be beyond fiery!
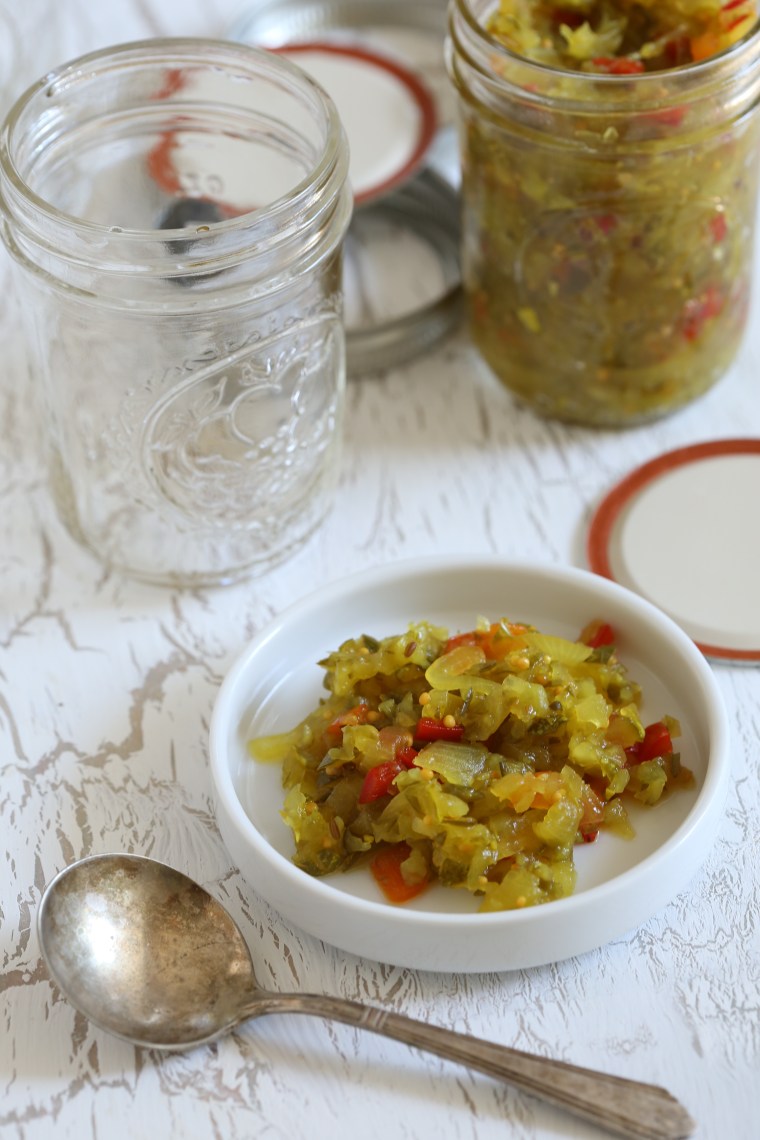
 Bread and Butter Relish
makes about 6 half pints
8 cups diced pickling cucumbers-about 3 pounds
1 pound onions, sliced or diced
1 cup finely diced red jalapenos
1/3 cup pickling or sea salt
11 ounces sugar (about 1 1/2 cups)
1 cup cider vinegar
1 tablespoon yellow mustard seeds
1 tablespoon grated fresh ginger
1 teaspoon celery seeds
3/4 teaspoon ground turmeric
1/2 teaspoon red chili flakes
1/2 teaspoon ground mace
The day before you will make the relish, toss the vegetables with the salt in a bowl or container that is non-reactive. Cover and store in the fridge for 12-24 hours. When you are ready to cook it, dump the mixture into a colander or mesh strainer over the sink and allow it to drain for at least 20 minutes. Give it a few presses with your hand to help it along but do not press it so much that it is completely dry-you want some of the juices for the flavor they will add.
In a large pot, combine the sugar and vinegar and over medium-low heat, stir to dissolve the sugar. When it comes to the simmer, add the spices and then the vegetables and raise the heat to medium. Allow the mixture to cook, stirring frequently, and reduce until most of the moisture has evaporated and the vegetables are translucent. Depending on the pot, this will take a while, about 30 minutes for my batch.
While the relish is cooking, prepare your canning pot and jars by boiling them. Remove the jars from the boiling water and drain upside down on a rack so that you are filling hot jars. Using a canning funnel, fill each jar so that there is a half inch space at the top, wipe the rims if necessary and cap the jars. Fasten the bands so that they stay in place but do not tighten them too much or the tops will buckle. Process in the water bath for 10 minutes, allow the jars to cool completely on a rack before storing in the pantry or cupboard. It will taste best if stored for a few weeks before eating.
For more information on proper canning techniques, visit the National Center for Home Food Preservation’s website.
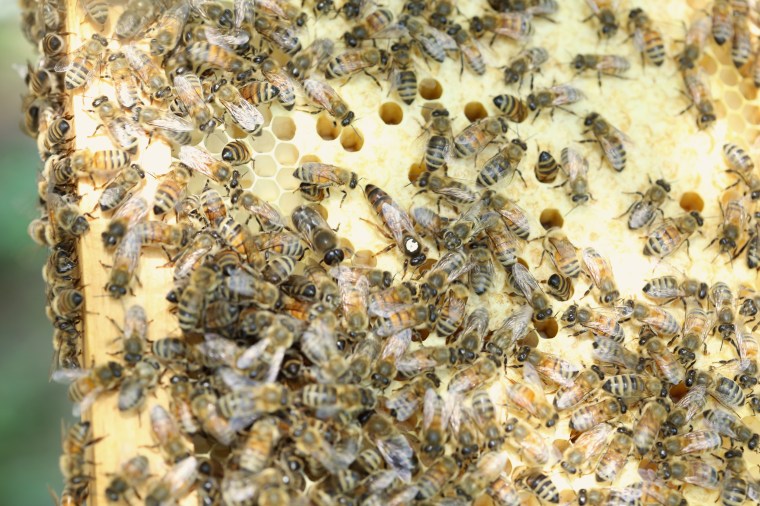 All hail the Queen. Can you see her? Center of the photo with the large yellow dot, that is our lady of the hive. We went into the hive yesterday to take a look, and there she was, at the top of the hive on the outside frame-not a good thing. What that means is that she is running out of room to lay eggs so lucky for her, we were prepared and had another box of frames ready to go.
 The hive is fairly full, so full that they were building comb in the feeder.
 Darry cleaned it all out and refilled it with sugar syrup.
 The hive has really increased in number, look at how busy they are!
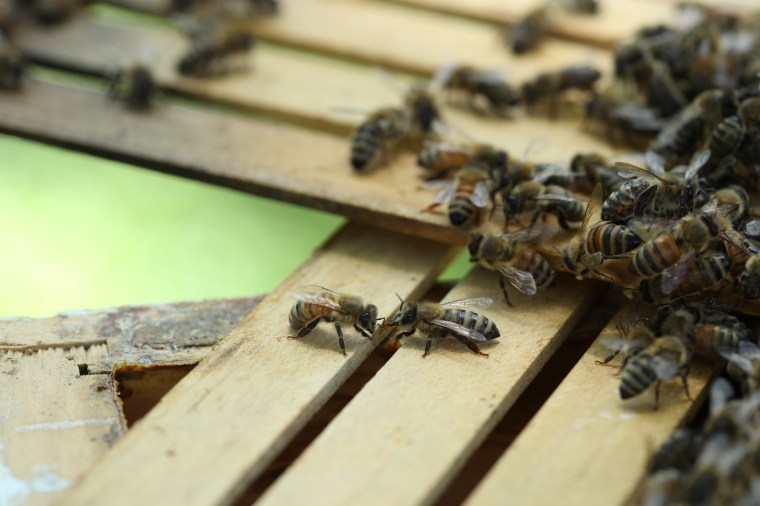
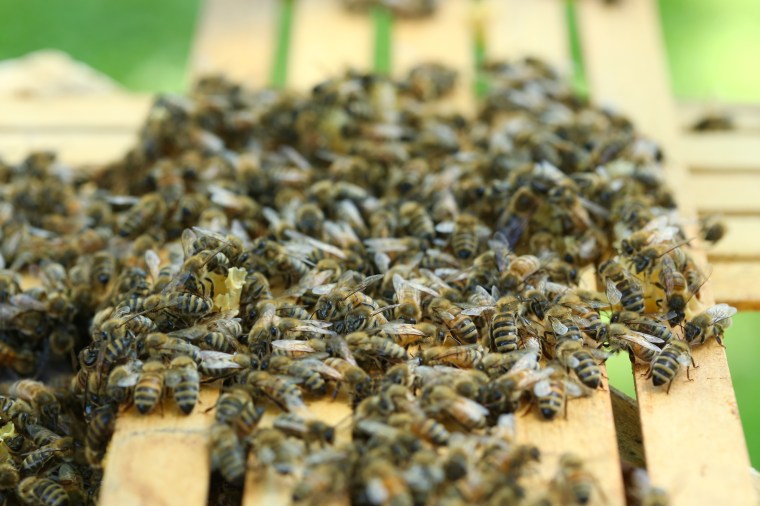 To clean out the feeder, Darry took out the floating bars, the bees were pretty calm about it and just gathered on the slats while he worked and I took photos.
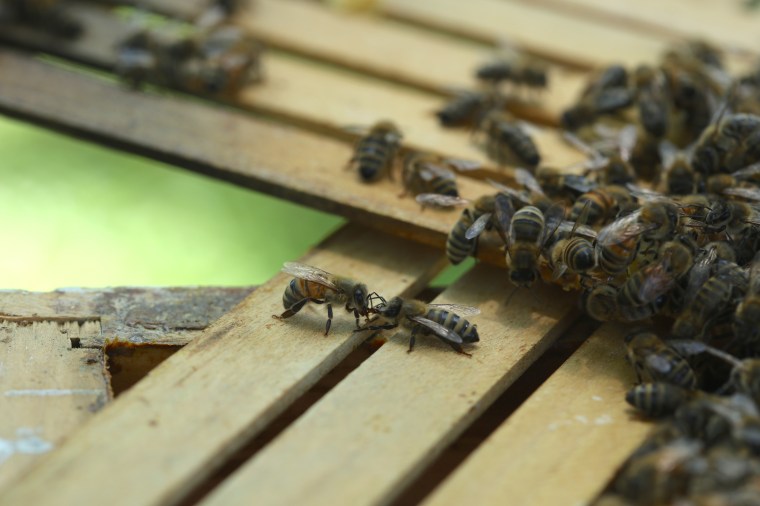 Drones cannot feed themselves when they first emerge from! The drone (on the left) is being fed by a worker bee (on the right) and he will start feeding himself by the time he is a week old. To learn more about the roles of bees in the hive,
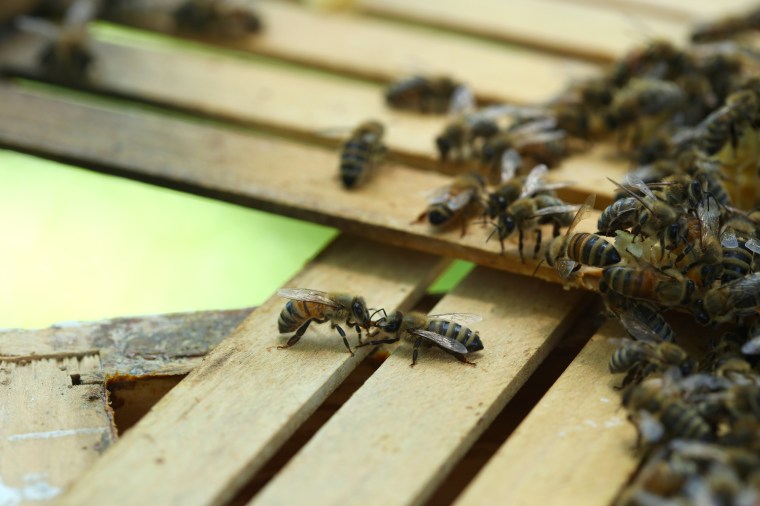
 Check back for more photos, I will post more next time we go in for a look!
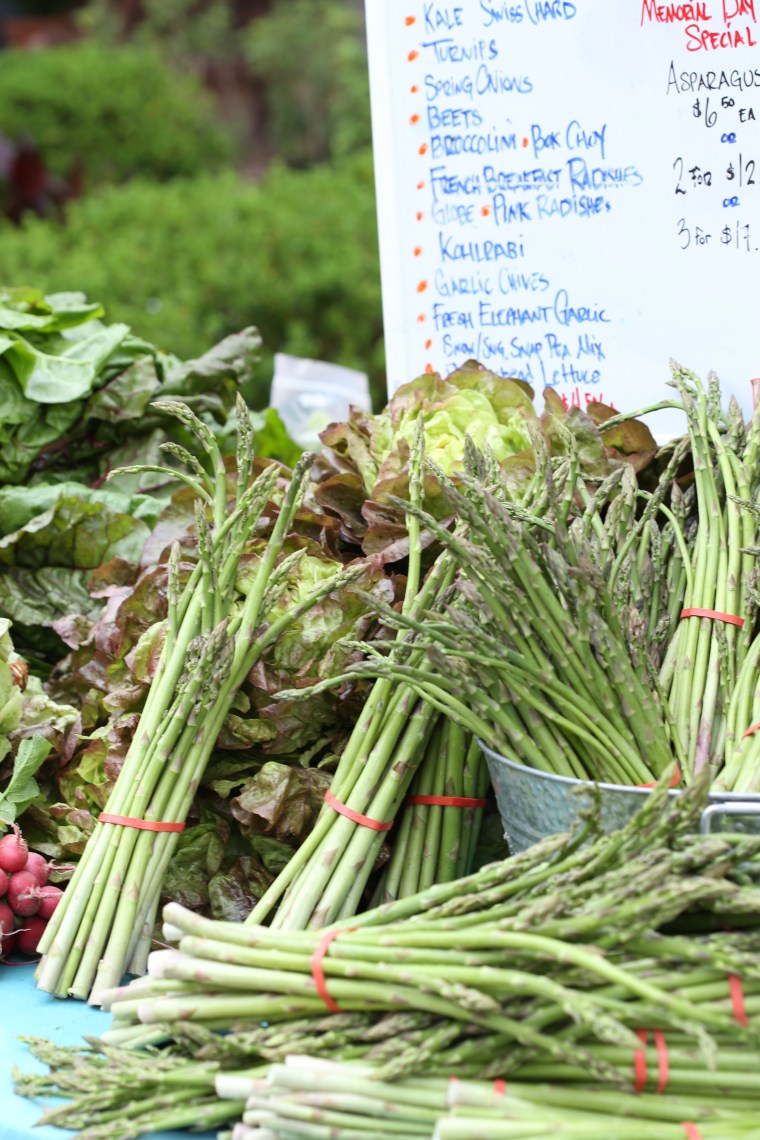 As spring comes to an end, our garden is beginning to provide us with more than we can eat. Because we have more freshly picked vegetables than we can eat, we very rarely go to the farmers market to shop. This past weekend, we ventured down to Merchant’s Square and took a look at what the farmers had to offer.
 There was no shortage of plants either; we came home with a Joe Pye Weed for our new bed in the front garden.
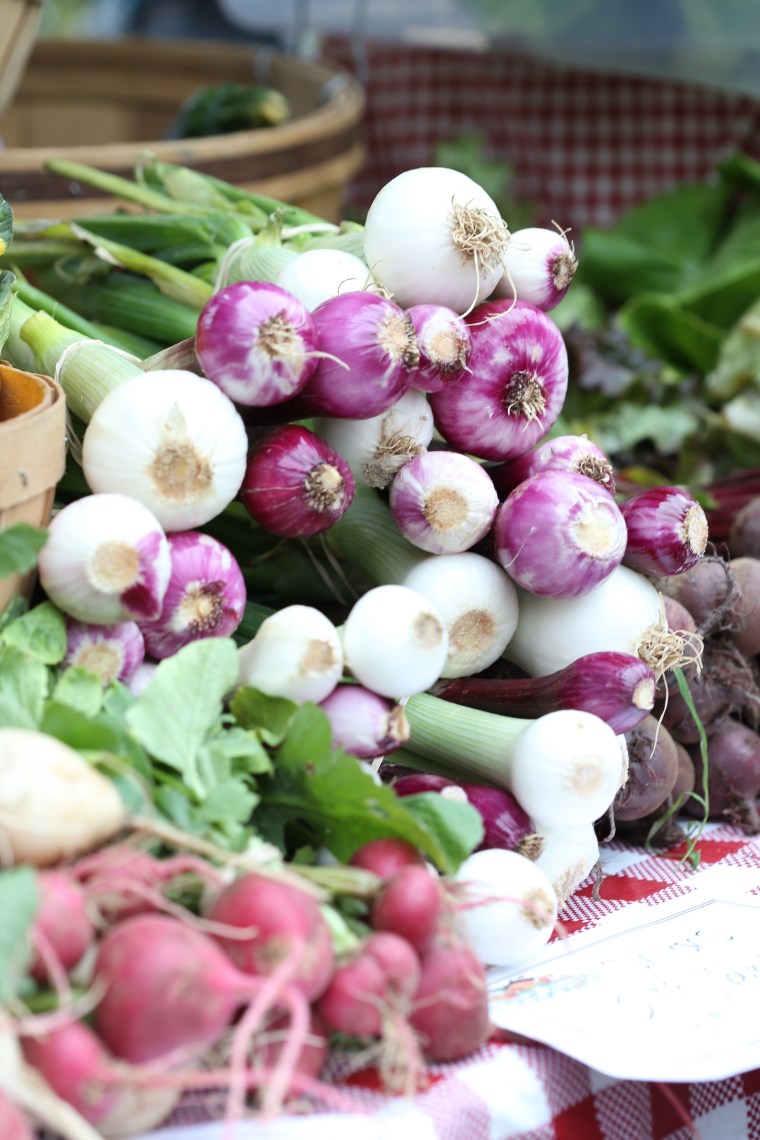 Onions and radishes were also plentiful.
 Since I discovered roasted radishes, I very rarely eat them raw but we did make some wonderful kimchi with them. Each week, the market has a core group of vendors that stay the same along with a group that come less frequently. This week, a group of women from the
  A table top spinner being used to spin cotton into yarn.
 It’s all about the tension, keeping it taught creates a fine thread.
 Not everyone uses a wheel to spin, some do it by hand with a drop spinner.
 The color of this yarn is beautiful, it looks fluffy too!
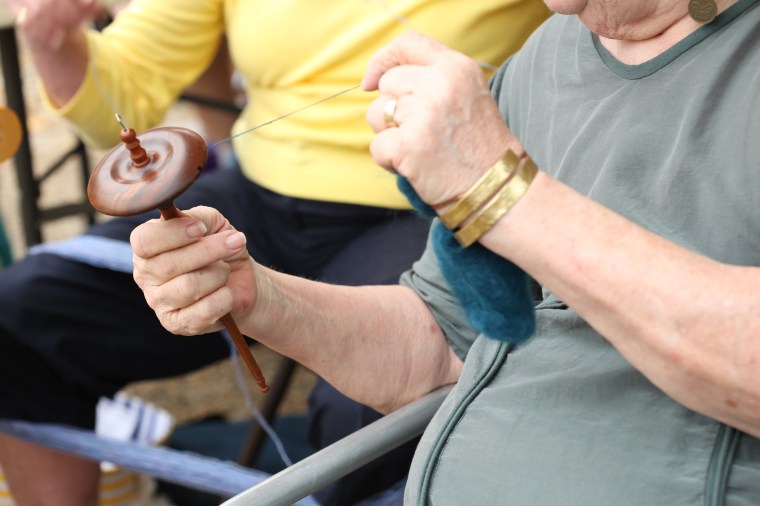 She worked at this yarn the whole time we were there.
 The weavers had Darry’s attention and he asked many questions about the process. This weaver had completed all of the work you see there in a rather short time, in between demonstrating the technique and answering questions. After we asked many questions and chatted with the ladies for a while, we headed back to the car.
 Not far from where we parked, Darry showed me a patch of
  We have a
  There were dozens of them and since we did not know anything about the mulch they were growing in, we did not pick any.
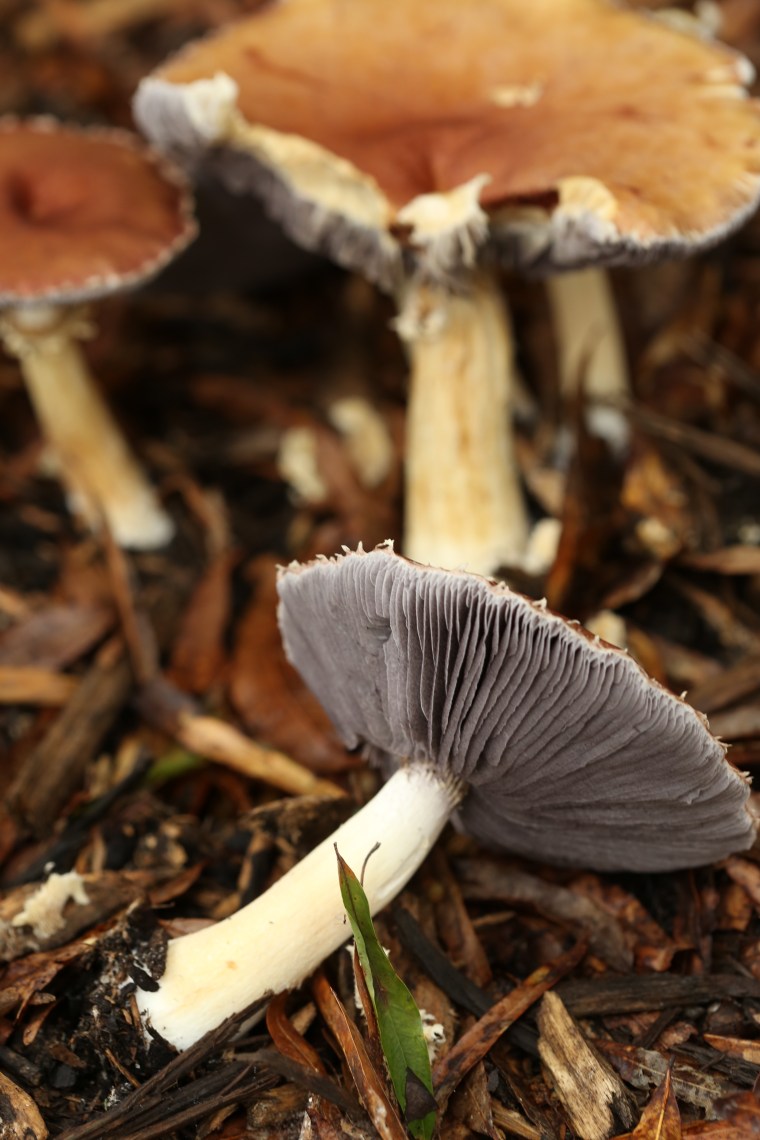 For now, we will have to wait for our patch to grow and multiply.
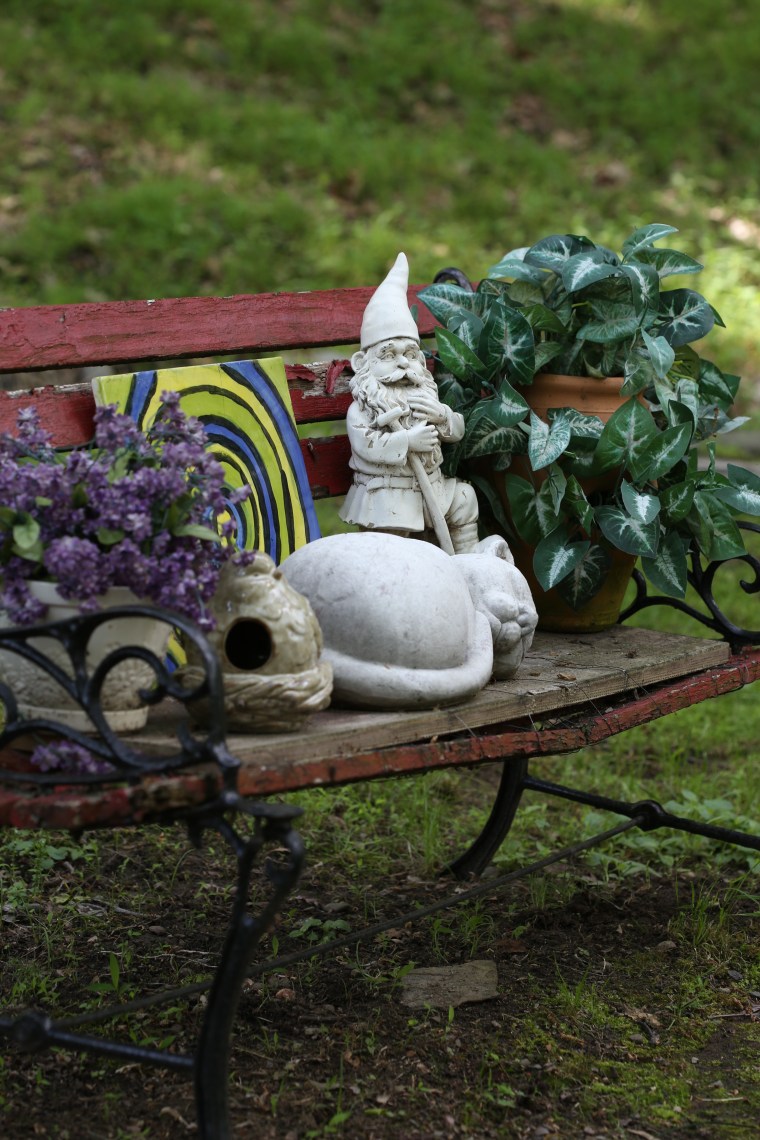 Just as there are many types of plants, there are many types of gardens. Some gardeners work with shade, some with flowers or succulents and others with just vegetables. Potagers, cottage gardens, rain gardens and so on. Personally, I have an herb garden, a shade garden and a sunny area planted with perennial flowers in addition to the very large potager style vegetable garden that takes up much of our front yard.
 Gardening with deer is a challenge. Especially when the community you live in is surrounded by state owned forest land. At times, there can be a dozen or more deer grazing around the yard. The landscape provides areas for them to sleep and rest and even when you think the small herd may have left the yard, it is entirely possible that some are still there but out of view. As if the deer weren’t enough, black bears also live in the area and have come through yard and more than one raccoon has raised a litter of kits in a tree near the shed. If you think deer can do damage, mischievous raccoons and squirrels can also cause problems.
 As a result, my mother is a gardener of things. All around the yard, you will find statues and knick-knacks, baskets of silk flowers and plants, gazing balls. She finds things in stores and yard sales and has them all over the yard. Bird houses hang from low branches all over the yard. Every where you look, little pops of color are present and it truly makes for a restful place to spend the afternoon outdoors.
 The deer really do eat just about everything and it was surprising that these little bluets were present since they are usually eaten to the ground.
 A constant theme in the garden is a smiling sunface. Actually, sun and moon faces are all over. That may be partly my fault since I often send them to her!
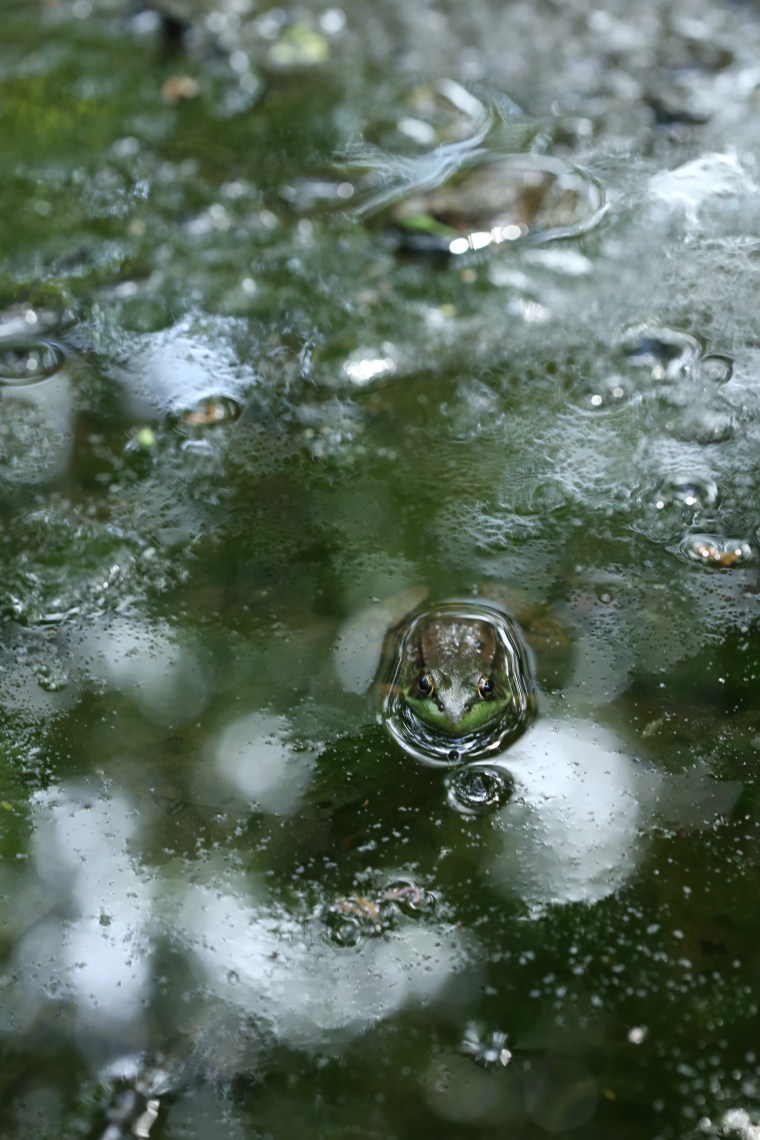 In a small hillside drainage pond, frogs rule. They are loud and you can hear them all over the yard. On this afternoon, I saw four of them in the water and on the rocks around it.
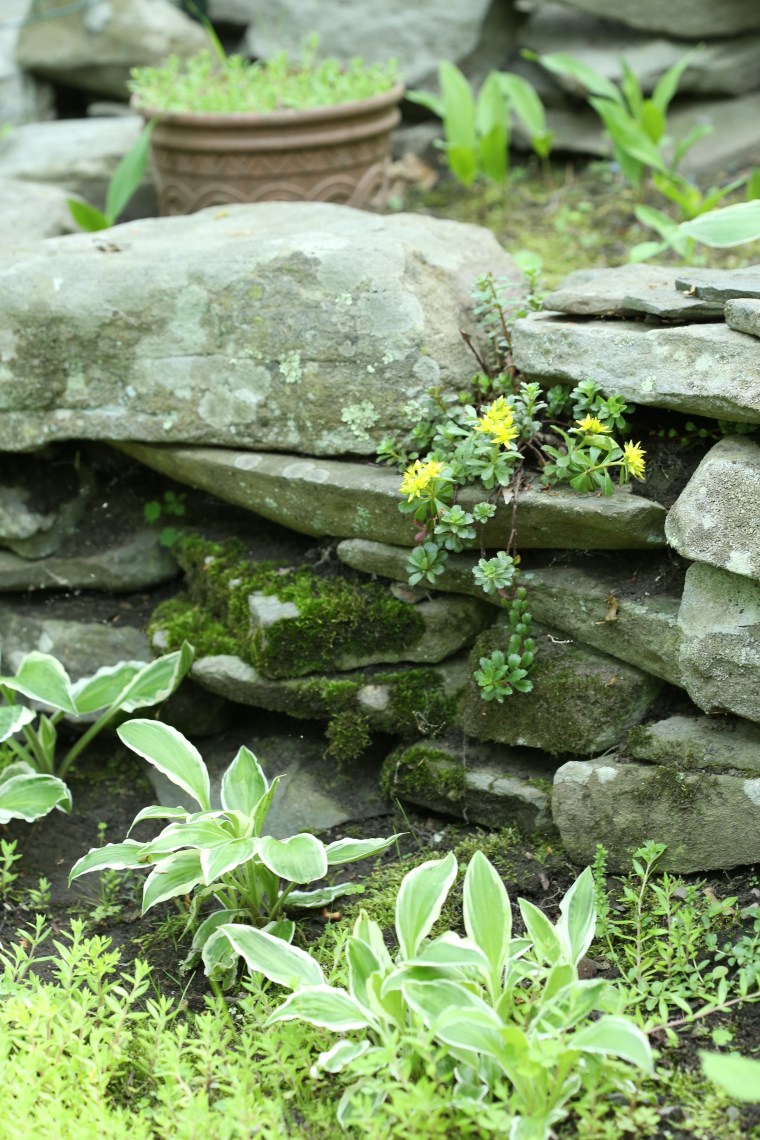 This is one of the few parts of the yard that actually has plants. The previous owners of the yard placed fencing around plants and shrubs to protect them from the deer. It was an unattractive sight and my mother has removed most of it. Although that meant the plants within met a nibbled to the ground death, it greatly improved the appearance of the yard. One place she left the fencing was around the pond and in this small area, she has a few hostas, several sedums and lily of the valley along with statues and knick-knacks.
 Lichens and moss cover all of the rocks in the yard.
 The pond is truly the focal point in this part of the yard. The Autumn Joy sedum has filled in the crevices above and moss and ferns are filling the areas near the water.
 Gazing balls are one of her favorite ways to add color to the yard. She will tell you that they must be colored and not silvered. Twice, my mother has placed silvered gazing balls in the yard and twice, a woodpecker tried to kill his reflection. Both of those gazing balls were shattered.
 You must walk around the yard to see it all because it is everywhere.
 Along the back of the house, she has a simple row of silk plants with pottery and glass accents.
 In that row, tucked in a corner, is what remains of a deer skull. It seems that this buck died on the property and after the vultures cleaned it, my mother placed the skull in her garden along the back of the house. Squirrels continually gnaw on the bones to keep their teeth in shape and have chewed up quite a bit of the skull and antlers.
 Have you ever heard the phrase referring to “bones knitting,” especially if you have broken a bone? It is easy to see why they say that when you look at the fuse line going up the skull. This was one of the most fascinating things to look at in the garden!
 You really must look carefully or you might miss something.
 And look everywhere, despite being colorblind, my mother has a talent for choosing colors so that they either blend in seemlessly or jump out.
 She also has a talent for finding unusual pieces like this pottery base to a planter.
 This old bench is so worn out that she has added a board to hold the objects on it. That gnome looks familiar-he lived in our house in Nashville for years and when we moved, I sent him to live with my mother. One of the girls, I think Alix, painted the tile and yes, the plants are silk. At least the deer won’t eat them! But beware, the raccoons love to move things and you never know what they will do.
 It’s salad season in my garden. Well, specifically, it is lettuce season. Living in the south means that lettuce is a cool weather crop while all the other parts of a salad, like tomatoes or cucumbers, are warm weather crops. Luckily, it is always fresh egg season in the chicken coop!
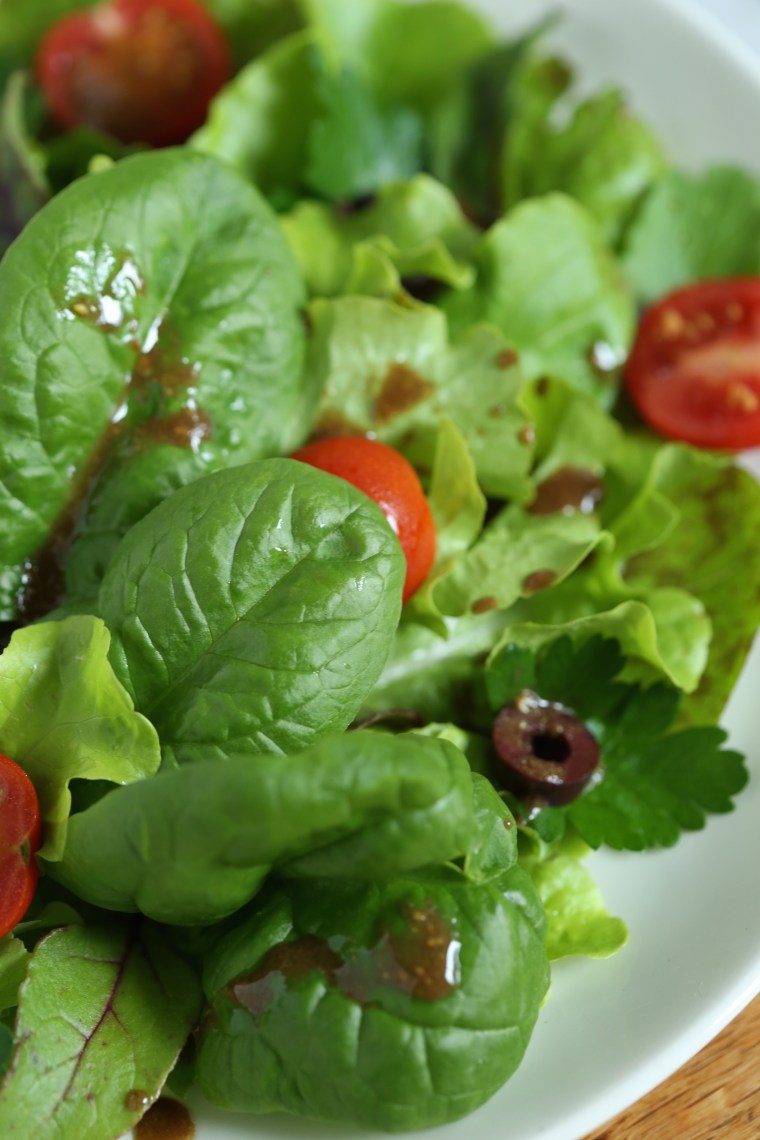 There are a dozen different salad greens in the garden right now. In the salad above are Bloomsdale spinach, baby beet greens, parsley, salad bowl leaf lettuce, buttercrunch, forellenschluss and arugula.
 Simply dressed with vinaigrette, garnished with cherry tomatoes, cucumbers and some kalamata olives and served with the paper; my idea of lunch.


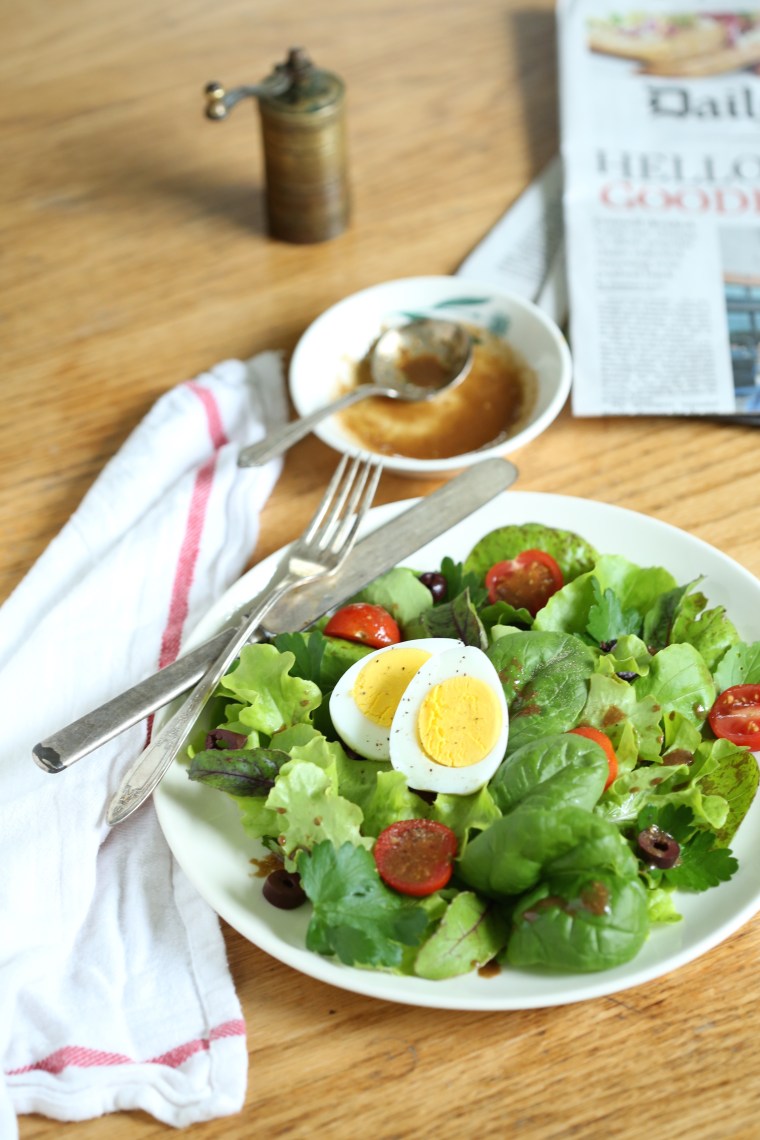 Of course, adding a hard boiled egg from one of our golden laced wyandotte hens and a slice of bread makes it a light, refreshing meal perfect for any season.
 This part of the garden does not get much direct sunlight and once the crape myrtle, which is not in the photo, leafs out completely, it gets little filtered light as well. Last spring I spent a week amending the soil and adding shade tolerant perennials to the bed. This year, nearly all of them came back except for a bleeding heart plant and they have truly filled the space.
 The iris actually gets enough light because it blooms before the crape myrtle creates shade. Also in bloom are azaleas, dianthus and phlox.
 Remind me to tell you the story of the gnome sometime… He is watching over the sunny part of the garden.
 Love the little blossoms on the strawberry begonia.
 While I have put a lot of work into the perennial beds near the front door of the house, none of that compares to the amount of work the vegetable garden has taken. We began in late fall of 2014 by composting the leaves that fell from our trees with grass clippings from the lawn and bags of coffee grounds from Starbucks. In spring of 2015, I topped each of the beds with that compost and placed 45 bales of straw on the beds in the garden. Throughout the year, I attempted to grow vegetables in the bales with out a ton of success. In early winter, when the bales began to tip like drunkards, I broke them down and scattered the straw on top of the compost along with more coffee, ground egg shells, compost (that includes litter from our hens) and a topping of purchased garden soil.
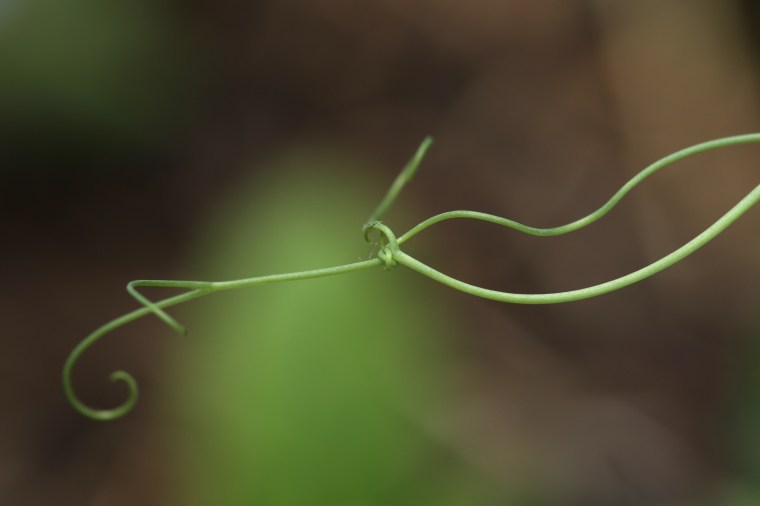 Peas were slow to get going but have finally come on board. Gotta love the tendrils and the way they tie themselves into knots.
 Everybody loves surprise potatoes! Must have missed one when I harvested them last fall. not sure what it is but I am thinking it is most likely a yukon gold but the alternative is red norland; either way works for me!
 A lot of firsts this year. Ailsa Craig onions along with some radishes from an 8 year old package of seeds I found lurking in the box! We have lots of mushrooms coming up in the beds. Did you know that is a good thing? There is a relationship between plants and mushrooms and when some combinations are grown together, you can actually improve your yields-this pairing was random and not of my doing but my fingers are crossed that it helps. Want to know more about it, pick up a copy of
  Chinese cabbage is doing so well-and I grew this from seeds!
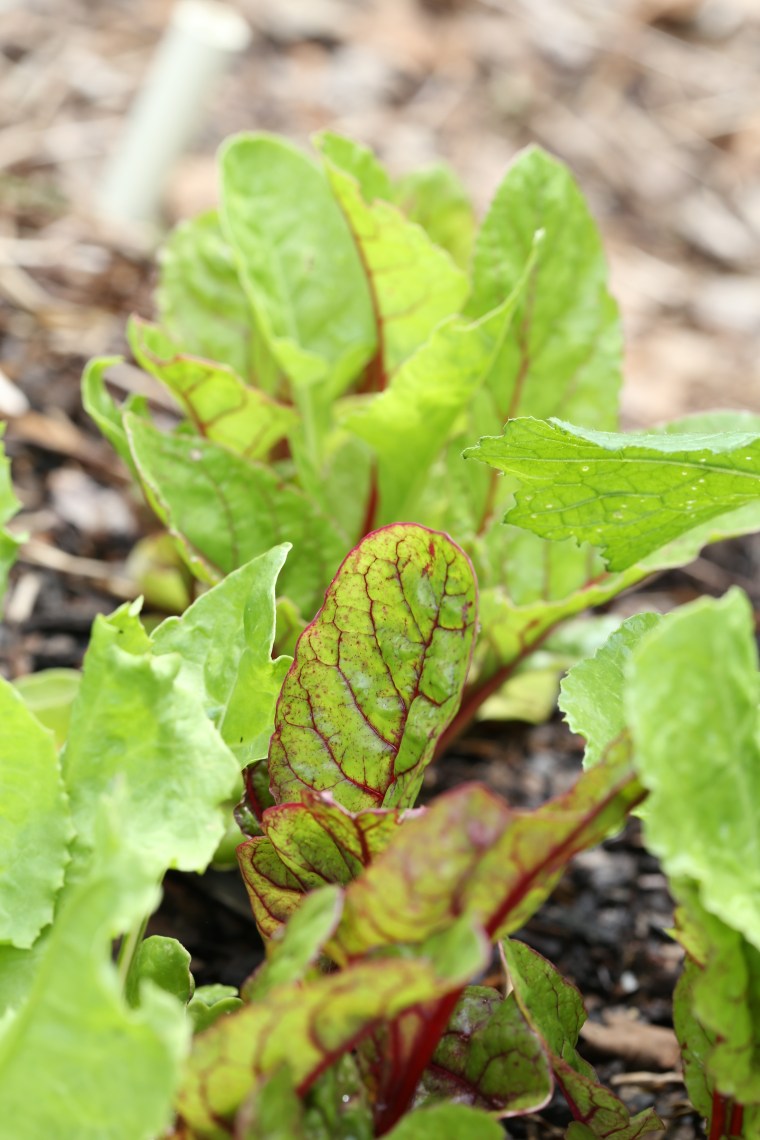 The way chard glows when backlit never gets old.
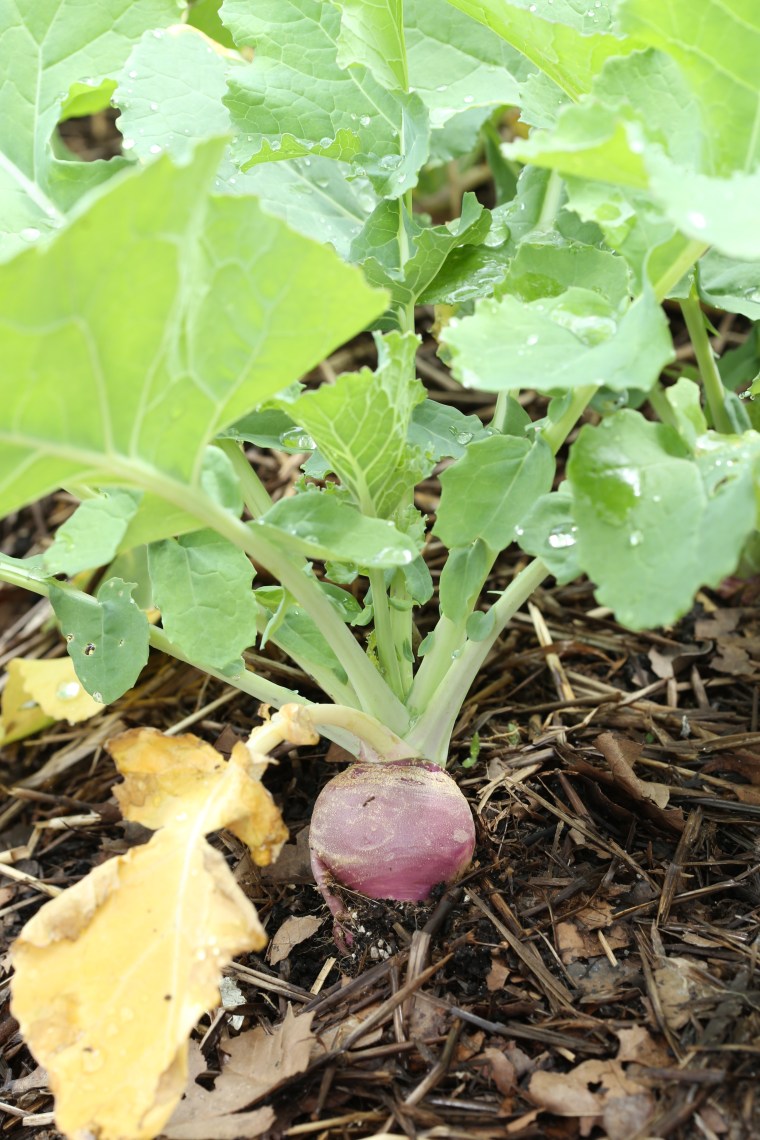 These rutabegas are taking off in the garden. If you grow them, be sure to eat the greens too! Cook them as you would collards and the plant will be doing double duty.
 Another of the firsts in our garden, salsify. Have no idea if we will enjoy it but I saw some plants in Colonial Williamsburg in the garden the the local master gardeners maintain and decided it was pretty and it needed to live in my garden too!
 Speaking of pretty, these radicchio starts have been stealing the show for a while now. We pull a few leaves off from the bottom and are letting the heads fill out.
 More starts, celery is taking its time.
 Last weekend, I had the pleasure of meeting with a group of ladies who also happen to be fellow members of the Virginia Bloggers. It was a rainy and somewhat dreary Saturday morning but it was perfect for drinking coffee and eating freshly baked sweets.
  Most of these ladies knew each other, or at least were familiar with each other, but there were a few that were new to the group, myself being one of them. The bakery is a bit small but we pulled a few tables together and spent our time chatting, trading business cards and getting to know each other.
 Of course, there were a few cameras out on the table and a bunch of cell phones so that we could all take photos.
 It was great to meet such a friendly bunch of ladies and trade information.
 My hope is to attend more of these meet-ups but it is a bit of a drive from Williamsburg, however, if the destination is another place like this, I will take one for the team!
 Before leaving, I picked a small selection of sweets to take home to Darry. These two were all but glued to the showcase-can you blame them?
 Most of the ladies that came out despite the rainy weather. If you are a blogger and live in Virginia, join the group and if you are interested in what is going on,
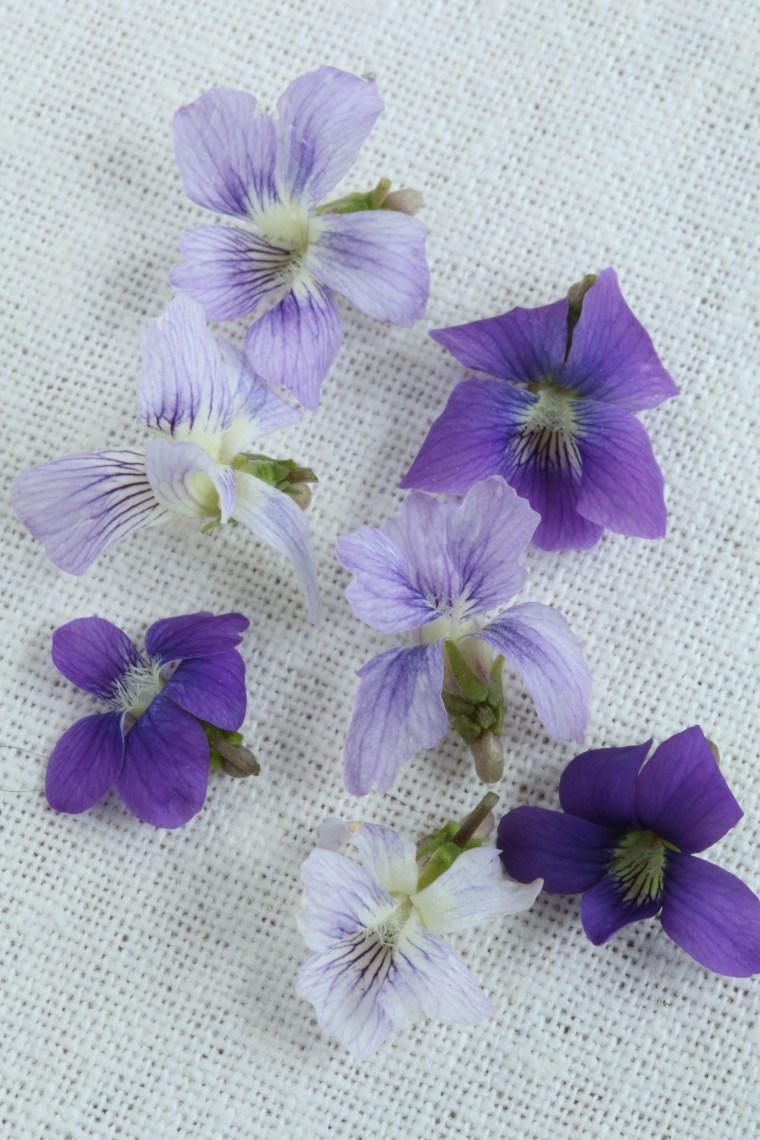
 Making liqueur is a bit tedious because you must pick large quantities of the blossoms. For the batch I made this year, I must have picked about 3 pints. For a single pint of liquer, I placed 2 cups of blossoms into a pint sized jar and added 2 cups of potato vodka and allowed the flowers to steep for a couple days, shaking it once a day. After it had sat and the flowers faded and grew limp, I strained them out and filled the jar with another 2 cups of blossoms. To this, I poured the previously infused vodka over the blossoms and allowed it to steep, shaking it daily for a couple of days and then I repeated the process a third time. My goal was to get a nice dark liqueur and a strong floral flavor.
 Having allowed the last batch of flowers time to infuse the batch, I strained them out and this was the result. If you look at the top of the liquid, you can see that it is a deep violet color, almost grey. Despite everything, it still had a strong alcohol taste but the aroma was all flowers-and honestly, I am not much of a vodka drinker so it was hard to not taste the vodka in the background but there was definitely a floral flavor there as well. And now that it has aged for a couple weeks, it has mellowed a bit.
 This beauty is
  A close up shot of the flower; look at the hairs on the back of the bloom and the tiny little stamens!
 Dead Nettle is a close cousin of Henbit, both are in the mint family, but if you look closely, you will see that these leaves are heart shaped and gradient in color from the top of the plant to the base while Henbit has round leaves with teeth. Another thing, Dead Nettle flowers make the blossoms from Henbit look huge!
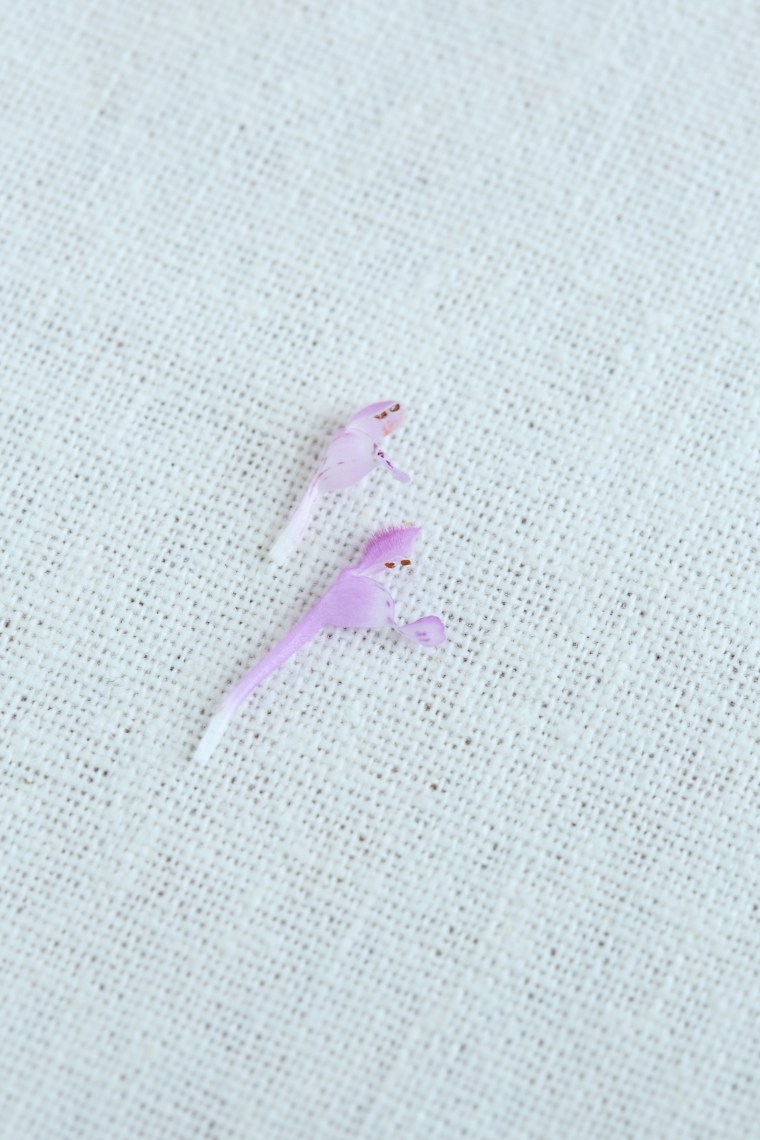 Dead Nettle flower on the top, Henbit flower on the bottom.
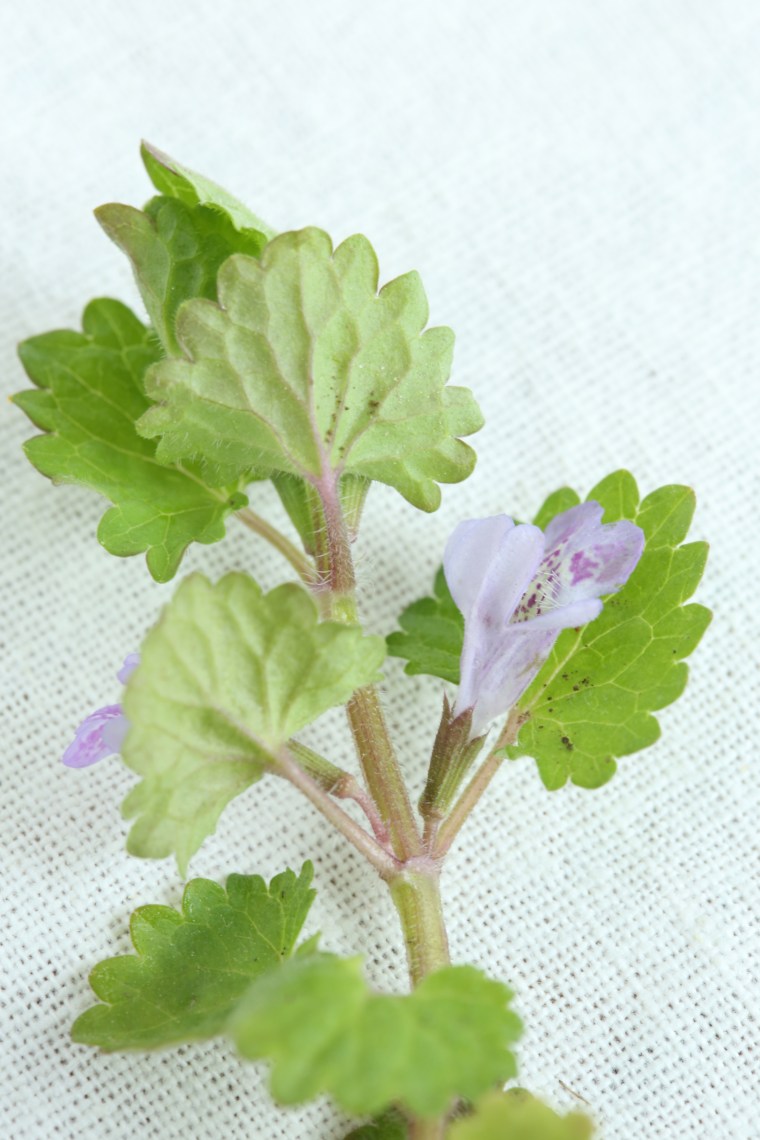 A third player in this game, Ground Ivy, also called Creeping Charlie because it trails like a vine and can quickly cover an area. These blooms are the largest of the three. While some publications will tell you that it is best to make teas rather than eat the leaves, I don’t think there is any real danger in adding a handful of blooms to a batch of likker-although, your back may cry foul!
 My first batch of lawn likker from last year, it has since changed color and is now a bright golden yellow and looks more like a bottle of urine than likker but trust me, the flavor is still floral and so is the aroma!
 It seems that to call yourself a pastry chef, one must know how to make macarons. Well, maybe not but that is the impression I have been given. A baker’s version of the Holy Grail, your cookies must be perfect little circles with slightly glossy, smooth tops sans cracks, and those famous “feet” and they are also the thing anxiety attacks are made of. They are fussy, subject to all kinds of results (and not many that you want) and quite capable of intimidating even the most experienced bakers. Of course I am speaking with experience. My own efforts landed with mixed results and I was beginning to hate the little things. This was only aggravated by the plethora of blogposts and pinterest posts from bakers and their dogs bragging about how easy they were to make…It was time to take action and by action, I mean that it was time to get over my fear of failure (again) and to actually try making them. First I needed to find a better recipe and I did; Joanne Chang has a
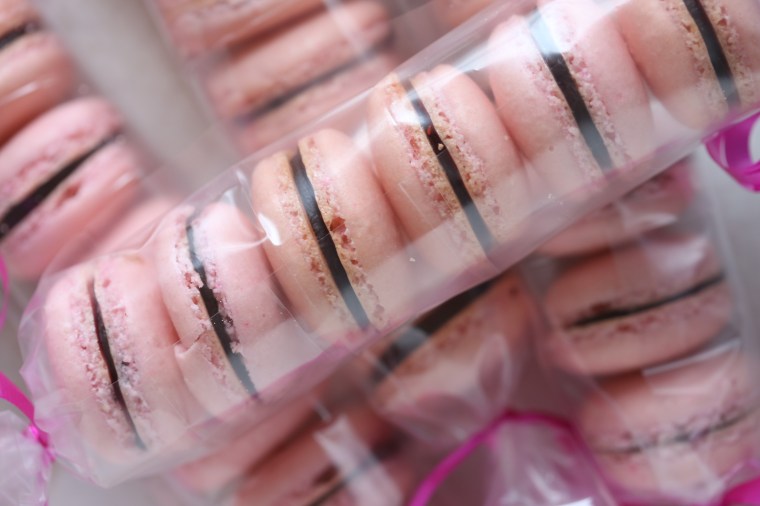
 Popcorn is one of those snacks that I cannot give up. My idea of perfect is a big bowl of corn popped in coconut oil and liberally sprinkled with salt. Caramel corn comes close and so does real state fair kettle corn but I can live without the sweet and 99% of the time, it is just a sprinkle of salt on top for me.
 Have you ever really looked at popcorn? The stuff you get in bags and at the fair always seems so much larger when it pops than the kernels you get from the supermarket and there is a good reason for that. Believe it or not, there is a special type of corn out there that will pop into large round puffs and it is called mushroom corn. Take a good look at the puff above. Notice how it is a larger, rounder puff with a texture on the outside that looks a little like a mushroom cap? You will have to seek this one out, search for it online and if you are lucky to live near a store that carries it, buy some and try it out.
 All bagged up and ready to ship. If you make this, let me share a few hints with you. Make your popcorn first! If you can get the mushroom corn, use it because the little nooks and crannies on the outside will catch the candy nicely. The original recipe for this called for 8 cups of popped corn from 1/3 cup of kernels, I doubled up on the recipe and 2/3 cup of mushroom corn made about 12 cups of popcorn so I made a second 12 cups. However, when I doubled the syrup, it made a huge amount and I personally would suggest you make double the popcorn called for-to me it was way too much candy for the amount of popcorn. Instead, dump the extra hearts into a bag with the candied corn as a garnish.