pink grapefruit tart; a tuesdays with dorie post

IMG_3138

While procrastinating, a favorite pastime of mine, I came across a list of what people were planning to give up for Lent.  My favorite answer on the list; winter.  Yes, I think giving up winter for Lent sounds like a great idea and as I sit here on my couch watching more snow fall and accumulate, I really cannot wait for winter to end!  Even so, there is one good thing to come from winter other than Christmas presents, it is actually peak season for citrus fruits.

Growing up, my mother would always treat us to grapefruits, usually white ones, and I can remember cutting them in half, pouring sugar over the top and eating the sections.  When I went out on my own, I found I preferred ruby red grapefruits to the white ones from my childhood but these days, I skip the sugar and just peel them and eat the segments.  Occasionally, I will pick up some juice but, I buy small quantities so that it does not go to waste.  However, taking those lovely fruits and making a cooked curd filled tart topped with yet more fresh grapefruit segments never really occurred to me.  After reading the recipe, I was rather skeptical that this would work for me.


IMG_3099

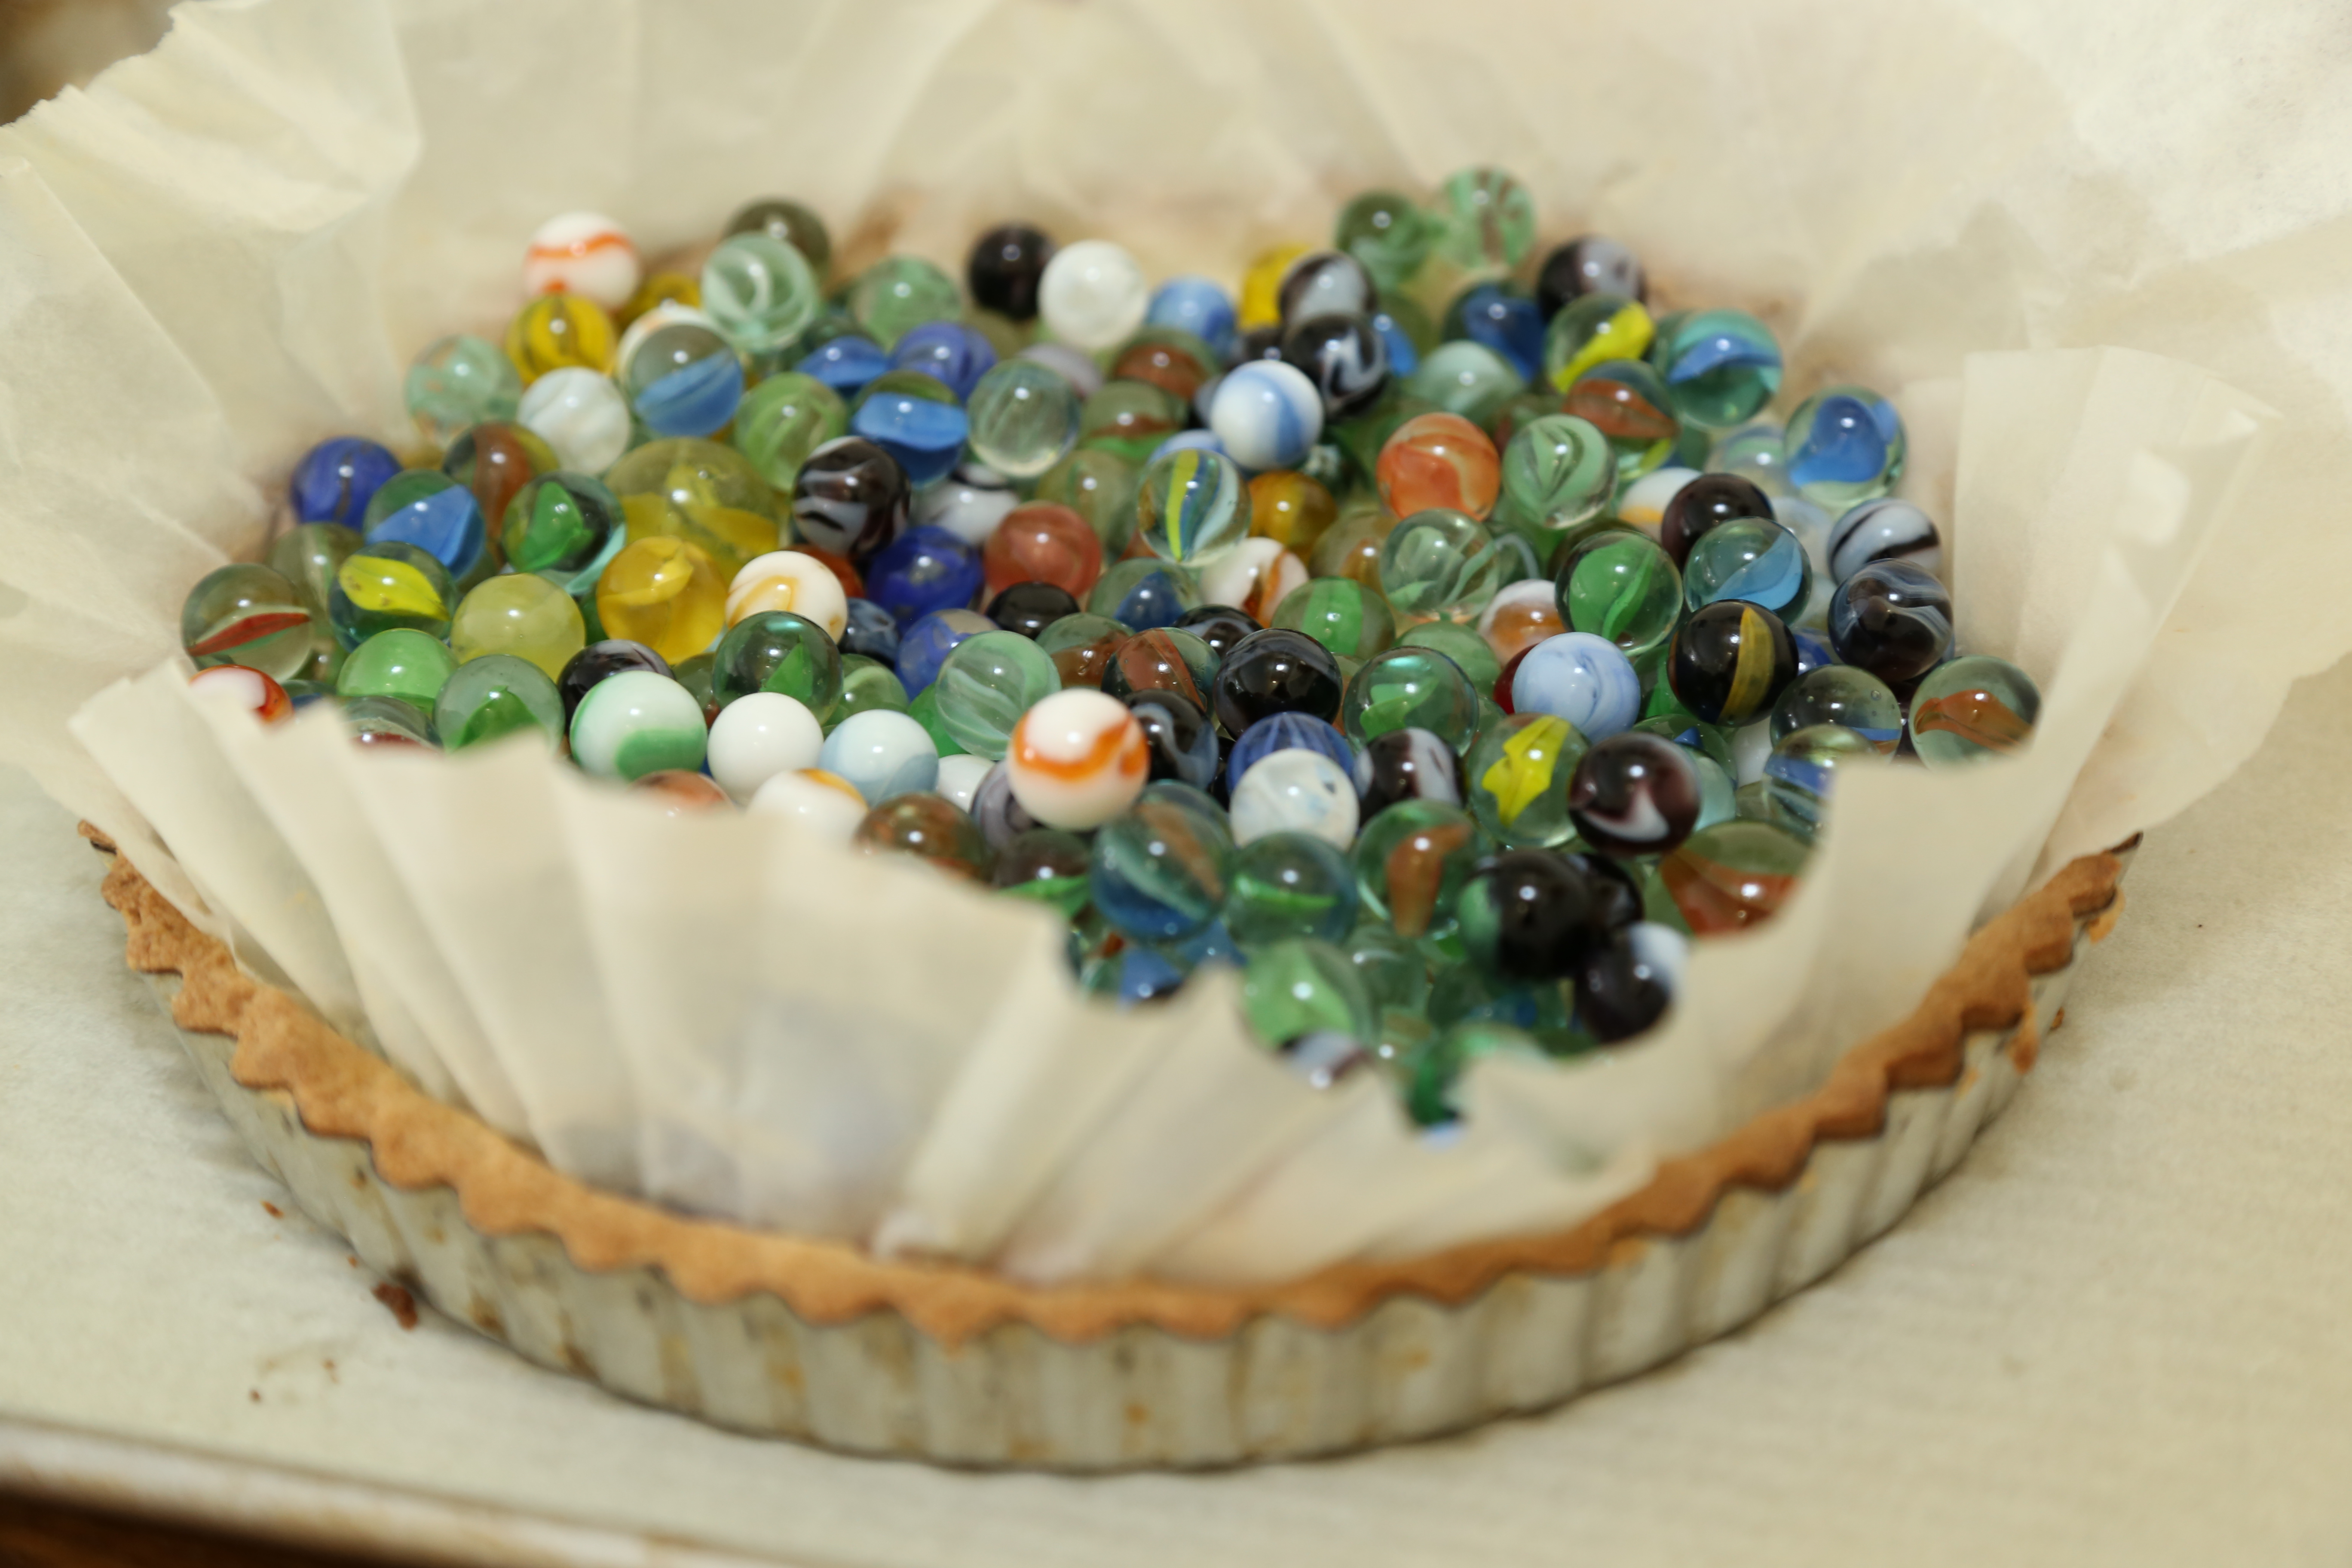
Even though I read the recipe before starting on this tart, I was surprised by just how much time it took to come together.  The recipe calls for using a food processor to make the dough for the tart shell, my favorite method for tart and pie dough.  My other favorite tart/pie method; using coffee filters and marbles when prebaking the shell.  Believe it or not, coffee filters are really the best choice for the task.  Parchment paper becomes brittle when baked, creases in a piece of foil can cut the shell and break it and wax paper is covered in wax-who wants that in a tart shell?  Coffee filters are very strong; they hold the weight of wet coffee as water pours through it.  If you can get restaurant sized filters, you will only need one otherwise you will need to use about 4 of the 8-12 cup filters.  The butter in the tart shell will keep the filter from sticking to the dough but if the shell is frozen and allowed to thaw before baking, give the inside of the shell a spritz of spray.  Keep in mind that the flour you rolled the dough out with and any condensation that forms on the surface make a thin layer of paste that can glue the filter in place making it difficult to remove and you could either leave some of the filter behind or it could take sections of the crust with it.  So if you are worried, err on the side of caution and give it a spritz.

Then there is the question of marbles as pie weights.  Well let’s just call them a solution to a dilemma I had; I couldn’t justify using a bag of beans or rice once and then tossing them when I remembered I had a collection of glass marbles.  The marbles stepped up to the plate and I have been using them ever since.  They conduct heat pretty well, they do not shatter in the oven-at least mine haven’t in all the years I have used them as weights and they are easy to clean.  The only down side; marbles bounce.  Trust me, if you drop them, they will bounce a few times before disappearing and finally rolling down the basement stairs for the cat to play with…Yes, I have lost a few of my marbles over the years but, I still have enough to do the job.


IMG_3146

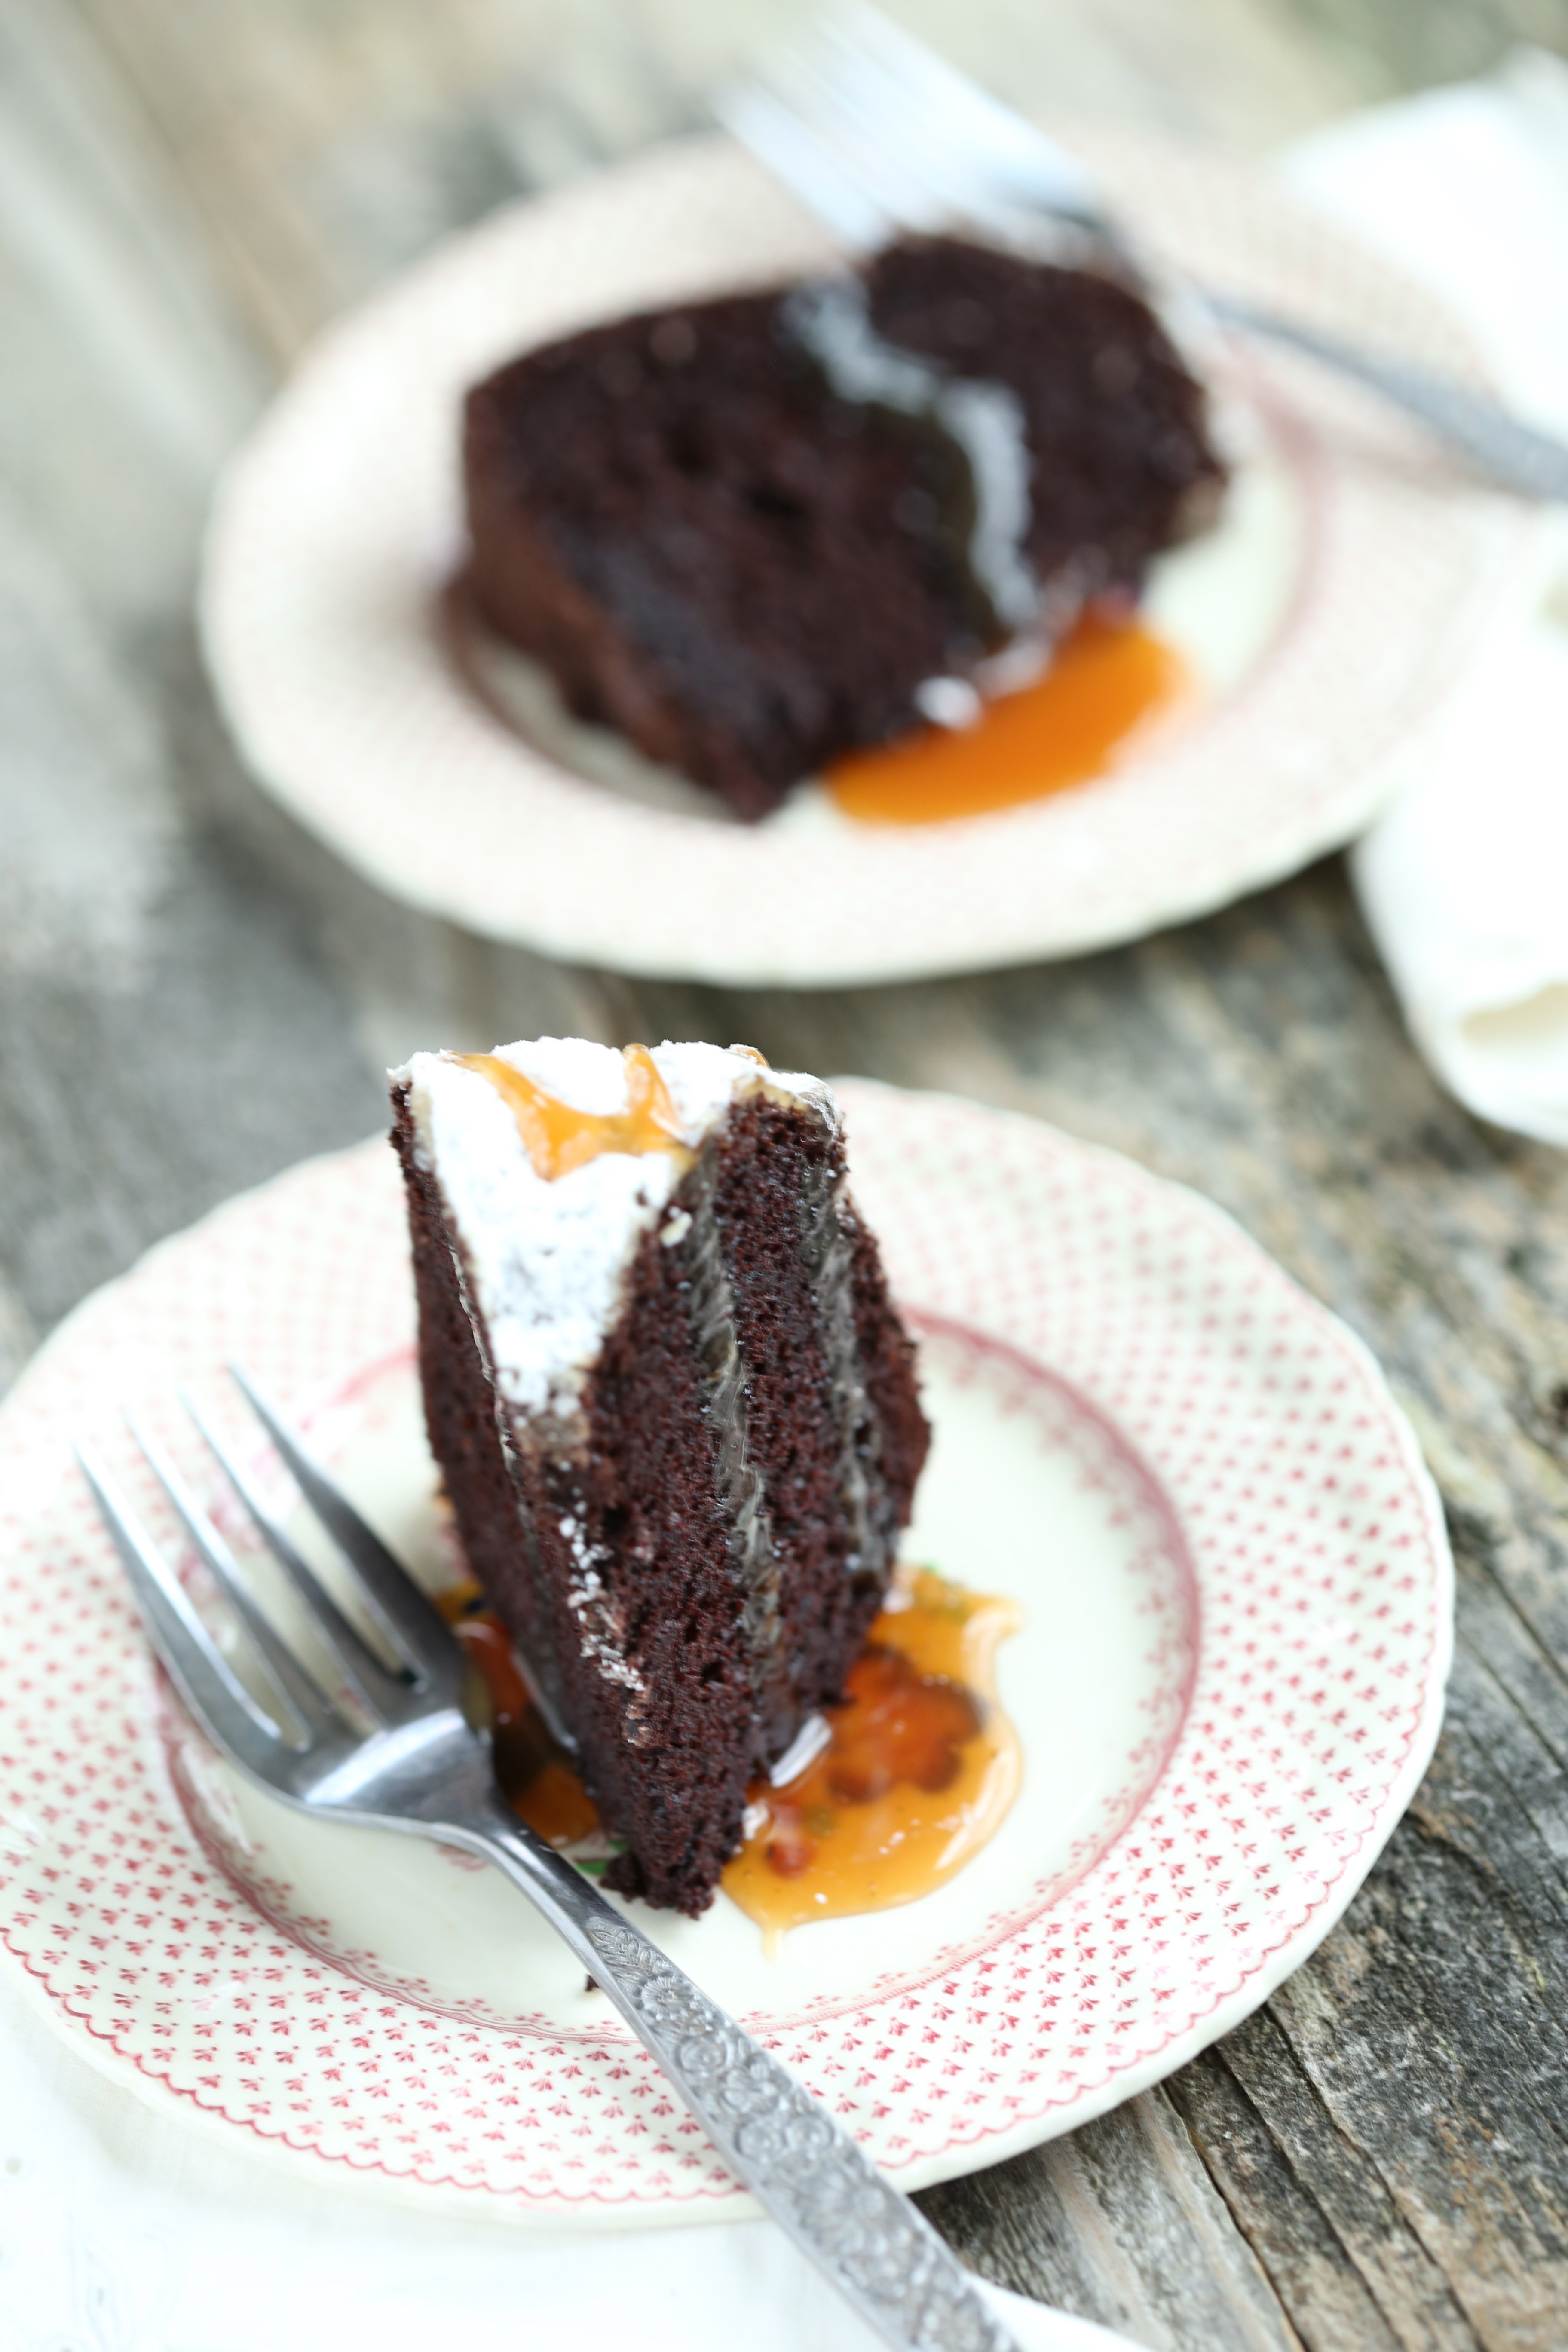
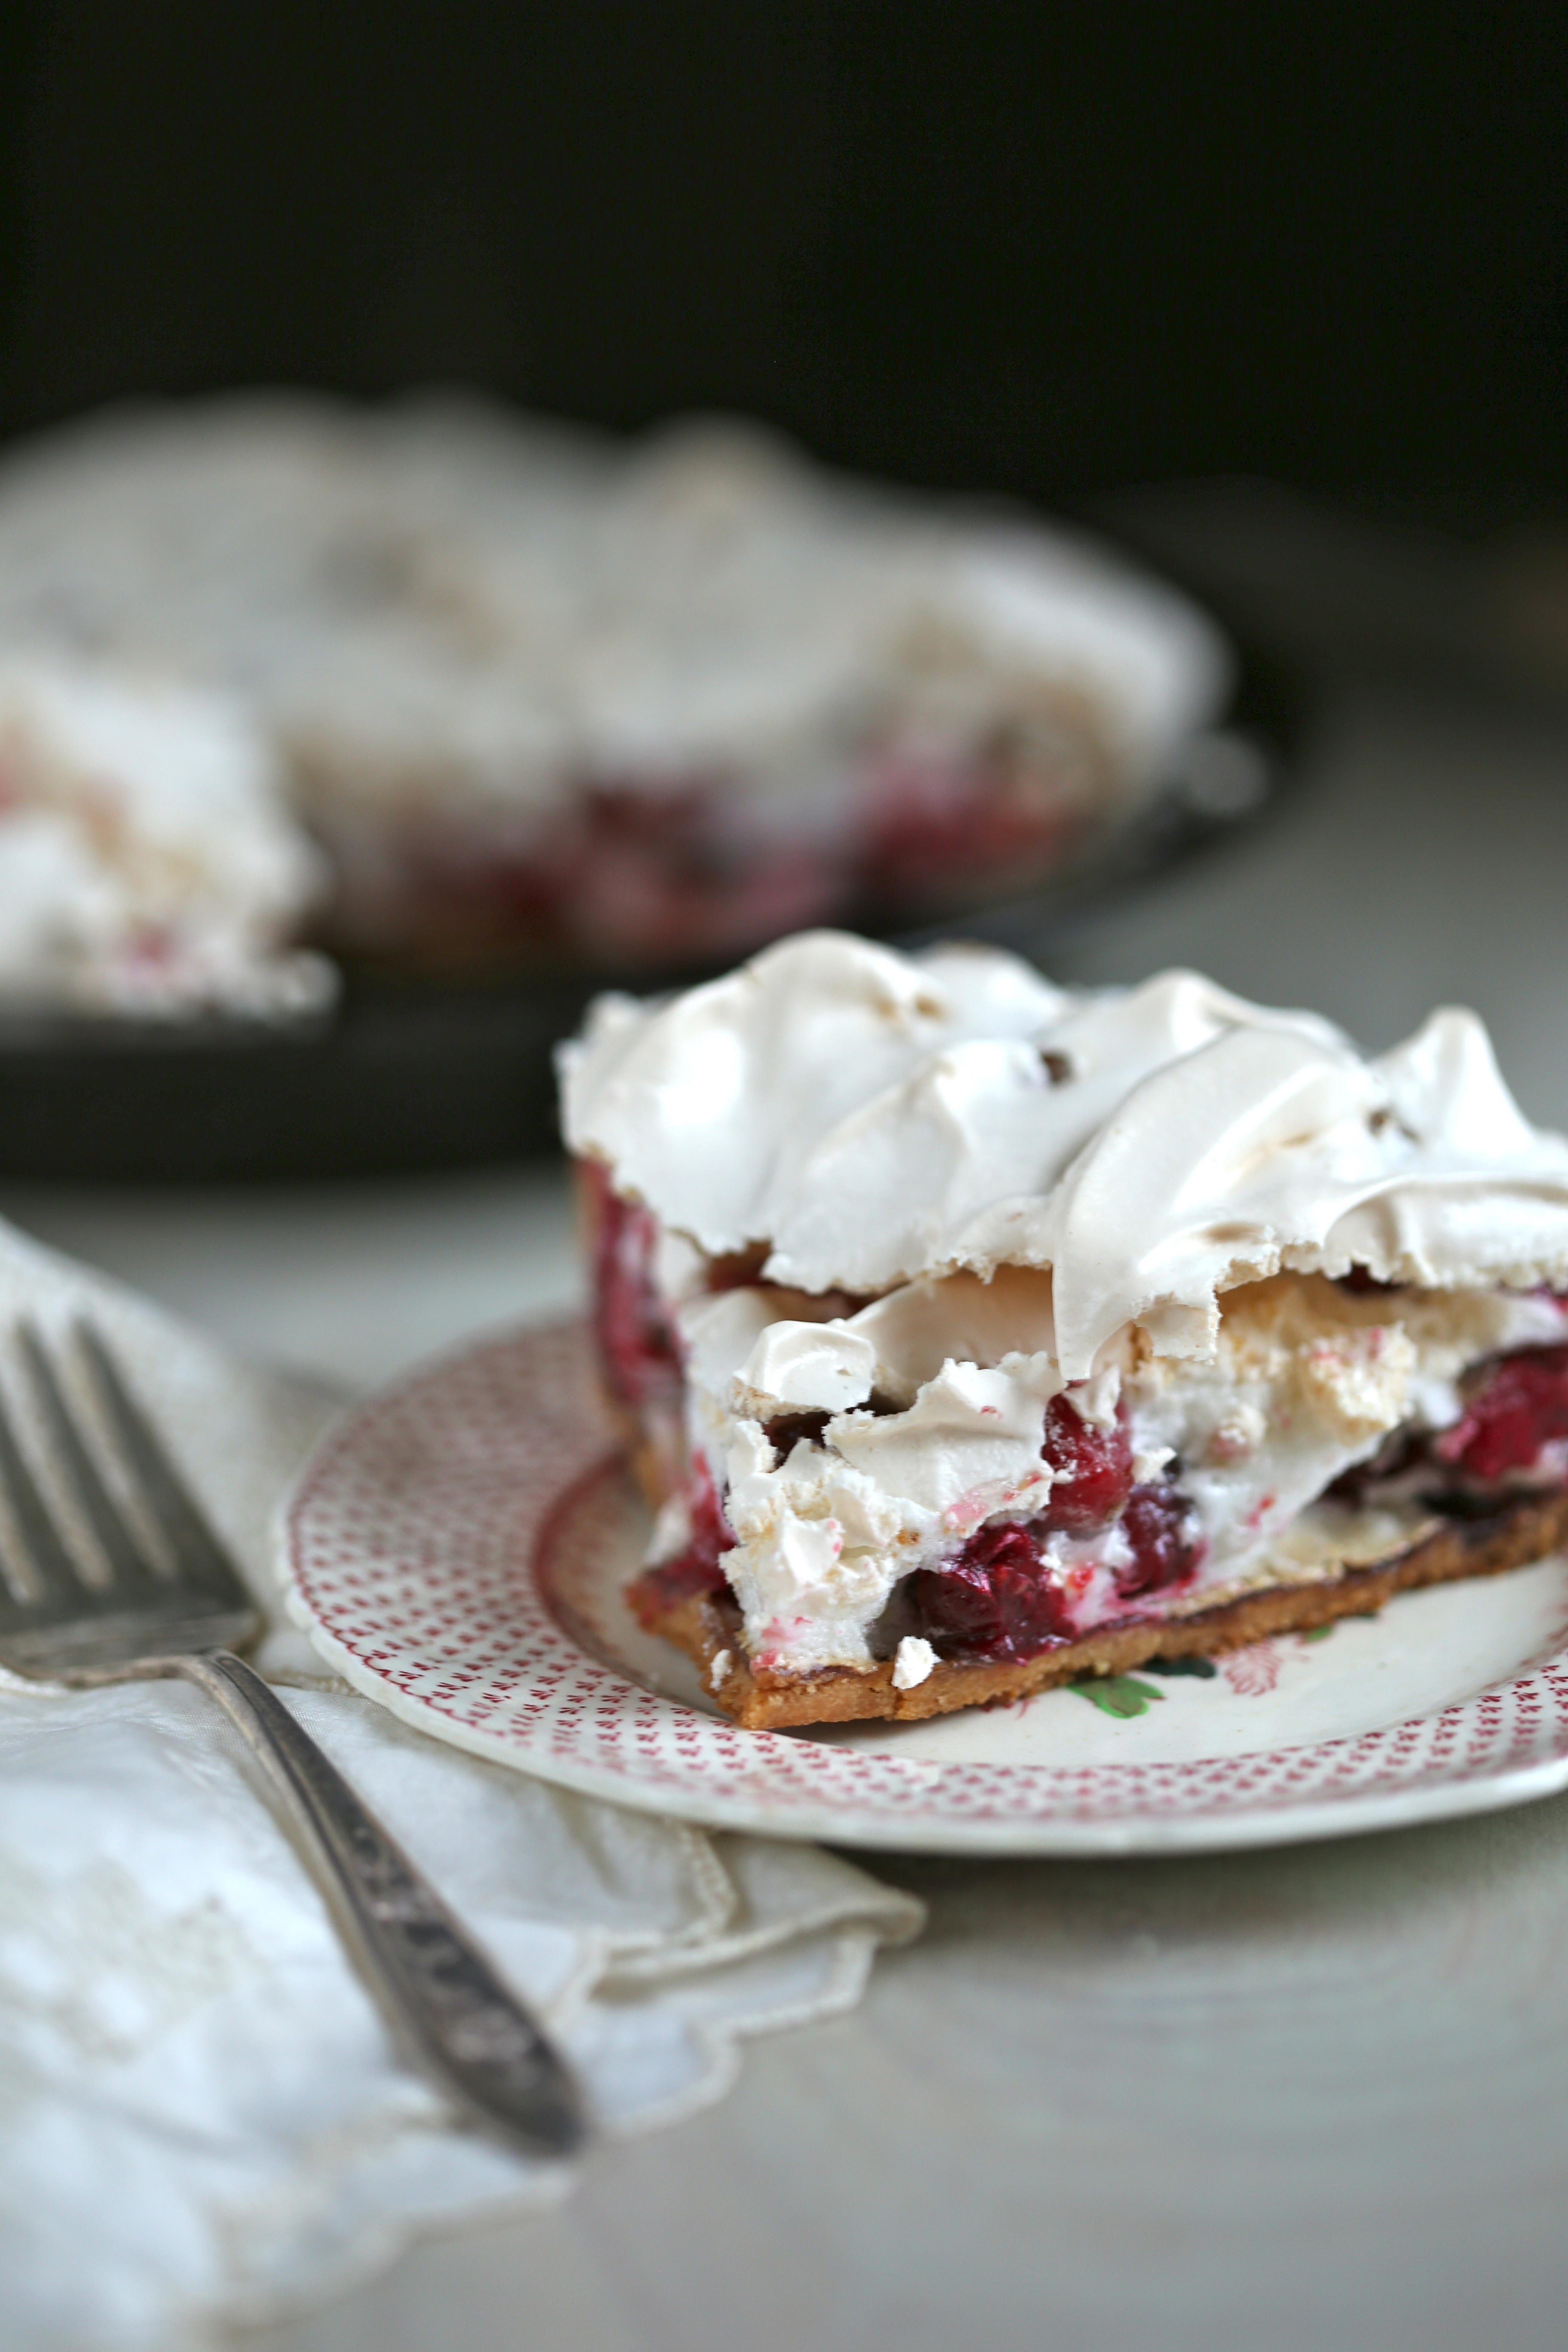
The whole point of this post is the tart, so how did it taste?  Let’s just say that it is not my most favorite tart ever.  The use of two fillings may seem excessive but it is actually close to genius if you ask this pastry chef.  The lemon-almond filling serves to buffer the crust from the moisture of the grapefruit cremeux.  There is nothing worse than realizing that your crust is soggy and gummy from the filling!  The lemon-almond filling is almost like a frangipan and I toasted the almond flour to give it a little more flavor.  The grapefruit cremeux was extremely flavorful but I wonder if it could be made more like a curd and stiffer without the use of gelatin, something I do not enjoy working with-especially now that I do not have a microwave in my kitchen.  At first, I wondered about the addition of Campari; I was not sure of the actual flavor of it and decided to taste it and I suggest you learn from my experience and do not drink it straight.  However, I am now completely aware of why it is called “bitters” and I was shocked at how well it blended with the grapefruit flavor of the cremeux without making it bitter.

The final step is to slice up the fruit so that you have segments to work with.  Because the grapefruits are so juicy, they need to be laid out on paper towels and allowed to dry for a few hours.  The dry segments are arranged over the two fillings in the baked shell.  My fruits varied in color and I was hoping to make an ombre pattern over the top but had to settle for just two shades of pink.  All the components come together to give you a strong grapefruit flavor with creamy and sandy textures wrapped around the fresh fruit.  It was nice, but not my favorite.  Having seen a few photos of some of the other bakers tarts as they prepared them this past weekend, I thought the use of blood oranges or tangerines just for the top might have been better.  However, If I make this one again, I am thinking I might like to use fresh raspberries on top of the grapefruit cremeux.  
IMG_3163

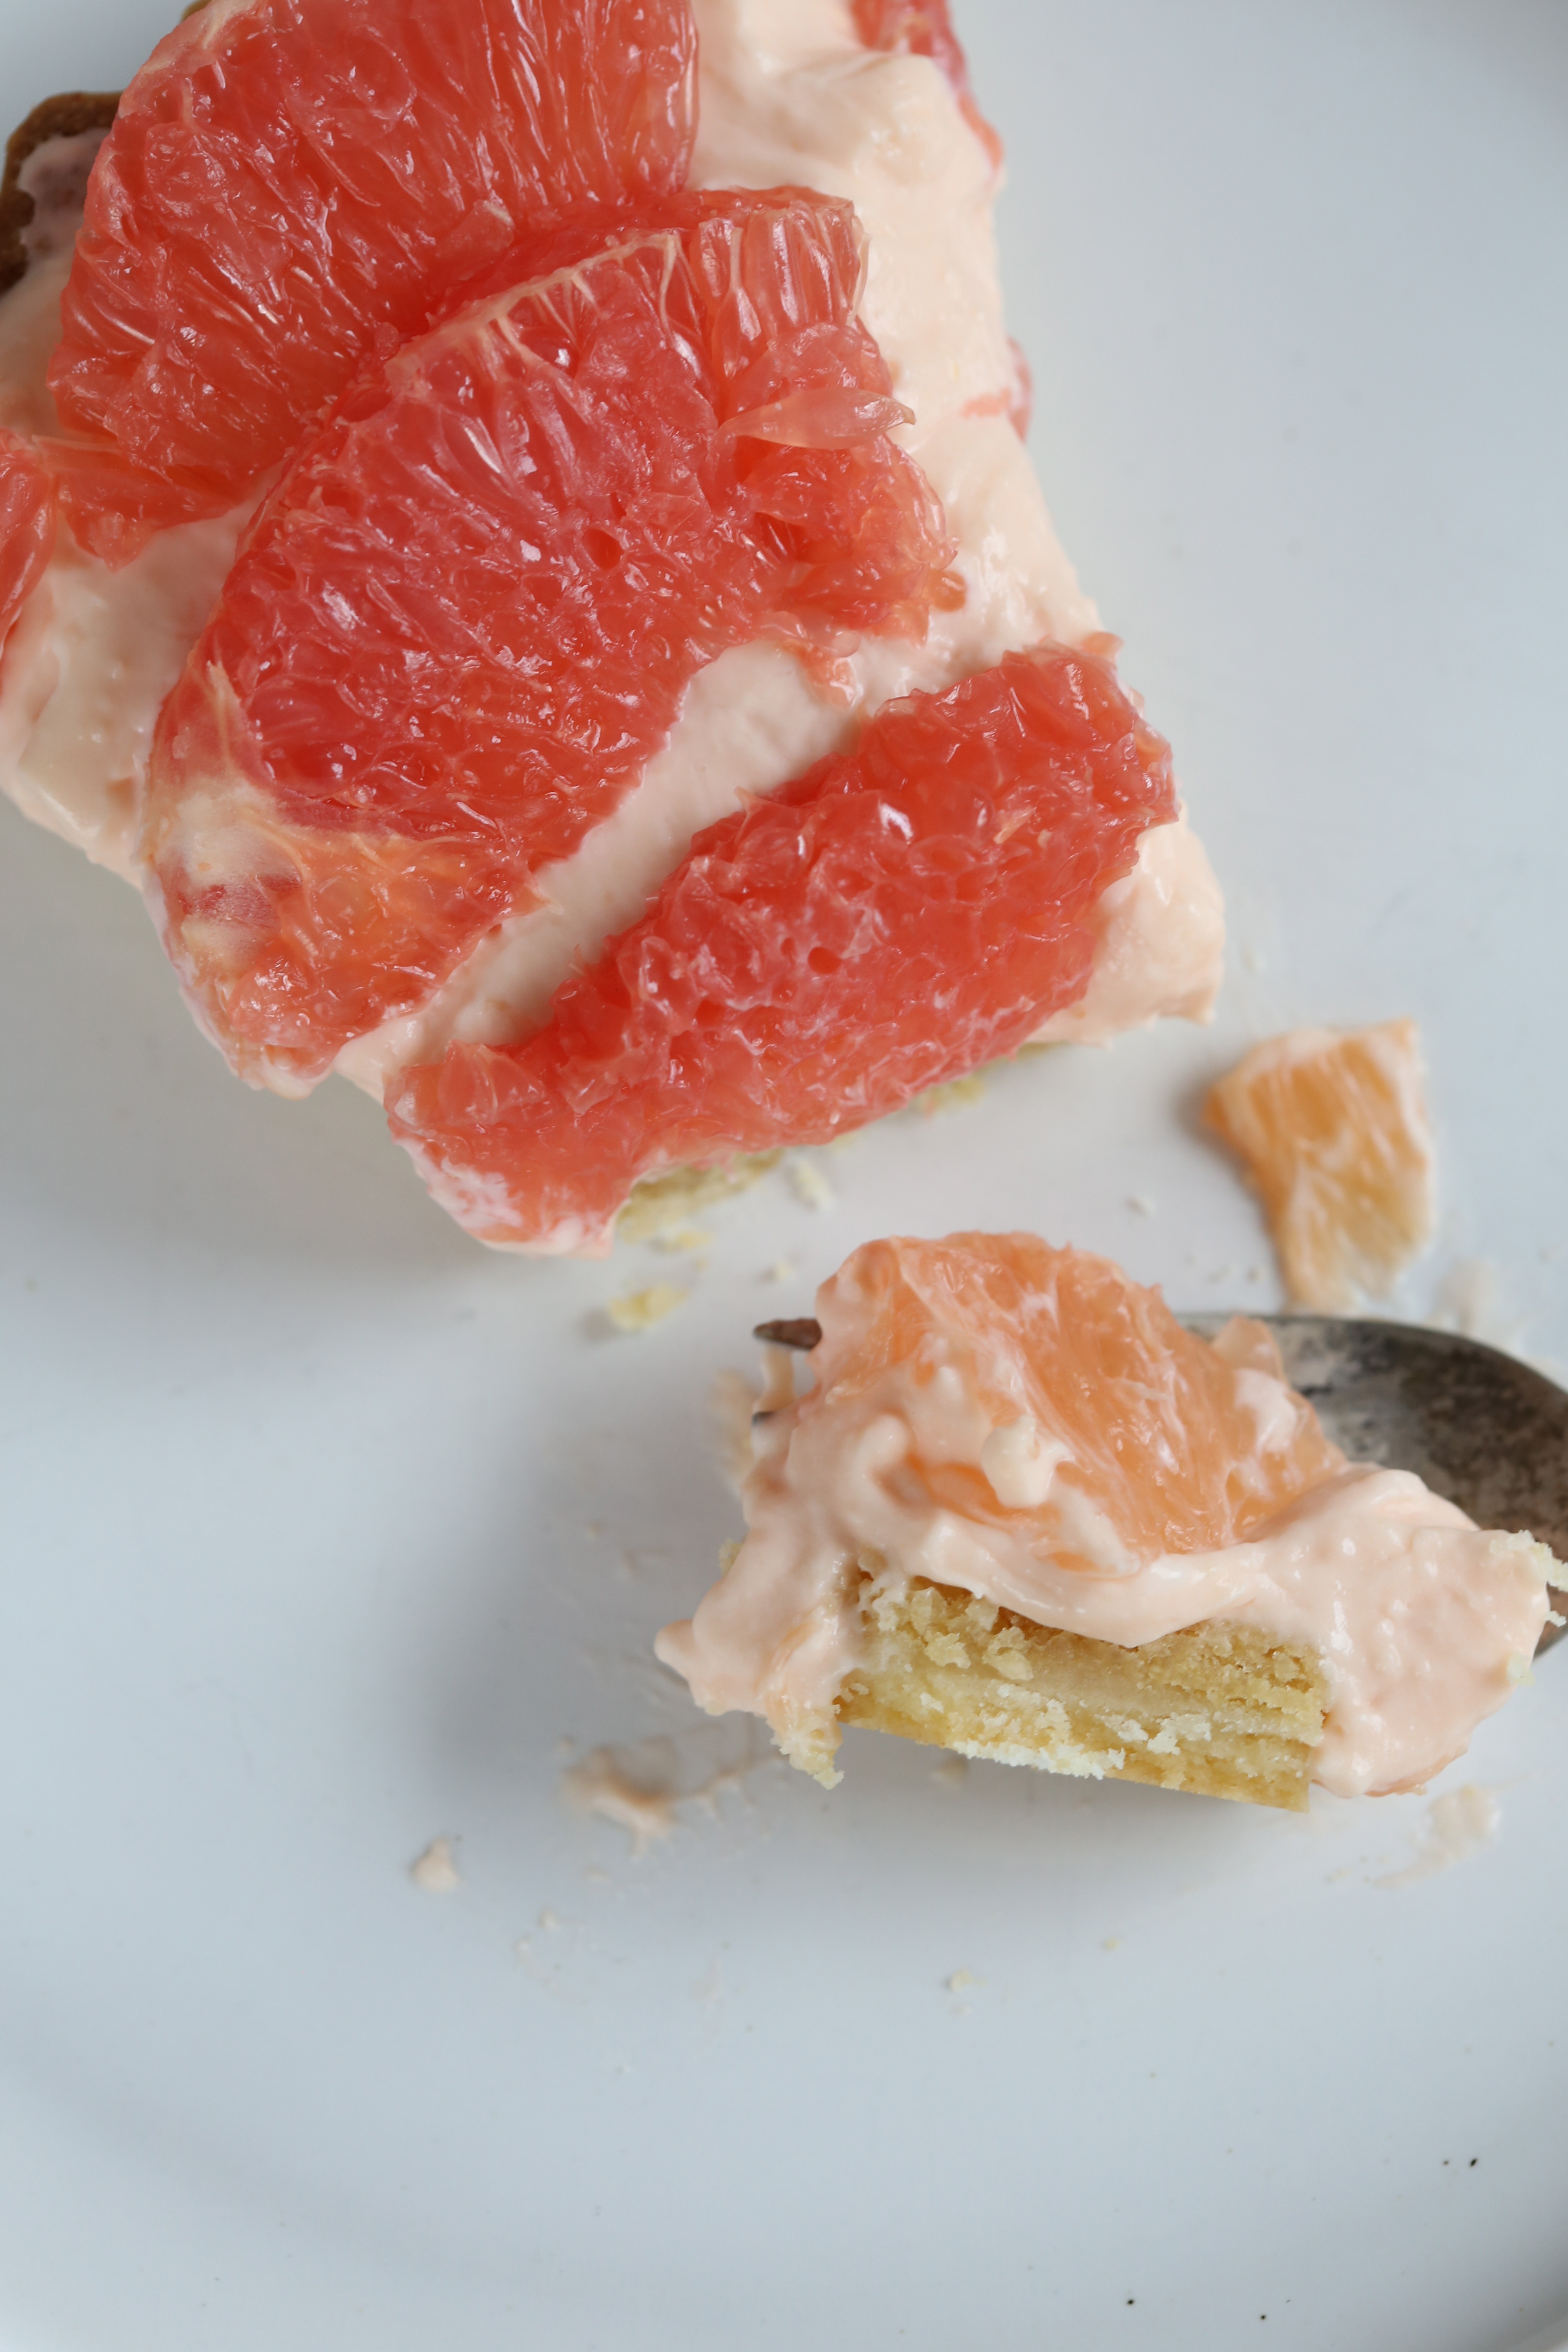
You can see the layers; the crisp tart shell, the softer and sandy lemon-almond filling, the creamy grapefruit cremeux and the fresh grapefruit segments.  The bright flavors of winter’s bounty will have to get us through the snowy weather and cold temperatures but let this be a warning to that rodent in Pennsylvania-your days are numbered…


IMG_3151To see how the other bakers fared with this recipe, be sure to visit the Tuesdays with Dorie website.  Want to bake with us?  Pick up the book and get to work!  We post the upcoming recipes on the website and you can bake some of the recipes or all of them-you decide.  Our only request, buy the book because we do not post the recipes.

chocolate chiffon bundt cake with drunken caramel; a tuesdays with dorie post

IMG_3071

Winter is once again showing us just who is in control.  Not only is it laughing at us, winter is flipping us the bird, repeatedly.  While I shouldn’t complain too loudly, it’s not like I live in the Boston area (sorry sis!), but as I sit here typing this, the weather forecast is calling for up to 15″ of snow to fall in the next 24 hours.  My complaint isn’t that it will snow but that 15″ is three times our average annual snowfall of 5 inches!

With the temperatures well below freezing with the wind chill, I was glad to be in my kitchen baking a chocolate cake.  And if there is one thing I am sure we can all agree on, chocolate cake fixes just about everything, especially if you serve it with a generous drizzle of drunken caramel sauce!  The cake, as the recipe is written in Baking with Julia, is supposed to be served with fresh raspberries soaked in liqueur and rich creme anglaise sauce that gets bruleed with a torch.  Well, I did not have raspberries or a torch and I did not want to make the creme anglaise sauce because it is just too rich for me.  But I did think a drizzle of caramel sauce would be nice and then I saw the bottle of Pennington’s and I couldn’t help myself…
IMG_3070

The cake itself is a typical chiffon cake; spongy and light and completely dependent upon the cocoa powder for flavor.  Because the cocoa powder is practically the sole component of the flavor profile, I suggest you use a high quality cocoa powder, I used Valrhona cocoa powder because I wanted that chocolate punch I knew Valrhona would give to the cake.  If I had used a cocoa powder typically found in the grocery store, I might have gotten decent results but the lack of raspberries and the creme anglaise would have been really obvious and I am not sure that a few dollops of my drunken caramel would have worked as well.  That caramel sauce packs a punch especially with the use of Pennington’s.  If you are not familiar with Pennington’s, let me tell you that you should get your hands on a bottle if you can.  It is distilled in Nashville and they use real strawberry flavor-not the fake stuff so it tastes like ripe juicy berries, the perfect companion for a chocolate cake.
IMG_3069Drunken Caramel Sauce

makes about 1 1/4 cups

1/3 cup heavy cream

1 cinnamon stick

1″ piece of a vanilla bean, split open

1 tablespoon unsalted butter

1 cup sugar

2 tablespoons light corn syrup

1/4 cup booze-dark rum, bourbon, or whiskey (I highly recommend Pennington’s Strawberry Rye Whiskey)

Pour the cream into a small pot with the cinnamon stick, vanilla bean (the seeds scraped out and added to the pot) and the butter and place it over very low heat to warm it.  Place the sugar and corn syrup in a deep, heavy bottom pot with 1/4 cup of water.  Bring the pot to a boil over medium-low heat, stirring occasionally to melt the sugar.  Wash the sides of the pot with a wet brush to prevent crystals from forming.  Allow the sugar to boil until it turns amber in color.  Remove the pot from the heat and carefully pour in the warm cream mixture, stirring to combine.  It will boil up violently so take caution when stirring.  Return the pot to the stove over low heat and stir gently to dissolve the caramelized sugar at the bottom and sides of the pot.  Do not boil the mixture, just stir until the sugar is fully dissolved and the mixture is combined.  Remove from the heat again and carefully stir in the booze.  Pour the caramel through a mesh strainer remove the cinnamon stick and vanilla pod and into a heat proof serving pitcher or a bowl.  Allow it to cool to about 100 degrees before serving, store in the fridge and reheat as needed.

To see how the other Tuesdays with Dorie bakers did with this recipe, check out the “LYL” page on the website.  If you would like to join us as we bake our way through Baking with Julia and Baking Chez Moi, get your hands on the books and get to work-the more the merrier!

marquise au chocolat and salsa quitza; a tuesdays with dorie post

IMG_3055

After a weeks absence, I am back in the kitchen, completely.  Let’s just say that if you have the chance to avoid the flu-do it.  It has been more than 10 years since I was that sick and honestly, I hope it doesn’t happen again for a long time!  The simplicity of this recipe was the perfect way to ease back into the kitchen.

The recipe for Marquise au Chocolat makes a large, rich loaf of frozen chocolate mousse which is meant to be served in slices.  Since there are just two of us, I cut the recipe and made only a quarter of the batch and since it was so small, I made the decision to press the filling into a six-inch round cake pan that I had lined with lady fingers.  This will be the perfect little pick-me-up since I also spiked it with some single barrel Kentucky Bourbon.  Finally, a drizzle of blackberry syrup and a few plump berries and dessert is served!  Something tells me my husband will not think twice about eating this one!


IMG_3046

As I mentioned earlier, I was sick last week, came down with it all so that I was too sick to make the Salsa Quitza which was my plan for Superbowl Sunday.  We were supposed to go to a friends house to watch the game but since we were both miserable, we sprawled out on the couch and did not move all day.  Needless to say, my plan of making the quitza to bring to the party was cancelled.  If you ask me, that wasn’t such a bad thing.  Honestly, I was doubting the results as stated in the recipe and after reading the comments from plenty of the other bakers last Tuesday, I am glad I had a chance to follow my personal instincts.

The idea of spreading the dough out into a large cake pan and topping it with cream cheese had me thinking it would be messy to eat and for the two of us, just too cheesey.  My bakers sense (kinda like Spiderman’s “spidey” sense…) had me thinking it would make a nice focaccia.  Guess what-it did!  With just half a batch of dough, I made a quarter sheet pan sized piece of focaccia that was the perfect side dish for our dinner of grilled swordfish and salad.

IMG_3042If you want to make this the way I did, use blue corn meal.  Believe it or not, it doesn’t lend any color to the dough but it does add a nice nutty flavor along with dark flecks and crunch.  Several bakers commented on the salsa being really wet and I honestly think that the recipe probably should call for “pico de gallo” and not chunky salsa.  If you aren’t familiar with pico de gallo, it is a fresh mixture of finely chopped tomatoes, peppers, onions and cilantro with lemon juice.  I measured out nearly a cup and let it sit in a strainer for about an hour to drip dry and then sprinkled it over the top of the dough after shaping.  A generous topping of shredded Mexican cheeses over the salsa and then into the oven it went.  It baked up fast, just 20 minutes and it was done.  After cooling for a while, I sliced off strips and cut them into diamonds; two-bite pieces to pair with dinner.

The dough itself was fairly easy to make with a mixer if you do not have a bread machine.  It was a bit soft and sticky but after mixing it for about 2 minutes, I turned the mixer off and let the dough sit in the bowl for 10 minutes.  This rest, autolyse is the technical term, let the dough absorb all of moisture and as a result, it was not quite as sticky as it could have been.  This is definitely a dough recipe worth having in my repertoire.  It just might make another appearance in my kitchen.

To see what the other bakers came up with, visit the Tuesdays with Dorie website and look for the LYL (leave your links) page.  If this seems interesting to you, consider baking along with us as we prepare each of the recipes in Baking with Julia and Baking Chez Moi.  You will have to purchase or borrow the books if you do not already have them; out of respect for the author, we do not publish the recipes!

brown butter and vanilla bean weekend cake; a tuesdays with dorie post

IMG_2932

Another dreary, rainy weekend, but it still put a smile on my face.  For a change, I would have perfectly diffused light to take photos.  As I rummaged through drawers searching for the exact linens needed, I came across an envelope.  Tucked inside was a pretty little square of Swedish bobbin lace that my mother-in-law brought home from one of her trips to Europe.  For years, that envelope has made appearances as I shuffled things from drawer to drawer and today, with a flash of inspiration I can only blame on the rain, I thought it would be the perfect stencil for my cake.

The recipe for the cake calls for baking it in a 9″x5″ loaf pan but I wanted to make just half the batter-which is still too much for the two of us.  After picking through boxes and pans, I settled on a small granite-ware skillet which would make a nice, round cake; a perfectly boring round cake…Luckily, with that flash of brilliance and a tub of powdered sugar, the cake would be anything but ordinary in appearance. 
IMG_2931

While I have no idea how bobbin lace is made, I am envious of those who are skilled in the craft.  The photos I have seen show slender, intricately carved bobbins made from wood or bone and weighted with spangles of glass beads as well as pins, lots of pins.  The work is intricate and obviously time-consuming but the results are lovely and delicate; a true work of art.


IMG_2933

A lucky break-the square fit perfectly over the cake and left very little space uncovered.  The hearts are my favorite part of the design.  The way the threads between them make a star or a flower depends on how you look at it.


IMG_2948

Sifting powdered sugar using a large wire mesh is the best method.  If tapped gently, you can cover a large area with a fine layer of sugar.


IMG_2950

Now for the tricky part, removing the lace without ruining the pattern.  This is a one and done method.  If it doesn’t work the first time, it is unfortunate because once there is some sugar on the surface, you can not move the lace and try again.  With fingers crossed, I gently lifted the lace making an effort not to smear the design or dump any of the excess sugar off the lace and onto the surface of the cake.


IMG_2953

It truly was my lucky day!  Not only did the design transfer well, I was able to lift the lace without incident!!!


IMG_2956

The flower pattern between the hearts transferred nicely and so did the delicate scalloped edge.  But that square in the center…I just love the little beads of sugar and that barely there dusting in the center.  This may not be what the lace was intended for but I can say that I will use it again.


IMG_2959It almost seemed sacrilegious to cut it but I have no will power where cake is concerned!  So how did it taste?  Well, the recipe calls for browning the butter and I did that, but I think I should have gone a little further with it.  Since my supply of vanilla beans is really sparse and I am not sure of a reasonably priced local source, I decided to go with vanilla extract and because we did not have any rum, I used the next best thing, bourbon.  In my opinion, it could use more flavor and I do not think it is worth sacrificing a vanilla bean to get that extra punch.  Personally, I think a little more butter, maybe an extra tablespoon, browned to a color no less than my tabletop in the photo would help add flavor and a little more moisture.  Also, the added fat can help prevent the gluten from developing as the flour is mixed in; my cake had tunnels in it that I am sure were caused by over mixing when I whisked in the flour as directed by the recipe.  The amount of vanilla extract initially seemed excessive but now, maybe not, however, it was strong enough that the bourbon was not noticeable.  In the future, I might cut the vanilla by 25% and increase the bourbon by 50%.  This is a recipe that I can see myself using again when I need a simple cake and because it is basically a blank slate, I can also see it being the base of a shortcake or part of a trifle.  And lastly, serving it plain with a simple dusting of sugar is good but I have a feeling it could also stand up to being slathered with buttercream frosting.

If you enjoy reading my Tuesdays with Dorie posts, be sure to visit the website and look for the “LYL” post to see how the other bakers made out with the recipe, and if you are feeling left out, JOIN US!!!  Pick up a copy of Baking Chez Moi or Baking with Julia and bake along with us as we work towards our goal of baking every recipe in the two books.

european rye bread; a tuesdays with dorie post

IMG_2470

Rye bread is one of those things people either love or hate.  In my opinion, I think it is more likely related to whether or not you like caraway seeds.  Most of it would probably be better off labeled caraway bread since the distinct flavor of the seeds is all you can taste in commercially prepared rye bread.  However, as a lover of toast, rye bread, loaded with caraway and slathered in salted butter, is one of my favorite breakfasts.

This week, the Tuesdays with Dorie bakers are sharing their experiences with European Rye Bread from Baking with Julia.  If you recall, we made a similar recipe from the book, Pumpernickel loaves, a while back.  Both recipes were contributed by Lauren Groveman and they each call for the unusual step of hanging the loaf in a sling for the final rise of the shaped loaf.

IMG_2874The bread is fairly easy to mix and since it is a rye bread, the ingredient list is simple.  The only confusing part about it, finding the proper rye flour.  Allow me to wish you well with this endeavor.  Every rye bread recipe I read calls for a specific type of rye flour and not all millers produce them equally.  Essentially, the amount of whole grain used in the flour is the difference and if you would like a better understanding of what each type of rye flour is, this chart from the Whole Grains Council may help you understand it all.   While the chart does explain things, they also make it a point to mention, repeatedly, that not all millers produce equal products; the chart is more of a suggestion than a standard.  As for my bread, I have only been able to find Hodgson Mill 100% stone ground rye flour which according to the chart makes it a dark rye flour.

IMG_2451The whole grain flour gives the dough a lot of texture and it also makes it a bit denser than I like.  Working with a half batch of dough, I made just one loaf and I stuck to the recipe pretty closely.  Bread baking is not really my strong point and I really wanted to make a loaf as described by the head note of the recipe, with a brittle crust that snaps into small flakes and a soft, slightly moist and a little springy inside.

IMG_2455

Just as the recipe instructed, I hung the shaped loaf in a towel sling and heated the oven.  As the bread hung in kitchen, it continued to rise and I could see it splitting and I knew it would not get any better in the oven.  Rather than get mad, I decided to take this as a lesson and make another half batch.  This time though, I would make a few changes.

First thing I did was to cut back on the amount of rye flour.  Since I was using whole grain, I knew it would be denser and I figured a little less would have to do.  Second change I made, a lot more kneading but not all at once.  After adding the majority of the flour to the yeast and water, I mixed the dough until it came together and formed a ball which took about 2-3 minutes and then I simply turned off the machine and let it sit there for about 10 minutes.  Once the dough was allowed to sit and rest, I resumed kneading on medium-low speed for about 12-14 minutes.  To be sure I had kneaded it enough, I attempted a window pane test and while it wasn’t perfect, I could see a huge improvement from the first loaf.

IMG_2459

After hanging this loaf in the sling, here it is on the peel just before I put it in the oven.  This time, I gave it a wash of straight egg whites-no water and plenty of caraway seeds.  Just before I slid it into the oven, I gave it a few slashes and crossed my fingers; it couldn’t hurt…

IMG_2466As you can see from the photo, the top loaf is little more than a train wreck.  It split all over and really wasn’t very pretty.  The second loaf is on the bottom and while it is not perfect, it is easy to see that it worked out much better.  This is destined to be one of those recipes I return to multiple times in the hope of getting it right.

IMG_2463The last thing about the recipe that I found difficult to follow from reading it, the shaping method.  Rolling, stand it on the side, pinch, poke, and so on.  Hospital corners-we are talking about bread, right?  For my second loaf, on the left, I just ignored all the fussy instructions and tried to use a little common sense instead.  Looks like it worked out okay, it seems to have held the shape better.  To see the inside of the loaf, refer to the very first photo above, the second loaf is on the left and I think I like the color of that bread better than the first loaf which is on the right.

To see what the other bakers came up with, be sure to visit the Tuesdays with Dorie website and look for the LYL (leave your links) page.

granola energy bars; a tuesdays with dorie post

IMG_2867

For what seems like forever, I have wanted to make my own granola bars.  When I had to pack lunches for the girls, I would buy them and occasionally, eat some myself, but a single glance at the ingredient list alway left me cringing.  Over the years, I have experimented with granola bars but most of the results just did not give me the chewy but soft texture I was hoping for.  My collection of recipes to try has grown quite a bit and when the Tuesdays with Dorie bakers chose to make the recipe for Granola Energy Bars in Baking Chez Moi, I happily baked along.

The recipe is fairly simple and does not have any tricky steps.  Toast, boil, mix and bake.  Simple ingredients, easy process, what more could a baker want?  The added perk, flexibility as far as what you put in the bars.  The only must, rice syrup something that most supermarkets with a natural food section carry these days.  My thought was to try different combinations of fruits and nuts to make a variety of bars to snack on.  The only thing I did not do was use rolled oats.  Trader Joe’s sells a whole grain hot cereal blend that is made of rolled oats, wheat, barley and rye. There is almost always a carton on the shelf in my pantry and I decided to use the blend rather than just oats.  Working with half the recipe amounts for each batch, I made one batch with dates, cocoa nibs, and walnuts, one batch with Trader Joes Berry Blend (dried cranberries, cherries, golden raisins and blueberries) with almonds and a third batch with mission figs and almonds.  For all of them, I included sweetened coconut and pumpkin seeds, substituted coconut oil for the butter and eliminated the sunflower seeds and the vanilla extract.  
IMG_2872

The mixture was easy to prepare and the three pans came together quickly.  My only wish, that somewhere in the directions it stated how thick they should be in the pan.  The dimensions of the pan is slightly uncommon and with my half batches, I was winging it and hoping that my 6″x 6″ were a good choice.  Since I have had such a problem with the oven temperatures in other recipes, I set the oven to 300F and it took a long time for them to bake, nearly double the time to get them a nice toasty color on top.  This may also have to do with the fact that I did not pretoast my rolled grains; I was hoping to keep them softer.

So what were my results?  Really chewy and almost hard bars that despite the different combinations of fruit, all tasted the same.  Because I did not want them to taste like vanilla, I left out the extract but now I wonder about whether I should have added something like cinnamon because they had an oily taste that must have come from greasing the pans.  In the end, I was a little disappointed with my results but will probably try them again with a full batch of the recipe and a little cinnamon or maybe some pumpkin seed oil and possibly a tiny bit of extract.  As for my husband, he couldn’t eat them fast enough and in a couple of days, had devoured at least half of the bars!

To see what the rest of the bakers came up with, visit the Tuesdays with Dorie website and look for the “leave your links” post.
IMG_2859

tuesdays with dorie

Mixed starter bread from Baking with Julia, baked in early December 2014.

Each Tuesday, the members of the Tuesdays with Dorie blogging group post photos and comments on the challenge of the week.  If you are not familiar with the group, we are currently baking our way through two of Dorie Greenspan’s books; Baking with Julia and Baking Chez Moi.  The recipes are chosen by the members each month and we post them on alternating Tuesdays, two recipes from each book.

This week, we are posting about our experiences with the Inside-out, Upside-down Tiramisu recipe from Baking with Julia.  However, I chose not to make this recipe.  Crazy, I know, but over the years, I have made so many batches of tiramisu that I just did not want to make it.  We just do not eat that much dairy and with just the two of us, I could not see the point in making it.

Fear not, I will be back again for the second Baking with Julia recipe this month because I love rye bread and the scheduled recipe is the Eastern European Rye bread on page 98.  As I mentioned above, I also participate in the Baking Chez Moi recipe challenges and next week, we are baking the Granola Energy Bars on page 328 and they sound interesting enough to me that I am looking forward to the results.

If you are interested in baking along, pick up a copy of either book and visit the website to see the schedule.  Be sure to visit the website each Tuesday and look for the “leave your links” post to read the experiences of all the participants.  Not only will you get tips and tricks to use when baking, you will get first hand reviews of each recipe, insider information if you will.  However, you will have to buy or borrow the books, we make it a rule not to publish the recipes.  Join us, we’d love to have you bake along with us!

mixed starter bread; a tuesdays with dorie post

IMG_2112This is the Tuesdays with Dorie/Baking with Julia tale of two breads; the train wreck version and the fingers crossed I hope it works version.

Bread baking has always been one aspect of my career that I completely lack confidence in.  There are so many variables and so many ways for it to go wrong and yes, baking in general is often a disaster waiting to happen, but bread is where I have had so many more failures.  As you know, baking is science oriented and when you add a living creature, yeast specifically, there are just so many more rules that must be followed.  In my world, a baguette has always fallen into the buy it not bake it category because I have never achieved good results when baking one at home.

So it was with the greatest of expectations and hopes that I set off to bake this bread.  When I read the instructions, I saw that I could actually make four different shapes if I followed the recipe, and I was determined to make at least three of the shapes.  But, as the Steinbeck wrote, “even the best laid schemes of mice and men, often go awry.”

First mistake; no bread dough to make the starter with.  Not a problem, I subbed a small amount (1/4 cup) of my homemade starter.  While this sounds good in theory, it made the starter very wet and it set the stage for more problems as I followed the recipe.  In the final rise stage, my dough was simply too soft and probably could have used another half cup of flour to make up for the added moisture in the starter I used.  However, the mistakes are not all mine.  Did anyone else notice the rather large discrepancy between the photo tutorial on page 116 and the directions in the recipe on page 117?

Give me a moment to vent and then I shall stumble down off my soapbox.  First let me state that I admire Dorie greatly.  She has helped put women bakers up in front of the crowd and to show the world that yes, women can be pastry chefs too.  She has in a lot of ways done for baking what women like Alice Waters and Julia Child did for cooking as far as convincing the world that women can do this and do it just as well if not better than men.  But editing is editing and as a published cookbook author, I can say that if the words under the photo do not match the words in the recipe, we’ve got a problem.  While this may have been fixed in later editions, my $3 flea market find is actually a first edition and I had a major mishap as a result.

My complaint is simple, step 3 of the photo tutorial instructs you to fold the dough down again (the folding process starts in step 2) and to seal the seam…it then goes on to tell you to repeat this process once or twice to form a short log shape with a tight skin.  That right there is it, one of the largest factors that my bread dough simply spread out rather than rise up and why it was not possible to get it off the floured towel without deflating it.  If you read the recipe, it only tells you to complete the folding and rolling once.  The tight skin is crucial not only to the success of a crispy, flaky skin but to the shape and the height of the loaf as well.

After having nurtured this dough along for 2 days, arranging our day around the baking schedule and then having such a flop that I had to go out and buy bread for dinner, I was truly annoyed with myself for not succeeding.  As I dumped half of the batch in the trash, I made the decision to save a piece of the dough and start again.  Then, while standing there in my kitchen peeling the rest of the dough off of a floured towel, I could not bring myself to tossing it in the trash.  Stubborn determination had me grabbing my basket and shaping the remaining dough.  The dough was soft and a little sticky at first but as I worked at shaping it into a smooth ball, I saw a change in the texture, it was no longer soft and shapeless and it was now tight and structured.  It rose beautifully in the basket and when it had doubled, I dumped it out on to the baking peel, slashed the top, slid it onto the heated stone in the oven and poured the water into the pan in the bottom of the oven.  Voila!  Picture perfect bread, and a lesson learned!

IMG_2125

The crust was thin and crispy, just like a good baguette and despite the many missteps and the extra rise time, it has absolutely no sour taste.

IMG_2141Just look at the interior of the loaf, all of the open bubbles you would expect after reading the recipe, but not the photo tutorial as it does not advise you to retain the open structure and air bubbles by handling it gently and not to deflate or mash it.  In the end, I am better prepared to make a baguette and my second batch is nearing the final rise.  Stay tuned fellow bakers, I will post additional photos when I get a decent loaf!

To see what the other Tuesdays with Dorie bakers came up with, visit the website.

cranberry crackle tart; a tuesdays with dorie post

IMG_2028

Cranberries are a vital part of the holiday season for many Americans.  In my family, we cook them up into a sweet sauce flavored with oranges, vanilla bean and spices and the kids eat them by the bowl full.  It is one tradition that I really will miss this holiday season.  We relocated from Nashville to Williamsburg and our family group that gathered together each Thanksgiving and Christmas is now separated by nearly 700 miles.  Even so, I couldn’t resist buying a bag or two, or four of cranberries and had to find a tasty way to use so many fresh cranberries.  Thankfully, this recipe used more than half of a bag, and now I only have 3 and a half more bags in the fridge…

The recipe gives you some good options and I decided to test some of them out.  With two different dough recipes to choose from,  I decided to mix up a batch of the sweet tart dough and as I mixed it, I chose to follow the recipe suggested in the “Bonne Idee” sidebar; it gave the option of using a small portion nut flour in place of the all purpose flour called for in the recipe.  It was quick to mix up in the food processor but I really think the amount of dough it produces was about double what was needed to make the pie shell.  As a result, I formed a patty with the leftover dough and tucked it away in the freezer.

As a person who literally has rolled out hundreds of pie shells by hand, this dough was very pleasant to work with and I did not have any sticking or crumbling or tearing.  It was so easy to work with that I had the crust rolled and in the pan in a matter of minutes.  Where I had issues, the baking time.  When I read the instructions and saw 20 minutes at 400, I was skeptical, it seemed like a long time for such a high temp.  In hindsight, I wish I had listened to my inner voice.  My crust came out of the oven a little black around the edges.  Luckily, I had not trimmed it down by one-third as the recipe called for and had enough to trim away the burnt edges and still have a side crust.

The filling of a marshmallowy meringue was such a small amount that I had trouble mixing it in my 6qt kitchen aid bowl; it just wasn’t enough volume for the beater to really come in contact with it at first.  After a really long time, it finally came together.  Since I did not want to buy any jam-I have two dozen jars of homemade blackberry jelly in my pantry, I just used some of my own from the open jar in the fridge.

As the tart baked in the oven, it puffed and cracked and finally, it was a nice, light golden shade and had a few deep cracks across the top. Carefully, I removed the pan from the oven, closed the door and set it down to cool.  A quick glance at the clock, 11:12pm; we wouldn’t be tasting this pie tonight.  Off to bed, to sleep and to dream of crunchy, crackly meringue and tart pockets of ruby red berries…

IMG_2029