a tale of two biscotti’s-tuesdays with dorie

i must have blinked; somehow, it is suddenly tuesday and time for the next (tuesdays with dorie) post from baking with julia. even better is the fact that this month, we will do 3 recipes.  first up is the hazelnut biscotti recipe hosted by jodi of homemade and wholesome and katrina of baking and boys! be sure to visit either of their blogs for the complete recipe or better still, buy a copy of the book baking with julia and bake along with us.

baking biscotti is something special for me.  years ago, i developed a series of recipes for biscotti and we actually opened a small wholesale bakery that specialized in biscotti.  we baked more than 20 flavors and had about 40 wholesale accounts as well as a small mail order business.  fast forward 15 years and i have moved on; i no longer operate my own baking business.  however, i still get requests for biscotti and bake them as gifts for friends and family.  in my current baking job, i make them just to grind them into crumbs and make cookie crust pie shells with them.  suffice it to say, i was curious to try this recipe.

upon reading the recipe, i realized that i had the option to change the nuts used.  that was a good thing since i had a severe shortage of hazelnuts (none actually) and in the 105 (no not kidding) degree heat, no desire to go out to the store.  i chose pistachios and lemon zest to flavor mine since that is one of my favorite biscotti combinations.

first step was to measure out all of the ingredients.  since my pistachios were already skinned and toasted, i eliminated the blanching and toasting step from the recipe.  actually, whenever i make biscotti, i always use untoasted nuts.  the reason behind this is that they have the potential to become over toasted in the second bake and that can give the biscotti a bitter and burnt taste.

this is a very lean recipe.  by lean i am referring to the fact that the only fat in the dough is what is present in the egg yolks and the nuts.  low fat isn’t a bad thing unless you have dental issues because lean biscotti are hard biscotti.

the instructions for shaping the logs suggests flouring your hands.  with the number of logs i have baked, i can tell you don’t use flour, use a little water instead.  a small amount of moisture on your hands will allow you to quickly shape the logs without the dough sticking to them.

out of the oven, i let them cool completely before slicing them.

be sure to use a very sharp serrated knife for clean cuts.
pistachios add nice color to the slices

since i am also working on what i hope will be my next book, i mixed up a batch of my own recipe.  these are chocolate with almonds and coffee beans.  the biggest difference from the twd recipe and mine (besides the chocolate) is that these have a little less egg and a generous amount of butter.  that difference results in a lighter, softer crunch.  one guaranteed to be friendlier to your smile!

be sure to check out the tuesdays with dorie page to see the biscotti’s from all of the participants!

twd: chocolate truffle tartlettes

are you ready for another tuesday with dorie?  this week’s challenge is being hosted by 4 different participants; steph, spike, jaime and jessica.  i know i was raring to go-how could you not be ready for chocolate?  since this was a chocolate challenge, i decided to make them for valentines day with my husband and one of our daughters.   both of them are fans of chocolate, especially dark chocolate but being a pastry chef, i decided to customize my tart for them.  what that means is rather than dark and white chocolate chunks and chopped biscotti being added to the tart, i opted to use dark chocolate, peanut butter cups and peanut brittle.

 first, the dough mixes up incredibly fast in the food processor.
 rather than 6 small tartlettes, i made one 9″ tart
 as always, the marbles came out of the closet with a coffee filter to serve as pie weights
 perfectly baked!
 for the filling-egg yolks are whipped with sugar to the ribbon stage

 the booty-peanut brittle, mini peanut butter cups and bittersweet chocolate were folded into the mousse filling.

 the filling in the prepared tart shell before going into the oven
 after baking-the large tart took about 25 minutes at 350 to bake
fudgy perfection!  it was a huge hit with the husband and daughter-me too!!!
many thanks to this weeks hosts-looking forward to the next challenge.  bake on friends and if you dare, bake one and send me a photo-i will post it here!  see the tarts from all of the participants here

it’s a pie, it’s a cheesecake, no wait! it’s both, pie #51 of 52

so it was the week before thanksgiving and all through the house…wait, wrong story…well, it was the week before thanksgiving and i got completely derailed from my plan of posting this before the holiday.  it ultimately ended up being done in time for thanksgiving but sadly, not in time for anyone to see and attempt it.  hopefully, you will forgive me and then run out and buy the ingredients to try and bake one for the next big holiday celebration.

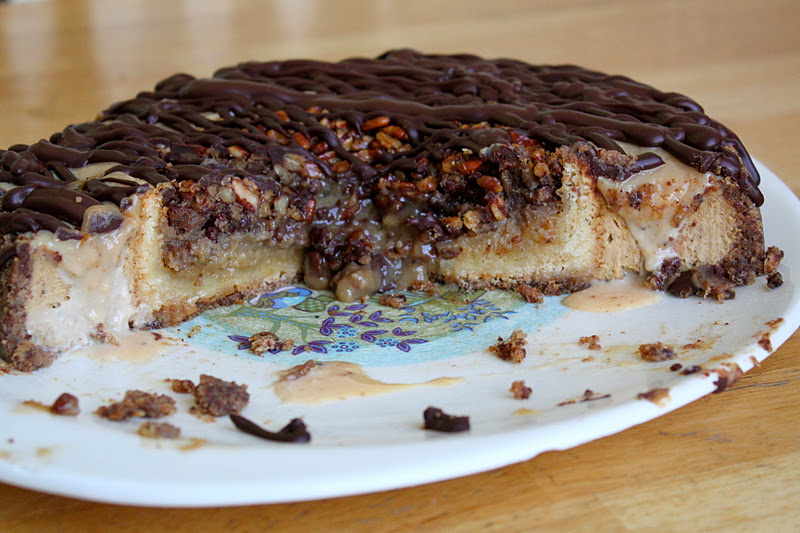
remember last year’s big thing-cherpumple cakes?  when i saw them posted all over the internet, i wanted to try one.  then i saw the recipe-frozen pies and cake mix…major disappointment! no time to play with that many scratch recipes this week.  instead i decided to bake my own version based on things my family enjoys.  there was one holiday season that after baking about a bejillion pies in the cafe, i refused to make any for our annual thanksgiving trash can turkey extravaganza.  needless to say, even though they enjoyed the pumpkin cheesecake i baked, they missed having a pie on the table.  this year i decided to combine two pies with a cheesecake and see what would happen.

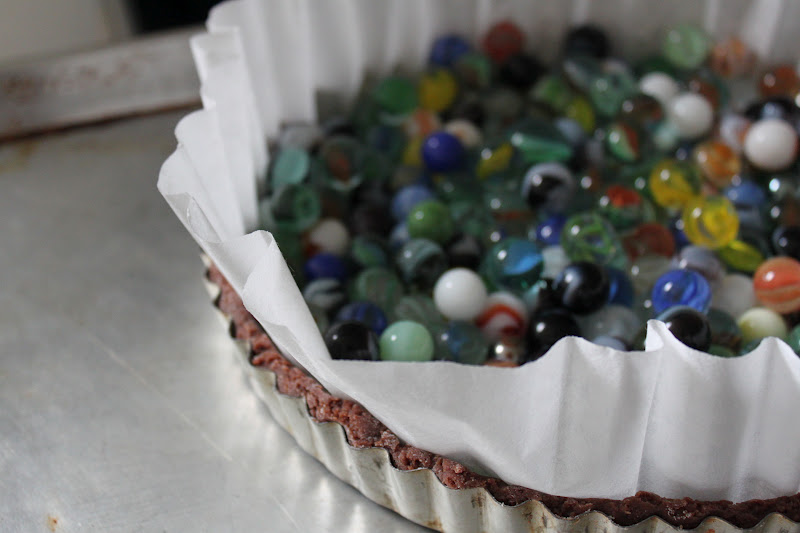
word of warning, this is not a quick dessert.  to do it right, right meaning so that it doesn’t fall apart, it will take you more than a day to complete, possibly 2 to 3 evenings if you have limited time to work on it.  another important note, i never use springform pans or a water bath to bake cheesecakes!!!  this recipe uses heavy gauge cake pans and if you follow the directions, the cake will work just fine.  you may even want to consider baking your cheesecakes in a cake pan all the time; it is so much easier to use than a springform pan and a water bath!

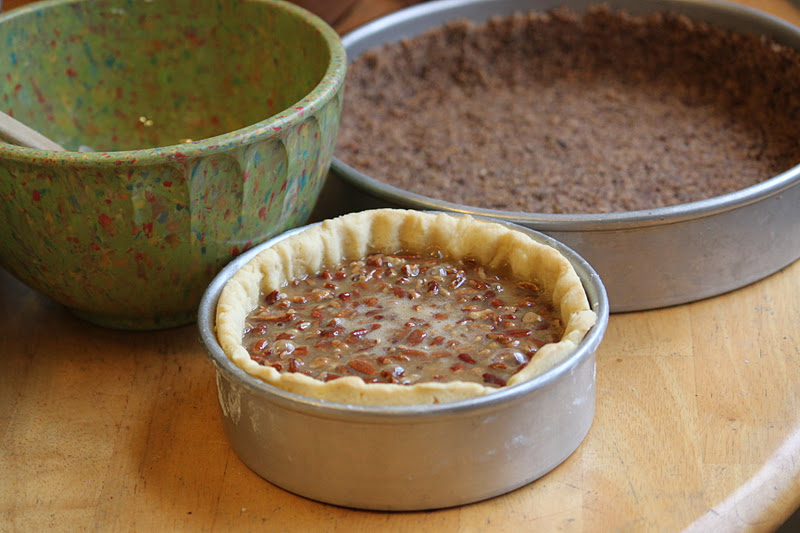
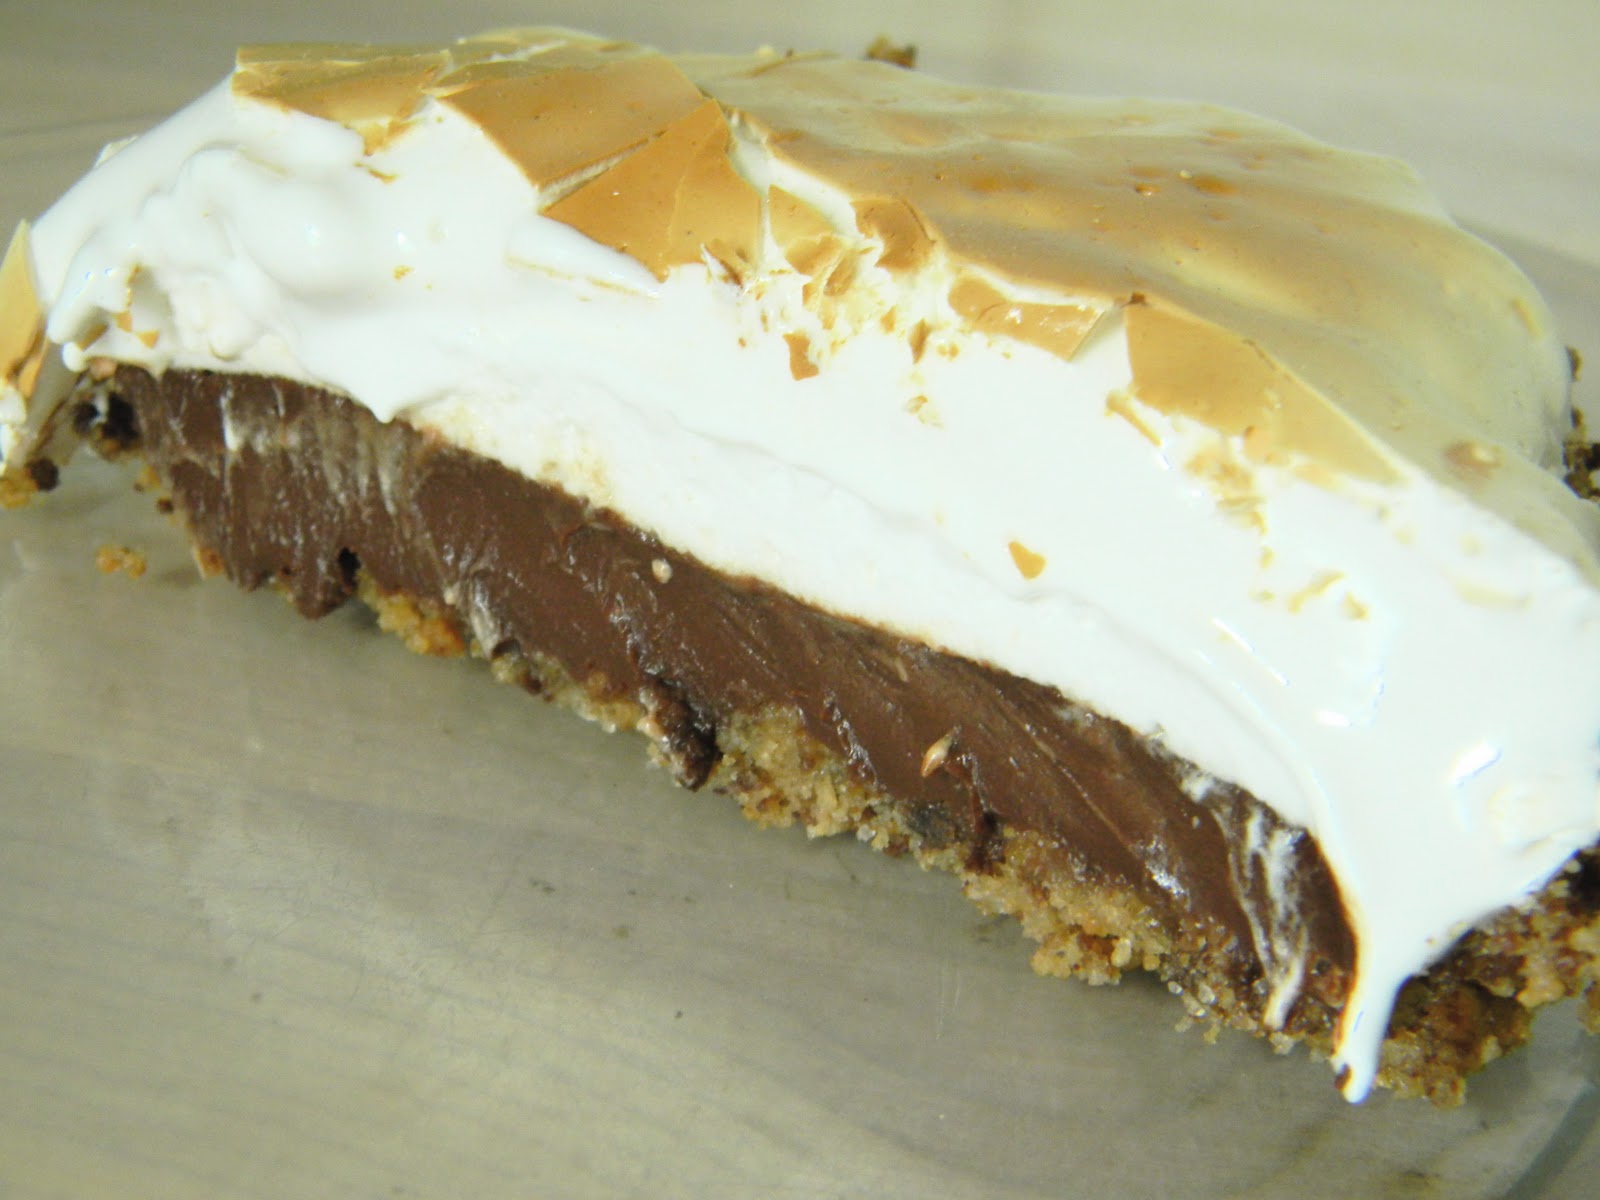
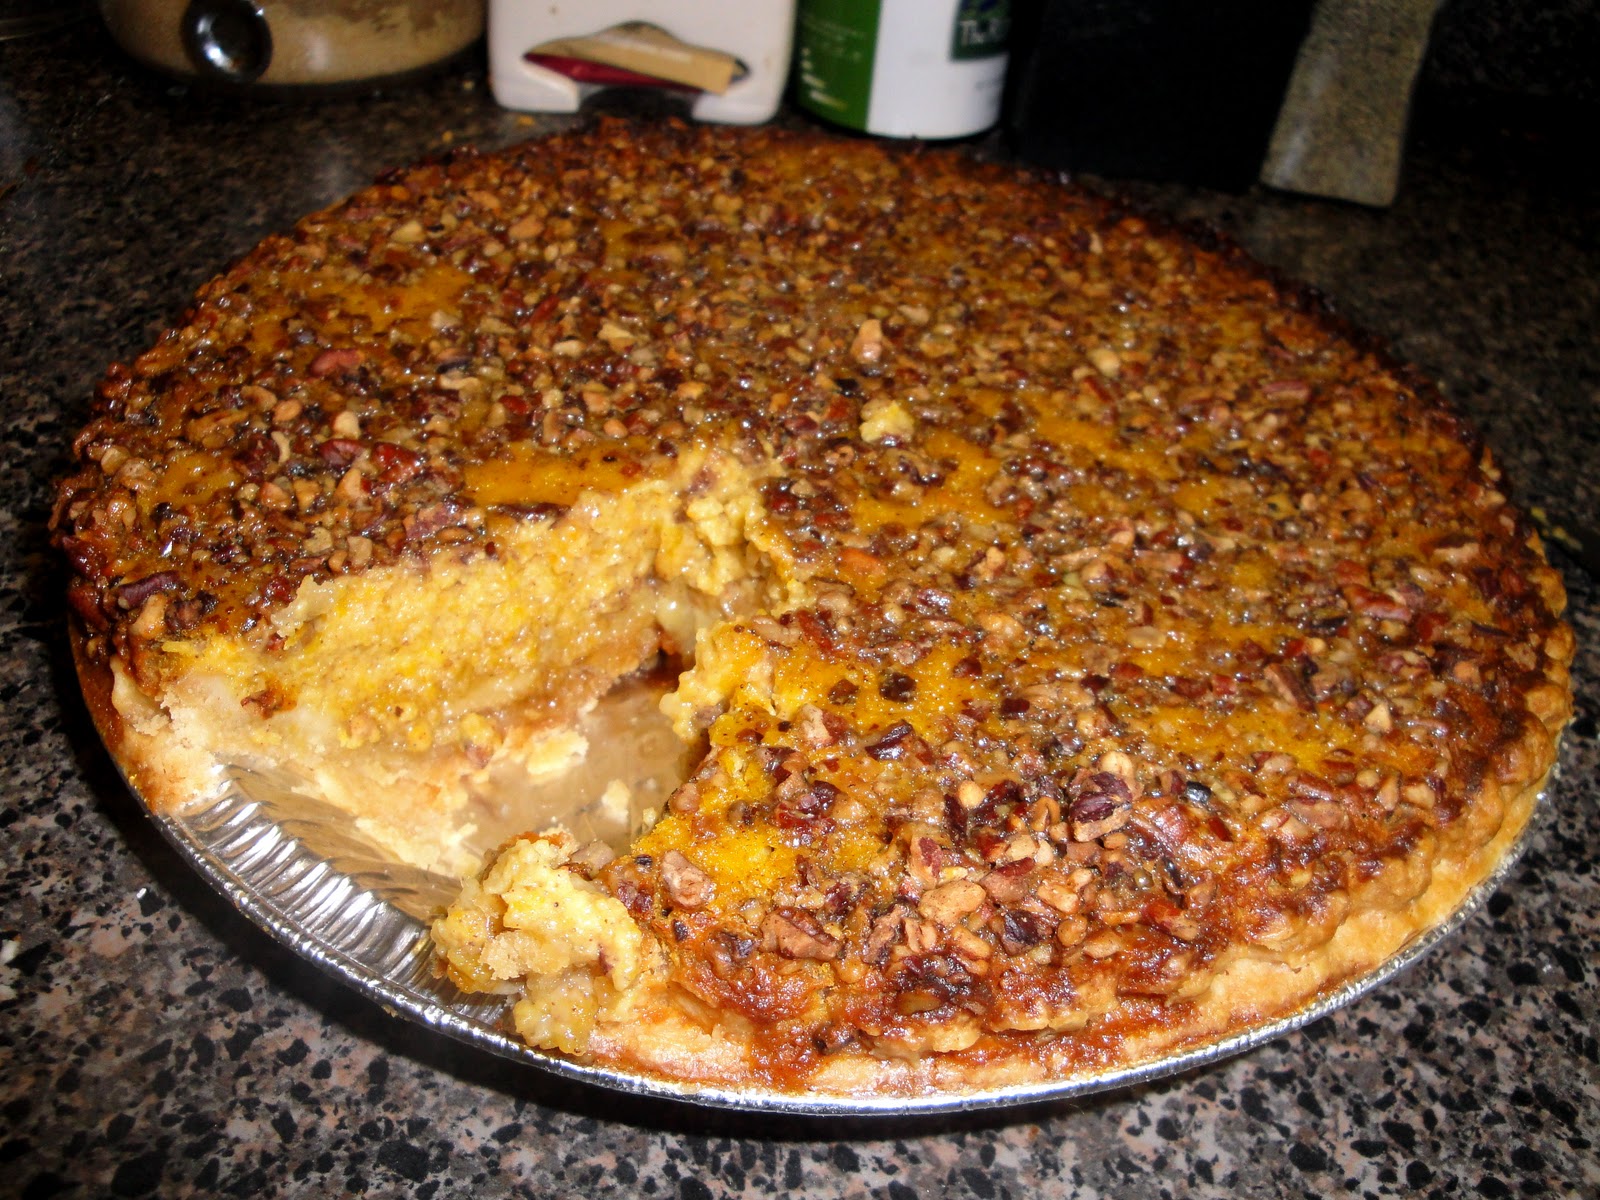
first step was to make half of a pecan pie in a 6″ cake pan.  it was so cute!  after baking it, i chilled it completely so that i could take it out of the pan without destroying it.  by gently warming the bottom over very low heat on the stove, i was able to turn the cold pecan pie out in one piece.  since the crust stood a little taller than the filling and got a little dark, i carefully cut it off using a serrated knife.

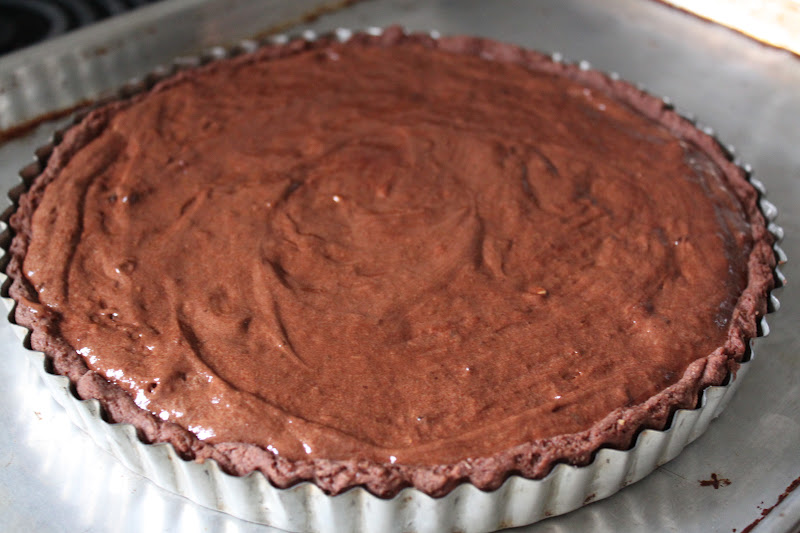
the cheesecake filling was quickly assembled in the food processor.  the cookie crust was pressed into a 10″ cake pan.  i set the pecan pie in the center of the crust and carefully ladled in the cheesecake filling.  it was baked and then completely chilled overnight before i set out to make the turtle pie topping.

the cheesecake is removed from the pan using the same method as the pecan pie.  cover a flat platter with plastic wrap and lightly spray it with pan spray.  gently warm the bottom of the cake pan, place the prepared platter upside-down over the cheesecake and invert it.  the cheesecake should slowly slide out of the pan.  then you can place your serving plate onto the bottom of the cake and invert it again.  sounds tricky but it works!

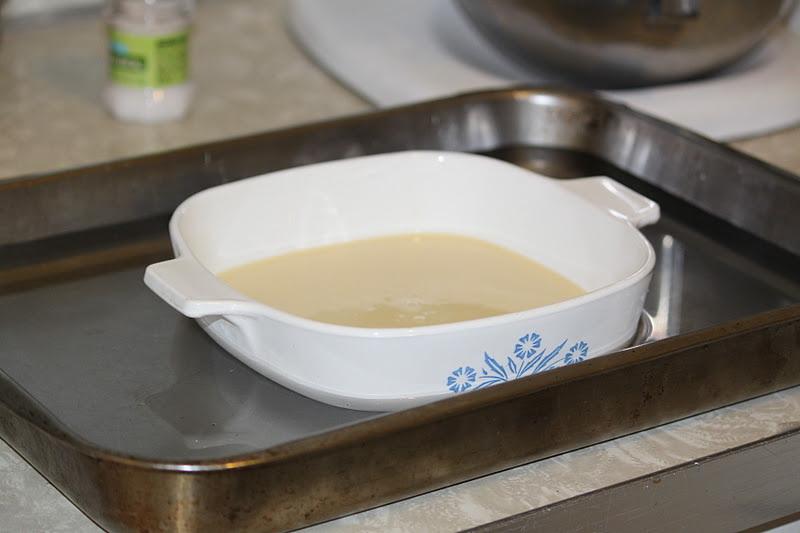
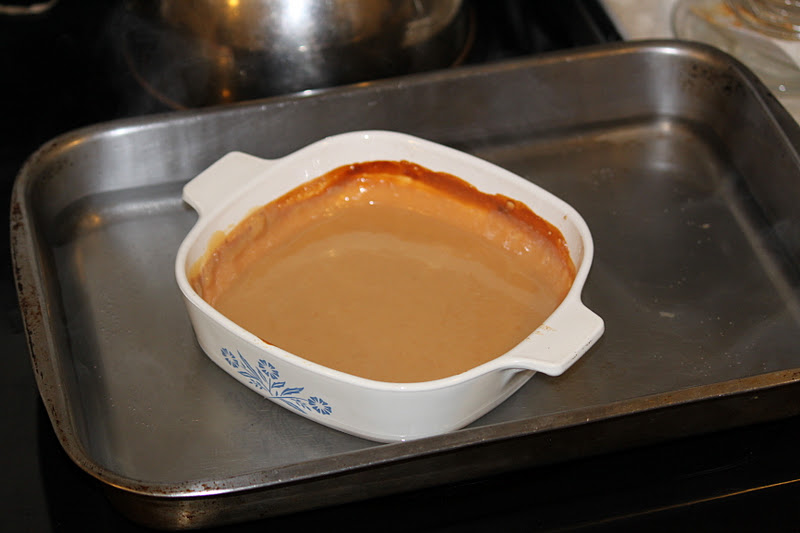
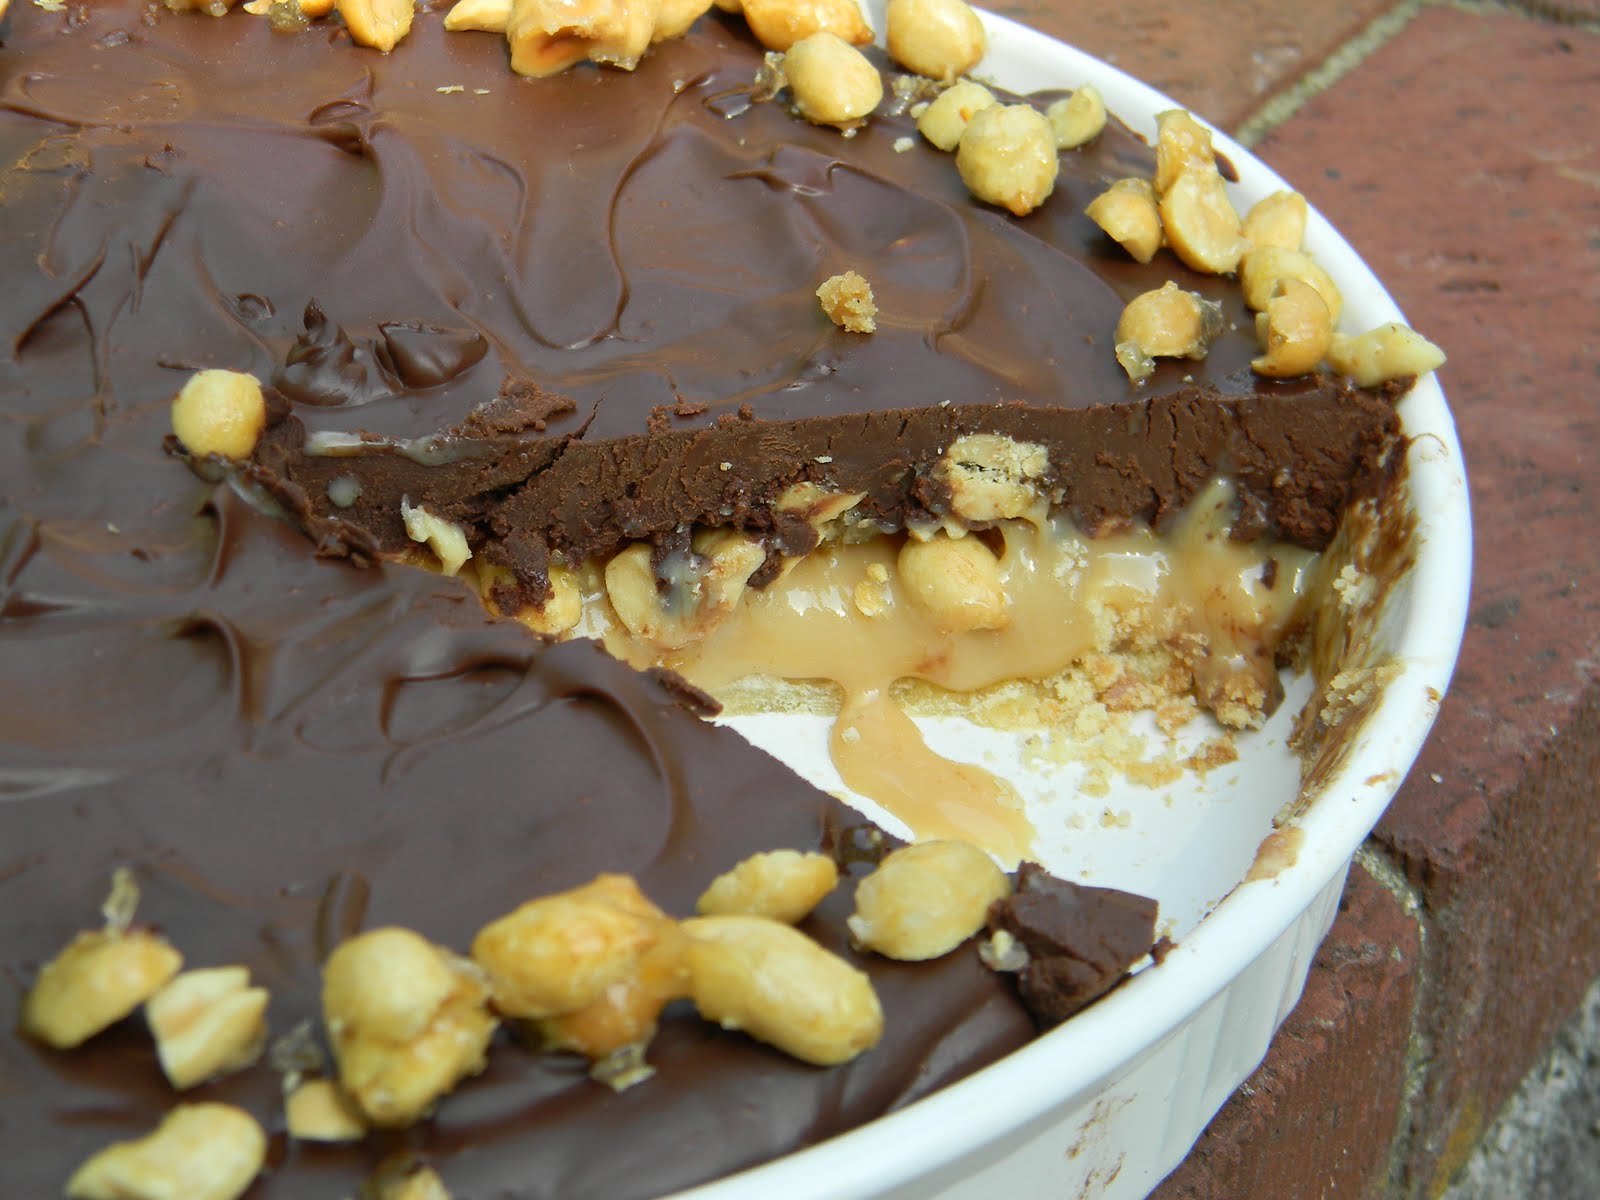
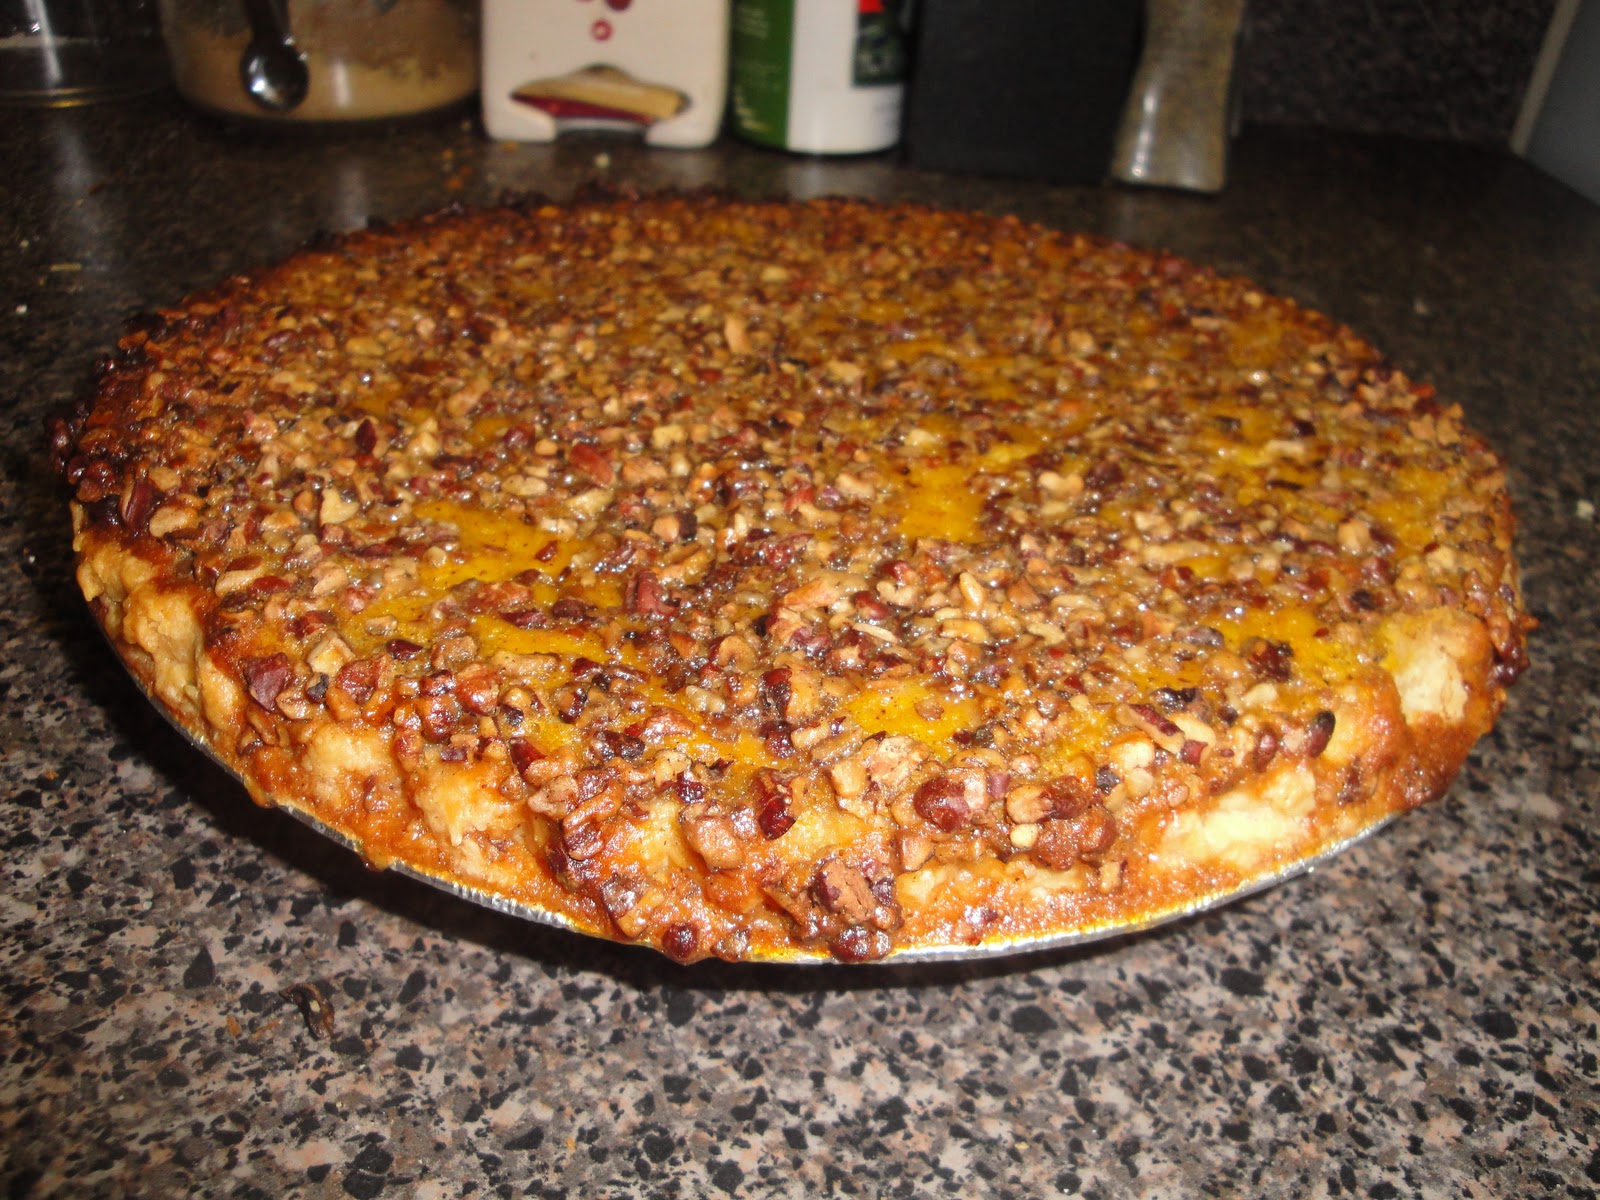
the turtle pie topping is made from a single can of sweetened condensed milk that has been baked to caramelize it.  on the left, straight out of the can and on the right, after two hours of baking. 

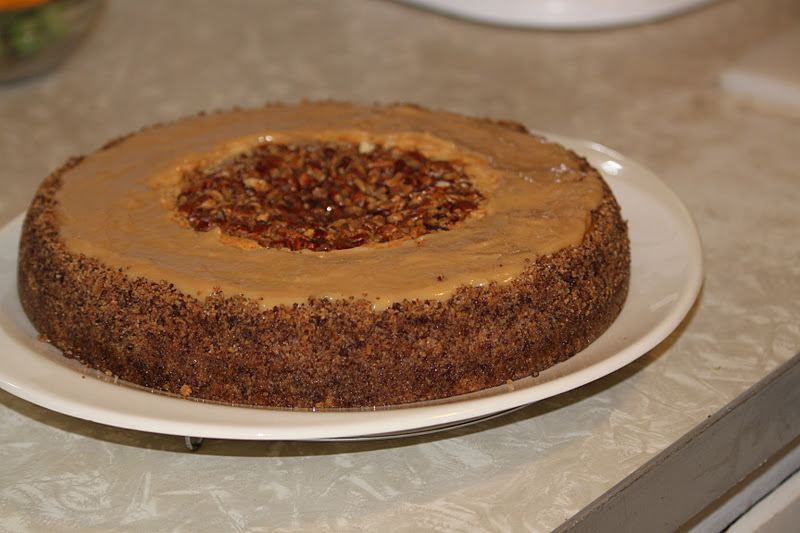
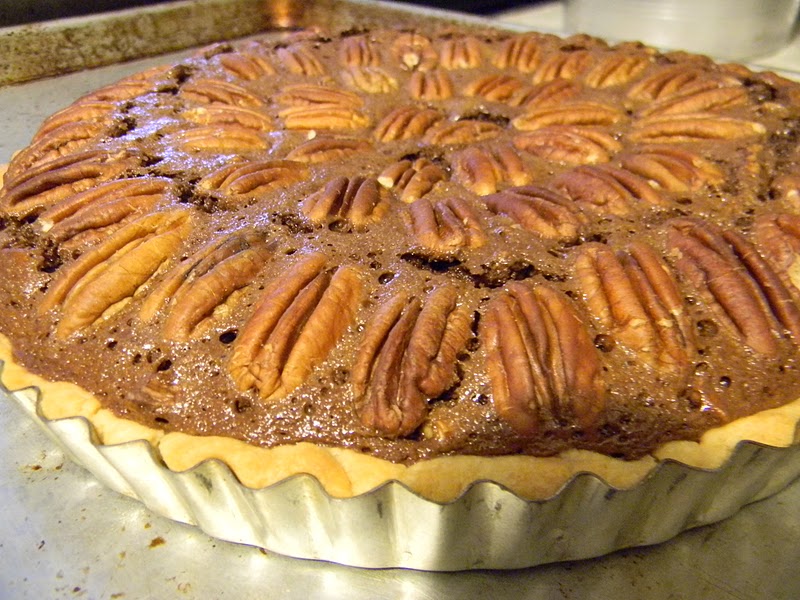
neatly spread the hot caramel over the cheesecake portion of the cake.  spread it out evenly.  then back into the fridge to chill it so the chocolate topping can go on.  the chocolate topping is made very quickly in the microwave and is easily applied to the pie with a piping bag.

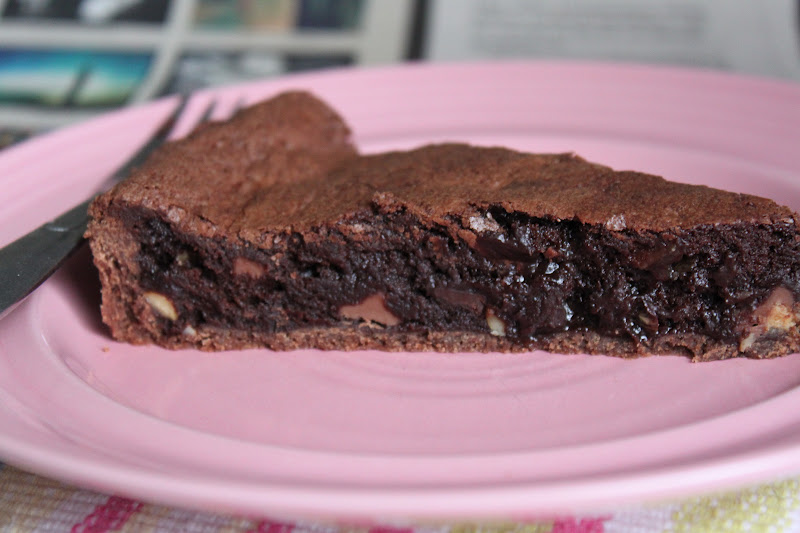
pecan pie in a pumpkin cheesecake
1 (10″) cheesecake serving about 14
pecan pie
6 tablespoons cold unsalted butter
1 cup all purpose flour
1/4 cup powdered sugar
1/4 teaspoon salt
1 egg yolk
1 tablespoon liquid-i used buttermilk
1/4 cup brown sugar
1/2 teaspoon vanilla
1/8 teaspoon cinnamon
2 tablespoons unsalted butter, melted
2 eggs
1/2 cup corn syrup
1 cup pecan pieces
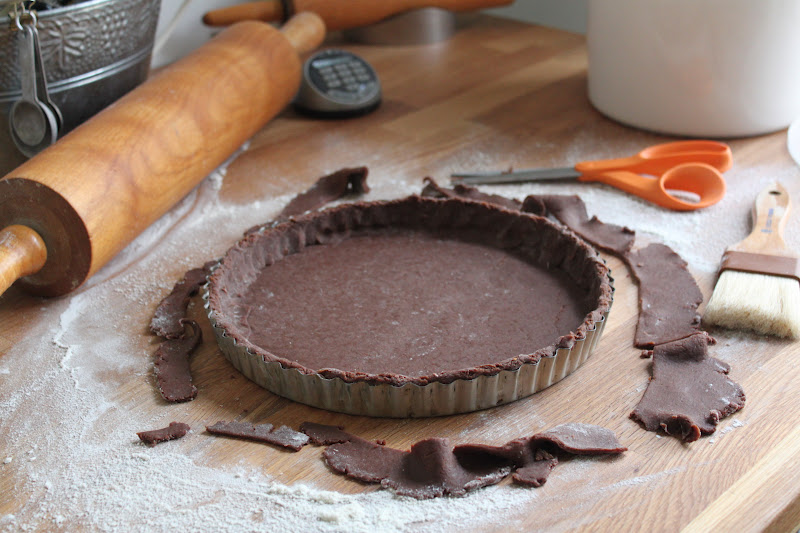
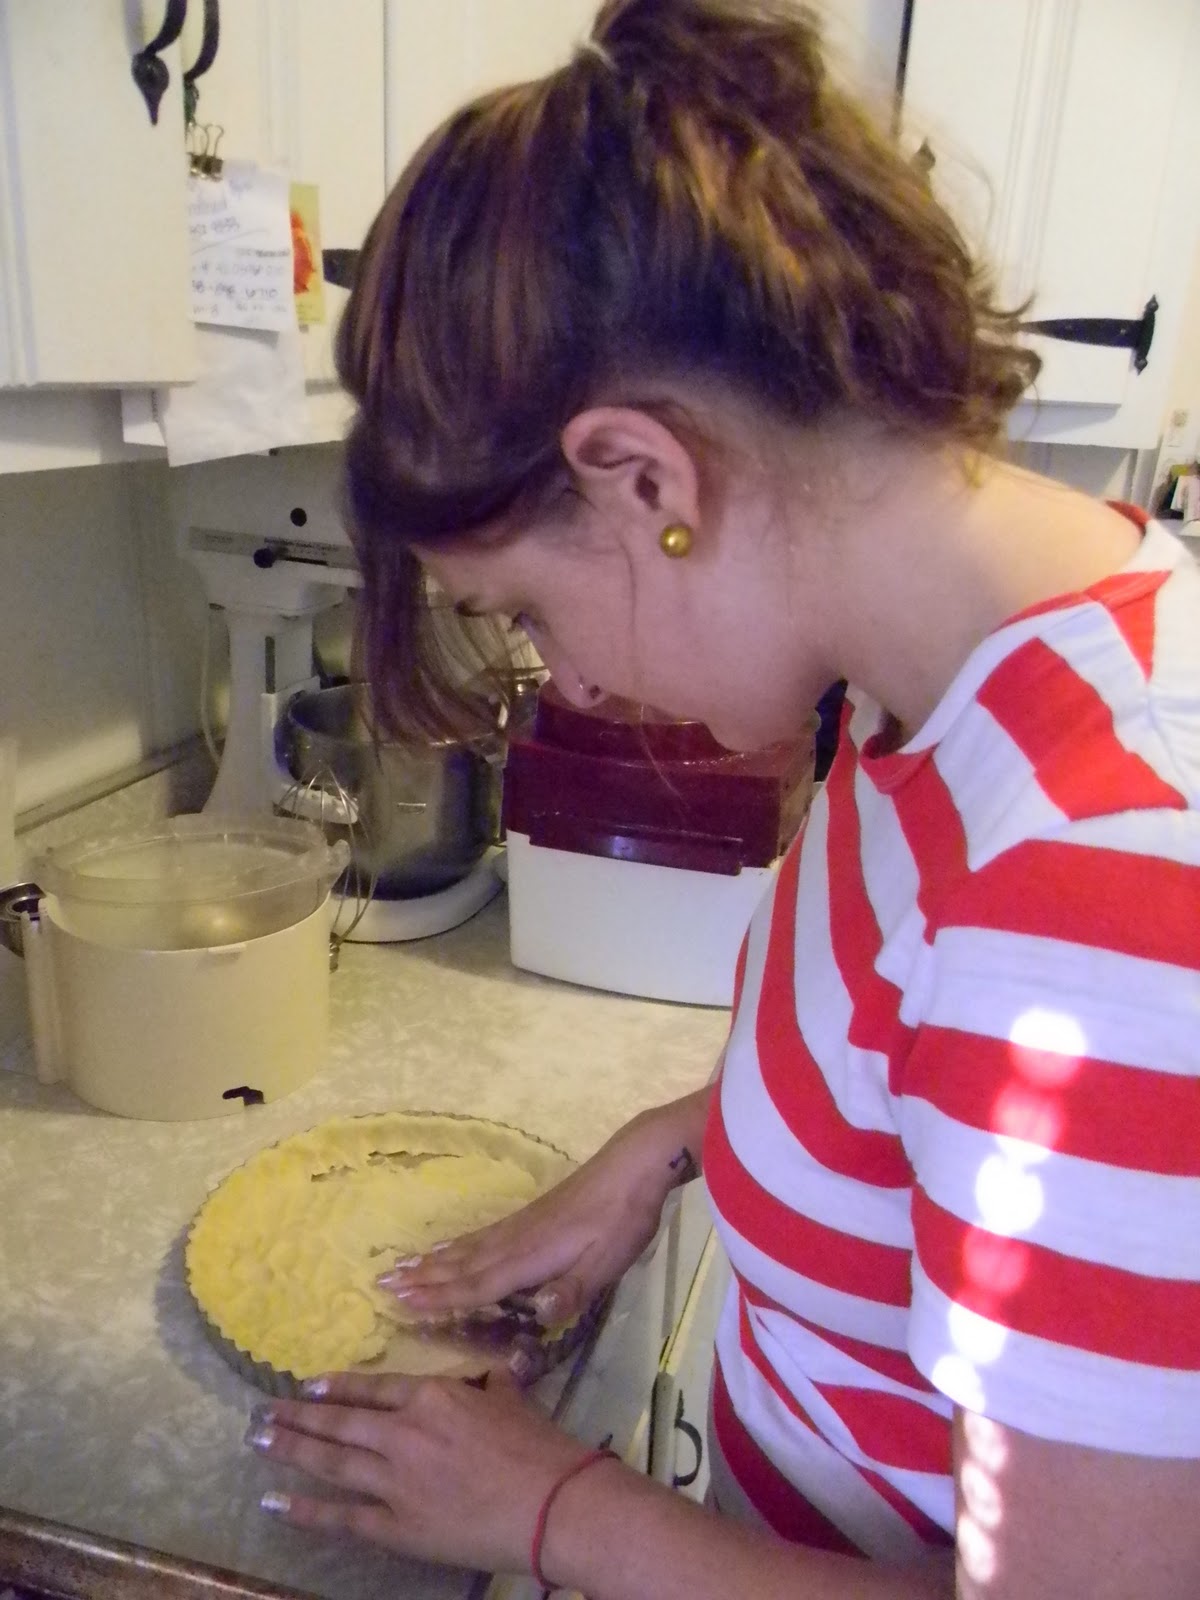
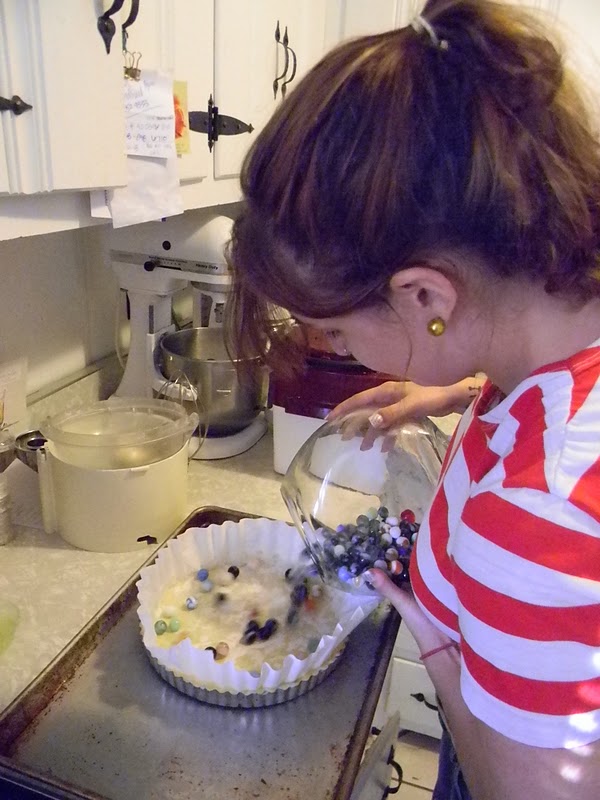
preheat the oven to 300.  cut the cold butter into small cubes.  place the flour, powdered sugar and salt into the bowl of a food processor.  sprinkle the butter cubes over the top of the dry ingredients and pulse together until it resembles a coarse meal.  add the egg yolk and the liquid and pulse until it forms a soft dough.  using your fingers, carefully press the dough into a greased 6″ cake pan.  line the crust with paper and fill with weights and bake until it is no longer glossy on the bottom and it barely shows any color, about 30 minutes.  
while the shell partially bakes, make the filling by mixing the brown sugar, vanilla and cinnamon in a bowl.  whisk in the butter and mix until smooth.  add the eggs, one at a time and mix each one in completely.  finally, whisk in the corn syrup.  when the crust is ready, remove from the oven, turn the oven temperature up to 350 and carefully remove the weights and the paper from the pan.  place the pecans in the crust and pour in the custard filling.  return the pan to the oven and bake it until it is set all the way across, about 40 minutes.  allow the pie to cool and then chill it until it is completely cold and unmold the pie as described above.
pumpkin cheesecake
2 cups cookie crumbs
4 tablespoons sugar
6 tablespoons unsalted butter, melted
1 pound cream cheese, softened
2/3 cup pumpkin puree
1/2 cup dark brown sugar
2 tablespoons all purpose flour
1 1/2 teaspoon pumpkin pie spice
4 eggs
1/3 cup sour cream
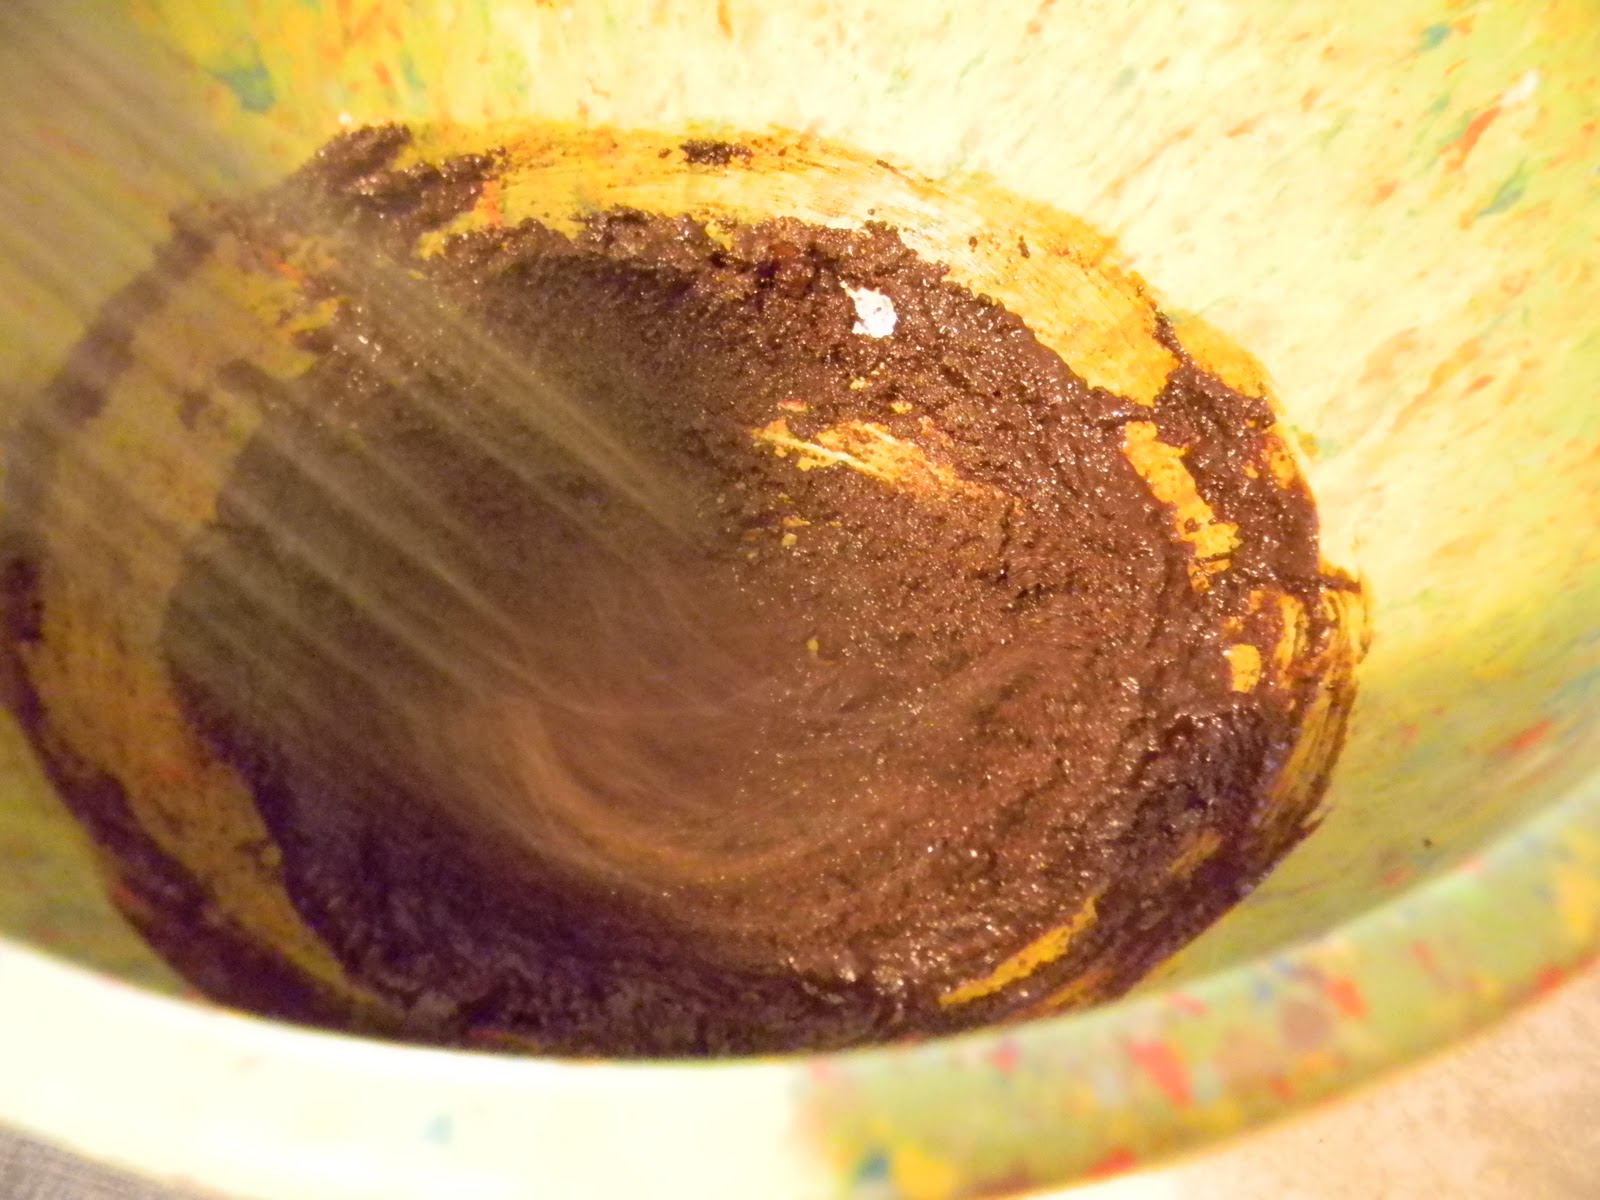
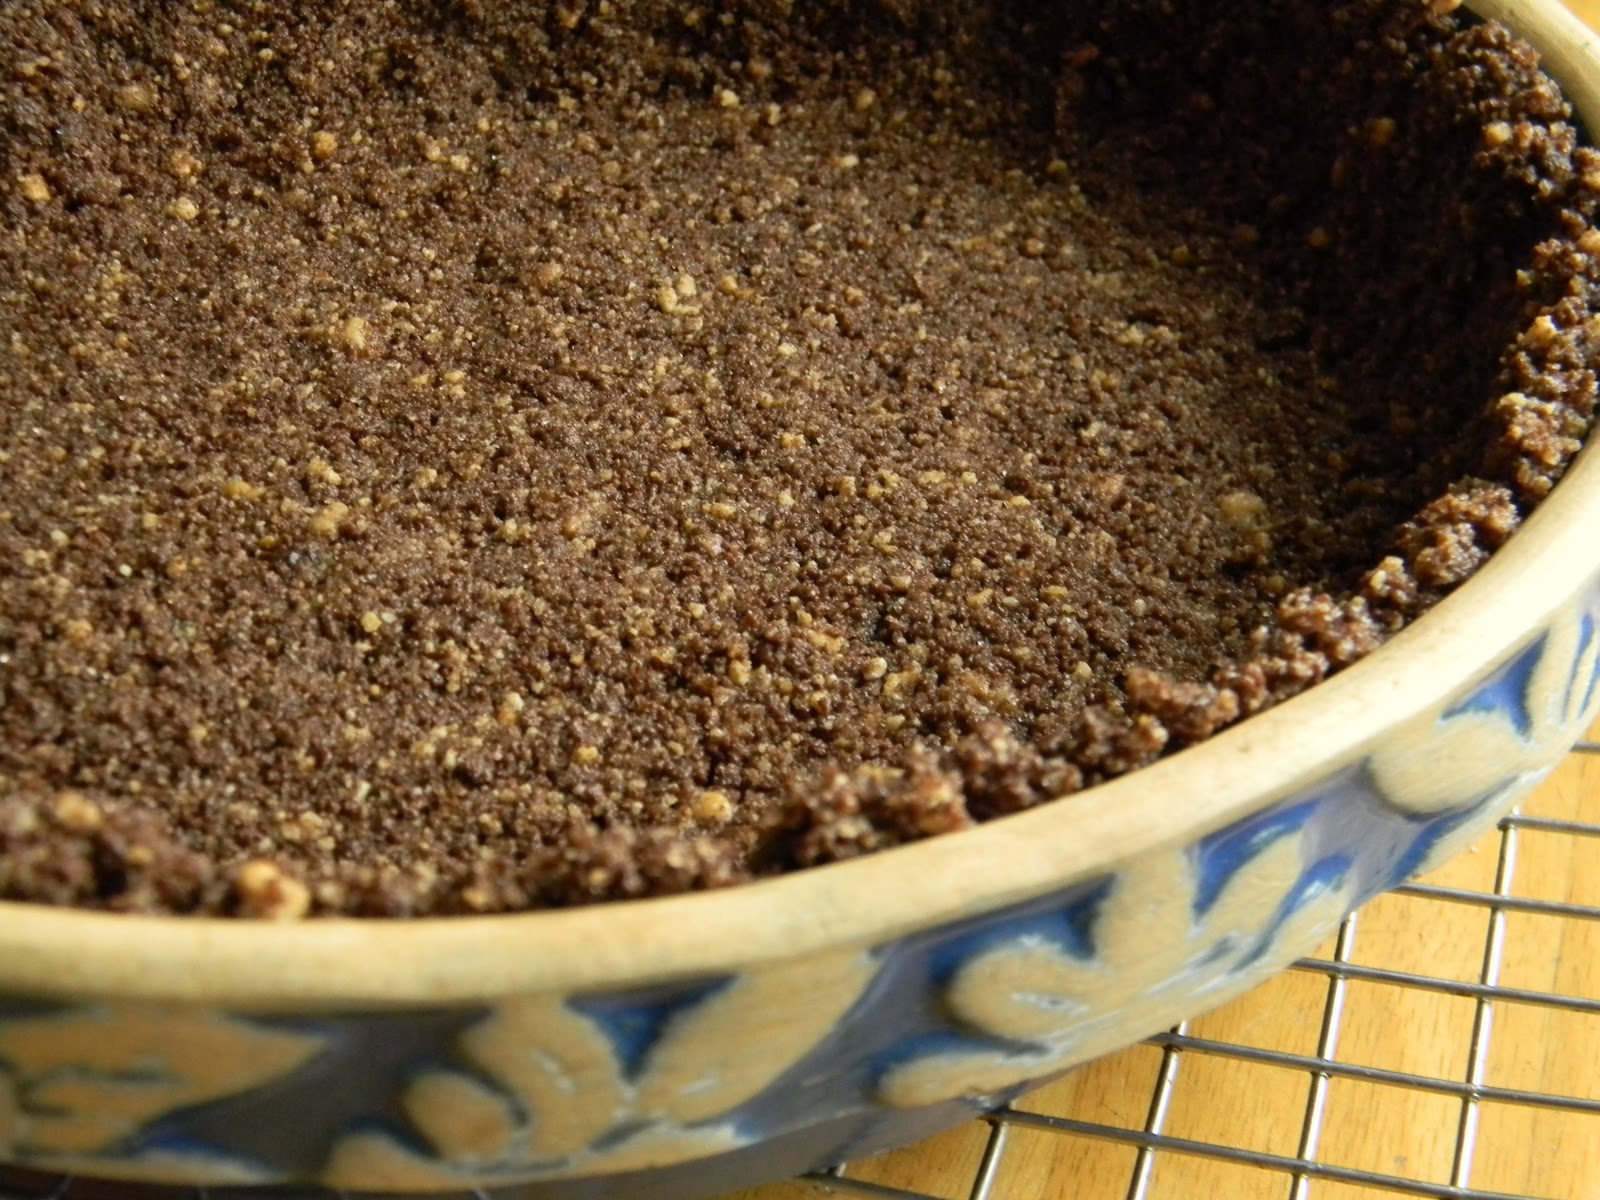
preheat the oven to 300.  make the crust by combining the cookie crumbs, sugar and butter.  carefully press the mixture into a greased 10″ cake pan.  to mix the filling, place the cream cheese, pumpkin, brown sugar, flour and spice into the bowl of a food processor.  pulse to combine and be sure to scrape the bowl at least once.  with the machine running, add the eggs 1 at a time.  scrape the bowl again and add the sour cream.  pulse it, scrape it and pulse it again.  
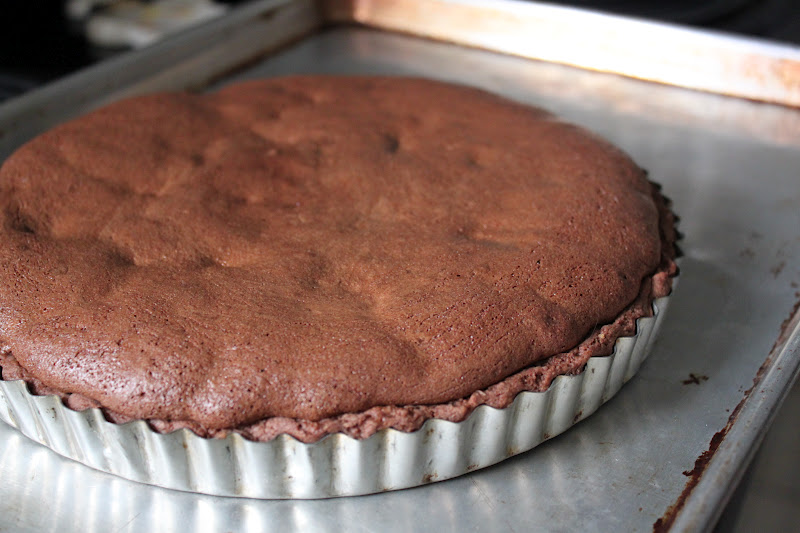
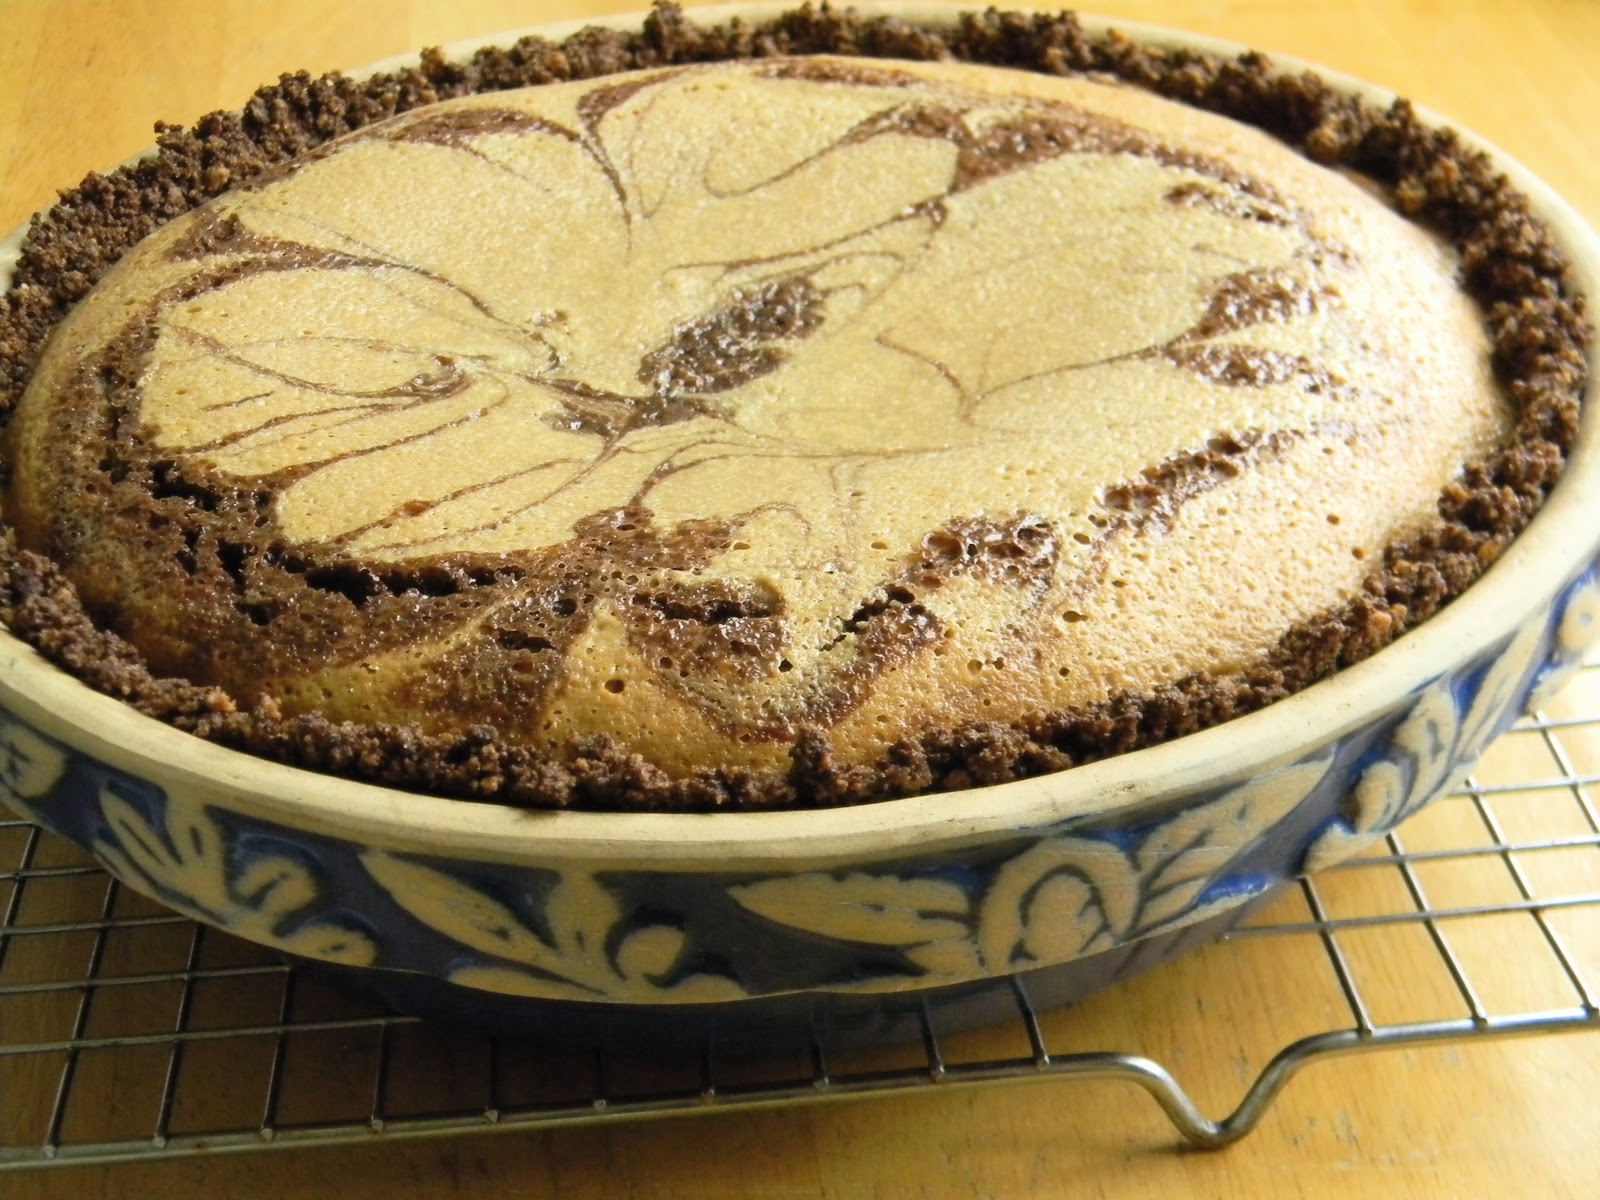
to assemble, place the cold pecan pie in the center of the cheesecake pan.  carefully spoon the filling around it without getting any on top of the pecan pie.  bake the cake for 45 minutes then carefully run a knife around the edge of the cake to release it from the pan and prevent cracking.  turn the oven off and leave the cake in the oven with the door just slightly open for 15 minutes.  remove from the oven, the cheesecake should be slightly puffed and feel almost firm to the touch.  let it cool and then chill it overnight before proceeding with the turtle pie topping.
turtle pie topping
1 (14) ounce can sweetened condensed milk
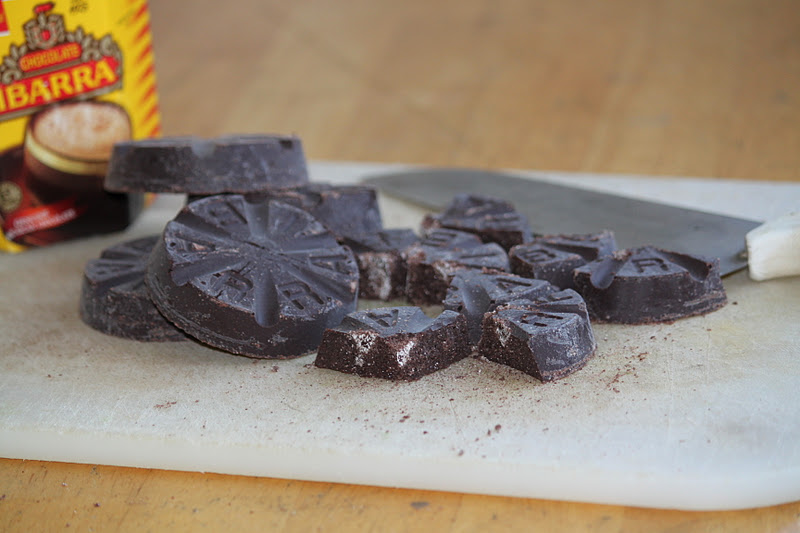
4 ounces bittersweet chocolate
1/4 cup half and half
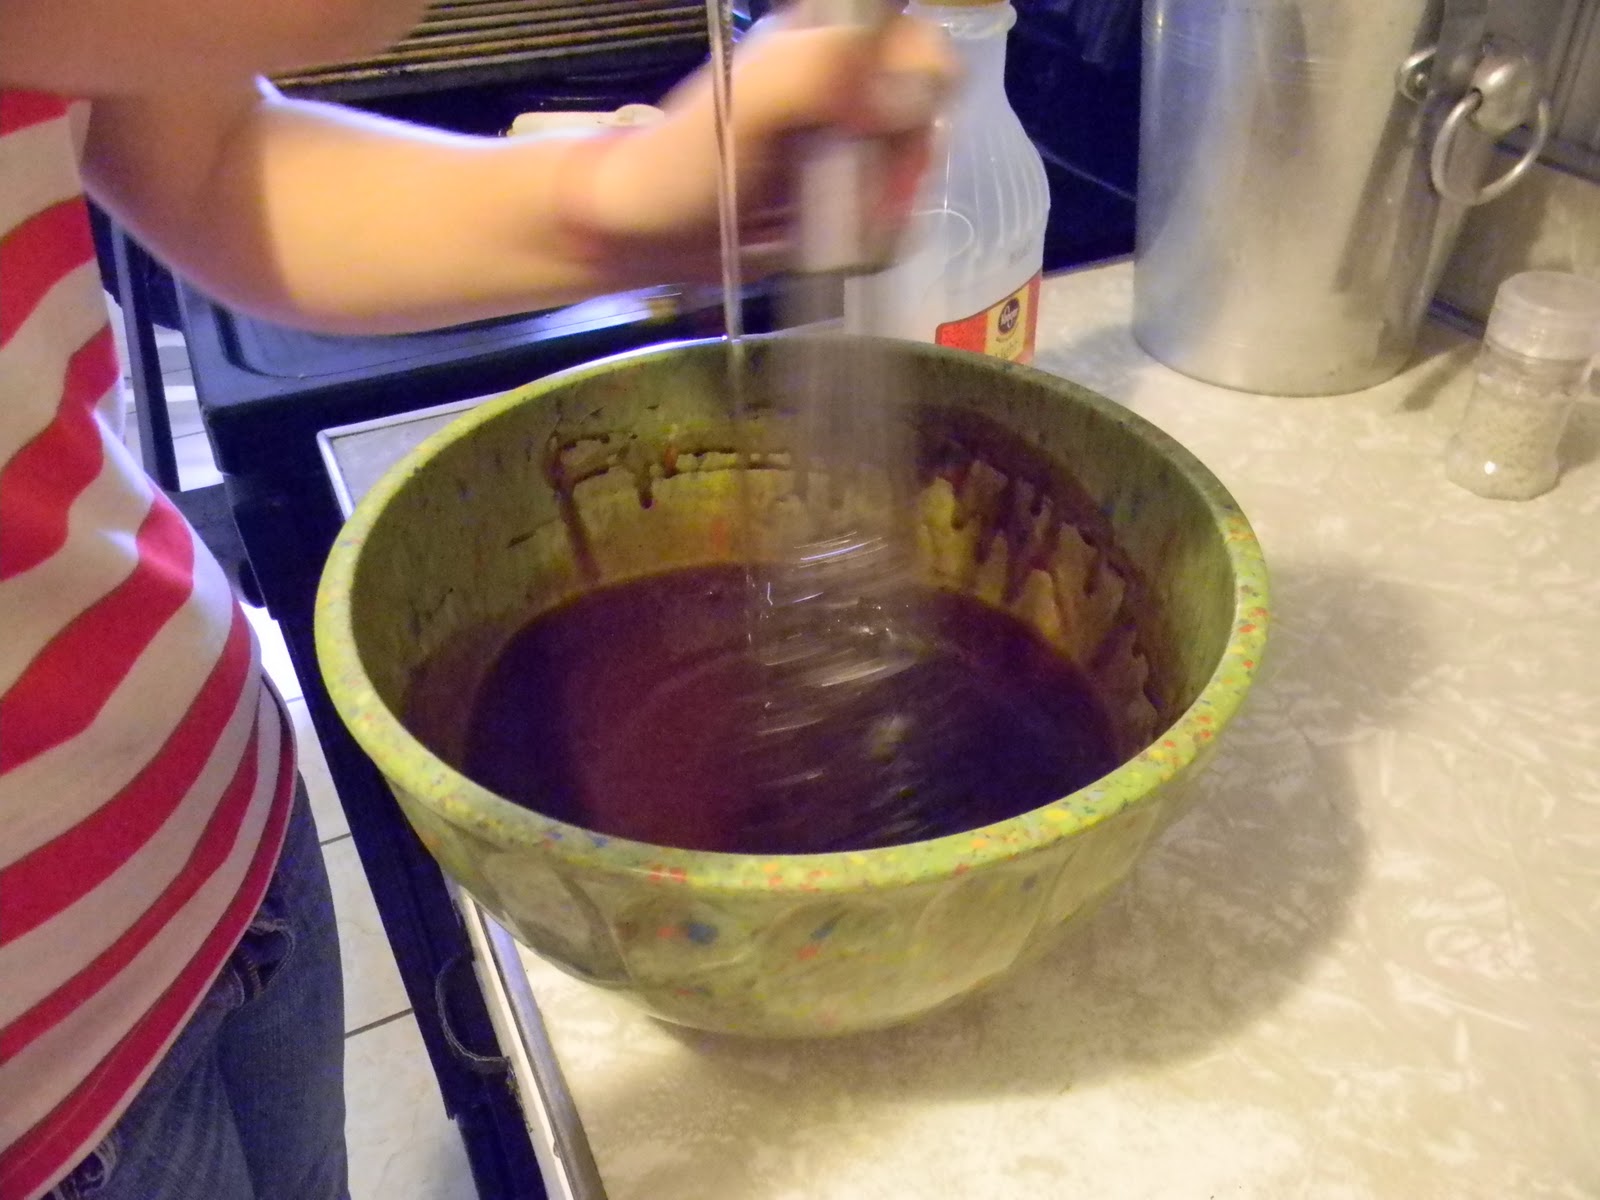
heat the oven to 350.  pour the sweetened condensed milk into a small covered casserole dish.  place the dish in a pan of water so that the water comes up to the same height as the milk.  carefully place in the oven and bake.  every 30 minutes, remove the pan from the oven and whisk the milk completely to ensure even caramelization.  this will take about 2 hours and during that last 30 minutes, you may have to do this a little more often to prevent scorching.  using the photos above as a guide, top the cheesecake portion (after you have taken the cake out of the pan!!!) with the caramel.  chill completely before topping it with the chocolate mixture.

break up the chocolate and place in a microwave safe bowl.  add the half and half and using 15 second intervals, heat on the lowest setting until the chocolate melts.  stir it until smooth.  place in a piping bag with a small (#4 to #6) straight tip and make the lattice top by using a quick back and forth motion.  turn the cake a 1/4 turn and repeat the action to get a chocolate lattice design.  allow the cake to chill for about 30 minutes to set the chocolate.

and now that my food coma is lifting, bake one and send me a photo-i will post it here!  bakinbabe116@aol.com

mexican chocolate tart with cinnamon toast crunch crust, pie #50 of 52

pie # 50…have to let that sink in for a minute.  i realize that it is a little late in being posted but that couldn’t be avoided-i lost 3 weeks when the house was robbed and i am still trying to get back to normal, don’t know if i ever will.  last two pies will be part of our trashcan thanksgiving extravaganza so look for them this week.

anyway, since the kids are both out of the house for the foreseeable future, my husband and i have been able to find the bottom shelf of the pantry closet as well as see to the back of it.  amazing what has been lurking in there.  i found two boxes of ibarra chocolate and the unopened box of cinnamon toast crunch cereal that i purchased for a visiting 6 year old-had no idea that a 6 year old wouldn’t like cereal that was sweet.  no matter, it makes a fantastic crust for a no bake tart.

the chocolate is flavored with cinnamon and almonds and is rather grainy in appearance due to the sugar crystals.  ibarra is meant to be used for hot chocolate style drinks but it has long been a favorite of ours for cooking and baking.  my husband will drop a puck into a pot of chili and i have favored it blended with bittersweet chocolate to dip biscotti in, specifically my blue corn pecan biscotti.  

to make the crust, i crushed the cereal after i measured it.  don’t turn it into a powder but rather a collection of crumbs that are not completely uniform in size.  to punch up the almond flavor, i toasted some almonds in a skillet on the stove so the tart was truly a no-bake tart!

mexican chocolate cinnamon crunch tart 
1(9″) tart serving 8-10
crust
1/2 cup sliced almonds
4 cups cinnamon toast crunch cereal
1/4 cup sugar
6 tablespoons unsalted butter, melted and hot
toast the almonds in a skillet over medium heat until they are golden brown-be sure to watch them constantly as they will color quickly.  remove from the heat and turn them out onto a plate to cool.  using your hands, crush the cereal in a bowl until it is mostly small crumbs with some powder and very few large pieces.  roughly chop the almonds so that they are roughly the same size as the cereal crumbs.  add the almonds, sugar and hot butter and mix to combine.   dump the mixture into a tart pan with a removable bottom and press it evenly up the sides and across the bottom.  set aside.
chocolate filling
9 ounces ibarra chocolate-i used 3 pucks
3 ounces bittersweet chocolate
2/3 cup half and half
place the ingredients in a microwavable bowl and using the lowest setting, heat it in 30 second intervals taking the time to stir the mixture after each heat cycle.  when the chocolate has all melted and is smooth, pour it into the prepared crust and make the white chocolate swirl.
white chocolate swirl
1 1/2 ounce white chocolate
1 tablespoon half and half
mix the ingredients in a microwavable bowl and heat it on the lowest setting until it is melted, about 30 seconds.  stir until smooth and then using a small spoon, drizzle all over the top of the tart.  take a tooth pick and swirl the white chocolate into the tart so that it is marbleized.  carefully place the tart in the fridge to cool and set for at least 2 hours.  to serve, remove the ring and carefully insert a thin palette knife between the crust and the metal bottom.  move the palette knife around to completely release the crust and then slide it onto a flat serving platter.  to cut, use a hot, wet knife taking care to completely clean the blade between slices for perfect cuts.
and as always, make it and send me a photo, i will post it here.  bakinbabe116@aol.com

baking sweet memories with my daughters, part 1: chocolate pecan tart, pie #42 of 52

it has always been a hope of mine that my two daughters will embrace the art of home made food.  to me, a well made meal is an event and when shared with family, there isn’t much out there that can top it. over the years, both of my girls have shown a desire to bake, mostly cookies with the occasional cake thrown in.  but with all of these pies i have been baking, i have wanted to spend an afternoon baking a pie with each of them.  this last week, i finally got that wish.  alix was home for a visit and to help her sister get packed for the big move west and i took advantage of the time to bake a tart with alix.  when asked what kind of pie she would like to make, she chose chocolate pecan-you can’t go wrong with chocolate and when you add pecans, it’s even better!


we quickly mixed up a batch of tart dough using the food processor and alix pressed it into the pan with her fingers-no rolling pin required!  be sure to use a tart pan with a removable bottom to make cutting serving the easy.


using my foolproof method for partially baking a tart/pie shell, alix lined the shell with a large coffee filter and filled it full of marbles-my choice of pie weights.

while the tart shell baked, we mixed up the filling.  for a smooth filling every time, it is important that the ingredients are combined in the proper order.  otherwise, the custard separates in the oven and it the chocolate will float to the top.  to emulsify the filling, the brown sugar is whisked with the melted butter and chocolate mixture, the cinnamon and vanilla.  then the eggs are whisked in one at a time.  the final addition is the corn syrup.  be sure to scrape that bowl as you go.

alix whisking in the corn syrup-gotta love the action shots!

toast the pecans if you like and then chop them up and fill the shell with them.

pour the custard over the chopped nuts
decorate it with pecan halves

baked to fudgy perfection!  let it cool completely before removing it from the pan or it may crumble

chocolate pecan tart
serves 8
for the tart shell, use half of the recipe for tart dough from pie #39.  freeze the second half for another time and partially bake the tart shell at 325 for 20-25 minutes.  the dough should no longer look glossy and it will not have begun to color.  remove the weights and proceed with the recipe.
filling
1 cup pecan pieces
3 tablespoons unsalted butter
1.5 ounces unsweetened chocolate
3/4 cup brown sugar
1 teaspoon vanilla
1/4 teaspoon cinnamon
3 eggs
3/4 cup corn syrup
pecan halves to decorate the tart, at least 1 cup
preheat the oven to 350.  toast the pecan pieces on a baking tray until fragrant, about 5-7 minutes.  place the pecans in the partially baked tart shell.  melt the butter and the chocolate together by placing them in a microwave safe bowl and using the lowest power setting.  place the brown sugar in a mixing bowl with the vanilla and cinnamon.  whisk in the melted chocolate and butter.  whisk in the eggs, one at a time.  be sure to scrape the bowl between additions.  finally, whisk in the corn syrup and pour the custard into the prepared tart shell.  carefully arrange the pecan halves on the top of the tart.  bake until it puffs up and is almost set in the center, about 30-35 minutes.  allow the tart to cool completely before removing it from the pan or cutting.
as always, if you bake one, send me a photo and i will post it here.  may the power of pecans be with you…bakinbabe116@aol.com

all american brownie pie, #31 of 52

so, it was the afternoon on july 4th.  we had already come back from the hot chicken fest-and were totally fried, literally(read the previous post) and i realized that i hadn’t baked my pie for our barbecue party.  my ideas of a fruit pie were shelved for something much simpler-a crustless brownie pie.  i know, that’s a bit lame to call it a pie but in my own defense, i was sun-fried and overheated not to mention short of time.  brownie pie it is…

some brownies recipes call for whipping the eggs and sugar, and this recipe is one that instructs you to whip them to a ribbon.  but just what is a ribbon?  it is easily defined as a slowly dissolving mound of batter as it falls from the beater.  if you look at the photo to the left, you can see that the batter is slowly mounding and that the mound is slowly smoothing out.  ok, some imagination is needed but keep in mind that i held the beater with my left hand and worked the camera (somewhat clumsily) with my right hand and in that time frame, the mound built and dissolved.

baking a brownie in a glass or pottery pie dish makes it easy to serve as a dessert-just cut into wedges and serve with ice cream, caramel, whipped cream or any other garnish that you like.  this quick recipe mixes up in less than 15 minutes and can be baked and ready to serve in an hour and a half.

quick and easy brownie pie
1 (9″) pie serving 8-10
3 eggs
3/4 cup sugar
1 teaspoon vanilla
3 ounces unsweetened chocolate
4 tablespoons unsalted butter
1/2 cup self rising flour
3 tablespoons cocoa powder-natural not dutched
heat the  oven to 350.  grease a deep 9″ pie dish and set aside.  in a mixing bowl on medium speed, whip the eggs with the sugar and vanilla until it forms a thick ribbon (see photo above).  while the eggs whip, melt the chocolate and butter in the microwave on the lowest setting.  fold the butter and chocolate into the egg mixture.  sift the cocoa and flour over the batter and carefully fold it until it is mixed and no streaks remain in the batter.  pour into the pie dish and bake until slightly fudgy when tested with a pick-about 40 minutes.  allow it to cool about an hour before cutting.  serve it with ice cream, whipped cream, hot fudge, caramel…the list goes on and on
and if you dare to bake one, snap a photo and send it to me, i will post it here!
bakinbabe116@aol.com

better late than never: pie #24-snickers bar pie

while it might seem that i have given up on this challenge-believe me, i haven’t.  our younger daughter graduated from high school and with that occasion came all kinds of fan fare and family.  for the last two weeks, i have managed to make all of my pies but have not had the time to sit down and share them. 
when younger, much younger, my husband and i thought it would be exciting to move around the country.  we worked in restaurants which made finding jobs easy.  it also meant leaving behind friends and family.  we had reached a crossroad of sorts 16 years ago when my uncle was killed by a reckless driver.  we made the decision to move closer to my family on the east coast.  despite our good intentions, we didn’t quite make it and now find ourselves still missing out on the chance to see them.  time flies, we often go a year or more between visits and in that time, our girls have grown up.  to have the chance to spend some time with my mom was great and the chance to share some pies with her was fun too.  
so first up is the snickers pie.  anything that has chocolate, caramel and candied peanuts works for me and most of the family too. in an effort to save time, i used a recipe i found online and made subtle changes to adapt it to pie size rather than a small square baking pan.  
a few notes to start with:  the crust was really greasy when i prebaked it.  actually, there was a lot of fat in the recipe in relation  to the amount of flour and i cannot help but think that there is a typo in it.  if you choose to follow the recipe, consider using a different crust.   while i could have just used the dulce de leche called for in the original recipe, i chose to caramelize sweetened condensed milk since i had a small collection of cans in the closet.
snickers pie
adapted from dorie greenspan by way of the naptime chef
1 (10″) pie serving 10-12
caramel filling
2 (14oz) cans of sweetened condensed milk
preheat the oven to 350.  place the milk into a covered casserole dish and place the dish into a larger pan.  pour in enough hot water  to reach the same level as the milk.  place the pans in the oven and bake until a deep golden brown (darker than the photo above-i wasnt happy with the consistency).  it will take as long as 2 hours and you will need to stir it and whisk it every 20 minutes to gain an even tone.  while this bakes, make and bake the crust, recipe follows.  pour the caramel into the prepared crust, press a piece of plastic wrap to the surface andchill it completely-at least several hours or overnight.
crust
1 cup all purpose flour
1/4 cup sugar
2 tablespoons powdered sugar
1/4 teaspoon salt
8 tablespoons unsalted butter, cold and cut into small cubes
1 egg yolk
preheat the oven to 350.  place the flour, sugars and salt into the bowl of a food processor and pulse to combine.  add the cubed butter and pulse a few times to cut in the butter but only until the mixture resembles coarse meal.  add the yolk and pulse to combine and forms a ball of dough.  press this dough into the bottom of a 10″ pie dish which has been lightly greased.  prick the crust all over with a fork and prebake it until it just starts to color, about 20 minutes. allow it to cool completely before assembling.
topping
2/3 cup sugar
1/3 cup water
2 cups salted peanuts
10 ounces semisweet chocolate
2/3 cup half and half
combine the sugar and water in a saute pan and cook over medium heat until it boils  and the sugar melts.  continue to cook until it starts to color but be sure that you do not stir it.  add the peanuts and stir to coat them with the sugar.  turn them out of the pan onto a greased baking sheet and allow them to cool completely. 
in a microwave safe bowl, melt the chocolate and half and half on the lowest setting until it is melted and smooth.  using 15-20 second intervals on low power, be sure to remove the bowl and whisk in between heating cycles to prevent scorching.  
assembly
chop the peanuts coarsely and sprinkle 3/4 of them evenly over the top of the caramel while reserving the remainder for garnish.  drizzle the chocolate glaze over the peanuts and smooth it out evenly.  allow it to set in the fridge for at least 30 minutes.  decorate the pie with the remaining peanuts.
so there you have it, one down and two more to go before i make this weeks pie!!!  make one and send me a photo, you will see it here!!!  bakinbabe116@aol.com

something new for #16-homemade marshmallows and a parve s’more tart

like many of you foodies out there, i also look at many other websites and blogs dedicated to food.  in a recent post on food52, i saw an invitation to members of the website to test tart recipes that they are featuring in an editors pick challenge.  since i knew i would be making a pie this week, i quickly committed myself to testing the s’more tart on the list.  little did i know that it was a parve tart.  for those of you who do not know what this means, it is a jewish dietary law that does not allow the mixing of meat and dairy.  anyone who has come from a home with a kosher kitchen understands this-i did not but have had enough exposure to it to know that this was going to be interesting.  how can you make marshmallows without egg whites?  since i have promised an original recipe each week, i am including the link to the recipe from the food52 as well as my nonparve interpretation.

no homemade s’more tart is complete without homemade marshmallows.  i made a small batch using a recipe i found on an interesting website called cooking for engineers.  the recipe is a good reference for someone who has never tackled the task of making fresh marshmallows-like me.  the only suggestion i have to the recipe is to cut the vanilla extract in half.  for my pie, i piped them out into little kisses so that i could arrange them on the top of the pie.  they came out nice with a good texture.  they were a little sticky but i will attribute that to the fact that i did not make them into a slab dusted with cornstarch as suggested in the recipe.
now, for the parve version.  if you follow the link above, you will find yourself looking at a recipe that just might be missing something-especially if you are not familiar with the term parve or the practice of eating a kosher diet.  the recipe is mainly water, sugar and gelatin.   while it looks improbable that the two steps could combine to form a marshmallow like topping, they do and for what it’s worth, it’s pretty close in flavor and texture to the commercially produced stuff available.  keep in mind that most of them are not made with egg whites either-just lots of sugar and gelatin.

i made two small tarts, the parve version is in the rear while the nonparve version is in the forefront.

both were placed under the broiler for a little color-its not a s’more without a toasted marshmallows…

the parve version was made with cookie crumbs (should be non dairy/egg cookies like graham crackers to be truly parve-i did not have any so i pretended) as well as sugar and margarine.  the chocolate ganache filling was a combination of bittersweet chocolate and coconut milk.  it worked out well but it was a little firmer than i prefer for a ganache.  the topping formed a crispy crust under the broiler and was very sticky to cut through-must use a wet knife to do so.  all in all, the flavor was good and the topping was surprisingly like a marshmallow.  would i make this again-not sure.  honestly, we do not have the need to follow a parve diet and since none of us suffer from food allergies to dairy or egg whites(albumen), it is not likely that i would do this.  however, it is nice to know that this can be done just as easily as the non parve version and i am glad to have had the chance to try it out.  at the end of the day, i learned a new technique and that in itself made it worth the effort.

s’more tart
adapted from shoshana of couldn’t be parve and michael chu of cooking for engineers
1 (9″) tart serving 8
1 1/2 cups cookie crumbs-i used a combination of non-dipped biscotti pieces
1/3 cup sugar
6 tablespoons butter, unsalted and melted
9 ounces bittersweet chocolate
1/2 cup coconut milk
1/2 cup heavy cream
1 tablespoon unflavored gelatin, about 1 package
2 1/2 tablespoons water
2/3 cup sugar
3 tablespoons corn syrup
2 tablespoons water
pinch of salt
1/2 teaspoon vanilla
in a mixing bowl, combine the cookie crumbs with the 1/3 cup sugar.  add the melted butter and mix well.  press it into a tart pan with a removable bottom.  it is possible to bake this crust to make it crispy but i skipped that step.   heat the coconut milk and heavy cream until it is almost simmering.  place the chocolate in a heat proof bowl, pour the milk/cream over it and let it sit for 5 minutes.  stir until smooth and then scrape it into the tart shell.  place in the fridge to set while you prepare the marshmallows.  
pour the water into a small bowl and sprinkle the gelatin over it.  set aside and proceed with the recipe.  place the sugar, corn syrup, salt and water into a small sauce pan.  bring to a boil, washing down the sides of the pot if necessary and cook to 248 on a thermometer.  remove from the heat, add the gelatin and stir until smooth.  pour into the bowl of a stand mixer and with the whip, whip until fluffy and no longer hot.  add the vanilla and mix well.  using a piping bag, pipe little mounds onto a pan that has been dusted with cornstarch.  let the marshmallows set and when they are no longer soft and sticky, arrange them on top of the tart.  using the broiler or a torch, carefully toast the marshmallows.  use a wet knife to cut the tart.

it’s 3/14!!! happy pi(e) day!!! #15 of 52, peanut butter & chocolate pie

forget the math, eat pie!!!  it’s like i have a holiday of my own just to celebrate this blog challenge!!!  so in honor of the day, i pulled out all the stops anad relived a vintage tv commercial.  and for those of you who do not remember: 

now that we’ve gotten that out of the way, let’s make a pie…around my house, pie is not something that gets eaten quickly unless it is ice cream or something chocolate.  add peanut butter to that and it will be gone in a flash.

chocolate cookie crumb crust

peanut butter and chocolate fillings are poured into the dish and then swirled together with a skewer

the finished pie before baking

the pie after baking

peanut butter and chocolate pie

1 (10″) deep dish pie that serves 8-10

preheat the oven to 325.  make the crust and then the two fillings.  pour each of the fillings into a measuring cup or pitcher with a 2 cup capacity.  alternately pour 1 cup of each filling into the center of the crust.  you will have a series of rings, see photo above.  swirl the two together gently.  bake for about an hour or until the pie is slightly puffed around the edges and a little firm in the center.  cool completely and chill before cutting and serving.  serve with whipped cream if desired.

crust
1 1/3 cup cookie crumbs
3 tablespoons sugar
4 tablespoons melted butter
combine the cookie crumbs and sugar.  pour in the butter and mix.  press evenly up the sides and across the bottom of the pie plate.  for the best consistency, use cookies that are not high in fat.  graham crackers, wafers or undipped biscotti will be lower in fat.  high fat cookies will make a crust that is greasy and hard to press into the pan smoothly.

peanut butter filling
1/3 cup brown sugar
1/2 cup corn syrup-light
1/3 cup half and half
1/3 cup peanut butter-homogenized!
1/2 teaspoon vanilla
2 eggs
place all ingredients in a bowl and use that elbo grease to whisk it together until it is smooth!

chocolate filling
2 ounces unsweetened chocolate
1/3 cup half and half
1/3 cup brown sugar
2 eggs
2/3 cup corn syrup
1/2 teaspoon vanilla
melt the chocolate and half and half in a microwave using the lowest heat setting.  the goal is to melt but not overheat so use short intervals of 30-45 seconds.  whisk the chocolate with the brown sugar.  whisk in the eggs, one at a time.  whisk in the corn syrup and the vanilla.  to get a smooth and emulsified filling, follow the order as listed and do not try to take shortcuts-the chocolate can separate and it will not taste good or have a creamy texture.

this week’s round up!!!
many thanks to gwen daniels for sending photos of the maple pecan tart with butternut squash.  she also posted it up on her blog and you can read the full post here.  

well done gwen!  thanks for sharing photos and your blog page!   now for the rest of you out there-bake one, send me photos and see it here.  bakinbabe116@aol.com is the address and have a happy pi(e) day, y’all…