eastern mediteranean pizzas; a tuesdays with dorie recipe

tomatoes are in season, finally.  we were so late at getting them into the garden due to a cool, wet spring that i was beginning to think that we would never have them.  this recipe was the perfect way to use a few ripe ones. 
 the simple recipe calls for few ingredients.  yeast is stirred into water.
 whole wheat flour is added and stirred until silky smooth.

 the sponge is allowed to rest and develop flavor; mine sat for 5 hours.  when i was traveling last year, i brought home a shower cap from the hotel i stayed in.  they are perfect for covering a bowl of dough and they are reusable.

 after resting, all purpose flour is added and stirred in.  once the dough is too stiff to stir, it is kneaded.

 eight to ten minutes later, the dough is ready to rise and double.

 the topping is simple too.  onions and garlic are sauteed.  the recipe calls for the addition of ground lamb but i didn’t want to buy a pound of it for just the needed four ounces; i used a vegetarian ground meat substitute.

 tomatoes from the garden were diced up and added.  after a few minutes of sauteing, they needed to be drained of the juices.  finally, traditional spices were added.

 can you believe the size of this tomato?  have i mentioned how much i love my garden?

 the dough doubled in less than two hours.

 the dough is rolled out by hand.  the directions call to use a well floured surface.  my advice, go lightly with the flour or the dough will not cooperate and will slide around the table.

 the topping is spread around the dough and into the hot oven they went.  i baked them on a stone.

 they baked up quickly.

 the recipe calls for half the dough, i made pita bread with the rest.  i used a cast iron skillet and “baked” them on the stove top.

 the rounds of dough puff up slowly in the skillet.
 suddenly, they will expand
 and you have, pita pockets!

perfect for sandwiches and so much more!  to see what the other bakers came up with, check out the tuesdays with dorie page.  to participate, buy the book, baking with julia.

summer vegetable tart; a tuesdays with dorie challenge

this week, we made a vegetable tart using phyllo dough for the crust.  i knew i had a package lurking in the freezer and i decided to use it rather than buy a new package.  should have just bought the new one…this dough, even though it thawed in the fridge for a day, was not going to cooperate.  it came apart in pieces.  there was no way to get the required 4 sheets and cut them in half.  there was no way to make a shell using 8 half sheets, layed in an overlapping manner.  my shell was a total hack job and i am certain i used more than 4 sheets.

and that folks, is as pretty as it gets.  the directions called for 1/2 a cup of clarified butter.  i simply melted 3 tablespoons and and honestly, it was more than enough-i used about half.  after prebaking the shell, i worked on the filling.

banana peppers from the garden, portobello mushrooms, onions, spinach, garlic, a few cherry tomatoes and a handful of basil, oregano and thyme.  to keep the tart from weeping excessively, i cooked it slowly over low heat.

we watch our cheese consumption here and i am not a goat cheese fan.  this tart had about a cup of blended feta, fontina and romano cheeses, most of it sprinkled over the top.  a quick trip under the broiler gave it a little bit of a melt but not much.

it was mostly vegetable, perfect for summer.  honestly, i would rather have this on a pizza crust with a little white sauce.  the phyllo dough crust just didn’t do much for me.  it certainly was not easy to serve-it was hard to cut cleanly, the crust was not strong enough to support the weight of the filling.  the cheese did not glue it together either.  from a cookbook authors point of view, it was easy to see why they did not include a photo, even a small black and white one; this thing was not pretty.  even so, my husband devoured it and declared it a success.  go figure…

to see what all the other participants made, check out the tuesdays with dorie page.  interested in baking along?  get a copy of the book and jump right in, we’d love to have you join us!

pina colada cake

this is the story of two cakes.  one a beautiful cake and the other, a shipwreck.  or train wreck, take your pick.  either name will work.

as i have mentioned before, i work in a demonstration garden with my fellow master gardeners.  it is my responsibility as the project chair to round up the volunteers and maintain the garden.  to do this, i have resorted to bribery; it works out so much better than whining and begging…since i go out to the garden every sunday morning, i have made it a habit to take a freshly baked cake with me.  sounds easy but it is a challenge to come up with a different cake each week.

the result is that every week, i create a new recipe.  sometimes, it is as simple as substituting an ingredient or two in an already successful recipe.  other weeks, it can be complicated as i attempt a new formula all together.  most of the time, the cake works out and i am able to make minor adjustments to use the next time i bake the cake.  other times, not so much.  this last time, really, really not so good.  and by not so good, i mean the cake was self destructing from the moment i took it out of the oven.

 don’t you love the ski slope effect?  trust me, it went completely down hill from here…

as i stood there looking at my sad cake, i watched in horror as more and more of the sides of the cake just fell off and littered the tray.  so sad, so embarrassing.  how would i fix this?  there wasn’t any time to bake another cake, i would just have to bring it out to the garden and hope for the best.  the best laugh that is.  shirley quickly dubbed it a total shipwreck.  and honestly, it was-no harm, no foul, just lots of giggles.  she and lynn were astonished that i could have baked this.  so as you see, even a pastry chef is capable of a shipwreck every now and then.  the mistake here, i tried to temper the acid level of fresh pineapple by adding a little baking soda to the recipe.  guess what, the cake did not need any tempering.

so this week, when i set out to bake a cake for my gardening friends, i had a new challenge; no eggs.  we have a couple of new volunteers that both follow a mostly vegan diet and the eggs needed to go.  luckily, they were both okay with a small amount of butter but definitely not the eggs.  and luckier still, i happened to have a package of ener-g egg replacer in the pantry and a supply of coconut milk and coconut oil.  i also had the determination of a baker scorned; i simply was not going to be pushed around by a cake.  no, i was going to win this thing, we were going to eat pina colada cake and it was going to be a good cake.  no ifs, ands or buts.  just a really good cake!

recipe notes:  to get a nice pineapple flavor, use fresh, ripe pineapple.  peel, core and cut enough of it into 1″ cubes to make 2 cups.  place the pineapple in a food processor and pulse to produce tidbits.  do not let the machine run for more than 5 or 10 seconds at a time or you will quickly make puree.  put the pineapple tidbits into a mesh strainer and press out as much of the juice as you can.  reserve the juice for the syrup that is poured over the warm cake.  2 cups of chunks should yield 1 cup of tidbits and 1/2 cup of juice which is what you will need for the cake.

for the liquid in the recipe, i have used coconut milk.  to get the best texture without it being gummy or overly moist, use a light coconut milk or an unsweetened coconut milk beverage.  these will add moisture without excess fat that can make the cake greasy and heavy.

for the vegans, use all coconut oil(2/3 cup) and ener-g egg replacer(4 1/2 teaspoons mix to 6 tablespoons of warm water).  for the not so vegan, you can do as i did and use half unsalted butter(6 tablespoons) and half coconut oil(1/3 cup) with the egg replacer.  and for those of you throwing caution to the wind, you can also just use 3 large eggs, and all butter but you will have to use  coconut milk to be able to call it pina colada!

if you have never used ener-g egg replacer, it is easy!  follow the instructions on the box and use as you would real eggs.  place the powder in a mixing bowl, whisk in warm water and let it sit while you start mixing the recipe.

pina colada bundt cake
1 bundt cake serving about 12
*before starting-read the notes above!!!
1 cup fresh pineapple tidbits*
ener-g egg replacer equivalent to 3 eggs*
6 tablespoons unsalted butter, softened*
1/3 cup coconut oil*
2 cups sugar
1/2 teaspoon salt
3 cups all purpose flour
1 tablespoon baking powder
1 cup coconut milk*
1/2 cup pineapple juice
1/4 cup light brown sugar
preheat the oven to 350.  grease and flour a bundt cake pan.  place butter, coconut oil, sugar and salt into the bowl of a food processor.  pulse to combine.  with the motor running, pour in the egg replacer and process until smooth.  pour the mixture into a mixing bowl with the pineapple tidbits.  stir to combine and distribute the tidbits evenly.  sift the flour and the baking powder over the batter and fold it in a few times.  sprinkle the coconut milk over the top of the batter and fold together until no streaks of flour or butter remain.  scrape the batter out of the bowl and into the prepared pan.  smooth out the top and bake until a pick inserted comes out clean, about an hour.  while the cake bakes, make the syrup by combining the juice and the brown sugar in a small sauce pan.  bring the mixture to a boil, reduce it to a simmer and allow it to simmer for 2-3 minutes.  set it aside while the cake bakes.  allow the cake to cool in the pan for 15 minutes and then turn it out onto a rack to cool.  prick the surface of the cake with a fork and spoon the glaze over the top of the cake.  allow it to cool completely before slicing.

fruit salad sorbet

when life gives you too much fruit salad, make sorbet!  since i found our electric ice cream freezer at a local thrift store ($12.98 plus tax for a new machine!), i find reasons to make sorbet.  it is the perfect treat on a hot day.  we had a watermelon aging in the fridge so i combined it with a few kiwis and a basket of ripe strawberries.  you could use any combination, what ever you like to add to your fruit salad mixture; honeydew, pineapple, grapes, mangoes or any other fruit you might put into a salad.  there are no rules here, just fruit, ripe, juicy fruit.

for mine, i had about 4 cups of fruit chunks.  puree the fruit in a blender or food processor.  i liked the seeds in the puree-it added an interesting texture but you could strain them out if you like.

to make the syrup, combine 1/3 cup sugar with 1/4 cup of water and 1/3 cup of honey(corn or rice syrup for the vegan version!) in a sauce pan.  bring to a boil and simmer for 5 minutes.  remove from the heat, add 1 tablespoon of lemon or lime juice and allow to cool.  add the cooled syrup to the fruit puree and freeze according to the manufacturers directions.  my yield was about 2 cups of sorbet, but you could easily double the recipe if your machine is large enough.

vegan strawberry-banana ice cream

my attempts to change my diet are a little hit or miss.  got the cholesterol under control only to lose the vitamin d level needed for strong bones.  frustrating to say the least.  so, to change that, i am spending time outside in the garden during sunny hours and i am eating small amounts of dairy.  one thing i won’t stop doing, eating sorbet and ice cream made without dairy products.  i recently picked a bowl of strawberries from the garden and mixed up a batch of ice cream using one of david lebovitz’s recipes.

strawberry blossoms are pretty.  when you look at them close up, the center of the bloom looks like a little yellow strawberry.

when you grow strawberries, it is a constant battle between you and the critters who eat them with a healthy dose of praying the rain doesn’t ruin the berries.  it is also a little like treasure hunting too.  each afternoon, i walk around the bed peeking under leaves in search of ripe berries.

a few notes about the recipe; strawberries soak up water like a sponge so wash them by giving them a quick dunk in a bowl of cold water and then pat them dry with paper towel to prevent waterlogging.  a ripe banana will add to the creamy texture but you can omit it and increase the strawberries to a pound and a half.  if you are not a coconut milk fan, use almond or hazelnut milk for a nutty flavor or switch it to rice or soy for a neutral flavor.  when you puree the mix, if you leave it chunky, there will be icy bits of fruit in the finished product-the fruit freezes to a hard texture because of its high water content, i recommend a smooth puree.  the added syrup and alcohol will also help prevent that rock hard frozen consistency but not much-let it soften before serving.

vegan strawberry-banana ice cream
adapted from david lebovitz
makes about 1 quart
1 pound fresh strawberries, rinsed and hulled
1 ripe banana-the riper it is the stronger the flavor
2/3 cup sugar
2 tablespoons rice syrup (or wildflower honey if you are not a true vegan)
1 can coconut milk
2 teaspoons dark rum
2 teaspoons lemon juice
combine the strawberries with the sugar and the syrup and allow it to stand for an hour to juice.  add the remaining ingredients and puree in a food processor or blender.  place in ice cream freezer canister and process according to the manufacturers instructions.  allow the final product to set in the freezer for several hours before serving.

stuffed artichokes; almost as good as grandma’s

growing up in northern new jersey, i knew a few things were certain.  you were likely to be catholic and quite possibly jewish if you weren’t catholic.  if you were catholic, like my family is, then the chances that you were irish or italian were pretty high.  for me and my siblings, there was no either or, we are both irish and italian.  
like most families, our food traditions were firmly based around our ethnicity.  for my mother’s family, my irish side, it was new england yankee all the way.  we can trace our roots back before the civil war on this side making the menu a traditional american one.  not so much on my father’s italian side.  they came to america long after the civil war, just around the turn of the century making them italian americans.  my great grandmother held on to the tradition of an italian woman; she did a lot of cooking and almost all of it from scratch, including some of the pasta dishes.  the sunday dinners looked more like a feast and we won’t even get started on holiday dinners.  ask my father about them, he can speak at length to the tradition of the seven fishes on christmas eve.  all i can remember is the jello she would make for me and all of the milano cookies my great grandfather would share with me.
my grandmother however was not a traditional woman.  she was a career woman.  having lost her husband to world war two, she went to work as a secretary in an office in new york city.  after my great grandmother passed away, she began cooking and sunday dinner became her responsibility.  what i remember most from those dinners; mountains of fusilli, meat balls so unbelievably tender, a salad served after the meal and it was often little more than chickory with red wine vinegar, the occasional plate of raw fennel slices, and artichokes filled with a moist bread stuffing.
more than once, i shared an artichoke with a friend who did not know what they were.  after explaining how you just scraped the leaves on your teeth to get the flesh, i mainly got odd looks and a hasty “no thanks”.  when my children came along, i shared this with them as well.  luckily for me, my husband knew all about artichokes and enjoyed them almost as much as i do.  both of my girls will dig into one with out any coaxing.  so it shouldn’t surprise anyone that we planted some in our garden.  earlier this week, i picked our first three and they were part of our dinner that night.

 artichokes are members of the thistle family and if you let the blooms mature, they look like thistle flowers on steroids.

 the flower heads consist of leaves with a tiny thorn on the end of each one.  the thorns must be trimmed away before eating.

 each main flower is located on the end of the branch but each leaf on the branch also develops a side bloom.

 since we do not use any chemicals on our vegetables, they needed a good cleaning.  i soaked the trimmed heads in salt water to help flush out the critters.

 to fill the centers, i mixed up some plain bread crumbs with fresh parsley, salt, pepper and a little granulated garlic.  after combining this, i added a little olive oil to moisten it and then filled the centers.  to make it worth the effort, i packed it in there as best as i could.

 to cook them, i placed them in a pot with about an inch or so of vegetable stock and let them simmer, covered, for an hour and a half.  to keep them moist, i replenished the vegetable stock as it reduced.

they are done when you can pull a leaf out easily-pull one half way between the top and bottom towards the middle of the choke to get the best idea.  taste it, it should be creamy and soft not at all chalky or astringent.  now for the hard part, waiting for more to grow…

feeding the monster: chocolate chip cookies

life is getting a little complicated for me.  it seems that i am reaching that age many women dread; you know, that age where you reluctantly reveal the ages of your children.  that age where your joints will ache when you simply think about doing something strenuous or catch the part of the forecast that calls for a drop in temperature.   yup, that’s the one, the one leading to the change, yes, that change.  
what does that mean, you ask.  it means that i can gain weight through osmosis and that you better think twice about cutting off my chocolate supply.   to add the proverbial insult to injury, i also feel a cold coming on, lucky me.  needless to say, i spent the day in the house not venturing any further than the recycling bin in the carport.  a call for comfort food led me to chocolate chip cookies-they were easier to make than a pot of matzoh ball soup.
in my quest for healthier eating habits, i have amassed a small collection of vegan cookbooks by isa chandra moskowitz.  my need of a chocolate fix had me perusing the index of vegan with a vengeance in search of a chocolate chip cookie recipe.  it seems that they have been on my mind for weeks and i needed to get them out of my system.  what better way to do this than to simply eat way too many warm from the oven cookies.  
as a cookbook author, i love reading isa’s books.  she lets her personality show and she doesn’t hold back.  the first sentence of the head note for her chocolate chip cookies reads:  “there’s nothing healthy about these.”  her motivation for this recipe was to simply prove that a vegan version could be as tasty as a traditional non-vegan version.  it worked, she proved her point, and now i needed to prove to myself that i could make some that might be a little less unhealthy for me in my quest to keep the cholesterol level in check.
my first step was to convert the recipe over to 
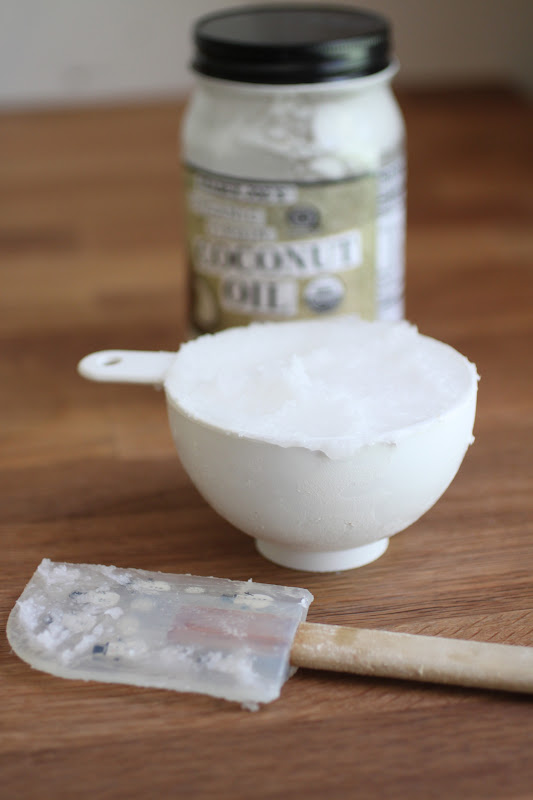
coconut oil.  while it wouldn’t have been a bad thing to use a nonhydrogenated margarine, i didn’t have any and had to use what was in my closet-a new, unopened jar of virgin coconut oil i picked up on my last trip to trader joe’s. 

 the recipe calls for regular granulated sugar and the addition of molasses.  well, that sounds easy enough if you happen to have some which i somehow do not at the moment.  even my supply of sorghum seemed to have dried up.  in the closet, i found (from left to right) brown rice syrup, barley malt syrup, sugar beet syrup and honey from our bees.  i went with the honey-a non vegan ingredient.

 the coconut oil will not whip up the way margarine does-it will actually get a little runny if you over mix it.  so take care with the length of time you cream it with the sugar.

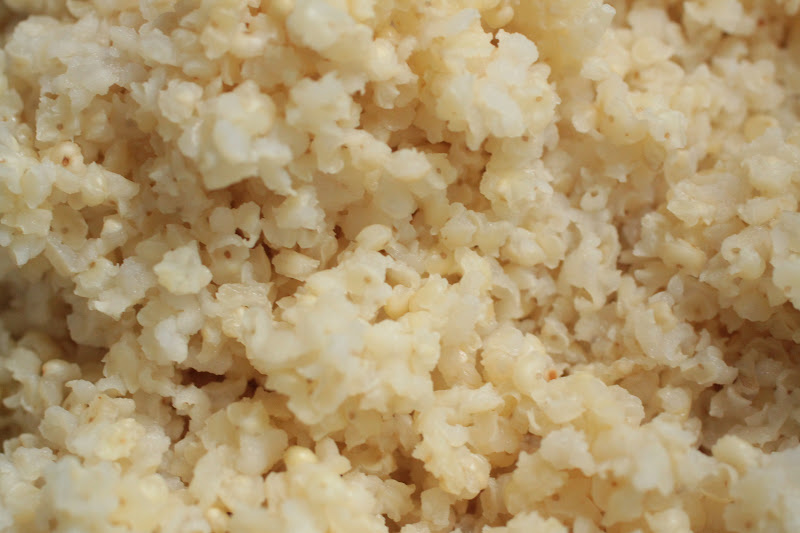
the recipe also calls for all purpose flour.  i was a little surprised by that.  i decided that if i was going to eat these cookies, they definitely needed some whole grain.  in place of the 2 1/2 cups all purpose flour,  i used a combination of all purpose flour, whole wheat flour and ground flax seeds.

i didn’t have vegan chocolate chips, and honestly, i don’t know that i would keep them on hand since i do not follow a strict vegan diet.  to keep them tasting a little more like the traditional toll house recipe, i added some chopped walnuts.  unfortunately, the dough came out really dry and crumbly most likely as a result of the whole wheat flour and the flax seeds.  the last minute addition of some soy milk saved the day.

 pressing the tops of the cookies to make more of a thick disk before baking improved their appearance.

 honestly, you can’t tell by looking at them that they are (almost completely) vegan cookies.  the whole wheat flour and the ground flax seeds are barely visible.  i certainly didn’t taste it and i am a little nauseated now having eaten at least 3 of them while they were still warm from the oven…

almost completely vegan chocolate chip cookies
makes 3 dozen cookies

1 cup whole wheat flour
1 1/3 cup unbleached all purpose flour
2 tablespoons ground flax seeds
1 teaspoon baking soda

1 cup coconut oil-preferably virgin coconut oil and solid at room temperature
1 1/4 cups sugar
1 tablespoon molasses or sorghum(for the vegan version-honey, for the non-vegan)
2 teaspoons vanilla extract
1 teaspoon salt
1 1/2 cups semi sweet chocolate chips-vegan or non vegan
1/2 cup walnuts, chopped small
1/4 cup plain, unsweetened soy milk
preheat the oven to 350.  in a small bowl, whisk together the whole wheat flour, all purpose flour, flax seeds and the baking soda and set it aside.  in a large mixing bowl, cream the coconut oil with the sugar, molasses, vanilla and salt for 2-3 minutes taking care not to let it get to warm.  add the whisked dry ingredients and mix on low speed to combine.  add the chocolate chips, walnuts and soy milk and mix to form a slightly crumbly dough.  using a #40 scoop or a fully filled and rounded teaspoon of dough, form the cookies by gently pressing the top of the dough to flatten it into an even disk.  bake for 9 minutes (if you are using a convection fan, you may have to adjust the time) or until they are slightly browned around the edges.  allow the cookies to cool on the pans for 5 minutes and then remove them to a rack to finish cooling.
and now, it is time for me to step away from the rack…i may never go back to the traditional version; thanks isa!!!

millet tabbouleh

wandering through thrift stores is a favorite past time of mine.  visiting the used book store is another.  whichever the destination, i am bound to make my way out to the car carrying an armload of stuff, especially cookbooks.  recently, i found a hardback copy of mark bittman’s “how to cook everything” for $7.99 and it was sporting the tag color of the week; serious thrift shoppers know that means it was discounted, i picked it up for $4 and change.  yesterday, i mailed it to my older daughter who has expressed an interest in cooking.  not to worry, a couple of months ago, i found a paperback copy at the used book store for $2.  wow-two copies of that book and less than $10 spent.  
you would think that as a cia grad that a comprehensive book like that wouldn’t be of much interest to me.  after all, i should know the material.  however, i gave up the cooking part a long time ago to pursue the baking/pastry side and with a husband who is a chef, i don’t need to do much cooking.  with the girls out of the house, i really don’t need to do much cooking.  but for some reason, i am finding myself in the kitchen after spending the day in a kitchen, cooking.  and i really mean cooking from scratch using as many ingredients as i can pick from the garden.  
reading through this book, i stumbled upon what i think is the best tabbouleh recipe and more importantly, it is a perfect way to use the abundance of tomatoes and parsley out in the garden.  while the traditional recipe calls for bulgur, i have been experimenting with other grains.  the last batch i made had red quinoa in it.  lurking in the cupboard was a jar of millet and today, it became the grain of choice for my tabbouleh.

my husband scoffs at the idea of eating millet-“i’m not a bird…” and i understand his point since he is constantly filling the feeders outside with a seed mix that includes millet.  but this is a great way to get big kids like him to play nice and try new foods…

millet is starchy and it must be rinsed a few times after cooking to prevent it from becoming sticky and pasty.  the method i used can be found in a tabbouleh recipe from the vegetarian times.  i used their cooking method and substituted it for the cooked bulgur in mark bitumen’s recipe.

having an herb garden is wonderful!  especially when you can plant whatever you want!!!  pictured here are the three types of parsley i used.  the large one on top is mitsuba, a japanese parsley.  it looks like flat leaf parsley on steroids.

with only minor changes, i reduced the amount of olive oil called for in the recipe and added a little diced cucumber since it is summer and i do have them in the garden, this is the result.

millet tabbouleh
adapted from “how to cook everything” by mark bittman
makes about 5 cups 
1/2 cup millet
2 cups fresh parsley leaves
1 cup fresh mint leaves
2 cups diced fresh tomatoes
1/2 cup diced cucumber
1/2 cup diced red onions
4 tablespoons fresh squeezed lemon juice
4 tablespoons olive oil
1 clove garlic, crushed
salt and pepper to taste
cook the millet according to the instruction on the package or by using this link and allow it to cool.  chop the parsley and mint leaves somewhat coarsely.  combine the cooled millet with the remaining ingredients, season it with the salt and pepper and chill the salad for a few hours to blend the flavors.  while chilling it allows the flavors to meld and develop, it will taste best if it is allowed to come to a near room temperature before serving.  

dinner for 1

when my husband has to travel for work, i tend to cook meatless meals-too much work for me to make an elaborate meal for just myself.  the choices i make lean towards a larger quantity than i need so that i can live on leftovers.  almost all of the meals incorporate some sort of bean or a grain other than rice since hubs makes that frequently.

with winter being so mild this year, our garden has chugged along nicely.  the crops we planted for fall are still in the beds and that has given us a chance to consume fresh picked produce a lot longer than typical for a winter garden.  we deliberately left our broccoli plants in the bed even though we had harvested the crowns.  if you allow broccoli to stay, little side shoots will produce single stalks of flower heads that are every bit as tasty and perhaps a little more tender than the large central stalk that makes up the crown.  did you know the leaves are tasty too?  they can be clipped, stemmed and cooked like collards making a wonderful addition to a meal and a pretty cheap one too-think of it as doubling the yield of a plant!

broccoli florettes and brussel sprouts from the garden are mixed with some store bought cauliflower and marinated using a recipe for cauliflower steaks from gluten free fix.  simply substitute a selection of chopped vegetables for the steaks and coat them evenly with the marinade.  then roast them until they are soft and have some color-about 30 minutes

 my idea of heaven in a bowl!
for the main course, i turned to a new acquisition, the flexitarian table by peter berley.  the hubs and i were perusing the cookbook section in mckay’s and i picked it up for $5.  the photos are beautiful and i am eager to try out several.  for my first cooking adventure, i chose the bulgur with roasted chickpeas, red onions and lemon.  it is meant to serve 4 as a main course but i planned to live on it for a couple days and i did!
i made a couple changes to the recipe.  first, when ever a recipe calls for water, especially when it is a grain, i substitute vegetable broth.  for additional flavor, i added a couple cloves of garlic.  since i am not a huge fan of cayenne pepper, i substituted some ground chili.  lastly, i chose to keep the bulgur and the chickpeas separate.
bulgur with roasted chickpeas, red onions and lemon
serves 4

1 1/3 cups vegetable broth
1 cup medium bulgur
2 tablespoons olive oil
1 medium red onion, thinly sliced
2 cloves garlic, minced
1 (15 ounce) can chickpeas, rinsed and drained
2 tablespoons freshly squeezed lemon juice
2 bay leaves
1 teaspoon cumin seeds
1/2 teaspoon ground turmeric
1/2 teaspoon sweet paprika
1/8 teaspoon ground chili or cayenne

to cook the bulgur, heat the broth to a boil  over medium heat in a covered sauce pot.  add the bulgur to the boiling broth and stir it in.  return to the boil then immediately remove from the heat, cover tightly and allow it to sit until the broth is absorbed, about 20 minutes.  meanwhile, prepare the chickpeas and vegetables.

preheat the oven to 400.  in an oven proof skillet-i used a cast iron skillet, heat the olive oil and sauté the onions and garlic until translucent, about 3-5 minutes.  add the chickpeas, lemon juice, bay leaves, cumin seeds, turmeric and chili and stir to combine.  place in the oven and roast until slightly caramelized, about 20 minutes.  be sure to stir it at least once to get an even color.   serve over the bulgur with a heaping side of the roasted veggies shown above.

and as always my friends, if you make this dish, do send a photo, i will post it here!  in the mean time, bake on…

almond butter hummus with kale chips

has it really been a month since the pie challenge ended?  wow-time flew!  while i have been contemplating my next project, i have allowed myself to be totally sucked into the holiday madness.  the husband and i have both been busy with work-him way more than me, such is the life of the executive banquet chef for a university.  that has left me at home alone for more than a few meals.  when i am left to cook for myself, you can be pretty sure that it will not be an elaborate meal and it will most likely be vegetarian and quite possibly vegan.  
lately, without our girls at home(both are living elsewhere right now), we have taken to purchasing more organic produce and are shifting our diet towards less meat laden meals. as i have mentioned before, i have had a few blood tests come back with higher than normal levels of cholesterol.  thankfully, the highest number so far has been less than 220 but that doesn’t mean i shouldn’t be concerned.  a diet change that eliminated many dairy products has helped me get that number back down below 200 and i hope to keep it there.  
my recent obsession with the cookbook, appetite for reduction has given me a new weapon for my arsenal too.  that book is chock full of great vegan recipes that even a carnivore can find satisfying-providing they eat veggies, beans and grains.  while i do not plan to make the leap to a vegan diet, i am happy to say that i can easily eat vegan meals and not feel deprived.   darry is also learning to enjoy some of these changes and he recently experimented with some organic kale chips, a tasty addition to my favorite meal for one, hummus on crusty bread.  and before you say “hummus, how boring”  keep in mind that i never do anything boring-of course i have changed it up a bit!  i am not a huge fan of tahini; it tastes a little bitter to me and the level of saturated fat is high enough to cause me to think twice before consuming it.  so a thought occurred to me, what if i used unsweetened almond butter instead?  wow!!!  what a concept and what a difference-i am sold and will probably never reach for tahini again!
almond butter hummus with kale chips
yields about 1 1/2 cups hummus
1 (15oz) can of chick peas
4 tablespoons unsweetened almond butter
2-3 tablespoons freshly squeezed lemon juice
2 teaspoons chopped garlic
salt-if desired
kale chips-purchase or home made (great recipe here)
baguette slices or other bread
drain the chickpeas but reserve the juice.  place all of the remaining ingredients into the bowl of a food processor with the drained chickpeas and pulse to combine.  scrape the bowl and run until it is smooth adding the reserved liquid as needed to reach the desired consistency.
to serve, top each of the baguette slices with a tablespoon or two of the hummus and top it off with a kale chip.  enjoy!!!
and if you would like to try this out, please do and remember that the pies are no longer the focus here but the power of pies will always be with me…