One bag of kale, part 2: Potato-Kale Hash with Chickpeas

Hash browns, real true hash browns have always been a favorite of mine.  Chunks of potatoes, slabs of onions, maybe a few pieces of bell peppers all fried up together so that they get a little color and a little crispy around the edges.  Add a couple eggs, over easy and that could easily be one of the best meals to eat if you ask me.  Actually, I can live without the eggs, but the rest of it, I could eat it every day.  Unfortunately, it isn’t good for healthy diet to eat like that daily.

Rather than eliminate this from the menu, I try to make it so that it is a little less unhealthy.  Using kale to bulk up the dish is a great way to add nutrients and fiber without adding the extra starch that a larger quantity of white potatoes contains.  The chickpeas also add lots of fiber and give the dish a nice flavor.  My favorite addition to the dish is a sprinkle of Nanami Togarashi, a Japanese red pepper blend that adds a little bite and a ton of flavor.

This is a quick dish to put together and it is good for anytime of day, not just breakfast.  The next time you bake a potato, put a couple extra in the oven so that you can mix up a batch of this hash.  If you have read the previous post, Autumn Kale Salad with Butternut Squash, this recipe uses on of the small portions of kale as explained in how to divide the 1 pound bag, it is approximately 1/8 of the bag.

Potato-Kale Hash
serves 2-4
2 tablespoons olive oil
1 cup diced onions
2-3 medium baked potatoes, cold and diced
2 cloves garlic, minced
3/4 cup chickpeas, canned or cooked dry
2-3 cups kale leaves
salt and pepper
nanami togarashi
Heat the oil in a large skillet over medium heat.  Cook the onions until translucent, about 3-5 minutes.  Add the potatoes and let them cook on one side for a couple minutes.  Turn the potatoes to allow the other sides to color.  Give each side 2-3 minutes, the idea is to add a little color and crisp, not to char the potatoes.  If they are getting dark, lower the heat.  If the pan is dry, add additional oil, a few drops at a time or give it a spritz with spray oil.  When the potatoes are almost completely browned, add the garlic, chickpeas and kale and continue to saute, turning the mixture as you go, until the kale is wilted and the chickpeas have gained a little color.  Season with the salt and pepper before serving.  Sprinkle a little of the Japanese pepper blend over the top if desired.
One bag of kale recipes:

one bag of kale, part 1: autumn kale salad with butternut squash

The butternut squash with it’s coating of spices and oil before going into the oven

Kale, it’s everywhere, it’s added to every dish you can think of including sweet breakfast smoothies.  Get over it already.  Kale isn’t meant to be added to a smoothie.  Honestly, have you ever listened to someone go on and on and on as they list the ingredients in the 24 ounce smoothie they just whipped up at home?  Seems to me that if you are going to eat an apple, a banana, a tub of Greek yogurt, a scoop of peanut butter a handful of kale, a scoop of…and so on, you are probably slurping down way more than you really need and that could explain why you haven’t lost much weight.  Ranting a bit, aren’t I.  Well, can you blame me?  As a gardener and a trained chef, it irritates me to see something as nutritionally packed and tasty as kale is being so over used.

So let me start this all over again.  Kale is one of those plants that loves cold weather and is so easy to grow that it is almost impossible not to have a few plants in your garden.  As a matter of fact, kale is a plant that you can grow 3 out of 4 seasons simply by harvesting just the outer leaves and if it sends out a flower stalk, cut it out and add that to the pile of leaves you are going to cook!  One simple rule of thumb, kale should not be grown in the hotter months and for most of us, that means between May and August; not only will it bolt(go to seed) it will attract all sorts of undesirable insects to your garden.  To keep it interesting, search seed catalogs for the different varieties available; we generally grow 2 or 3 types in our garden for variety.

But what if you do not have a garden or do not want to grow your own kale?  Head to the grocery store and buy a bag of kale.  Most grocery stores offer large bags of cut cooking greens, usually kale or collard greens and they weigh a pound.  While most stores offer the traditional curly kale, some carry Tuscan kale in large bags too.

The bag is almost big enough to be a pillow and I can hear you now:  “that’s a lot of kale, I won’t be able to eat all of that!”  Well guess what?  You can eat all of that, you will not waste any of it and you will not get tired of eating it.  Why buy it in a bag instead of by the bunch even though it is a smaller amount?  Because the bag is cheaper, the kale is already cleaned and the larger, woody stems are removed making every bit in the bag usable.  This is the first of 4 posts on the blog showing you how to use the entire bag.

For the first recipe, I have decided to make a salad.  The only thing that gets cooked is the butternut squash and while the squash is in the oven, you can prep the rest of the recipe.  This salad tastes a lot better if it is allowed to sit for a few hours in the fridge and if you make it a day ahead, it will be just fine.  It actually holds up pretty well in the fridge for a couple days but it will not be as crunchy by the second day.

To get started, first divide the contents of the bag in two.  Place on half in a large mixing bowl and set it aside for the salad.  Take the remaining kale and divide it in half as well.  Place one half into the bag it came in and then divide the last portion in half again and bag each of these separately; one will be used in a hash recipe and one will be used in a soup recipe.  Store the other portions of kale in the fridge until you are ready to make the other recipes.

The recipe for the salad comes to me from a fellow blogger, Angela Roberts of The Spinach Tiger.  My husband came with me to a potluck and Angela made the salad for the party.  He liked it so much that he actually looked her recipe up and he has been using it ever since.  We both enjoy it and often use the recipe as a starting point.  For this version, I used a butternut squash instead of the sweet potatoes and I subbed dried apricots and smoked pecans for the dried cranberries and pumpkin seeds.

This is also one of those dishes that you can serve as a vegetarian entree or serve it on the side with grilled poultry or fish-you choose.  As a matter of fact, the recipe is so flexible that you can get creative with what you add to it.  You could easily swap out the kale for another green, arugula comes to mind, just be mindful that a softer green will not hold up as well as kale in the long run.

The addition of nuts adds protein so if you are keeping this vegetarian or vegan, feel free to add more than the recipe calls for.

Autumn Kale Salad with Butternut Squash
Adapted from The Spinach Tiger
Makes enough salad for 2 large entree sized portions or 4 side salads
8 ounces chopped kale, half of a bag
1 small butternut squash, peeled and cubed
1 tablespoon olive oil
1 tablespoon maple syrup
1/2 teaspoon salt
1/4 teaspoon cinnamon
1/4 teaspoon cayenne pepper
1/4 teaspoon turmeric
1/8 teaspoon black pepper
1/8 teaspoon nutmeg
Vinaigrette dressing, recipe follows
1/4 cup diced dried apricots
1/4 cup chopped smoked pecans
additional dried fruit and nuts for garnishing the salad if desired
Preheat the oven to 400.  Place the kale in a large bowl and set aside.  Toss the butternut squash with the olive oil, maple syrup, salt and the spices, place it on a baking tray and roast until soft, about 15 minutes.  Remove from the oven and let it cool.  While the squash cools, make the vinaigrette dressing.
To make the salad, add the squash, apricots, pecans and the vinaigrette to the kale in the bowl and toss to combine.  Place the salad in the fridge and let it sit for a few hours to soften.
Vinaigrette Dressing
4 tablespoons cider vinegar
1 clove of garlic, minced
1 tablespoon maple syrup
1 tablespoon Dijon mustard
2 tablespoons pumpkin seed oil
6 tablespoons olive oil (or all olive oil)
1/2 teaspoon salt
1/4 teaspoon black pepper
Place the vinegar, garlic, maple syrup and mustard into the canister of a blender.  Turn the machine on to a low speed and with it running, pour the oils in in a steady stream to emulsify.  Add the salt and pepper while it is still running.
One bag of kale recipes:
Potato-Kale Hash with Chickpeas

Leaf Peeping at Waller Mill Park

 Since moving to Williamsburg in September, I have spent a bit of time exploring the trail system around the city.  It has become a way to occupy my time; without a large garden to tend to I have the opportunity to wander trails.  On a recent Sunday, I took my husband out to Waller Mill Park to hike the Lookout Tower Trail.  To learn more about the trail system in the park, the City of Williamsburg has a page on their website that offers a pdf file that I recommend downloading.  It is called Great City Walks and the trails in Waller Mill Park are included.

Waller Mill Park is home to the reservoir system that provides water to the City of Williamsburg and James City County and with that in mind, it is not a free park.  However, the $2 entry fee is well worth the money.  The park has limited hours and it closes by 5pm each day but if you have an hour or two, you can get a lot of exploring in.  For those of you not interested in hiking, you can play disc golf, rent a paddle boat or canoe or bring your own non-gasoline powered boat, fish, picnic or bring the dog to the dog park.  To learn all of the rules and restrictions, visit the homepage for the park.

We arrived at about 2pm and figured we would be finished with the nearly 3 mile hike in about an hour and 15 minutes.  However, there was so much to see on the trail it took us two hours!  The close up photo of the moss and lichen growth on the rock in the photo above is just one example of the distractions we encountered.  To see more of our discoveries, you will have to explore the cellphone photos I posted on my Instagram feed, I did not take photos of every mushroom we found using my camera because we may not have made it out of the park before closing time!

 The views of the foliage were beautiful.  The day was overcast and that was a good thing.  We took our time and just enjoyed the surroundings.  This area is just beginning to put on a display of color, the cold snap we are expecting should change that.

 On this afternoon, there were a few boaters paddling around and hikers with dogs but for the most part, we were on our own.  It was truly a peaceful place to be and I plan to make this a regular destination.

 The boat launch near the parking area had one of the best views of foliage in the park!  It was hard not to pull camera out and I could easily have spent an hour or more on the dock.

 The reflections were every bit as enchanting as the view itself.  To my husbands surprise, and possibly his dismay, I actually laid down on my stomach to take these shots.

 The ripples in the water distorted the reflection and the random leaves floating on the surface of the water caught my attention.

 There was a pair of ducks swimming near by but I never even thought to get them in the photo

The clouds in the sky look even angrier due to the distortion of the reflection.  
Go on out to Waller Mill and hike the trails, you will not regret it.  Keep in mind that this is one of the rootiest trail systems I have been on.  Watch your footing, something tough to do on a leaf covered pathway.  If you have bad knees or ankles, this may not be the place for you since it is guaranteed that you will trip over at least a couple roots along the way.  For those with limited mobility, you may want to stick to the Paved Bike Path, a two mile walkway, look for it on the map.

palets de dames, lille style: a tuesdays with dorie post

Can you believe that it has been more than two years since we began working our way through Baking With Julia?  Twice a month we prepare a recipe from the book and it has been a lot of fun to try all the different techniques.  When the Tuesdays With Dorie gals announced that we would also be baking from Dorie’s new book, Baking Chez Moi, I did not hesitate to order a copy of the book.
For our first recipe, we chose palets de dames, lille style.  To see the recipe, I always encourage folks to support the author by purchasing a copy or borrowing the book from a library, but the recipe has been available on the amazon.com page for the book.
Let me first say that not only do I love the simple but elegant look of the cookies, I really love the fact that the recipe is an easy one!  The directions were easy to follow and the results were exactly as described.  While it may not seem like much to rave about, I am baking in a new kitchen with an electric range and it is almost like learning all over again.  

 Follow Dorie’s advice and use a scoop to portion the cookies.  Trust me, not only will it be much quicker and less messy than rolling the dough into little balls but the cookies will be much more consistent in size.  That little hint will keep you from having overbaked and underbaked cookies on the same tray.

To dip the cookies in white glaze was too easy, almost boring if you ask me.  So just to make them a little more colorful, I tinted the glaze with a bit of purple hoping for a nice lavender shade.  Let me just say that no matter how hard you try, it almost always ends up looking a little too much like grey. To prevent that from happening, I also added a tiny amount of red to the mix.   A little sprinkle of clear sugar crystals on top gives them a bit of sparkle too!

If you add sugar crystals, let the glaze set a bit until it is just a little tacky.  If you put it on immediately, it sinks in and doesn’t sparkle.  To see what I mean, compare the cookies at the top of the photo to the ones on the bottom.

So, this is all fine and dandy but the true test is tasting them.  Drum roll…Yeah, well, not my favorite cookie.  Hard to say but I really wanted these cookies to be incredibly good but all I tasted was sweet.  The texture is nice, almost cakey but to be honest, I just do not see how a 1/4 teaspoon of vanilla could have added any flavor to the dough.  Usually, I tend to change or add flavors but this time, I followed the recipe exactly as written.  If I make these again, and I probably will because they are great for gift giving, I would pump up the flavor to a teaspoon of vanilla or even rosewater or add some freshly grated lemon zest.

The only part of the recipe that did not work out for me was the glaze.  The 1 1/2 tablespoon of milk called for was something I did not have so I subbed half and half.  The glaze required more like 2 tablespoons and even so, I still had about a dozen cookies without glaze.  Since the cookies reminded me of a childhood favorite, New York Black and Whites, I decided to mix up white and chocolate glazes to finish the batch; a perfect solution to my dilemma!

Not sure what a black and white is?  You can read about the history of them in this article by Robert Sietsema.  To make a batch of your own, use the palet de dames cookie recipe and mix up some chocolate and vanilla glazes or try this recipe from the New York Times.

In the meantime, be sure to visit the Tuesdays with Dorie page to see what the other bakers came up with!

shepherd’s pot pie with chicken

The drop in temperatures outside has made it perfect for turning on the oven.  One of my favorite cold weather, comfort food meals is a pot pie.  Who doesn’t have memories of them from childhood?  Little boxes pulled from the freezer, mini pies baking on a tray and a bowl of gravy to dunk biscuits in?  Certainly not a healthy meal when you stop to think about it and that is precisely why you should make your own.  While a pie crust is the traditional topping for a pot pie, the use of a mashed potato topping has less fat and more fiber but even so, this isn’t something you should eat regularly.

To keep it a little healthier, try to put a rainbow in the mix; use lots of hard vegetables of many colors in the filling.  To help keep vegetables such as broccoli from turning to mush, add them to the filling raw and allow them to cook as the pie bakes.

Boil the potatoes and mash them with a small amount of butter and use lowfat milk or even soy milk to keep it lean.  My mixture contained a single egg yolk which I am thinking could probably be omitted without consequence.

This is one of those dishes that can be cobbled together with leftovers.  We had a previously roasted chicken in the fridge and I simply chopped the breast meat from half of it to make the filling.  However, you could easily make this with turkey or any other meat, even a steak or a loin roast and for those of you who prefer it to be meat free, just double the veggies.

The filling was made with vegetable broth because that is what I had handy and to thicken it, I added a small amount of flour.  Mix and match to your heart’s content, I know I will be making this again, and who knows what will end up in it-depends on what is in the fridge!

Shepherd’s Pot Pie
Makes 1 (10″) or 2 (6″) pies
serves 4
Potato topping
1 1/4-1 1/2 pounds russet potatoes, peeled and cut into cubes
1/4-1/3 cup lowfat milk or unsweetened/unflavored soy milk, warm
3 tablespoons unsalted butter
1 egg yolk
salt and pepper to taste
Place the potatoes in a sauce pot and cover with water.  Bring to a gentle boil and cook until very soft, about 10-15 minutes.  Drain the water from the potatoes, mash them by hand or with a mixer.  Add the milk and butter and mix until creamy.  Add the egg yolk and seasoning, combine thoroughly and set aside while you make the filling.
Filling
2-3 tablespoons olive oil
1 cup sliced leeks
1/2 cup sliced carrots
1/2 cup sliced celery
1/2 cup corn-thawed if frozen
1/2 cup mushrooms, quartered
1-2 cloves garlic
1 teaspoon poultry seasoning
1/2 teaspoon dried thyme (or 1 teaspoon fresh)
1/2 teaspoon salt
1/4 teaspoon freshly ground pepper
1/4 teaspoon smoked paprika
2 tablespoons all purpose flour
2 cups broth-vegetable or other low fat broth
1 cup cooked poultry or meat cut into cubes, omit if this is vegetarian and just add extra veggies
1/2 cup broccoli florets
1/2 cup cauliflower florets
Preheat the oven to 375.  In a large saute pan, heat the olive oil.  Saute the leeks, carrots, celery and mushrooms until softened, about 5 minutes.  Add the garlic, poultry seasoning, thyme and the spices and saute for an additional minute.  Add the flour and stir to coat the vegetables then pour the broth in while you stir the contents in the pan.  Bring to a gentle boil, stir in the meat and then scrape the mixture into a deep-dish pie pan.  Sprinkle the broccoli and cauliflower over the top of the mixture.  Starting at the edge of the dish and working towards the middle, carefully spread the potato topping over the vegetables.  Place the dish on a heavy duty baking tray that will not warp in the oven and bake until the topping is golden brown around the edge and the filling is bubbly, about 30-40 minutes.  Allow the pie to sit for about 15 minutes before serving.  

sourdough bread with home grown starter; over 5 years old and still going

When I actually began my sourdough starter is a little sketchy.  My best guestimations are late summer in 2009 with grapes grown in the demonstration garden I worked in.  As we packed up the house in Nashville in preparation for our move to Virginia, I knew the starter was coming with me; a souvenir of time spent in the garden with friends.  Now that things have settled here, it was time to test it and see if it still could produce a loaf of bread.

Despite the fact that the starter is stuffed into the back of the fridge and neglected for months at a time, it still produces a nice loaf of bread!  As it is with any loaf of freshly baked bread in our house, most of it gets eaten by the slice, slathered in butter and sprinkled with salt.  When it gets a little dry, it becomes toast, slathered in butter and sprinkled with salt.  Is there anything better than that?  In my opinion, there isn’t much that can compare to a thick slab of freshly baked sourdough bread slathered in butter and sprinkled with salt…

To make some starter, follow this recipe on food.com from Nancy Silverton, it is the one I used to get my starter going.  If you are successful, you can use it in any recipe that calls for a starter.  My favorite sourdough bread recipe is from Nick Malgieri’s wonderful book, How to Bake.  The easy to use recipe also tells you how to make and maintain a starter but I just substitute my own starter and proceed with the recipe.  This is a true sourdough bread which means that it can take several days to make not counting the time needed to make a starter from scratch, so be sure to plan ahead.

If your starter has been dormant, take the time to refresh and feed it and give it a couple days to become active.  Once you are sure that it is ready to go, mix up the sponge and allow it to sit for about 24 hours to develop the best flavor.

Nick Malgieri’s Sourdough bread
1 loaf
sponge:
1 cup warm water, 110 F
1 cup active sourdough starter
1 1/2 cups unbleached all purpose flour or bread flour
1/2 cup whole wheat flour
dough:
the sponge
1 1/2 cups to 1 3/4 cups unbleached all purpose flour or bread flour
2 teaspoons salt
additional flour and cornmeal for sprinkling
To make the sponge, whisk the starter and water together in a large bowl.  Stir in the flour and cover the bowl tightly.  Allow it to sit at room temperature for at least 8 hours, and up to 24.
To make the dough, stir the sponge to deflate it, stir in 1 1/2 cups of the flour and the salt.  You can knead by hand or machine to form a smooth, elastic and slightly sticky dough for about 5 minutes.  Add additional flour as needed to make the dough manageable.  
Coat the dough in oil and rise it in a large bowl, covered with plastic, until doubled.  This can take an hour or more-the temperature of your kitchen will control this.  Most often, I let my dough rise in a cold oven(one that has not been heated) with the light on-you would be amazed at how much heat an oven light can produce!
When the dough is ready, first set the oven up, then shape the dough.  Place a rack in the center of the oven with your baking stone on it.  Set a rack below the stone and place a heavy pan on it-this will be for adding steam to the oven so be sure it is a heavy gauge metal pan that can handle a sudden addition of water.  Set a cup of water nearby.  To shape the dough, scrape it out of the bowl and deflate it.  Form it into and even round ball and be sure to seal the bottom seam well.  Place it seam side up in a well floured bread  basket or a bowl lined with a towel and is heavily floured.  Cover the basket with plastic and allow the dough to rise until doubled, at least 1 hour.
Thirty minutes before baking, turn the oven on to 500 degrees to heat the stone properly.  Invert the loaf onto a baking peel that has a generous sprinkle of cornmeal, slash the top and slide the loaf onto the stone.  Quickly pour the water into the tray and close the oven.  After 20 minutes, reduce the oven temperature to 350 and continue to bake.  After about 20 minutes, check the internal temperature of the bread with a thermometer-it will be 210F when finished.  Bake the loaf at 350 for however long it takes to reach that temperature, it could be as long as 40 minutes total.  Remove the bread from the stone and cool it completely on a rack before slicing.
The bread will last a couple days at room temp but is best the day it is baked.  To refresh it, wrap it in foil and bake it at 350 for 15 minutes but keep in mind, it will be pretty crispy when it cools-use the leftovers for bread crumbs, croutons or stuffing.

blue corn-pecan biscotti dipped in Mexican chocolate

When my husband and I first opened our wholesale only bakery, we specialized in biscotti. With a couple tried and true base recipes, we were able to offer our customers more than 20 different flavors with a choice of chocolate dips. My personal obsession with organic blue cornmeal led me to develop a recipe that included pecans and spices and I would dip them in a blend of Mexican and semisweet chocolates which gives the chocolate a slightly grainy appearance from the sugar crystals. While they weren’t our top selling flavor, they certainly were one of our favorites. The bakery has long since closed and we have moved on but those biscotti, they make appearances in gift packages frequently. 

In my opinion, biscotti should not be so hard that they need to be dunked to enjoy them. The cornmeal in the recipe helps to increase the softness of this recipe and to add a slightly sandy texture. The combination of cinnamon and ground chili give a depth and warmth to the flavor profile while the pecans add a little more crunch along with their wonderful buttery-nut flavor. Then there is the chocolate used in the dipping; Ibarra chocolate has long since been a secret weapon in my baking arsenal. Do yourself the favor and seek it out for the most authentic tasting Mexican chocolate. However, if blue cornmeal is not available, use any other whole grain cornmeal, white or yellow, but make sure it is just cornmeal without any other ingredients such as leaveners or lime added. When baking biscotti, don’t be tempted to use pretoasted nuts. The second bake to dry the biscotti can scorch the nuts and give them a bitter taste so always use raw nuts. 

The dough can be shaped into 2 large logs or 4 small logs and when I am sharing these, I will bake them into small logs so that I have plenty to fill the packages. The secret to perfect slicing is to let the logs sit overnight before cutting them. The moisture in the log will distribute evenly and soften the edges preventing them from crumbling as you slice, of course it also goes without saying that using a sharp, serrated knife will also ensure clean cuts. Since biscotti are dried, they have a long shelf life making these the perfect gift to share since you can make them well ahead (as long as a month) of the madness and store them air tight till it is time to pass them out!

Mexican chocolate tends to be a bit grainy.  The reason is that most of the popular brands are meant to be used to make hot chocolate drinks and the sugar crystals which are whole and visible when you chop up the disks, melt when heated.  Usually, the chocolate is flavored with cinnamon and at times, almonds to further add depth and character to hot chocolate or any other item you might make with it.

When I blend in Mexican chocolate to dip biscotti, the crystals remain visible since the chocolate is not heated enough to melt them.  While some may find this objectionable, I like the texture it adds and it gives the final product a unique appearance.

biscotti have long been a favorite homemade gift for sharing in my kitchen.  they hold up well for weeks if kept air tight and that means they are around after the holidays when you may actually have time to brew a cup of tea or coffee and actually enjoy them.  to package them, buy a tea cup and saucer set from the thrift store and fill it with biscotti.  depending on how large the cup is, the one above is actually pretty small, you could also throw in a few tea bags or a sample size packet of coffee.  wrap it in cello and tie it up with a ribbon-picture perfect!

you could also just stack them and wrap them like the biscotti on the left and in the center.  if you are frugal, save the trays that produce comes in, wash them and fill them as I did in the package on the right.  the black box came with mushrooms in it and when we used them up, I simply washed and dried it and lined it with tissue paper before filling it biscotti.

blue corn-pecan biscotti dipped in Mexican chocolate
makes 40-80 pieces
10 tablespoons unsalted butter
2 1/2 cups unbleached all purpose flour
1 1/4 cup sugar
2/3 cup pecans-roughly chopped
1/2 cup blue corn meal
1 1/2 teaspoon baking powder
1 teaspoon cinnamon
3/4 teaspoon ancho chile powder
1/4 teaspoon baking soda
1/4 teaspoon salt
4 eggs
2 teaspoons vanilla-Mexican if you can find it

Preheat the oven to 350. Line to half size baking pans with parchment paper and set aside. Melt the butter over low heat taking care not to boil it. In a large mixing bowl, stir together the flour, sugar, pecans, cornmeal, baking powder, cinnamon, chili, baking soda and salt until completely combined.


In a small mixing bowl, whisk the eggs with the vanilla to combine them. Pour the eggs and the melted butter over the dry ingredients and stir to form a soft dough. Do not hesitate to use your hands to knead it slightly to form a soft dough but keep in mind, the more you mix it, the tougher it will be in the dry stage.

To shape the biscotti, divide the dough into 2 or 4 equal pieces. Stretch the dough out so that it is the length of the pan, about 16″ long, and then pat it down to about 3/4 inches in height. The larger sized logs will be nearly 3 inches wide while the smaller ones will be around 1 1/4 inches wide. If the dough seems too sticky to work with, moisten your hands with a small amount of cold water and then shape them. Bake the logs until they are slightly firm and spring back when pressed, about 25-28 minutes for the large logs and 20 minutes for the smaller ones. Allow them to cool for at least 4 hours, or over night before slicing.

Preheat the oven to 350. To slice the logs, place them on a cutting board and carefully trim away one end using a sharp serrated knife. Slice the biscotti 3/4 inches apiece and place them back onto the sheet pan so that they are standing up. Place the pans into the oven and turn it off. Do not open the door for at least one hour. To check for dryness, gently squeeze a slice, if it gives, it isn’t dry. Repeat the process by heating the oven to 300 degrees, return the biscotti to the oven and turn off the heat. Check them after 15 minutes. Do this carefully to be sure you do not over bake them. Allow them to cool completely before dipping or packing them.

Mexican chocolate dip
12 ounces semisweet or bittersweet chocolate, chopped
4 ounces Mexican chocolate, chopped

Place the chocolates into a heat proof bowl and set it over a pot of barely simmering water. Stir to melt the chocolate and when it is half melted, turn off the heat. Continue to stir until most of the chocolate is melted and then remove it from the heat. Stir until the chocolate is completely melted and is slightly warmer than body temperature.


Dip the bottom of each cookie into the chocolate and place it upright on a tray lined with parchment paper to set. If it is a warm or humid day, refrigerating it for 5-10 minutes will speed up the process but do not leave the pans in the fridge any longer than that or you will lose your shine on the chocolate.

When the chocolate is fully hardened, remove the biscotti from the paper and pack them up airtight to keep them crispy. Be sure to keep them away from warm or sunny spots to prevent the chocolate from melting.


this recipe also appears on food52.com where it is currently entered in the best edible gift contest.  to see it, follow this link and be sure to visit my food52.com page

strawberry-rhubarb pie

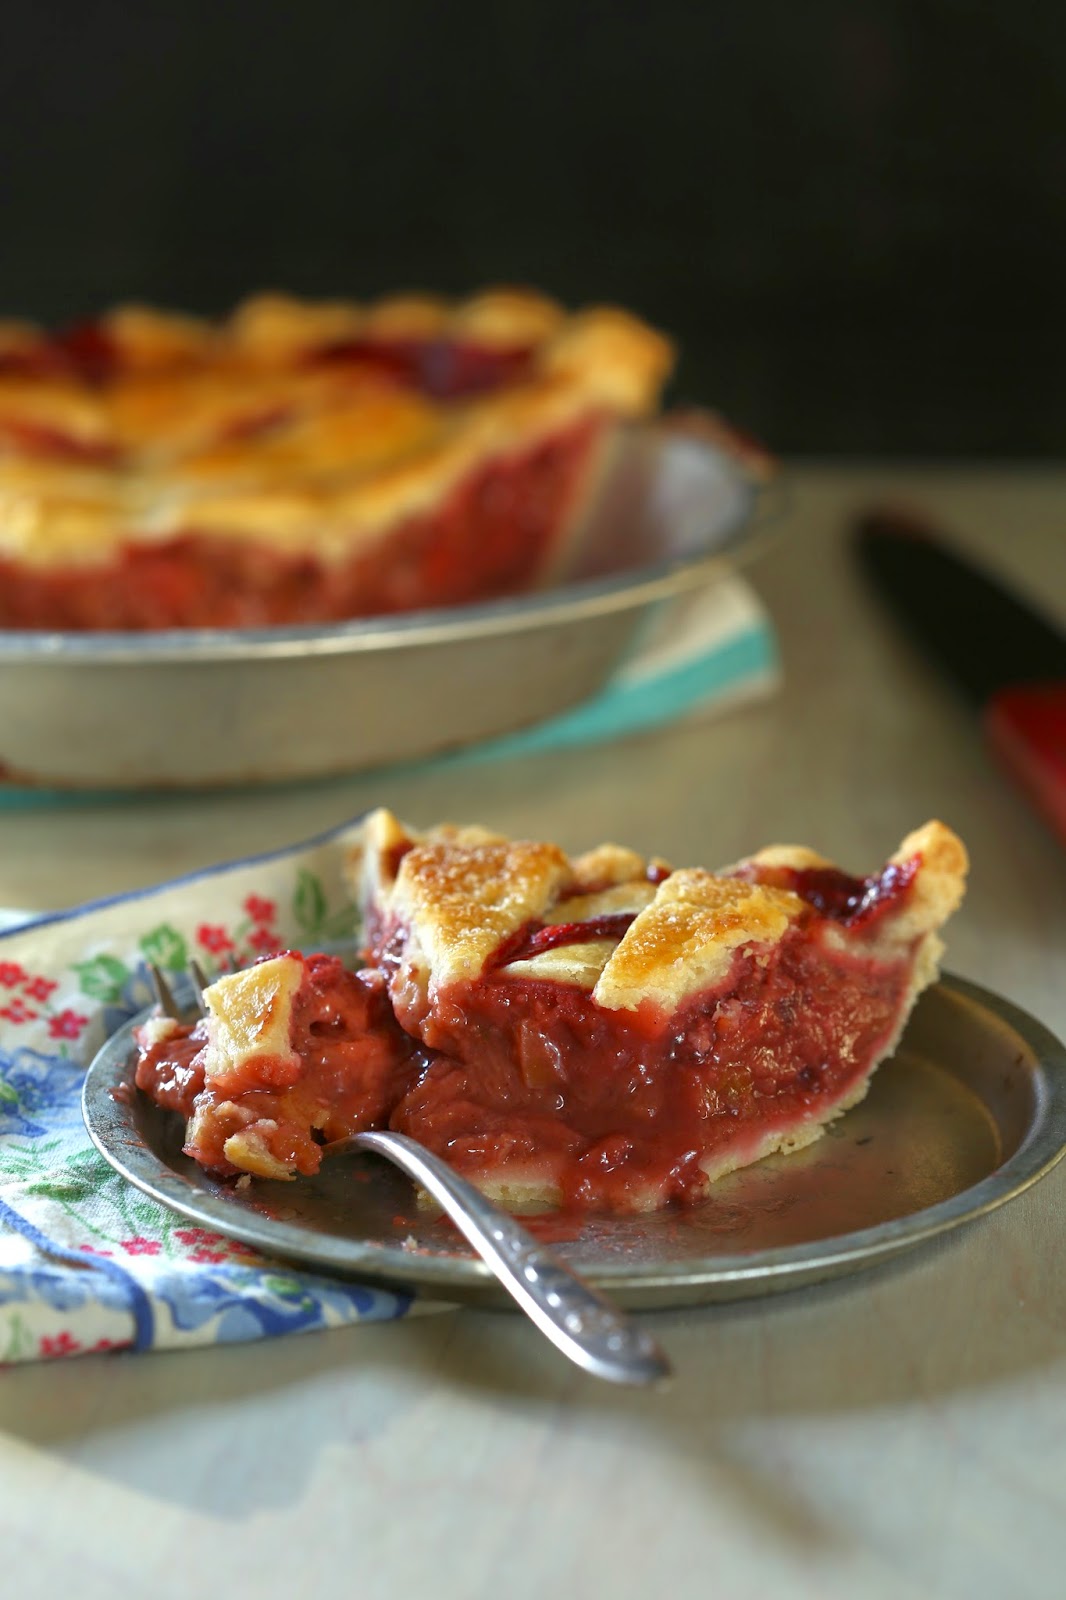
one of our family traditions is to make a cake for birthday celebrations rather than buy one.  when my dad came to visit recently, I presented him with a freshly baked strawberry rhubarb pie in honor of his birthday.  while a pie may seem like an odd choice, I happen to know that strawberry rhubarb is one of his favorite pies and since we rarely get to spend time together at birthdays, a pie seemed like the perfect birthday dessert.

since the middle of fall is not strawberry season, or rhubarb season for that matter, I decided to use frozen fruit.  there are plenty of people out there that are probably thinking that I made a poor choice but the truth is, frozen fruit is at times better quality than what is available in the fresh produce section of most grocery stores.  the fruit is picked ripe and processed so quickly that it is also a lot fresher and since it is cleaned before freezing, it is ready to use one it is thawed.

the best part of a freshly baked pie is a homemade crust.  if I have heard it once, I’ve heard it many times, many people are convinced they just cannot make a fresh pie crust from scratch.  the truth is, it is one of the easiest recipes to master and that includes the rolling process.  there are just a few things that you must remember about pie crust:  heat is your enemy, over mixing is a sure way to get a tough crust, use plenty of flour to roll it out because you can easily brush it off and last, let it rest before baking by putting it in the fridge to give the gluten time to relax.

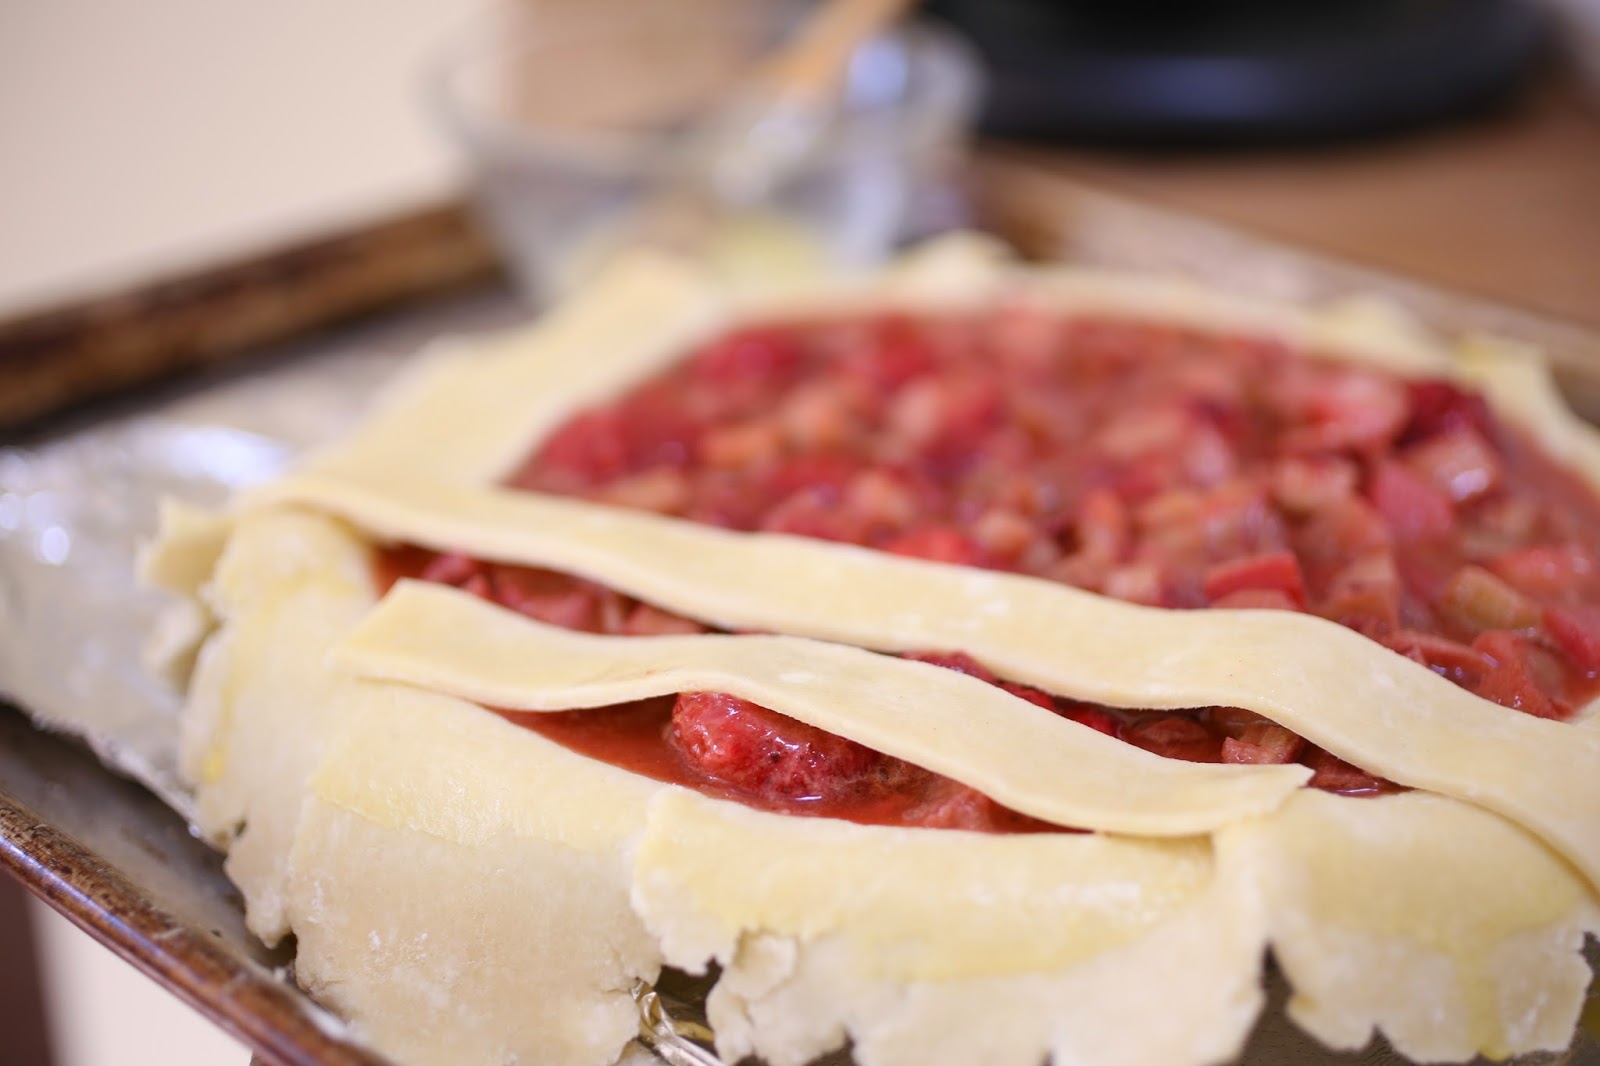
this pattern is probably my favorite one to top a pie with.  it looks woven but really isn’t.  alternating strips of dough are placed on the pie starting along one side.  the next strip is placed at the top of the pie perpendicular to the previous strip.  the third strip overlaps the second one at the top.  repeat the process by alternating a strip horizontally and vertically until you get to the bottom and you will form an eye catching chevron pattern.

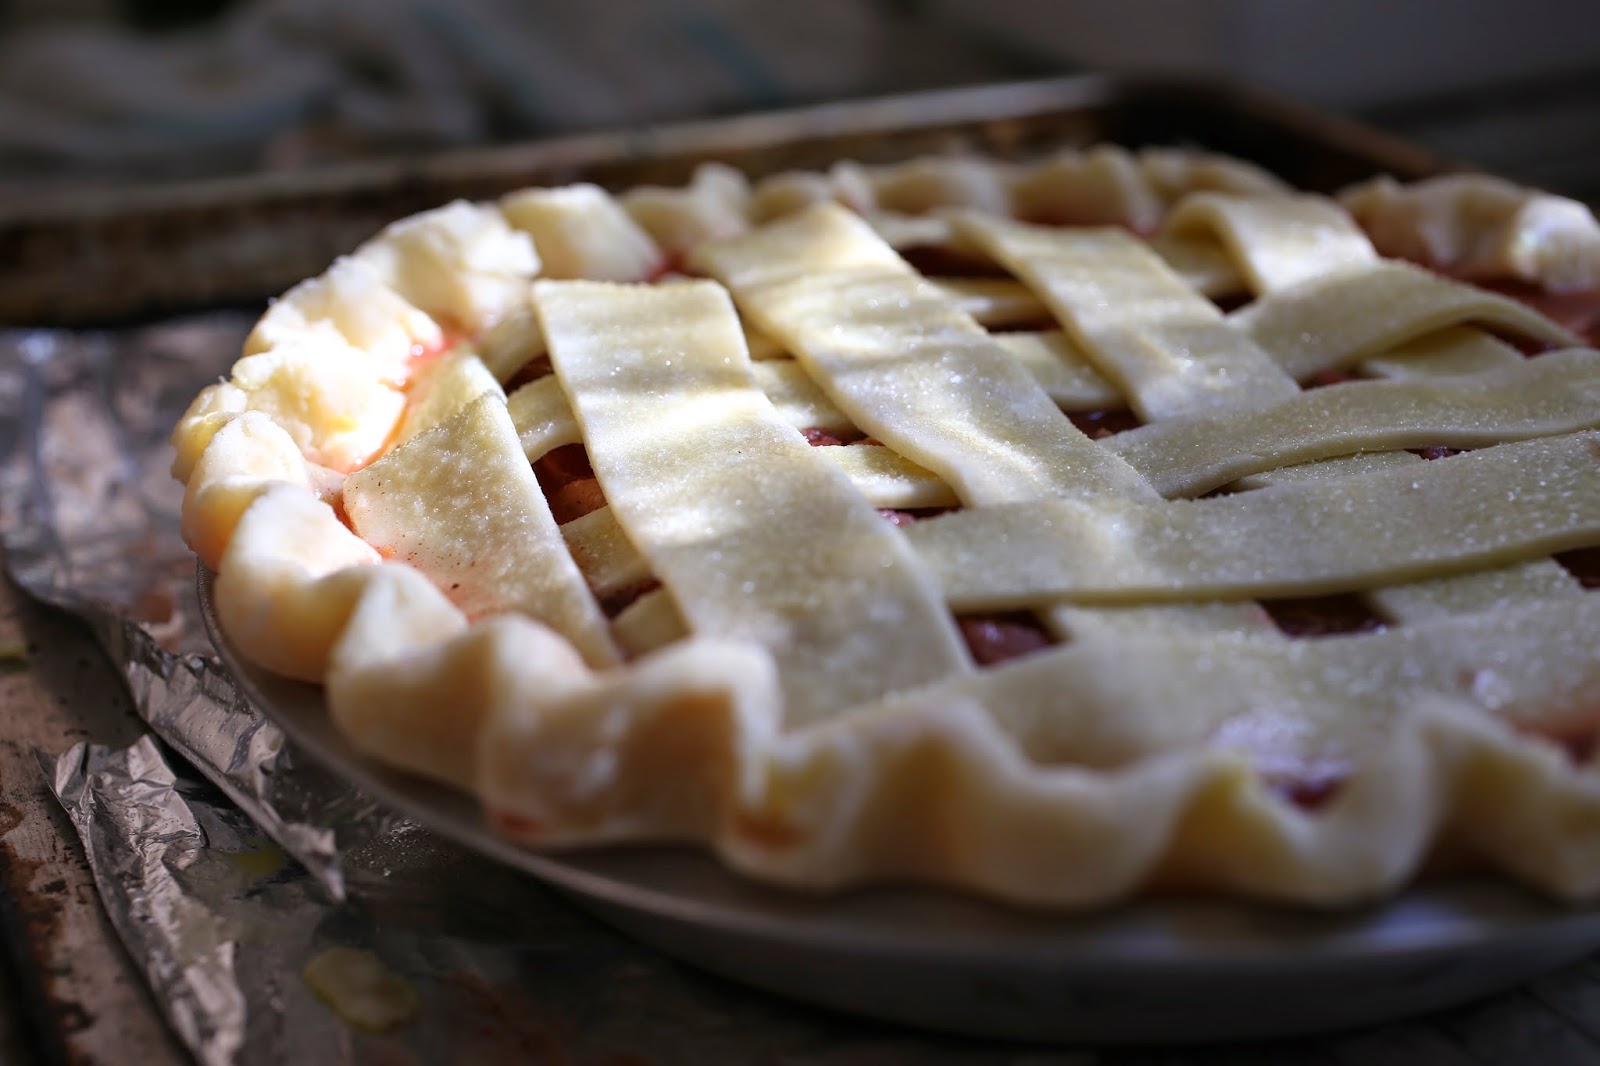
carefully trim away the excess dough but leave enough to roll the edge and flute it.  you can either egg wash each strip as you go or all together at the end.  give it a light sprinkle of sugar and into the oven she goes…

now that I am not making pies by the dozen at work each day, I actually look forward to making them at home.  in some ways, I think I actually miss making fruit pies.  that could just be the change of seasons too-I am not a fan of winter and the fact that it is approaching quickly has me pining away for warm, balmy summer mornings in the garden…

for now, I am concentrating my efforts on getting settled and building the garden.  learning the patterns of sunlight both indoors and out is a large part of my focus.  so far, this house has many more options for light than our house in Nashville had and I am taking full advantage of it.

as winter approaches and my plans for the garden grow, I continually think of the seeds I will sow and the plants I will add to the beds.  growing rhubarb is challenging in the south because of the high heat and humidity but strawberries are easy and almost self sufficient.  there will be plenty of room for a large bed of plants and if I can keep the critters out, we will have enough berries to make a pie or two rather quickly.  for now, I can only dream about it and thankfully, finding strawberries and rhubarb out of the growing season is not difficult and may be just the thing to stave off the winter blues.

strawberry rhubarb pie with homemade crust
makes 1 (9″) lattice topped pie plus extra dough
pie crust
1/3 cup cold water
1 1/2 tablespoons distilled white vinegar
2 2/3 cup unbleached all purpose flour
1 1/4 teaspoon salt
8 ounces unsalted butter, cold and cut into small cubes
(you can also use chilled vegetable shortening or a combination of the two, measure out and refrigerate the shortening overnight for best results)
1 egg whisked with 1 tablespoon of water
strawberry rhubarb filling, recipe follows
combine the water and vinegar and place them in the refrigerator while you prepare the remaining ingredients.
in a large mixing bowl with a flat bottom, stir together the flour and salt.  sprinkle the cubes of butter (and/or shortening) over the flour and gently toss together to coat the fat with flour, be sure that they are all separated and evenly distributed.  using your finger tips, two forks or an old fashioned pastry blender (my personal choice), to cut the fat into the flour.  you want the pieces of fat to be no smaller than peppercorns and if there are some the size of peas, that is good too.  sprinkle the cold water over the mixture in the bowl and gently toss the dough together to moisten it evenly.  if the dough is crumbly or there are pockets of dry ingredients, add a few sprinkles of water until it is moistened and pliable but not at all stick.  
this is an important part of the process, do not try to work with soft, fresh dough!  divide the dough into three equal pieces and form a thick disk.  wrap each separately and refrigerate for at least an hour.  take the dough out of the fridge and let it sit on the counter until it is somewhat pliable and gives when you squeeze the edge.  it should not be sticky or soft but rather cool and manageable-the edges shouldn’t crack and crumble when pressure is applied.  
flour your work space liberally-yes, liberally.  the excess can be brushed away much easier than sticky dough can be scraped off of the counter and rolling pin!  flour the top of the dough and begin rolling from the center out.  continually add more flour as you turn the dough between rolling pin strokes so that you get a circle rather than a square of dough.  when the dough is large enough to line a pan, brush the flour off the top surface, gently fold the dough over in half and brush the flour off the bottom.  carefully lift the dough and turn it over so that you can brush the flour off the other side.  if the dough is the proper temperature, it will be manageable at this point and moving it will be possible.  if it isn’t, roll it up on the pin and transfer it to a baking tray and pop it in the fridge for 5-10 minutes to chill it and make it easier to handle.  keep in mind, if you chill it, you must also let it soften or it will crack when you pick it up.  it is a bit of a dance, but learning to judge the temperature of the dough and the consistency is a skill worth having and it will ensure stress free pie baking!
transfer the crust to a pie pan that has been lightly greased and place it on a baking sheet lined with foil or parchment.  put the crust in the fridge to rest while you make the lattice strips and the filling.
to make the lattice strips, roll out a second disk of dough using the method above but instead of making a circle, make a rectangle that is about 9-10 inches wide and about 3/8 inch thick.  using a rotary cutter or a large knife, cut strips of dough that are 3/4″ thick.  you will need a dozen strips to make the pattern I used, you can re-roll the scraps once but they will be tougher than the first batch so resting them is a must!  you can use the third disk of dough if necessary or freeze it for another pie.  brush off the excess flour and place the strips on a baking tray and set them in the fridge to rest.
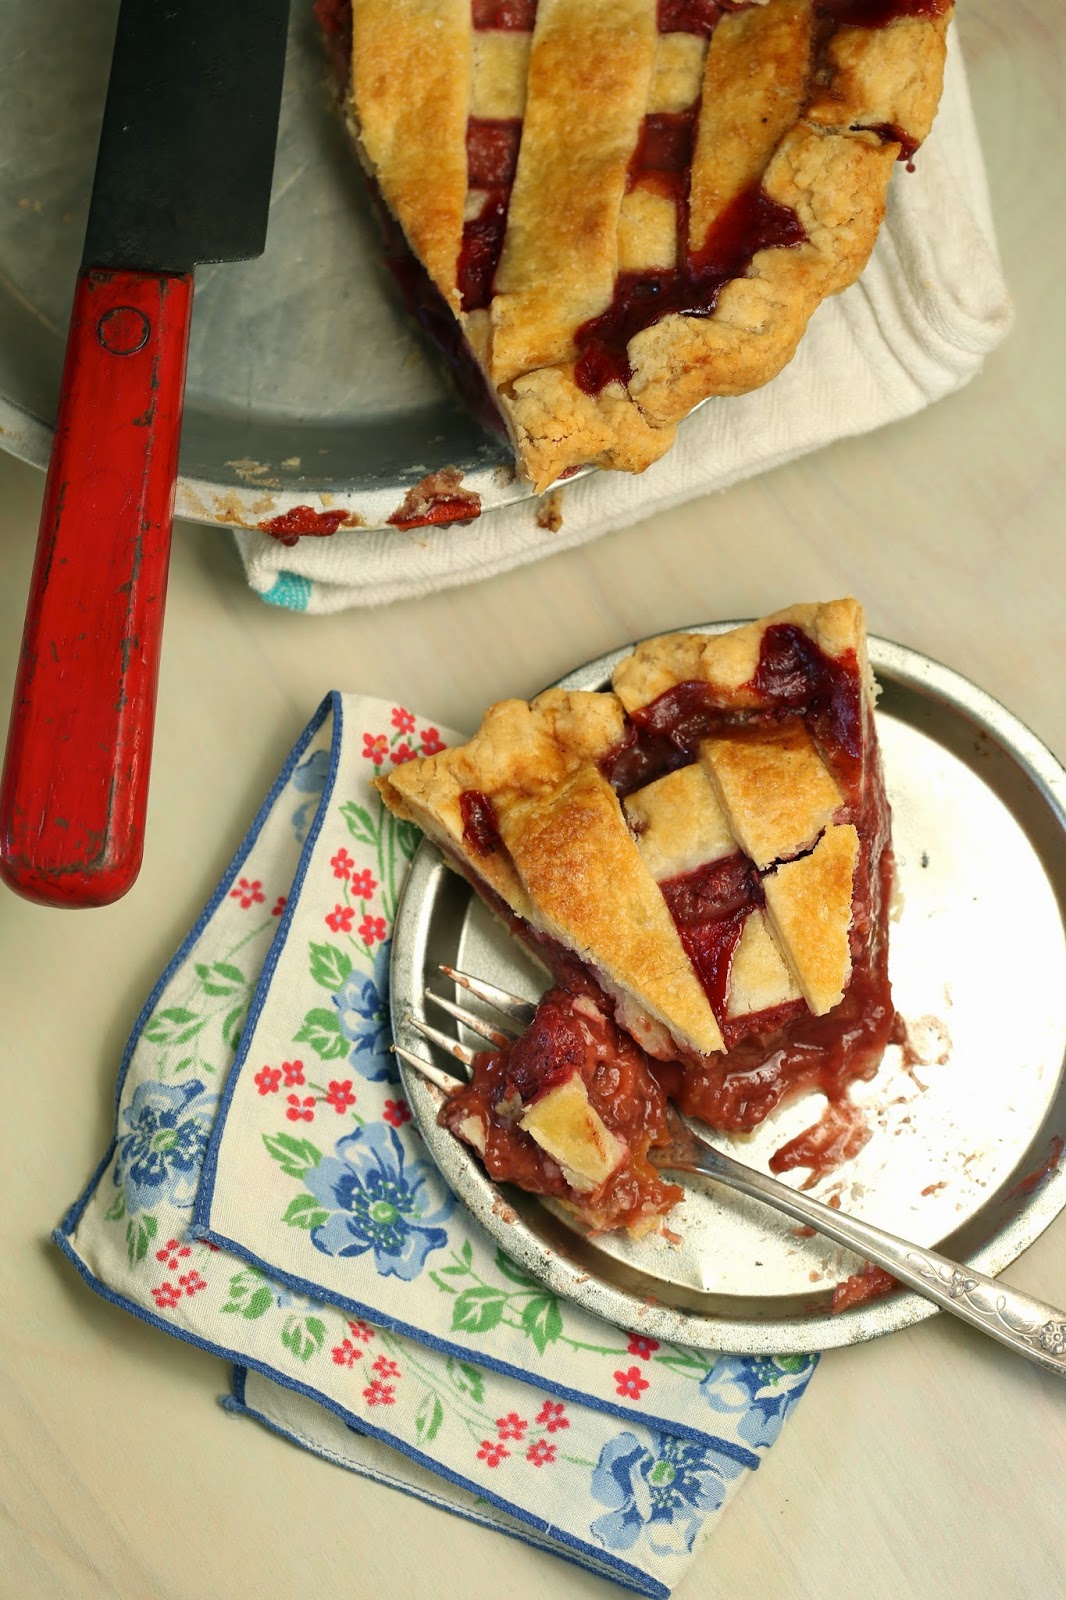
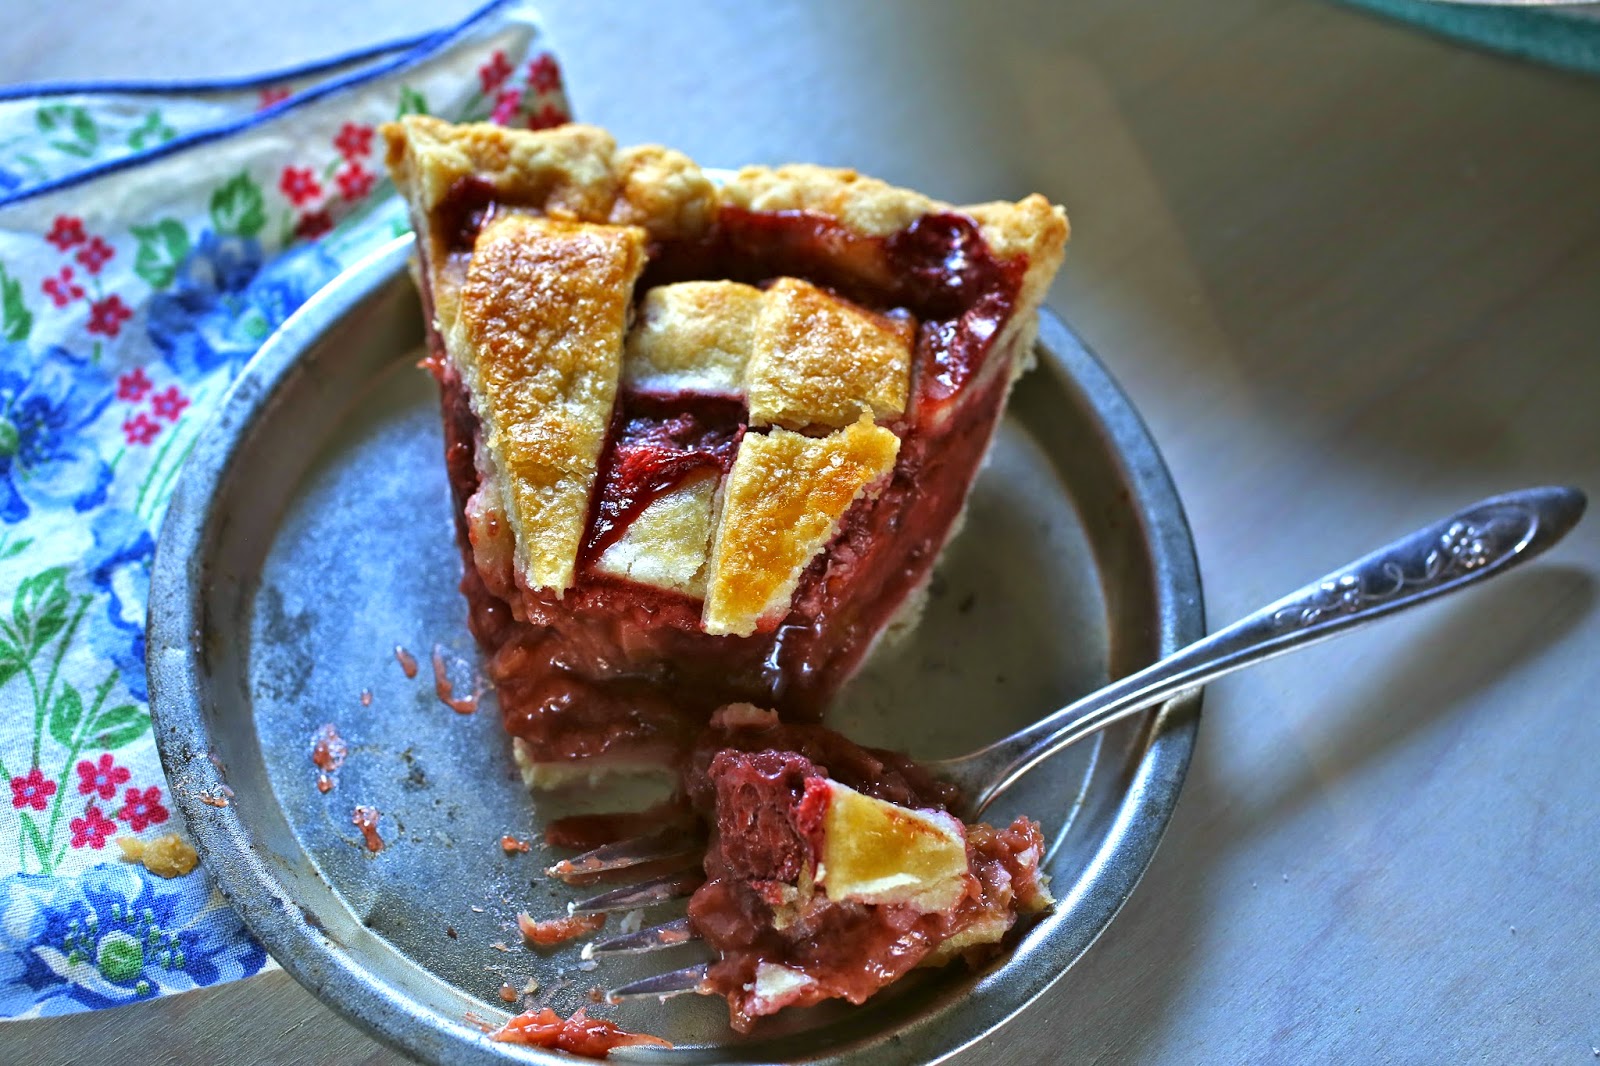
preheat the oven to 350.  fill the pie shell and carefully brush some egg wash around the edge.  lay the lattice strips according to the directions with the photos and if desired, you can brush each strip with egg wash as you go or wait until it is finished.  sprinkle with a little sugar and bake until the filling is bubbling in the center, about an hour.  let the pie cool to room temperature before cutting or the filling will run out.
strawberry rhubarb filling
12 ounces strawberries 
12 ounces chopped rhubarb
3/4 cup sugar
3 tablespoons cornstarch
1-2 teaspoons of freshly grated orange zest
1 teaspoon cinnamon
1 teaspoon apple pie spice or pumpkin pie spice, either will work
if you are using frozen fruit, allow it to thaw completely and be sure to add the juices to the mixture.  in a mixing bowl, stir the sugar with the cornstarch, zest and spices to combine them completely.  add the fruit and toss to coat.  scrape the filling into the prepared pie shell and top with a lattice, bake as directed above.
if you like this recipe, then perhaps you would enjoy the book it came from.  please check out my latest book, Desserts from the Famous Loveless Cafe!

beer vs. wine; visiting a brewery and a winery in one afternoon

When my daughter came for a visit recently, we decided to taste some of local wares.  Our first stop was at the Williamsburg Winery.  For those of you who are not familiar with wine production, Virginia wines are gaining ground and winning awards.  Hard to believe but it is true, Virginia is the fifth largest grape producer in the nation.  Still don’t believe me, read this article from Forbes magazine about the wine industry in Virginia.

While it is no secret that I prefer to sip a glass of wine (or three…) to just about any other alcoholic beverage, I am by no means a connoisseur.  My preferences run to dry whites such as Sauvignon Blanc, Fume Blanc and Pinot Grigio, my only requirement besides dry and white is that it is not Chardonnay.

Even so, I always enjoy a trip to a winery and a chance to see how they produce their wines.  When it includes a chance to taste the wines, even better.  The tour of the Williamsburg Winery will take you about an hour, including the tasting.  While some wineries do this for free, it will cost you $10 to take this tasting tour.  If you ask me, that is a pretty cheap way to sample the wines and see the facility.  Forgive the lousy cellphone photo, it was so dark in the cellar and I was traveling without a tripod.

This is a small winery in comparison to some of the ones I have visited on the west coast.  This room is where they store all of the red wines.  Again, I apologize for that cellphone photo.

Each Barrel is marked with a stamp from the cooper.  Coopers practice the art of making wine barrels, and this cooperage from France.  The other stamped letters and numbers also convey information relevant to the barrel.  While I do not know what the A or the H mean, I do know that the M and T refer to a Medium Toast of the barrel which will impart characteristics to the wine aging in the barrel.  The white, handwritten letters are unique to the winery and I am not sure what they mean but I am guessing that the indicate the type of wine and the year it was produced.

The winery offers different types of tours, we went on a basic tour but they also offer a reserve tour.  The reserve tour includes a tasting in the actual cellar.   We could only admire the setting from behind a gate and I am thinking this looks like a great place to learn about the wines.

In the bottling room, Riesling was being pumped into the bottles.

The storage tanks in the winery, just another interesting part of the winery.  The art of wine making has been around for centuries and while old world techniques are still in use, modern technology has crept in.

Of course, just about everyone goes on a winery tour to taste the wines and I am no exception to that rule!  We tasted eight wines and this was one of the reds, a 2012 Lord Botetourt Red which is a blend of red Bordeaux varietals.

We also had the chance to taste the 2013 Dry Rose(a wine made from estate grown grapes), 2012 James River White Sauvignon Blanc, 2013 Midsummer Night’s White (a wine made from estate grown grapes), 2010 J. Andrewes Merlot, 2012 Hening’s Statute Cabernet Franc, 2012 Virginia Trianon (a Cabernet Franc)  and the Jamestown Cellars Settler’s Spiced Wine which is a spice infused red wine that can be served warm or chilled.

While we enjoyed the winery and the chance to taste the wines, we had a schedule to keep and beer to taste; off we went to the local brewery Alewerks.

Disclaimer; I am not a beer drinker, do not expect a detailed explanation of anything here…We arrived at the brewery which is located in a small business park, not what we expected, at all.  Once again, this was not a free tour, and that is fine, they need to pay for the expense of educating visitors.  We were lucky to have a tour guide that not only knew his ales, but was engaging and entertaining.  For the first time, I actually understand a little about the different types of beers and what makes each one unique.

Our guide, Corbin, was quick to explain something important to us, traditionally, beer is made from 4 ingredients:  water, barley, hops and yeast.  What I also learned was that there are two basic types of beer, lager and ale, and what separates them is the type of yeast used and the temperatures that they are brewed is the biggest difference.  Alewerks only produces ale and that is a cold yeast process.

What makes the many brews different are the ingredients used.  While barley is the traditional grain used to make ale, it is not the only choice.  How the grains are toasted affects flavor and so does the amount of hops in the brew.  The other thing I learned, I do not care for a brew that is heavy in hops.

We tasted 5 different brews which included the Chesapeake Pale Ale, Washington’s Porter, Wheat Ale and Old Stitch-forgive me, I cannot remember the fifth one.  The light ales and the less “hoppy” brews were the ones I preferred.   Believe it or not, I actually like the Porter and probably could drink a glass.

After the tasting, we went to the actual brewery.  It is surprisingly small.  The entire brewery is in one room; the grain storage, brewing and bottling all takes place in the same space.

The bricks look blackened because it is actually soot from the flames that toast the grains.

Even more surprising, there is only one machine to bottle the brew.  This machine has the ability to bottle one case of beer per minute.  The cases are folded and glued by hand too.  Yes folks, this beer is truly hand crafted.

Still thinking of the Porter, and thinking that maybe I need to go back and take this tour again.  Join me and help support the local producers of Williamsburg.

coconut-corn soup with red curry

As the weather shifts from hot to cool, soups appear on our table frequently.  One of my favorite flavor combinations in a soup is corn and coconut milk with a little red curry paste and as the temperatures begin to drop, it is one of the first soups I will make.  The soup is not as thick as a traditional cream soup but it is every bit as filling and on occasion, I add a few shrimp when I serve it for dinner but usually, I prepare it with just vegetables.  To get the true flavor of corn in this soup, use 3-4 ears of corn when they are in season.  Prepare them by slicing off the kernels and breaking the cobs in two.  Simmer the cobs in the soup for 15-20 minutes and then remove them.  Although corn is a real star in late summer, the convenience of frozen products keep it around all year and this recipe can be made with frozen corn kernels which is what I did for this recipe.

Use this recipe as a guideline; add fish, seafood or poultry pieces if you like, keep it vegan if not.  The vegetables you choose are up to you.  For this batch, I used corn, onions, carrots, celery and red peppers but you could easily add mushrooms or chunks of hard squash.  To make it a little extra filling, serve it with rice.

coconut-corn soup with red curry
serves 4
2 tablespoons coconut oil
1 medium onion, diced
1 large carrot, peeled and diced small
1-2 ribs celery, sliced thin on the bias
1 medium red bell pepper, seeded and sliced into thin strips
1 large clove garlic, minced
1 tablespoon red curry paste
1 (12 oz) bag of frozen corn, thawed
2 cans light coconut milk
3 cups vegetable broth
3 large sprigs of basil
1 (2-3″) stalk of lemon grass
2-3 slices of fresh ginger
1-2 tablespoons fish sauce, optional
garnish-additional fresh basil, cilantro, slices of jalapenos, bean sprouts if desired
2 cups cooked rice
In a deep, heavy bottomed pot, melt the coconut oil over medium heat.  Add the onions, carrots, celery and red bell peppers and saute until softened, about 5 minutes.  Stir in the garlic and the curry paste and saute for another minute.  Pour in the corn, coconut milk, broth, 2 of the basil sprigs the lemon grass and ginger slices and adjust the heat so that the mixture simmers gently for 15 minutes or so.  Remove the basil sprigs, lemon grass and ginger slices and add the fish sauce if desired.
To serve, arrange the garnishes on a large platter for all to share.  Divide the soup into large bowls and serve the rice in small dishes on the side, allow everyone to garnish their bowls as they desire.
***If you have fresh corn on the cob, omit the frozen corn and add the fresh shucked corn and the cobs in its place.  Allow the soup to gently simmer for at least 15 minutes to extract the flavor from the cobs.  Before serving, remove the cobs.
***If you chose to add fish, seafood or poultry, add it when the soup is at the simmer and stir to prevent it from sticking to the pot.  Allow the soup to simmer long enough to ensure that the protein is properly cooked.